Android 多种dialog的实现方法(推荐)
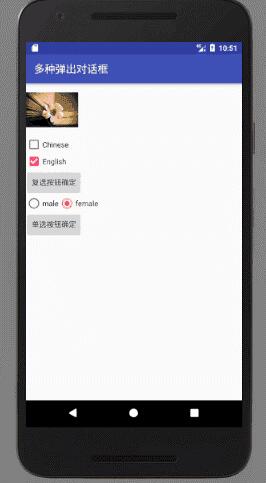
要求:设计如下界面,包括图片按钮、复选按钮、单选按钮、普通按钮,单击按钮弹出对话框,运行效果如下:

string.xml文件源代码:
<resources>
  <string name="app_name">多种弹出对话框</string>
  <string name="dialog_img">图片按钮</string>
  <string name="dialog_radio">单选按钮</string>
  <string name="dialog_box">复选按钮</string>
  <string name="close">关闭</string>
</resources>
布局文件源代码:
<?xml version="1.0" encoding="utf-8"?>
<LinearLayout
  xmlns:android="http://schemas.android.com/apk/res/android"
  android:orientation="vertical"
  android:layout_width="match_parent"
  android:layout_height="match_parent">
 <ImageView
   android:id="@+id/img"
   android:layout_height="100dp"
   android:layout_width="100dp"
   android:src="@drawable/aa"/>
  <CheckBox
    android:id="@+id/Checkbox1"
    android:layout_width="wrap_content"
    android:layout_height="wrap_content"
    android:text="Chinese"/>
  <CheckBox
    android:id="@+id/Checkbox2"
    android:layout_width="wrap_content"
    android:layout_height="wrap_content"
    android:text="English"
    android:checked="true"/>
  <Button
    android:id="@+id/button1"
    android:layout_width="wrap_content"
    android:layout_height="wrap_content"
    android:text="复选按钮确定"/>
  <RadioGroup
    android:id="@+id/radioGroup"
    android:orientation="horizontal"
    android:layout_width="wrap_content"
    android:layout_height="wrap_content">
    <RadioButton
      android:id="@+id/male"
      android:layout_width="wrap_content"
      android:layout_height="wrap_content"
      android:text="male" />
    <RadioButton
      android:id="@+id/female"
      android:layout_width="wrap_content"
      android:layout_height="wrap_content"
      android:checked="true"
      android:text="female"/>
  </RadioGroup>
  <Button
    android:id="@+id/button2"
    android:layout_width="wrap_content"
    android:layout_height="wrap_content"
    android:text="单选按钮确定"/>
</LinearLayout>
java文件源代码:
package com.example.shiyan1_4;
import android.app.Dialog;
import android.content.DialogInterface;
import android.preference.DialogPreference;
import android.support.v7.app.AlertDialog;
import android.support.v7.app.AppCompatActivity;
import android.os.Bundle;
import android.view.View;
import android.widget.Button;
import android.widget.CheckBox;
import android.widget.EditText;
import android.widget.ImageView;
import android.widget.RadioButton;
import android.widget.RadioGroup;
import static android.R.attr.id;
public class Shiyan1_4Activity extends AppCompatActivity {
@Override
protected void onCreate(Bundle savedInstanceState) {
super.onCreate(savedInstanceState);
setContentView(R.layout.activity_shiyan1_4);
ImageView img = (ImageView) findViewById(R.id.img);
Button button1 = (Button) findViewById(R.id.button1);
Button button2 = (Button) findViewById(R.id.button2);
img.setOnClickListener(new View.OnClickListener() {
@Override
public void onClick(View v) {
AlertDialog.Builder dialog1 = new AlertDialog.Builder(Shiyan1_4Activity.this);
dialog1.setTitle(R.string.dialog_img)
.setMessage("您点击了图片按钮!")
.setNegativeButton(R.string.close, null)
.create()
.show();
}
});
button1.setOnClickListener(new View.OnClickListener() {
@Override
public void onClick(View v) {
AlertDialog.Builder dialog1 = new AlertDialog.Builder(Shiyan1_4Activity.this);
String str1 = "";
//获取复选按钮的值
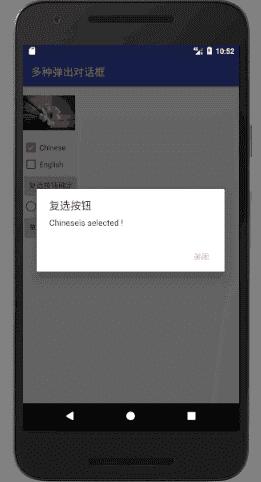
CheckBox Checkbox1 = (CheckBox)findViewById(R.id.Checkbox1);
if(Checkbox1.isChecked()){
str1 += Checkbox1.getText() + "is selected !";
}
CheckBox Checkbox2 = (CheckBox)findViewById(R.id.Checkbox2);
if(Checkbox2.isChecked()){
str1 += Checkbox2.getText() + " is selected !\n";
}
dialog1.setTitle(R.string.dialog_box)
.setMessage(str1)
.setNegativeButton(R.string.close, null)
.create()
.show();
}
});
button2.setOnClickListener(new View.OnClickListener() {
@Override
public void onClick(View v) {
AlertDialog.Builder dialog2 = new AlertDialog.Builder(Shiyan1_4Activity.this);
String str2 = "";
//获取单选按钮的值
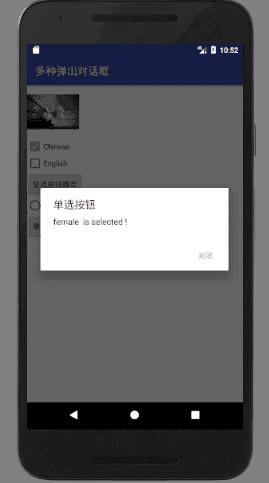
RadioGroup radioGroup = (RadioGroup)findViewById(R.id.radioGroup);
for (int i = 0; i <radioGroup.getChildCount(); i++){
RadioButton radioButton = (RadioButton) radioGroup.getChildAt(i);
if(radioButton.isChecked()){
str2 += radioButton.getText() + " is selected !";
break;
}
}
dialog2.setTitle(R.string.dialog_radio)
.setMessage(str2)
.setNegativeButton(R.string.close, null)
.create()
.show();
}
});
}
}
以上这篇Android 多种dialog的实现方法(推荐)就是小编分享给大家的全部内容了,希望能给大家一个参考,也希望大家多多支持我们。
您可能感兴趣的文章:
- android几种不同对话框的实现方式
- Android自定义dialog简单实现方法
- 7种形式的Android Dialog使用实例
- Android 自定义dialog的实现代码
- Android自定义对话框Dialog的简单实现
- 8种android 对话框(Dialog)使用方法详解
- Android的八种对话框的实现代码示例
相关推荐
-

android几种不同对话框的实现方式
app中肯定是少不了与用户交互的各种dialog,下面给大家介绍几种提示框的提示. 一般创建一个对话框需要经过以下几步: 1.创建AlertDialog.Builder对象. 2.调用AlertDialog.Builder的setTitle()或者setCustomTitle()方法设置标题. 3.调用AlertDialog.Builder的setIcon()方法设置标题logo. 4.调用AlertDialog.Builder的相关方法设置对话框内容. 5.调用AlertDialog.Buil
-
Android的八种对话框的实现代码示例
1.写在前面 Android提供了丰富的 Dialog 函数,本文介绍最常用的8种对话框的使用方法,包括普通(包含提示消息和按钮).列表.单选.多选.等待.进度条.编辑.自定义等多种形式,将在第2部分介绍. 有时,我们希望在对话框创建或关闭时完成一些特定的功能,这需要复写 Dialog的create().show().dismiss()等方法,将在第3部分介绍. 2.代码示例 2.1 普通Dialog(图1与图2) 2个按钮 public class MainActivity extends A
-
Android 自定义dialog的实现代码
Android 自定义dialog的实现代码 搜索相关关键字网上一大堆实现,但是看完总觉得缺胳膊少腿,绕了不少弯路,终于弄好了自定义dialog.把自己整合的完整代码发上来. 要点: 1.设置自定义dialog的布局文件my_dialog.xml 2.设置一份自定义的样式文件styles_wx.xml,该文件用于覆盖Android的默认主题样式,如黑色边框等. 3.Java代码继承Dialog实现自定义类MyDialog,实现自定义布局,还有设置窗口的大小.位置等. (网上文章要么少介绍第2点,
-
Android自定义dialog简单实现方法
本文实例讲述了Android自定义dialog简单实现方法.分享给大家供大家参考,具体如下: @Override protected void onCreate(Bundle savedInstanceState) { super.onCreate(savedInstanceState); setContentView(R.layout.function_music); // 实例化新的窗口 Window w = getWindow(); // 获取默认显示数据 Display display
-
8种android 对话框(Dialog)使用方法详解
本文汇总了android 8种对话框(Dialog)使用方法,分享给大家供大家参考,具体内容如下 1.写在前面 Android提供了丰富的Dialog函数,本文介绍最常用的8种对话框的使用方法,包括普通(包含提示消息和按钮).列表.单选.多选.等待.进度条.编辑.自定义等多种形式,将在第2部分介绍. 有时,我们希望在对话框创建或关闭时完成一些特定的功能,这需要复写Dialog的create().show().dismiss()等方法,将在第3部分介绍. 2.代码示例 2.1 普通Dialog(图
-
Android自定义对话框Dialog的简单实现
本文着重研究了自定义对话框,通过一下步骤即可清晰的理解原理,通过更改界面设置和style类型,可以应用在各种各样适合自己的App中. 首先来看一下效果图: 首先是activity的界面 点击了上述图片的按钮后,弹出对话框: 点击对话框的确定按钮: 点击对话框的取消按钮: 下面来说一下具体实现步骤: 第一步:设置Dialog的样式(一般项目都可以直接拿来用):style.xml中 <!--自定义Dialog背景全透明无边框theme--> <style name="MyDialo
-
7种形式的Android Dialog使用实例
在Android开发中,我们经常会需要在Android界面上弹出一些对话框,比如询问用户或者让用户选择.这些功能我们叫它Android Dialog对话框,在我们使用Android的过程中,我归纳了一下,Android Dialog的类型无非也就7种,下面我分别向大家介绍这7种Android Dialog对话框的使用方法,希望对大家能有所帮助. 1.该效果是当按返回按钮时弹出一个提示,来确保无误操作,采用常见的对话框样式. 创建dialog对话框方法代码如下: protected void di
-
Android 多种dialog的实现方法(推荐)
要求:设计如下界面,包括图片按钮.复选按钮.单选按钮.普通按钮,单击按钮弹出对话框,运行效果如下: string.xml文件源代码: <resources> <string name="app_name">多种弹出对话框</string> <string name="dialog_img">图片按钮</string> <string name="dialog_radio">单
-
Android修改Dialog样式的方法
一.Dialog源码解析 1.1 new AlertDialog.Builder(this).create() protected AlertDialog(@NonNull Context context, @StyleRes int themeResId) { super(context, resolveDialogTheme(context, themeResId)); //创建AlertController,是Dialog布局相关代码 mAlert = new AlertControlle
-
Android Studio 常见问题及解决方法(推荐)
一.Error:All flavors must now belong to a named flavor dimension 问题描述: Error:All flavors must now belong to a named flavor dimension. 解决办法: 应该是因为使用了productFlavors分包,解决方法就是在build.gradle中的defaultConfig中添加一个flavorDimensions "1"就可以了,后面的1一般是跟你的version
-
Android自定义Dialog的2种常见方法
目录 前言 方式一:继承DialogFragment,也是官方推荐的方式 事例 方式二:直接继承Dialog类或者AppCompatDialog类 更新 前言 大多数中,使用系统内置的dialog并不能满足UE的设计需要 方式一:继承DialogFragment,也是官方推荐的方式 通常我们只需要关注三个回调方法: onCreateDialog:创建一个dialog外壳 onCreateView:给dialog外壳填充自己想要的样式布局 onViewCreated:这里面给布局的view进行初始
-
Android解决dialog弹出时无法捕捉Activity的back事件的方法
本文实例讲述了Android解决dialog弹出时无法捕捉Activity的back事件的方法.分享给大家供大家参考.具体分析如下: 在一些情况下,我们需要捕捉back键事件,然后在捕捉到的事件里写入我们需要进行的处理,通常可以采用下面三种办法捕捉到back事件: 1)重写onKeyDown或者onKeyUp方法 2)重写onBackPressed方法 3)重写dispatchKeyEvent方法 这三种办法有什么区别在这里不进行阐述,有兴趣的朋友可以查阅相关资料. 然而在有dialog弹出时,
-
php、java、android、ios通用的3des方法(推荐)
php服务器,java服务器,android,ios开发兼容的3des加密解密, php <?php class DES3 { var $key = "my.oschina.net/penngo?#@"; var $iv = "01234567"; function encrypt($input){ $size = mcrypt_get_block_size(MCRYPT_3DES,MCRYPT_MODE_CBC); $input = $this->pk
-
android开发实现列表控件滚动位置精确保存和恢复的方法(推荐)
Android开发经常要对列表的滚动位置进行保存和恢复,网上也有很多关于此功能的方法文章,但绝大多数都只能保存恢复到某一行,对于滚动到半行的情况不能精确的恢复.也有很多文章介绍了好几种方法,也说某些方法能够精确的控制,但实际上根本不能实现.还有些介绍了很多玄乎且非常复杂的方法,但也没看到能完整实现的代码. 经过一段时间的研究测试,下面的代码可以完美的实现列表滚动位置的精确保存和恢复,而且只是在原来记忆到行位置的基础上增加了2行代码而已. 具体见下面代码和注释: //保存位置: int posit
-
Android判断软键盘弹出并隐藏的简单完美解决方法(推荐)
最近项目中有一个编辑框,下面是个ListView.在触发编辑框弹出软键盘后,ListView还能滑动,并且ListView的item还能响应单击.这样的体验效果很不好.于是便想在滑动或单击item时判断键盘是否弹出,若弹出,则把它隐藏. 网上一搜,发现Android并没有直接提供软键盘的弹出与隐藏判断,一些解决方案诸如判断父控件的高度或者判断 if(getWindow().getAttributes().softInputMode==WindowManager.LayoutParams.SOFT