微信小程序 自定义对话框实例详解

微信小程序 自定义对话框实例详解

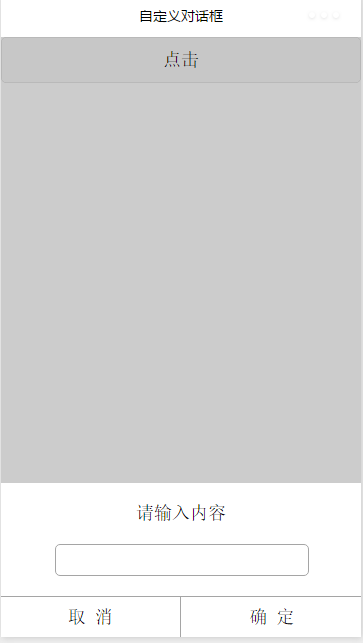
效果图:
index.wxml:

<button type="default" bindtap="clickbtn">
 点击
</button>
<view class="commodity_screen" bindtap="hideModal" wx:if="{{showModalStatus}}"></view>
<view animation="{{animationData}}" class="commodity_attr_box" wx:if="{{showModalStatus}}">
<!--对话框标题-->
<view class="dialog-title">
 请输入内容
</view>
<!--对话框输入部分-->
<view class="input-view">
 <input type="text" bindblur="input_content" class="input-style"/>
</view>
<!--对话框按钮-->
<view class="line-top">
</view>
<view class="btn-view">
 <view class="btn-cancel" bindtap="click_cancel">
     取 消
 </view>
 <view class="btn-line">
 </view>
 <view class="btn-cancel" bindtap="click_ok">
     确 定
 </view>
</view>
</view> 

index.js:

var inputinfo = "";
var app = getApp()
Page({
 data: {
  animationData:"",
  showModalStatus:false
 }, 

 onLoad: function () { 

 },
 showModal: function () {
  // 显示遮罩层
  var animation = wx.createAnimation({
   duration: 200,
   timingFunction: "linear",
   delay: 0
  })
  this.animation = animation
  animation.translateY(300).step()
  this.setData({
   animationData: animation.export(),
   showModalStatus: true
  })
  setTimeout(function () {
   animation.translateY(0).step()
   this.setData({
    animationData: animation.export()
   })
  }.bind(this), 200)
 },
 clickbtn:function(){
  if(this.data.showModalStatus){
   this.hideModal();
  }else{
   this.showModal();
  }
 },
 hideModal: function () {
  // 隐藏遮罩层
  var animation = wx.createAnimation({
   duration: 200,
   timingFunction: "linear",
   delay: 0
  })
  this.animation = animation
  animation.translateY(300).step()
  this.setData({
   animationData: animation.export(),
  })
  setTimeout(function () {
   animation.translateY(0).step()
   this.setData({
    animationData: animation.export(),
    showModalStatus: false
   })
  }.bind(this), 200)
 },
 click_cancel:function(){
  console.log("点击取消");
   this.hideModal();
 },
 click_ok:function(){
  console.log("点击了确定===,输入的信息为为==",inputinfo);
   this.hideModal();
 },
 input_content:function(e){
  console.log(e);
  inputinfo = e.detail.value;
 } 

}) 

源码下载:http://xiazai.jb51.net/201701/yuanma/modalTest(jb51.net).rar

感谢阅读,希望能帮助到大家,谢谢大家对本站的支持!

(0)

相关推荐

  • 微信小程序自定义模态对话框实例详解

    由于官方API提供的显示模态弹窗,只能简单地显示文字内容,不能对对话框内容进行自定义,欠缺灵活性,所以自己从模态弹窗的原理角度来实现了自定义的模态对话框. wx.showModal(OBJECT) 自定义 模态对话框 涉及文件 界面 wxml 样式 wxcss 事件及方法 js 效果图 界面代码 .wxml <button class="show-btn" bindtap="showDialogBtn">弹窗</button> <!--

  • 微信小程序 自定义对话框实例详解

    微信小程序 自定义对话框实例详解 效果图: index.wxml: <button type="default" bindtap="clickbtn"> 点击 </button> <view class="commodity_screen" bindtap="hideModal" wx:if="{{showModalStatus}}"></view> <

  • 微信小程序Redux绑定实例详解

    微信小程序Redux绑定实例详解 安装 clone或者下载代码库到本地: git clone https://github.com/charleyw/wechat-weapp-redux 将dist/wechat-weapp-redux.js(或者拷贝minify的也可以)文件直接拷贝到小程序的工程中,例如(下面假设我们把第三方包都安装在libs目录下): cd wechat-weapp-redux cp -r dist/wechat-weapp-redux.js <小程序根目录>/libs

  • 微信小程序组件 marquee实例详解

    微信小程序组件 marquee实例详解 1. marquee标签 html是有marquee标签的,可以实现跑马灯效果,但小程序没有,所以要实现.这里考虑使用css3的animation实现. html的marquee是这样使用的. <marquee direction="left" behavior="scroll" scrollamount="1" scrolldelay="0" loop="-1"

  • 微信小程序 地图map实例详解

    微信小程序 地图map实例详解 wxml: class="button" bindtap="getlocation" style="margin-top:30px" markers="{{markers}}">定位 longitude="{{longitude}}" latitude="{{latitude}}" markers="{{markers}}" co

  • 微信小程序 简单教程实例详解

    刚接触到微信小程序开发,这里做一个简单的教程: 1. 获取微信小程序的 AppID 登录 https://mp.weixin.qq.com ,就可以在网站的"设置"-"开发者设置"中,查看到微信小程序的 AppID 了,注意不可直接使用服务号或订阅号的 AppID . 注意:如果要以非管理员微信号在手机上体验该小程序,那么我们还需要操作"绑定开发者".即在"用户身份"-"开发者"模块,绑定上需要体验该小程序

  • 微信小程序 省市区选择器实例详解(附源码下载)

    微信小程序 省市区选择器:       最近学习微信小程序,为了检验自己的学习效果,自己做一个小示例,网上搜索下类似的实例,发现这个更好,大家看下. 一.区域间手势滑动切换,标题栏高亮随之切换 思路是:拿当前的current来决定高亮样式 1.监听swiper滚动到的位置: <swiper class="swiper-area" current="{{current}}" bindchange="currentChanged"> cu

  • 微信小程序template模板实例详解

    微信小程序template模板使用 前言 微信小程序中提供了template使用,即相同的板块可以进行代码互用,如下方的效果图,就可以用template. 效果图 一.模板定义 模板最重要的是模板的名称,即"" 以下是实例模板代码 <template name="postItem"> <view class='post-container'> <view class='post-author-date'> <image cl

  • 微信小程序tabBar用法实例详解

    本文实例讲述了微信小程序tabBar用法.分享给大家供大家参考,具体如下: 1.效果展示 2.原理:在app.json中配置tabBar属性 { "pages": [ "index", "picDisplay" ], "window": { "navigationBarBackgroundColor": "#ffffff", "navigationBarTextStyle&qu

  • 微信小程序自定义弹窗实现详解(可通用)

    本文为自定义弹窗,该内容可满足如下需求: 自定义各种布局弹窗 点击弹窗布局外消失弹窗 弹出弹窗时背景阴影半透明 各方向弹出效果(本文为自下而上弹出) 话不多说,先上图看效果: 点击昵称旁边的编辑按钮 弹出自定义弹窗 上图是我自己拙劣的审美自定义的一个编辑弹窗,因为重点是自定义弹窗,所以在下文的通用代码中我就去掉了这些布局,剩下填充部分由读者自行填充. 下面上代码,老规矩,还是微信小程序对应的几个文件的代码,可直接贴到页面里用的哦. .wxml 文件中 直接放到wxml的最底部就行了,十分简练.

  • 微信小程序 数据访问实例详解

    先简单说一下,小程序的结构 如图所示 1.每个视图(.wxml)只需要添加对应名字的脚本(.js)和样式(.wxss)就可以了,不需要引用,page下面的脚本以及样式都是继承至最外面的app.js , app.wxcss 2.脚本也就是.js文件,他有固定格式:page,是用于获取数据的 3.utils是用来放置数据接口的 数据访问,如果懂点ajax,都不是问题,没啥好讲的 微信小程序,因为IDE太烂了,如果代码再写得难以阅读,整个项目就很难维护了. 因为没有写过app,不知道在app中数据访问

随机推荐