Android评论功能的实现过程
目前,各种App的社区或者用户晒照片、发说说的地方,都提供了评论功能,为了更好地学习,自己把这个功能实现了一下,做了个小的Demo。
首先推荐一款实用的插件LayoutCreater,可以帮助开发者自动生成布局代码,具体用法可以去GiHub上看看:
GitHub地址:https://github.com/boredream/BorePlugin
1、新建一个Android工程,写MainActivity的布局 activity_main.xml
<RelativeLayout
 xmlns:android="http://schemas.android.com/apk/res/android"
 android:layout_width="match_parent"
 android:layout_height="match_parent"
 android:background="@color/grey">

 <ListView
  android:id="@+id/comment_list"
  android:layout_width="match_parent"
  android:layout_height="match_parent"
  android:layout_marginTop="10dp"
  android:layout_marginBottom="50dp" />

 <LinearLayout
  android:id="@+id/rl_enroll"
  android:layout_width="match_parent"
  android:layout_height="50dp"
  android:orientation="horizontal"
  android:layout_alignParentBottom="true"
  android:background="@color/white">

  <ImageView
   android:id="@+id/comment"
   android:layout_width="32dp"
   android:layout_height="32dp"
   android:src="@drawable/comment"
   android:layout_weight="1"
   android:layout_gravity="center" />

  <ImageView
   android:id="@+id/chat"
   android:layout_width="23dp"
   android:layout_height="23dp"
   android:src="@drawable/chat"
   android:layout_weight="1"
   android:layout_gravity="center"/>
 </LinearLayout>

 <RelativeLayout
  android:id="@+id/rl_comment"
  android:layout_width="match_parent"
  android:layout_height="50dp"
  android:background="@color/white"
  android:visibility="gone"
  android:layout_alignParentBottom="true">

  <View
   android:layout_width="match_parent"
   android:layout_height="1dp"
   android:background="@color/grey" />

  <TextView
   android:id="@+id/hide_down"
   android:layout_width="wrap_content"
   android:layout_height="wrap_content"
   android:text="@string/hide_down"
   android:textSize="13sp"
   android:textColor="@color/txtgrey"
   android:drawableBottom="@drawable/hide_dowm"
   android:layout_alignParentLeft="true"
   android:layout_centerVertical="true"
   android:layout_marginLeft="10dp"/>
  <View
   android:layout_width="1dp"
   android:layout_height="match_parent"
   android:background="@color/grey"
   android:layout_toRightOf="@id/hide_down"
   android:layout_marginLeft="10dp"/>
  <EditText
   android:id="@+id/comment_content"
   android:hint="@string/comment_content"
   android:textSize="15sp"
   android:singleLine="true"
   android:layout_width="240dp"
   android:layout_height="match_parent"
   android:background="@null"
   android:layout_toRightOf="@id/hide_down"
   android:layout_marginLeft="20dp"/>

  <Button
   android:id="@+id/comment_send"
   android:layout_width="50dp"
   android:layout_height="35dp"
   android:layout_margin="5dp"
   android:text="@string/send"
   android:textSize="13sp"
   android:textColor="@color/white"
   android:background="@color/mainColor"
   android:layout_alignParentRight="true"
   android:layout_marginRight="10dp"
   android:layout_marginLeft="15dp"/>
 </RelativeLayout>
</RelativeLayout>
2、创建评论内容实体类、 内容适配器、内容的Item布局
1)内容实体类 Comment
public class Comment {

 String name; //评论者
 String content; //评论内容

 public Comment(){

 }

 public Comment(String name, String content){
  this.name = name;
  this.content = content;
 }

 public String getName() {
  return name;
 }

 public void setName(String name) {
  this.name = name;
 }

 public String getContent() {
  return content;
 }

 public void setContent(String content) {
  this.content = content;
 }
}
2)内容适配器 AdapterComment
public class AdapterComment extends BaseAdapter {

 Context context;
 List<Comment> data;

 public AdapterComment(Context c, List<Comment> data){
  this.context = c;
  this.data = data;
 }

 @Override
 public int getCount() {
  return data.size();
 }

 @Override
 public Object getItem(int i) {
  return data.get(i);
 }

 @Override
 public long getItemId(int i) {
  return i;
 }

 @Override
 public View getView(int i, View convertView, ViewGroup viewGroup) {
  ViewHolder holder;
  // 重用convertView
  if(convertView == null){
   holder = new ViewHolder();
   convertView = LayoutInflater.from(context).inflate(R.layout.item_comment, null);
   holder.comment_name = (TextView) convertView.findViewById(R.id.comment_name);
   holder.comment_content = (TextView) convertView.findViewById(R.id.comment_content);

   convertView.setTag(holder);
  }else{
   holder = (ViewHolder) convertView.getTag();
  }
  // 适配数据
  holder.comment_name.setText(data.get(i).getName());
  holder.comment_content.setText(data.get(i).getContent());

  return convertView;
 }

 /**
  * 添加一条评论,刷新列表
  * @param comment
  */
 public void addComment(Comment comment){
  data.add(comment);
  notifyDataSetChanged();
 }

 /**
  * 静态类,便于GC回收
  */
 public static class ViewHolder{
  TextView comment_name;
  TextView comment_content;
 }
}
3)内容的Item布局 item_comment.xml
<LinearLayout xmlns:android="http://schemas.android.com/apk/res/android"
 android:orientation="horizontal"
 android:layout_width="match_parent"
 android:layout_height="match_parent">

 <TextView
  android:id="@+id/comment_name"
  android:layout_width="wrap_content"
  android:layout_height="wrap_content"
  android:textColor="@color/mainColor"
  android:textSize="15sp"
  android:layout_marginLeft="15dp"
  android:layout_marginRight="3dp"/>

 <TextView
  android:id="@+id/comment_content"
  android:layout_width="wrap_content"
  android:layout_height="wrap_content"
  android:textColor="@color/colorAccent"
  android:textSize="15sp" />

</LinearLayout>
3、在MainActivity选中布局,然后菜单栏点击 Code —> LayoutCreater,确定要生成的布局代码后,点击confirm完成

接下来再完善,具体的实现我已经在代码中做了注释,就不具体说了
public class MainActivity extends Activity implements View.OnClickListener {

 private ImageView comment;
 private TextView hide_down;
 private EditText comment_content;
 private Button comment_send;

 private LinearLayout rl_enroll;
 private RelativeLayout rl_comment;

 private ListView comment_list;
 private AdapterComment adapterComment;
 private List<Comment> data;

 @Override
 protected void onCreate(Bundle savedInstanceState) {
  super.onCreate(savedInstanceState);
  setContentView(R.layout.activity_main);
  initView();
 }

 private void initView() {

  // 初始化评论列表
  comment_list = (ListView) findViewById(R.id.comment_list);
  // 初始化数据
  data = new ArrayList<>();
  // 初始化适配器
  adapterComment = new AdapterComment(getApplicationContext(), data);
  // 为评论列表设置适配器
  comment_list.setAdapter(adapterComment);

  comment = (ImageView) findViewById(R.id.comment);
  hide_down = (TextView) findViewById(R.id.hide_down);
  comment_content = (EditText) findViewById(R.id.comment_content);
  comment_send = (Button) findViewById(R.id.comment_send);

  rl_enroll = (LinearLayout) findViewById(R.id.rl_enroll);
  rl_comment = (RelativeLayout) findViewById(R.id.rl_comment);

  setListener();
 }

 /**
  * 设置监听
  */
 public void setListener(){
  comment.setOnClickListener(this);

  hide_down.setOnClickListener(this);
  comment_send.setOnClickListener(this);
 }

 @Override
 public void onClick(View v) {
  switch (v.getId()) {
   case R.id.comment:
    // 弹出输入法
    InputMethodManager imm = (InputMethodManager) getApplicationContext().getSystemService(Context.INPUT_METHOD_SERVICE);
    imm.toggleSoftInput(0, InputMethodManager.HIDE_NOT_ALWAYS);
    // 显示评论框
    rl_enroll.setVisibility(View.GONE);
    rl_comment.setVisibility(View.VISIBLE);
    break;
   case R.id.hide_down:
    // 隐藏评论框
    rl_enroll.setVisibility(View.VISIBLE);
    rl_comment.setVisibility(View.GONE);
    // 隐藏输入法,然后暂存当前输入框的内容,方便下次使用
    InputMethodManager im = (InputMethodManager)getApplicationContext().getSystemService(Context.INPUT_METHOD_SERVICE);
    im.hideSoftInputFromWindow(comment_content.getWindowToken(), 0);
    break;
   case R.id.comment_send:
    sendComment();
    break;
   default:
    break;
  }
 }

 /**
  * 发送评论
  */
 public void sendComment(){
  if(comment_content.getText().toString().equals("")){
   Toast.makeText(getApplicationContext(), "评论不能为空!", Toast.LENGTH_SHORT).show();
  }else{
   // 生成评论数据
   Comment comment = new Comment();
   comment.setName("评论者"+(data.size()+1)+":");
   comment.setContent(comment_content.getText().toString());
   adapterComment.addComment(comment);
   // 发送完,清空输入框
   comment_content.setText("");

   Toast.makeText(getApplicationContext(), "评论成功!", Toast.LENGTH_SHORT).show();
  }
 }
}
注意:
因为Android 手机类型比较杂,所以有的手机中会出现底部输入框和输入法重叠,如下图,画红圈的这部分是没有的:

当出现这个问题时,可以在Manifest.xml文件中,给对应的Activity添加一条属性
android:windowSoftInputMode="stateHidden|adjustResize"
这样,输入法就可以自动调节,显示画红圈的部分,底部输入框和输入法就不会重叠了。
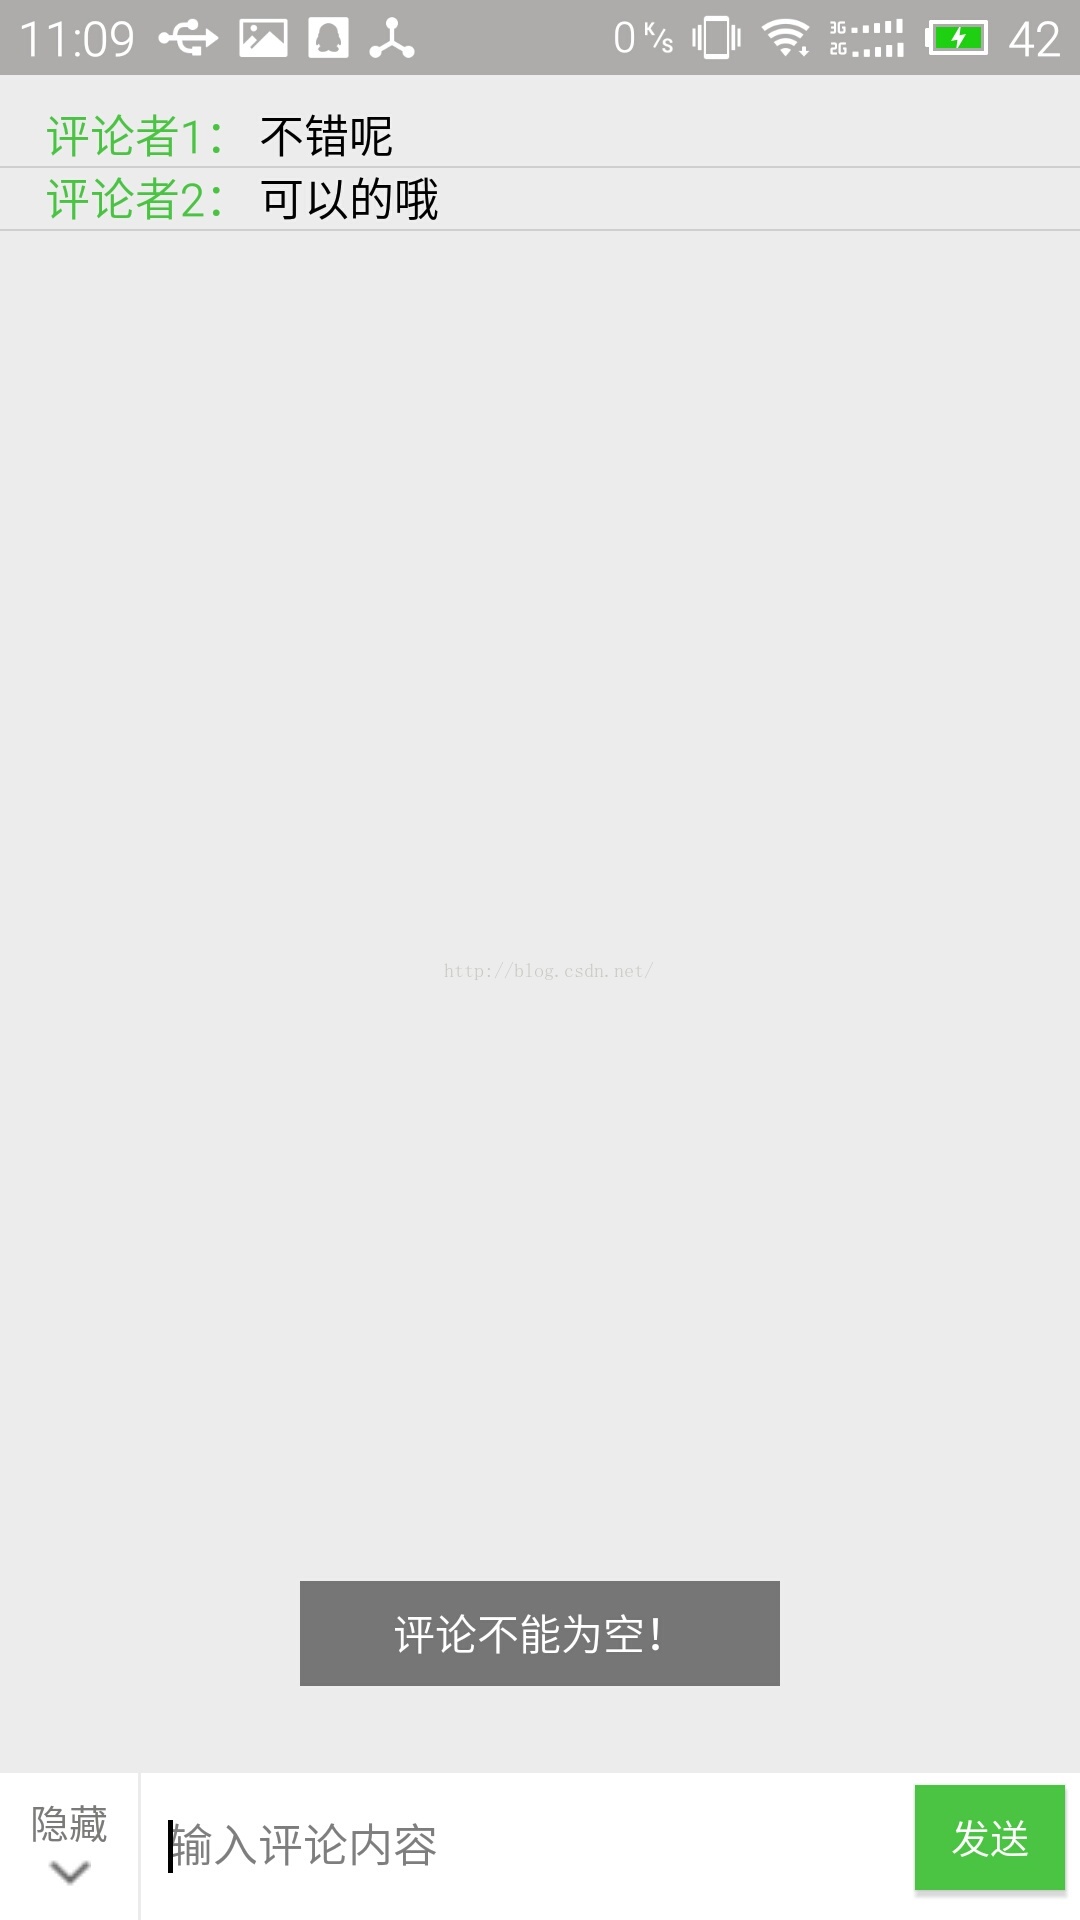
4、最后的效果图如下
隐藏输入框的界面

显示输入框的界面
以上就是本文的全部内容,希望对大家的学习有所帮助,也希望大家多多支持我们。
相关推荐
-
JS类定义原型方法的两种实现的区别评论很多
我们知道,给JavaScript类添加原形(prototype)方法是很简单的.而且常用的有下面这两种方法,可是这两种方法在使用时有区别吗? JScript Class: 复制代码 代码如下: function JSClass() { } Extends prototype method: 复制代码 代码如下: JSClass.prototype.MethodA = function() { }; Or 复制代码 代码如下: function = JSCla
-
python正则匹配抓取豆瓣电影链接和评论代码分享
复制代码 代码如下: import urllib.requestimport reimport time def movie(movieTag): tagUrl=urllib.request.urlopen(url) tagUrl_read = tagUrl.read().decode('utf-8') return tagUrl_read def subject(tagUrl_read): ''' 这里还存在问题: ①这只针对单独的一页进行排序,而没有
-
Python抓取京东图书评论数据
京东图书评论有非常丰富的信息,这里面就包含了购买日期.书名.作者.好评.中评.差评等等.以购买日期为例,使用Python + Mysql的搭配进行实现,程序不大,才100行.相关的解释我都在程序里加注了: from selenium import webdriver from bs4 import BeautifulSoup import re import win32com.client import threading,time import MySQLdb def mydebug():
-

PHP Ajax实现页面无刷新发表评论
大家都有在网站发表评论的经历,传统的发表过程无非是:发表->提交页面表单->等待刷新页面,这样在网络比较拥挤的时候,往往需要漫长的等待,今天介绍用PHP+Ajax实现页面无刷新发表评论,希望对初学ajax的PHPer有所帮助. 那么首先,我们需要一个基本的ajax开发框架,文件ajax.js就包含了这个框架,代码如下: var http_request=false; function send_request(url){//初始化,指定处理函数,发送请求的函数 http_request
-
jquery 新浪网易的评论块制作
效果图如下:技术要点: 1.因为 textarea里面不能放图片,所以和新浪的做法一样,选用iframe放内容,然后隐藏一个 textarea用于提交. 2 .JQqery tab 插件的使用(文盲都会) 先引用这三个: 复制代码 代码如下: <link href="http://ajax.googleapis.com/ajax/libs/jqueryui/1.8/themes/base/jquery-ui.css" rel="stylesheet" type
-
通过抓取淘宝评论为例讲解Python爬取ajax动态生成的数据(经典)
在学习python的时候,一定会遇到网站内容是通过 ajax动态请求.异步刷新生成的json数据 的情况,并且通过python使用之前爬取静态网页内容的方式是不可以实现的,所以这篇文章将要讲述如果在python中爬取ajax动态生成的数据. 至于读取静态网页内容的方式,有兴趣的可以查看本文内容. 这里我们以爬取淘宝评论为例子讲解一下如何去做到的. 这里主要分为了四步: 一 获取淘宝评论时,ajax请求链接(url) 二 获取该ajax请求返回的json数据 三 使用python解析json数据
-
Python Django使用forms来实现评论功能
貌似Django从版本1.6开始就放弃了对自带的comments的使用,具体原因未查,但是现在使用Django的内部的模块也可以实现评论功能,那就是借助于forms模块,下面是我的一个小例子. 环境准备 •操作系统 : windows 7 64 位旗舰版 •IDE: PyCharm 2016.1 •Python :2.7.11 •Django :1.9.6 设计 所谓设计,就是指我们将要实现的评论功能将要涉及的底层模型.我这里简单的设计如下,大家按照自己的想法,可以随意的设置,我这里的设
-
ASP+Ajax实现无刷新评论简单例子
<!--#include file="command.asp" --> <% Dim CurPage CurPage=cint(Request("page")) If CurPage = empty or CurPage<1 Then CurPage = 1 End If Response.ContentType="application/xml" Response.Charset="gb2312&
-
asp实现新评论自动发短信提示的代码
我很想自己写一个这样的程序,不过wordpress是php的,我blog是ASP的,只好用ASP写代码了.经过一番折腾测试,终于让我的梦想变为现实. 程序的流程是这样的,当有人发表评论的时候就会把那条评论发到我手机上,是通过过一个网站的api接口实现信息发送的,其实就是飞信的api.飞信不是可以自己发信息给自己吗?原理其实很简单. 提醒:你手机必须开通飞信功能. 例子: ====A.ASP==== 复制代码 代码如下: <FORM name="form2" action=&quo
-
Android评论功能的实现过程
目前,各种App的社区或者用户晒照片.发说说的地方,都提供了评论功能,为了更好地学习,自己把这个功能实现了一下,做了个小的Demo. 首先推荐一款实用的插件LayoutCreater,可以帮助开发者自动生成布局代码,具体用法可以去GiHub上看看: GitHub地址:https://github.com/boredream/BorePlugin 1.新建一个Android工程,写MainActivity的布局 activity_main.xml <RelativeLayout xmlns:and
-
Android仿微信实现评论功能
在最近做的项目中有碰到要写类似朋友圈的模块,因为要实现评论点赞功能,这里说下我是怎么实现评论功能的. 首先先放上效果图 这里贴上我的代码: //给评论图标设置点击事件 mIv_header_discuss.setOnClickListener(new View.OnClickListener() { @Override public void onClick(View v) { showPopupcomment(); } }); showPopupcomment()方法如下 private Po
-
Android仿微信朋友圈点赞和评论功能
最近在做朋友圈的项目,所以写一个Android仿朋友圈点赞和评论功能Demo,代码就是简单实现了一下功能,没有做优化,凑合看 图文排列是用的RecyclerView实现的,弹窗效果是用的自定义的PopupWindow,点赞应该是在本地请求数据库,设置一个flag,获取当前用户的id后,带着id向服务器post一个flag,评论就比较简单了,也是获取当前朋友id(或者昵称),带着内容,向服务器post 贴代码: package com.example.lenovo.dianzandemo; imp
-
Android多功能时钟开发案例(实战篇)
上一篇为大家介绍的是Android多功能时钟开发基础内容,大家可以回顾一下,Android多功能时钟开发案例(基础篇) 接下来进入实战,快点来学习吧. 一.时钟 在布局文件中我们看到,界面上只有一个TextView,这个TextView的作用就是显示一个系统的当前时间,同时这个时间还是一秒一秒跳的,要实现一秒一秒的跳就需要我们每隔一秒就要刷新一下,同时我们这里还考虑了切换到另一个Tab的时候,这个时间就不跳动了,这样就会减少这个对系统的占用,考虑到了这点我们在这里用到了Handler,通过han
-
基于Socket.IO实现Android聊天功能代码示例
一.简述 Socket.IO是一个完全由JavaScript实现.基于Node.js.支持WebSocket的协议用于实时通信.跨平台的开源框架,它包括了客户端的JavaScript和服务器端的Node.js. 该种官方介绍看起来有点懵逼,简而言之就是:客户端可通过Socket.IO与服务器建立实时通信管道 二.应用 该下就是介绍Socket.IO通信管道的铺设.通信以及销毁工作. 2.1 引入Socket.io包 compile 'io.socket:socket.io-client:0.8.
-
WordPress中对访客评论功能的一些优化方法
前几天见到某 Blog (忘记名字和网址了) 有一个相当实用的评论功能. 访客留言之后资料输入框会被隐藏起来, 如同登录了一般. 访客可以选择修改相关资料再进行评论. 给予访客很好的用户体验. 今天我将这个功能移植到了自己的主题上, 制作不难, 分享一下吧. 需求 细心的朋友可能已经注意到了: 当在某个 WordPress 发表评论后再次访问该 Blog, 资料就不需要再次填写, 因为它们都已经在资料输入框里面. 但没评论过的或者清除了 Cookie 之后, 资料输入框将空空如也. 1. 当访客
-
浅谈android性能优化之启动过程(冷启动和热启动)
本文介绍了浅谈android性能优化之启动过程(冷启动和热启动) ,分享给大家,具体如下: 一.应用的启动方式 通常来说,启动方式分为两种:冷启动和热启动. 1.冷启动:当启动应用时,后台没有该应用的进程,这时系统会重新创建一个新的进程分配给该应用,这个启动方式就是冷启动. 2.热启动:当启动应用时,后台已有该应用的进程(例:按back键.home键,应用虽然会退出,但是该应用的进程是依然会保留在后台,可进入任务列表查看),所以在已有进程的情况下,这种启动会从已有的进程中来启动应用,这个方式叫热
-
Vuepress 搭建带评论功能的静态博客的实现
vuepress 是 Vue 驱动的静态站点生成工具 本文仅介绍,搭建静态博客的过程,具体教程及文档请点击进入 vuepress中文网 点击查看项目代码 vuepress初始化 下面初始化 # 将 github 新创建的仓库克隆到本地 git clone git@github.com:zhb333/readme-blog.git # 进入项目 cd readme-blog # npm 初始化, 按照提示回车 npm init # 安装 vuepress npm i vuepress -D # 安
-
微信小程序实现简单评论功能
本文实例为大家分享了微信小程序实现评论功能的具体代码,供大家参考,具体内容如下 具体直接看代码 wxml: <view> <button bindtap='showTalks'>查看评论</button> </view> <!-- 整个评论区 --> <view class='talks-layer' animation='{{talksAnimationData}}'> <!-- 主要作用是点击后隐藏评论区 --> &l
-
浅谈Android ANR的信息收集过程
目录 一. ANR场景 二. appNotResponding处理流程 三. 总结 一. ANR场景 无论是四大组件或者进程等只要发生ANR,最终都会调用AMS.appNotResponding()方法,下面从这个方法说起. 以下场景都会触发调用AMS.appNotResponding方法: Service Timeout:比如前台服务在20s内未执行完成: BroadcastQueue Timeout:比如前台广播在10s内未执行完成 InputDispatching Timeout: 输入事