spring、mybatis 配置方式详解(常用两种方式)
在之前的文章中总结了三种方式,但是有两种是注解sql的,这种方式比较混乱所以大家不怎么使用,下面总结一下常用的两种总结方式:
一、 动态代理实现 不用写dao的实现类
这种方式比较简单,不用实现dao层,只需要定义接口就可以了,这里只是为了记录配置文件所以程序写的很简单:
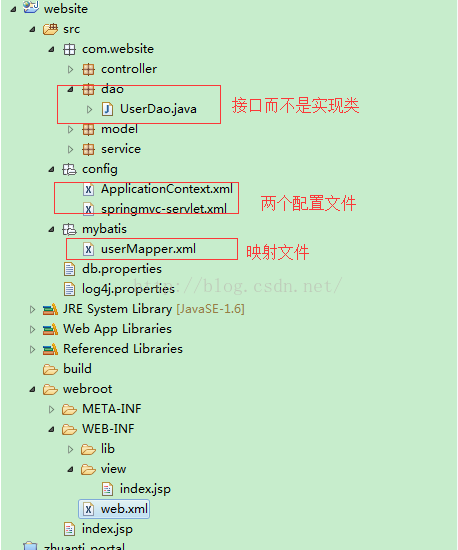
1、整体结构图:
2、三个配置文件以及一个映射文件
(1)、程序入口以及前端控制器配置 web.xml
<?xml version="1.0" encoding="UTF-8"?>
<web-app xmlns:xsi="http://www.w3.org/2001/XMLSchema-instance" xmlns="http://java.sun.com/xml/ns/javaee"
 xsi:schemaLocation="http://java.sun.com/xml/ns/javaee http://java.sun.com/xml/ns/javaee/web-app_3_0.xsd" id="WebApp_ID"
 version="3.0">
 <display-name>website1</display-name>
 <!-- 设置监听,在web容器启动时自动装配ApplicationContext的配置信息-->
 <listener>
  <listener-class>org.springframework.web.context.ContextLoaderListener</listener-class>
 </listener>
 <!-- 设置Spring容器加载配置文件路径 -->
 <context-param>
  <param-name>contextConfigLocation</param-name>
  <param-value>
  classpath:config/springmvc-servlet.xml,
  classpath:config/ApplicationContext.xml
  </param-value>
 </context-param>
 <!-- 字符编码过滤器 -->
 <filter>
  <filter-name>encodingFilter</filter-name>
  <filter-class>org.springframework.web.filter.CharacterEncodingFilter</filter-class>
  <init-param>
   <param-name>encoding</param-name>
   <param-value>utf-8</param-value>
  </init-param>
  <init-param>
   <param-name>forceEncoding</param-name>
   <param-value>true</param-value>
  </init-param>
 </filter>
 <filter-mapping>
  <filter-name>encodingFilter</filter-name>
  <url-pattern>*.do</url-pattern>
 </filter-mapping>
 <!-- 前端控制器 -->
 <servlet>
  <servlet-name>springmvc</servlet-name>
  <servlet-class>org.springframework.web.servlet.DispatcherServlet</servlet-class>
  <init-param>
   <param-name>contextConfigLocation</param-name>
   <param-value>classpath:config/springmvc-servlet.xml</param-value>
  </init-param>
  <!-- 这个配置文件在容器启动的时候 就加载 -->
  <load-on-startup>1</load-on-startup>
 </servlet>
 <servlet-mapping>
  <servlet-name>springmvc</servlet-name>
  <!-- 拦截请求 -->
  <url-pattern>*.do</url-pattern>
 </servlet-mapping>
 <welcome-file-list>
  <welcome-file>index.html</welcome-file>
  <welcome-file>index.htm</welcome-file>
  <welcome-file>index.jsp</welcome-file>
  <welcome-file>default.html</welcome-file>
  <welcome-file>default.htm</welcome-file>
  <welcome-file>default.jsp</welcome-file>
 </welcome-file-list>
</web-app>
(2)、扫描控制层、自动注入以及视图解析器的配置 springmvc-servlet.xml
<?xml version="1.0" encoding="UTF-8"?>
<beans xmlns="http://www.springframework.org/schema/beans" xmlns:xsi="http://www.w3.org/2001/XMLSchema-instance"
 xmlns:aop="http://www.springframework.org/schema/aop" xmlns:context="http://www.springframework.org/schema/context"
 xmlns:mvc="http://www.springframework.org/schema/mvc" xmlns:util="http://www.springframework.org/schema/util"
 xmlns:tx="http://www.springframework.org/schema/tx" xmlns:jdbc="http://www.springframework.org/schema/jdbc"
 xmlns:cache="http://www.springframework.org/schema/cache"
 xsi:schemaLocation="
 http://www.springframework.org/schema/beans http://www.springframework.org/schema/beans/spring-beans-3.1.xsd
 http://www.springframework.org/schema/aop http://www.springframework.org/schema/aop/spring-aop-3.1.xsd
 http://www.springframework.org/schema/context http://www.springframework.org/schema/context/spring-context-3.1.xsd
 http://www.springframework.org/schema/mvc http://www.springframework.org/schema/mvc/spring-mvc-3.1.xsd
 http://www.springframework.org/schema/util http://www.springframework.org/schema/util/spring-util-3.1.xsd
 http://www.springframework.org/schema/tx http://www.springframework.org/schema/tx/spring-tx-3.1.xsd
 http://www.springframework.org/schema/jdbc http://www.springframework.org/schema/jdbc/spring-jdbc-3.1.xsd
 http://www.springframework.org/schema/cache http://www.springframework.org/schema/cache/spring-cache-3.1.xsd">
 <!-- 注解驱动 -->
 <mvc:annotation-driven />
 <!-- <context:annotation-config /> -->
 <!-- context:component-scan 具有annotation-config 的功能 -->
 <!-- 扫描 控制层 -->
 <context:component-scan base-package="com.website.controller"></context:component-scan>
 <!-- 视图解析器 -->
 <bean id="viewResolver" class="org.springframework.web.servlet.view.InternalResourceViewResolver">
  <property name="prefix" value="/WEB-INF/view/">
  </property>
  <property name="suffix" value=".jsp"></property>
 </bean>
</beans>
(3)、数据源、service 自动扫描注入、spring代管mybatissqlsessionFactory 、dao层接口动态代理以及事务的配置ApplicationContext.xml
这里会有多中配置文件
1)、单数据源,动态代理实现dao层接口时不设置sqlSessionFactoryBeanName、或sqlSessionTemplateBeanName 两个属性的值
<?xml version="1.0" encoding="UTF-8"?>
<beans xmlns="http://www.springframework.org/schema/beans" xmlns:xsi="http://www.w3.org/2001/XMLSchema-instance"
 xmlns:tx="http://www.springframework.org/schema/tx" xmlns:context="http://www.springframework.org/schema/context"
 xsi:schemaLocation="http://www.springframework.org/schema/beans http://www.springframework.org/schema/beans/spring-beans-3.2.xsd
  http://www.springframework.org/schema/context
   http://www.springframework.org/schema/context/spring-context-3.2.xsd
  http://www.springframework.org/schema/tx
  http://www.springframework.org/schema/tx/spring-tx-3.2.xsd">
 <!-- 加载配置JDBC文件 -->
 <context:property-placeholder location="classpath:db.properties" />
 <!-- 数据源 -->
 <bean id="dataSource" class="org.springframework.jdbc.datasource.DriverManagerDataSource">
  <property name="driverClassName">
   <value>${jdbc.driverClassName}</value>
  </property>
  <property name="url">
   <value>${jdbc.url}</value>
  </property>
  <property name="username">
   <value>${jdbc.username}</value>
  </property>
  <property name="password">
   <value>${jdbc.password}</value>
  </property>
 </bean>
 <!-- 开启注解配置 即Autowried -->
 <!-- <context:annotation-config/> -->
 <!--其实component-scan 就有了annotation-config的功能即把需要的类注册到了spring容器中 -->
 <context:component-scan base-package="com.website.service" />
 <!-- 在使用mybatis时 spring使用sqlsessionFactoryBean 来管理mybatis的sqlsessionFactory -->
 <bean id="sqlSessionFactory" class="org.mybatis.spring.SqlSessionFactoryBean">
  <property name="dataSource" ref="dataSource" />
  <!-- mybatis配置文件路径 -->
  <property name="configLocation" value="" />
  <!-- 实体类映射文件路径,这里只有一个就写死了,多个可以使用mybatis/*.xml来替代 -->
  <property name="mapperLocations" value="classpath:mybatis/userMapper.xml" />
 </bean>
 <!-- <bean id="sqlSession" class="org.mybatis.spring.SqlSessionTemplate"> <constructor-arg index="0"> <ref bean="sqlSessionFactory"/>
  </constructor-arg> </bean> -->
 <!--动态代理实现 不用写dao的实现 -->
 <bean id="MapperScannerConfigurer" class="org.mybatis.spring.mapper.MapperScannerConfigurer">
  <!-- 这里的basePackage 指定了dao层接口路劲,这里的dao接口不用自己实现 -->
  <property name="basePackage" value="com.website.dao" />
  <!-- 如果只有一个数据源的话可以不用指定,但是如果有多个数据源的话必须要指定 -->
  <!-- <property name="sqlSessionFactoryBeanName" value="sqlSessionFactory" /> -->
  <!--直接指定了sqlsessionTemplate名称,这个和上面的其实是一样的 -->
  <!-- <property name="sqlSessionTemplateBeanName" value="sqlSession" /> -->
 </bean>
 <!--事务管理器 -->
 <bean id="transactionManager" class="org.springframework.jdbc.datasource.DataSourceTransactionManager">
  <property name="dataSource" ref="dataSource" />
 </bean>
 <!-- 使用全注释事务 -->
 <tx:annotation-driven transaction-manager="transactionManager" />
</beans>
2)、单数据源配置 sqlSessionFactoryBeanName 这个属性值
<?xml version="1.0" encoding="UTF-8"?>
<beans xmlns="http://www.springframework.org/schema/beans" xmlns:xsi="http://www.w3.org/2001/XMLSchema-instance"
 xmlns:tx="http://www.springframework.org/schema/tx" xmlns:context="http://www.springframework.org/schema/context"
 xsi:schemaLocation="http://www.springframework.org/schema/beans http://www.springframework.org/schema/beans/spring-beans-3.2.xsd
  http://www.springframework.org/schema/context
   http://www.springframework.org/schema/context/spring-context-3.2.xsd
  http://www.springframework.org/schema/tx
  http://www.springframework.org/schema/tx/spring-tx-3.2.xsd">
 <!-- 加载配置JDBC文件 -->
 <context:property-placeholder location="classpath:db.properties" />
 <!-- 数据源 -->
 <bean id="dataSource" class="org.springframework.jdbc.datasource.DriverManagerDataSource">
  <property name="driverClassName">
   <value>${jdbc.driverClassName}</value>
  </property>
  <property name="url">
   <value>${jdbc.url}</value>
  </property>
  <property name="username">
   <value>${jdbc.username}</value>
  </property>
  <property name="password">
   <value>${jdbc.password}</value>
  </property>
 </bean>
 <!-- 开启注解配置 即Autowried -->
 <!-- <context:annotation-config/> -->
 <!--其实component-scan 就有了annotation-config的功能即把需要的类注册到了spring容器中 -->
 <context:component-scan base-package="com.website.service" />
 <!-- 在使用mybatis时 spring使用sqlsessionFactoryBean 来管理mybatis的sqlsessionFactory -->
 <bean id="sqlSessionFactory" class="org.mybatis.spring.SqlSessionFactoryBean">
  <property name="dataSource" ref="dataSource" />
  <!-- mybatis配置文件路径 -->
  <property name="configLocation" value="" />
  <!-- 实体类映射文件路径,这里只有一个就写死了,多个可以使用mybatis/*.xml来替代 -->
  <property name="mapperLocations" value="classpath:mybatis/userMapper.xml" />
 </bean>
 <!-- <bean id="sqlSession" class="org.mybatis.spring.SqlSessionTemplate"> <constructor-arg index="0"> <ref bean="sqlSessionFactory"/>
  </constructor-arg> </bean> -->
 <!--动态代理实现 不用写dao的实现 -->
 <bean id="MapperScannerConfigurer" class="org.mybatis.spring.mapper.MapperScannerConfigurer">
  <!-- 这里的basePackage 指定了dao层接口路劲,这里的dao接口不用自己实现 -->
  <property name="basePackage" value="com.website.dao" />
  <!-- 如果只有一个数据源的话可以不用指定,但是如果有多个数据源的话必须要指定 -->
  <property name="sqlSessionFactoryBeanName" value="sqlSessionFactory" />
  <!--直接制定了sqlsessionTemplate名称,这个和上面的其实是一样的 -->
  <!-- <property name="sqlSessionTemplateBeanName" value="sqlSession" /> -->
 </bean>
 <!--事务管理器 -->
 <bean id="transactionManager" class="org.springframework.jdbc.datasource.DataSourceTransactionManager">
  <property name="dataSource" ref="dataSource" />
 </bean>
 <!-- 使用全注释事务 -->
 <tx:annotation-driven transaction-manager="transactionManager" />
</beans>
3)、单数据源配置sqlSessionTemplateBeanName 这个属性值
<?xml version="1.0" encoding="UTF-8"?>
<beans xmlns="http://www.springframework.org/schema/beans" xmlns:xsi="http://www.w3.org/2001/XMLSchema-instance"
 xmlns:tx="http://www.springframework.org/schema/tx" xmlns:context="http://www.springframework.org/schema/context"
 xsi:schemaLocation="http://www.springframework.org/schema/beans http://www.springframework.org/schema/beans/spring-beans-3.2.xsd
  http://www.springframework.org/schema/context
   http://www.springframework.org/schema/context/spring-context-3.2.xsd
  http://www.springframework.org/schema/tx
  http://www.springframework.org/schema/tx/spring-tx-3.2.xsd">
 <!-- 加载配置JDBC文件 -->
 <context:property-placeholder location="classpath:db.properties" />
 <!-- 数据源 -->
 <bean id="dataSource" class="org.springframework.jdbc.datasource.DriverManagerDataSource">
  <property name="driverClassName">
   <value>${jdbc.driverClassName}</value>
  </property>
  <property name="url">
   <value>${jdbc.url}</value>
  </property>
  <property name="username">
   <value>${jdbc.username}</value>
  </property>
  <property name="password">
   <value>${jdbc.password}</value>
  </property>
 </bean>
 <!-- 开启注解配置 即Autowried -->
 <!-- <context:annotation-config/> -->
 <!--其实component-scan 就有了annotation-config的功能即把需要的类注册到了spring容器中 -->
 <context:component-scan base-package="com.website.service" />
 <!-- 在使用mybatis时 spring使用sqlsessionFactoryBean 来管理mybatis的sqlsessionFactory -->
 <bean id="sqlSessionFactory" class="org.mybatis.spring.SqlSessionFactoryBean">
  <property name="dataSource" ref="dataSource" />
  <!-- mybatis配置文件路径 -->
  <property name="configLocation" value="" />
  <!-- 实体类映射文件路径,这里只有一个就写死了,多个可以使用mybatis/*.xml来替代 -->
  <property name="mapperLocations" value="classpath:mybatis/userMapper.xml" />
 </bean>
 <bean id="sqlSession" class="org.mybatis.spring.SqlSessionTemplate">
  <constructor-arg index="0">
   <ref bean="sqlSessionFactory" />
  </constructor-arg>
 </bean>
 <!--动态代理实现 不用写dao的实现 -->
 <bean id="MapperScannerConfigurer" class="org.mybatis.spring.mapper.MapperScannerConfigurer">
  <!-- 这里的basePackage 指定了dao层接口路劲,这里的dao接口不用自己实现 -->
  <property name="basePackage" value="com.website.dao" />
  <!-- 如果只有一个数据源的话可以不用指定,但是如果有多个数据源的话必须要指定 -->
  <!-- <property name="sqlSessionFactoryBeanName" value="sqlSessionFactory" /> -->
  <!--直接制定了sqlsessionTemplate名称,这个和上面的其实是一样的 -->
  <property name="sqlSessionTemplateBeanName" value="sqlSession" />
 </bean>
 <!--事务管理器 -->
 <bean id="transactionManager" class="org.springframework.jdbc.datasource.DataSourceTransactionManager">
  <property name="dataSource" ref="dataSource" />
 </bean>
 <!-- 使用全注释事务 -->
 <tx:annotation-driven transaction-manager="transactionManager" />
</beans>
4)、多数据源
注意如果是多数据源则一定要使用sqlSessionFactoryBeanName 或sqlSessionTemplateBeanName 来指定具体的数据源,不知道在上面的配置中有没有注意到,如果使用sqlSessionTemplateBeanName 的话要
<bean id="sqlSession" class="org.mybatis.spring.SqlSessionTemplate">
  <constructor-arg index="0">
   <ref bean="sqlSessionFactory" />
  </constructor-arg>
 </bean>
来创建具体的实例并赋值给sqlSessionTemplateBeanName 这个属性。
(4)、mybatis SQL映射文件 userMapper.xml:
<?xml version="1.0" encoding="UTF-8" ?>
<!DOCTYPE mapper PUBLIC "-//mybatis.org//DTD Mapper 3.0//EN"
 "http://mybatis.org/dtd/mybatis-3-mapper.dtd">
<!-- namespace的值就是dao接口的完整路劲,就这个demo而言namespace 就是userDao.java的完整路劲 -->
<mapper namespace="com.website.dao.UserDao">
 <!-- 这里的id就是接口中方法的名称 -->
 <insert id="saveUser" parameterType="java.util.Map">
  insert into user(id,name) values(#{id},#{name})
 </insert>
</mapper>
ok 到这里配置文件到搞定了下面来看看控制层,业务逻辑层以及dao层的代码。
3、controller层
package com.website.controller;
import java.util.HashMap;
import java.util.Map;
import javax.servlet.http.HttpServletRequest;
import javax.servlet.http.HttpServletResponse;
import org.springframework.beans.factory.annotation.Autowired;
import org.springframework.stereotype.Controller;
import org.springframework.web.bind.annotation.RequestMapping;
import org.springframework.web.bind.annotation.RequestMethod;
import com.website.service.UserService;
@Controller
@RequestMapping(value = "/user")
public class UserController {
 // 注入userService 对象
 @Autowired
 private UserService userService;
 @RequestMapping(value = "/save.do", method = RequestMethod.GET)
 public String saveUser(HttpServletRequest request,
  HttpServletResponse response) {
 String id = request.getParameter("id");
 String name = request.getParameter("name");
 Map<String, String> map = new HashMap<String, String>();
 map.put("id", id);
 map.put("name", name);
 userService.saveUser(map);
 return "index";
 }
}
4、service层
package com.website.service;
import java.util.Map;
import org.springframework.beans.factory.annotation.Autowired;
import org.springframework.stereotype.Service;
import org.springframework.transaction.annotation.Transactional;
import com.website.dao.UserDao;
@Service("userService")
@Transactional
public class UserService {
 // 注入dao接口实现类实例
 // @Resource、@Autowired两种注入方式都可以
 @Autowired
 private UserDao userDao;
 public void saveUser(Map<String, String> map) {
 int end = userDao.saveUser(map);
 System.out.println("end:" + end);
 }
}
5、dao 层 接口
package com.website.dao;
import java.util.Map;
//com.website.dao.UserDao
public interface UserDao {
 int saveUser(Map<String, String> map);
}
dao 接口的完整路劲就是这个dao 接口对应的那个映射文件的namespace 而方法名就是 id的值
ok到这里这种配置方式都完了,也有了一个完整的小demo,下面我们简单总结一下:
这种配置方式相比之前的配置方式(下面也会写出来)特别之处就是他使用了dao层接口的动态代理方式实现了,之前我们会在dao层自己手动实现dao层然后自动注入SqlSessionTemplate 实例来调用具体的方法 比如 insert("","") selectOne("","") 等方法 其中第一个参数就是映射文件的地址: namespace+id 而第二个参数就是传递的条件这样mybatis 就会按照我们传递的这两个参数找到具体的映射文件进行解析查询。而这里使用动态代理就省去了我们实现dao接口的这一步骤,而是由spring提我们实现了,那有个问题,查询条件参数我们传递了,但映射文件的具体路径即:namespce+id 没有传递怎么办,那就是你的映射文件的namespace 必须是接口的类全名称而id 必须是接口中的方法名称,这样动态代理就能找到路劲了也有了参数了。 这样一来是不是觉得就一样了啊哈哈哈!
二、手动实现dao层接口
下面先来看看手动实现dao层的配置以及代码:
1、正题结构图
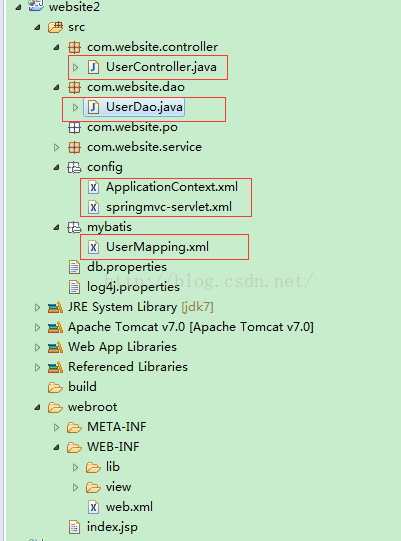
2、三个配置文件以及映射文件
(1)、程序入口,前端控制器配置 web.xml
<?xml version="1.0" encoding="UTF-8"?>
<web-app xmlns:xsi="http://www.w3.org/2001/XMLSchema-instance"
 xmlns="http://java.sun.com/xml/ns/javaee"
 xsi:schemaLocation="http://java.sun.com/xml/ns/javaee http://java.sun.com/xml/ns/javaee/web-app_3_0.xsd"
 id="WebApp_ID" version="3.0">
 <display-name>website2</display-name>
 <!-- 加载spring容器配置 -->
 <listener>
 <listener-class>org.springframework.web.context.ContextLoaderListener</listener-class>
 </listener>
 <!-- 设置Spring容器加载配置文件路径 -->
 <context-param>
 <param-name>contextConfigLocation</param-name>
 <param-value>
  classpath:config/springmvc-servlet.xml,
  classpath:config/ApplicationContext.xml
 </param-value>
 </context-param>
 <!-- 字符编码过滤器 -->
 <filter>
 <filter-name>encodingFilter</filter-name>
 <filter-class>org.springframework.web.filter.CharacterEncodingFilter</filter-class>
 <init-param>
  <param-name>encoding</param-name>
  <param-value>utf-8</param-value>
 </init-param>
 <init-param>
  <param-name>forceEncoding</param-name>
  <param-value>true</param-value>
 </init-param>
 </filter>
 <filter-mapping>
 <filter-name>encodingFilter</filter-name>
 <url-pattern>*.do</url-pattern>
 </filter-mapping>
 <!-- 前端控制器 -->
 <servlet>
 <servlet-name>springmvc</servlet-name>
 <servlet-class>org.springframework.web.servlet.DispatcherServlet</servlet-class>
 <init-param>
  <param-name>contextConfigLocation</param-name>
  <param-value>classpath:config/springmvc-servlet.xml</param-value>
 </init-param>
 <!-- 这个配置文件在容器启动的时候 就加载 -->
 <load-on-startup>1</load-on-startup>
 </servlet>
 <servlet-mapping>
 <servlet-name>springmvc</servlet-name>
 <!-- 拦截请求 -->
 <url-pattern>*.do</url-pattern>
 </servlet-mapping>
 <welcome-file-list>
 <welcome-file>index.html</welcome-file>
 <welcome-file>index.htm</welcome-file>
 <welcome-file>index.jsp</welcome-file>
 <welcome-file>default.html</welcome-file>
 <welcome-file>default.htm</welcome-file>
 <welcome-file>default.jsp</welcome-file>
 </welcome-file-list>
</web-app>
(2)、扫描控制层、自动注入以及视图解析器的配置 springmvc-servlet.xml
<?xml version="1.0" encoding="UTF-8"?>
<beans xmlns="http://www.springframework.org/schema/beans"
 xmlns:xsi="http://www.w3.org/2001/XMLSchema-instance" xmlns:aop="http://www.springframework.org/schema/aop"
 xmlns:context="http://www.springframework.org/schema/context"
 xmlns:mvc="http://www.springframework.org/schema/mvc" xmlns:util="http://www.springframework.org/schema/util"
 xmlns:tx="http://www.springframework.org/schema/tx" xmlns:jdbc="http://www.springframework.org/schema/jdbc"
 xmlns:cache="http://www.springframework.org/schema/cache"
 xsi:schemaLocation="
 http://www.springframework.org/schema/beans http://www.springframework.org/schema/beans/spring-beans-3.1.xsd
 http://www.springframework.org/schema/aop http://www.springframework.org/schema/aop/spring-aop-3.1.xsd
 http://www.springframework.org/schema/context http://www.springframework.org/schema/context/spring-context-3.1.xsd
 http://www.springframework.org/schema/mvc http://www.springframework.org/schema/mvc/spring-mvc-3.1.xsd
 http://www.springframework.org/schema/util http://www.springframework.org/schema/util/spring-util-3.1.xsd
 http://www.springframework.org/schema/tx http://www.springframework.org/schema/tx/spring-tx-3.1.xsd
 http://www.springframework.org/schema/jdbc http://www.springframework.org/schema/jdbc/spring-jdbc-3.1.xsd
 http://www.springframework.org/schema/cache http://www.springframework.org/schema/cache/spring-cache-3.1.xsd">
 <!-- 注解驱动 -->
 <mvc:annotation-driven />
 <!-- <context:annotation-config /> -->
 <!-- 扫描 -->
 <context:component-scan base-package="com.website.controller"></context:component-scan>
 <!-- 视图解析器 -->
 <bean id="viewResolver"
 class="org.springframework.web.servlet.view.InternalResourceViewResolver">
 <property name="prefix" value="/WEB-INF/view/">
 </property>
 <property name="suffix" value=".jsp"></property>
 </bean>
</beans>
(3)、数据源、service 自动扫描注入、spring代管mybatissqlsessionFactory 以及事务的配置ApplicationContext.xml
<?xml version="1.0" encoding="UTF-8"?>
<beans xmlns="http://www.springframework.org/schema/beans"
 xmlns:xsi="http://www.w3.org/2001/XMLSchema-instance" xmlns:tx="http://www.springframework.org/schema/tx"
 xmlns:context="http://www.springframework.org/schema/context"
 xsi:schemaLocation="http://www.springframework.org/schema/beans http://www.springframework.org/schema/beans/spring-beans-3.2.xsd
  http://www.springframework.org/schema/context
   http://www.springframework.org/schema/context/spring-context-3.2.xsd
  http://www.springframework.org/schema/tx
  http://www.springframework.org/schema/tx/spring-tx-3.2.xsd">
 <!-- 加载配置JDBC文件 -->
 <context:property-placeholder location="classpath:db.properties" />
 <!-- 数据源 -->
 <bean id="dataSource"
 class="org.springframework.jdbc.datasource.DriverManagerDataSource">
 <property name="driverClassName">
  <value>${jdbc.driverClassName}</value>
 </property>
 <property name="url">
  <value>${jdbc.url}</value>
 </property>
 <property name="username">
  <value>${jdbc.username}</value>
 </property>
 <property name="password">
  <value>${jdbc.password}</value>
 </property>
 </bean>
 <!-- 开启注解配置 即Autowried -->
 <!--component-scan拥有 annotation-config的功能即注入需要的类到spring容器中 -->
 <!--<context:annotation-config/> -->
 <!--使用自动注入的时候要 添加他来扫描bean之后才能在使用的时候 -->
 <context:component-scan base-package="com.website.service ,com.website.dao" />
 <!-- 在使用mybatis时 spring使用sqlsessionFactoryBean 来管理mybatis的sqlsessionFactory -->
 <!-- 而像这种使用接口实现的方式 是使用sqlsessionTemplate来进行操作的,他提供了一些方法 -->
 <bean id="sqlSessionFactory" class="org.mybatis.spring.SqlSessionFactoryBean">
 <property name="dataSource" ref="dataSource" />
 <!-- mybatis配置文件路径 -->
 <property name="configLocation" value="" />
 <!-- 实体类映射文件路径,在开发中映射文件肯定是多个所以使用mybatis/*.xml来替代 -->
 <property name="mapperLocations" value="classpath:mybatis/UserMapping.xml" />
 </bean>
 <!--其实这里类的实例就是mybatis中SQLSession -->
 <bean id="sqlSession" class="org.mybatis.spring.SqlSessionTemplate">
 <constructor-arg index="0">
  <ref bean="sqlSessionFactory" />
 </constructor-arg>
 </bean>
 <bean id="transactionManager"
 class="org.springframework.jdbc.datasource.DataSourceTransactionManager">
 <property name="dataSource" ref="dataSource" />
 </bean>
 <!--使用全注释事务 -->
 <tx:annotation-driven transaction-manager="transactionManager" />
</beans>
(4)、mybatis 映射文件
<?xml version="1.0" encoding="UTF-8" ?>
<!DOCTYPE mapper PUBLIC "-//mybatis.org//DTD Mapper 3.0//EN"
 "http://mybatis.org/dtd/mybatis-3-mapper.dtd">
 <!--这个namespace + 下面的id 就是一个完整的路径,在dao层我们写了完整的路径之后mybatis就是映射这个文件中的相关sql语句 -->
<mapper namespace="com.website.userMapper">
<!-- parameterType就是你接受的参数的类型, -->
<!-- 添加用户信息 -->
<insert id="insertUser" parameterType="java.util.Map">
 insert into user(id,name,password) values(#{id},#{name},#{password})
</insert>
</mapper>
你可能看到了这里的映射文件的namespace +id 是自定义的而不是dao 层接口的全类名+id
3、控制层Controller
package com.website.controller;
import java.util.HashMap;
import java.util.Map;
import javax.servlet.http.HttpServletRequest;
import javax.servlet.http.HttpServletResponse;
import org.springframework.beans.factory.annotation.Autowired;
import org.springframework.stereotype.Controller;
import org.springframework.web.bind.annotation.RequestMapping;
import com.website.service.UserService;
/**
 * @author WHD data 2016年6月5日
 */
@Controller
@RequestMapping(value = "/user")
public class UserController {
 @Autowired
 private UserService userService;
 @RequestMapping(value = "/save.do")
 public String saveUser(HttpServletRequest request,
  HttpServletResponse response) {
 String id = request.getParameter("id");
 String name = request.getParameter("name");
 String password = request.getParameter("password");
 Map<String, String> map = new HashMap<String, String>();
 map.put("id", id);
 map.put("name", name);
 map.put("password", password);
 userService.saveUser(map);
 return "index";
 }
}
4、业务逻辑层 service
package com.website.service;
import java.util.Map;
import org.springframework.beans.factory.annotation.Autowired;
import org.springframework.stereotype.Service;
import org.springframework.transaction.annotation.Transactional;
import com.website.dao.UserDao;
/**
 * @author WHD data 2016年6月5日
 */
@Service("userService")
@Transactional
public class UserService {
 @Autowired
 private UserDao userDao;
 public void saveUser(Map<String, String> map) {
 userDao.saveUser(map);
 }
}
5、dao层
package com.website.dao;
import java.util.Map;
import org.mybatis.spring.SqlSessionTemplate;
import org.springframework.beans.factory.annotation.Autowired;
import org.springframework.stereotype.Repository;
/**
 * @author WHD data 2016年6月5日
 */
@Repository("userDao")
public class UserDao {
 @Autowired
 private SqlSessionTemplate sqlSession;
 public void saveUser(Map<String, String> map) {
 int end = sqlSession.insert("com.website.userMapper.insertUser", map);
 System.out.println("end" + end);
 }
}
我们看倒dao层的 SqlSessionTemplate 这个其实是mybatis中的SqlSession 对象,我们看到在ApplicationContext.xml 中配置了,所以在我们使用时spring会帮我们自动注入,我们直接使用就可以了不用去自己创建,这也就是所谓的控制反转。ok 到此两种文件的配置方式就结束了。
总结
以上所述是小编给大家介绍的spring、mybatis 配置方式详解(常用两种方式),希望对大家有所帮助,如果大家有任何疑问请给我留言,小编会及时回复大家的。在此也非常感谢大家对我们网站的支持!
相关推荐
-
springmvc与mybatis集成配置实例详解
简单之美,springmvc,mybatis就是一个很好的简单集成方案,能够满足一般的项目需求.闲暇时间把项目配置文件共享出来,供大家参看: 1.首先我们来看下依赖的pom: <!-- spring --> <dependency> <groupId>org.springframework</groupId> <artifactId>spring-core</artifactId> <version>${spring.ve
-

springboot + mybatis配置多数据源示例
在实际开发中,我们一个项目可能会用到多个数据库,通常一个数据库对应一个数据源. 代码结构: 简要原理: 1)DatabaseType列出所有的数据源的key---key 2)DatabaseContextHolder是一个线程安全的DatabaseType容器,并提供了向其中设置和获取DatabaseType的方法 3)DynamicDataSource继承AbstractRoutingDataSource并重写其中的方法determineCurrentLookupKey(),在该方法中使用Da
-
Spring+MyBatis多数据源配置实现示例
最近用到了MyBatis配置多数据源,原以为简单配置下就行了,实际操作后发现还是要费些事的,这里记录下,以作备忘 不多废话,直接上代码,后面会有简单的实现介绍 jdbc和log4j的配置 #定义输出格式 ConversionPattern=%d %-5p [%t] %c - %m%n log4j.rootLogger=DEBUG,Console log4j.logger.com.cnblogs.lzrabbit=DEBUG log4j.logger.org.springframework=ERR
-
Spring Boot MyBatis 连接数据库配置示例
最近比较忙,没来得及抽时间把MyBatis的集成发出来,其实mybatis官网在2015年11月底就已经发布了对SpringBoot集成的Release版本,示例代码:spring-boot_jb51.rar 前面对JPA和JDBC连接数据库做了说明,本文也是参考官方的代码做个总结. 先说个题外话,SpringBoot默认使用 org.apache.tomcat.jdbc.pool.DataSource 现在有个叫 HikariCP 的JDBC连接池组件,据说其性能比常用的 c3p0.tomca
-
详解Spring Boot整合Mybatis实现 Druid多数据源配置
一.多数据源的应用场景 目前,业界流行的数据操作框架是 Mybatis,那 Druid 是什么呢? Druid 是 Java 的数据库连接池组件.Druid 能够提供强大的监控和扩展功能.比如可以监控 SQL ,在监控业务可以查询慢查询 SQL 列表等.Druid 核心主要包括三部分: 1. DruidDriver 代理 Driver,能够提供基于 Filter-Chain 模式的插件体系. 2. DruidDataSource 高效可管理的数据库连接池 3. SQLParser 当业务数据量达
-
Java+Spring+MySql环境中安装和配置MyBatis的教程
1.MyBatis简介与配置MyBatis+Spring+MySql 1.1MyBatis简介 MyBatis 是一个可以自定义SQL.存储过程和高级映射的持久层框架.MyBatis 摒除了大部分的JDBC代码.手工设置参数和结果集重获.MyBatis 只使用简单的XML 和注解来配置和映射基本数据类型.Map 接口和POJO 到数据库记录.相对Hibernate和Apache OJB等"一站式"ORM解决方案而言,Mybatis 是一种"半自动化"的O
-
详解Spring boot上配置与使用mybatis plus
http://mp.baomidou.com/#/?id=%e7%ae%80%e4%bb%8b这个是mybatisplus的官方文档,上面是mybtisplus的配置使用方法,以及一些功能的介绍 下面开始配置 maven依赖 <dependency> <groupId>org.mybatis.spring.boot</groupId> <artifactId>mybatis-spring-boot-starter</artifactId> <
-
spring、mybatis 配置方式详解(常用两种方式)
在之前的文章中总结了三种方式,但是有两种是注解sql的,这种方式比较混乱所以大家不怎么使用,下面总结一下常用的两种总结方式: 一. 动态代理实现 不用写dao的实现类 这种方式比较简单,不用实现dao层,只需要定义接口就可以了,这里只是为了记录配置文件所以程序写的很简单: 1.整体结构图: 2.三个配置文件以及一个映射文件 (1).程序入口以及前端控制器配置 web.xml <?xml version="1.0" encoding="UTF-8"?> &
-
在MyBatis中实现一对多查询和多对一查询的方式详解(各两种方式)
目录 1.多对一 1.1环境搭建 1.2编写实体类. 1.3编写接口方法 1.4编写Mapper 1.5实现 1.6运行结果 2.一对多 2.1环境搭建和一对多一样 2.3编写接口的方法 2.4编写Mapper配置 2.5实现 2.6运行结果 1.多对一 1.1环境搭建 数据库 CREATE TABLE teacher ( id INT(10) NOT NULL, NAME VARCHAR(64) DEFAULT NULL, PRIMARY KEY (id), )ENGINE=INNODB DE
-
详解springMVC两种方式实现多文件上传及效率比较
springMVC实现多文件上传的方式有两种,一种是我们经常使用的以字节流的方式进行文件上传,另外一种是使用springMVC包装好的解析器进行上传.这两种方式对于实现多文件上传效率上却有着很大的差距,下面我们通过实例来看一下这两种方式的实现方式,同时比较一下在效率上到底存在着多大的差距. 1.下载相关jar包.需要引入的jar出了springMVC的jar包外,还需要引入com.springsource.org.apache.commons.fileupload-1.2.0.jar和com.s
-
详解Java两种方式简单实现:爬取网页并且保存
对于网络,我一直处于好奇的态度.以前一直想着写个爬虫,但是一拖再拖,懒得实现,感觉这是一个很麻烦的事情,出现个小错误,就要调试很多时间,太浪费时间. 后来一想,既然早早给自己下了保证,就先实现它吧,从简单开始,慢慢增加功能,有时间就实现一个,并且随时优化代码. 下面是我简单实现爬取指定网页,并且保存的简单实现,其实有几种方式可以实现,这里慢慢添加该功能的几种实现方式. UrlConnection爬取实现 package html; import java.io.BufferedReader; i
-
Spring MVC获取HTTP请求头的两种方式小结
1 前言 请求是任何Web服务要关注的对象,而请求头也是其中非常重要的信息.本文将通过代码讲解如何在Spring MVC项目中获取请求头的内容.主要通过两种方式获取: (1)通过注解@RequestHeader获取,需要在Controller中显式获取: (2)通过RequestContextHolder获取,可以任何地方获取. 接下来通过代码讲解. 2 通过注解@RequestHeader获取 需要在Controller中显示使用@RequestHeader. 2.1 获取某个请求头 只获取其
-
Mybatis控制台打印SQL语句的两种方式实现
问题描述 在使用mybatis进行开发的时候,由于可以动态拼接sql,这样大大方便了我们.但是也有一定的问题,当我们动态sql拼接的块很多的时候,我们要想从*mapper.xml中直接找出完整的sql就会非常的难,这个时候经常会需要把组合之后的完整sql调试出来比较好.下面来看两种调试出sql的两种方式 解决方案 方案1: 网上说的比较多的,之前也是这么用的一种方式 1:首先将ibatis log4j运行级别调到DEBUG可以在控制台打印出ibatis运行的sql语句 2:添加如下语句: ###
-
配置vue全局方法的两种方式实例
目录 1,前言 2,第一种方式 3,第二种方式 总结 1,前言 在Vue项目开发中,肯定会有这样一个场景:在不同的组件页面用到同样的方法,比如格式化时间,文件下载,对象深拷贝,返回数据类型,复制文本等等.这时候我们就需要把常用函数抽离出来,提供给全局使用.那如何才能定义一个工具函数类,让我们在全局环境中都可以使用呢?请看下文分解. PS:本文vue为2.6.12 2,第一种方式 直接添加到Vue实例原型上 首先打开main.js,通过import引入定义的通用方法utils.js文件,然后使用V
-
详解springboot中使用异步的常用两种方式及其比较
一般对于业务复杂的流程,会有一些处理逻辑不需要及时返回,甚至不需要返回值,但是如果充斥在主流程中,占用大量时间来处理,就可以通过异步的方式来优化. 实现异步的常用方法远不止两种,但是个人经验常用的,好用的,这里我就说两种,最好用的是第二种. spring的注解方式@Async org.springframework.scheduling.annotation.Async jdk1.8后的CompletableFuture java.util.concurrent.CompletableFutur
-
把JSON数据格式转换为Python的类对象方法详解(两种方法)
JOSN字符串转换为自定义类实例对象 有时候我们有这种需求就是把一个JSON字符串转换为一个具体的Python类的实例,比如你接收到这样一个JSON字符串如下: {"Name": "Tom", "Sex": "Male", "BloodType": "A", "Hobbies": ["篮球", "足球"]} 我需要把这个转换为具
-
spring boot 配置动态刷新详解
本文测试使用的springcloud版本为: Dalston.SR1 很多朋友只知道springcloudconfig可以刷新远程git的配置到内存中, 却不知道springcloudconfig的客户端可以脱离服务端使用, 更不知道springcloudconfig客户端结合actuator还可以刷新本地的配置文件到内存中. 具体做法如下: 1.pom: <?xml version="1.0" encoding="UTF-8"?> <projec