浅谈@Aspect@Order各个通知的执行顺序
目录
- @Aspect@Order各个通知的执行顺序
- 代码
- 小结
- spring AspectJ order(顺序)
@Aspect@Order各个通知的执行顺序
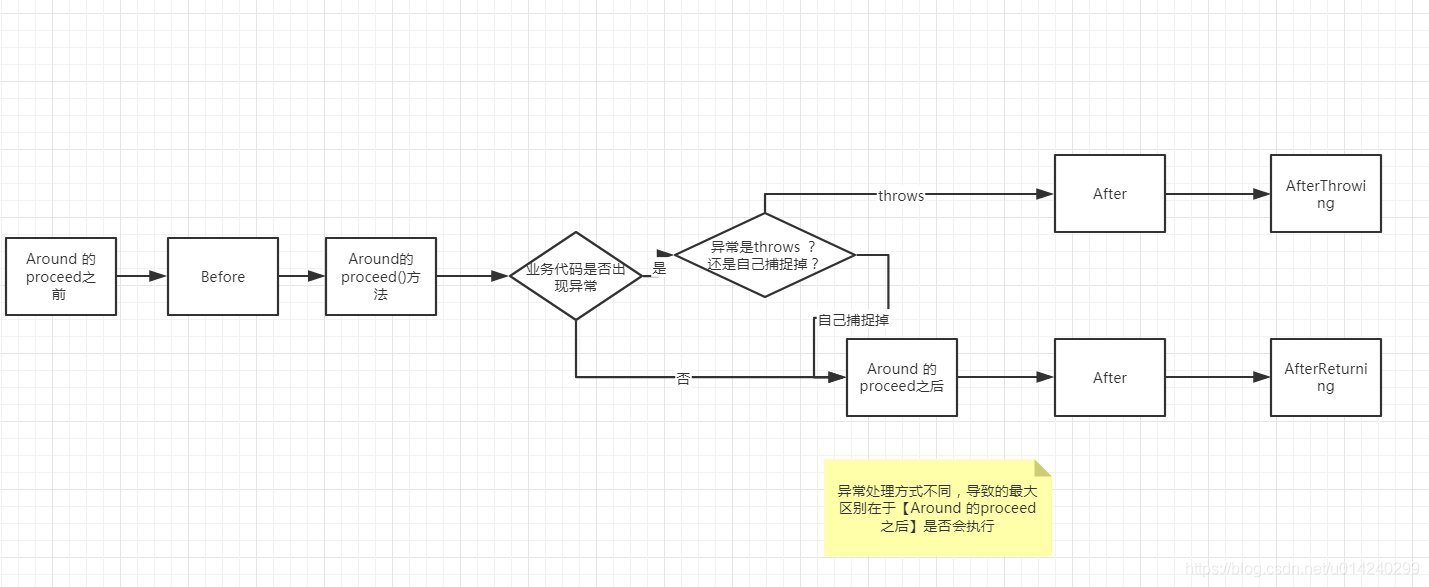
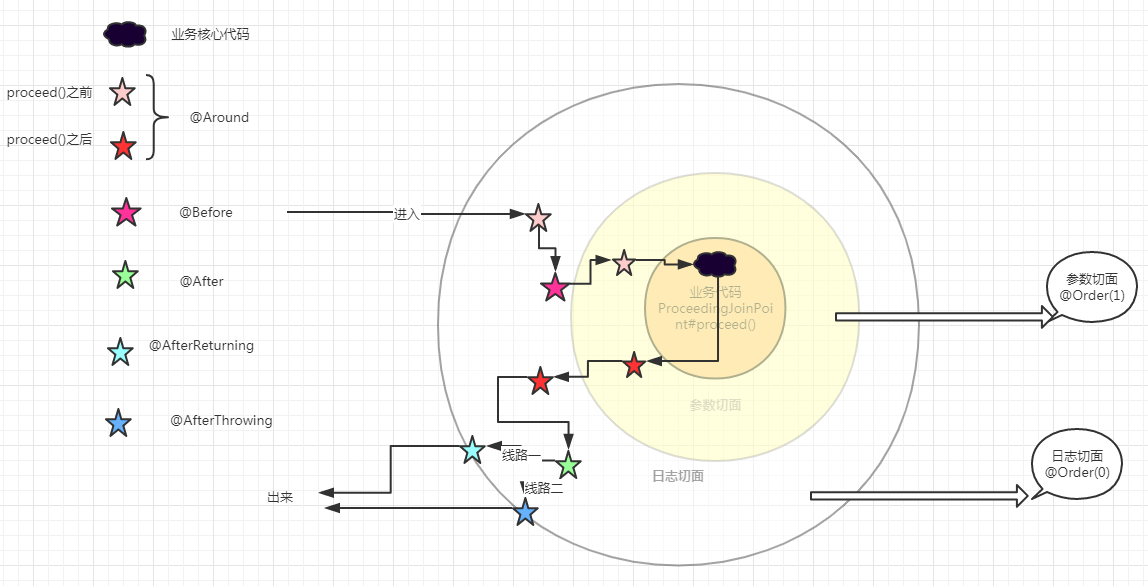
两个切面类:【记录日志】和【判断参数】,分别对应顺序 @Order(0) 和@Order(1) 。
本文只是将重点说下 执行顺序 这么回事哈哈哈
代码
【业务类】
/**
 * 登录控制器
 */
@Controller
public class LoginController {
    //向外面抛出异常
    public void loginWithThrow(String username, String password) throws Exception {
        if (username == null || password == null) {
            throw new Exception("登录信息不可为空啊");
        }
        System.out.println("LoginController#login...");
    }
    //抛出异常自己捕获的情况
    public void loginWithTryCatch(String username, String password) {
       try{
           if (username == null || password == null) {
               throw new Exception("登录信息不可为空啊");
           }
           System.out.println("LoginController#login...");
       }catch (Exception e){
           e.printStackTrace();
       }
    }
}
【切面类】
/**
 * 输出日志注解
 */
@Order(0)
@Aspect
@Component
public class LogAspect {
    //抽出共通的execution用的
    //com.yuki.demo.aop.aspect 包或者子包下所有类的方法
    @Pointcut("execution(* com.yuki.demo.aop.aspect..*.*(..))")
    public void pointcut(){
    }
    //前置通知
//    @Before("execution(public void com.yuki.demo.aop.aspect.LoginController.*(String,String))")
    @Before("pointcut()")
    public void before() {
        System.out.println("LogAspect#before...");
    }
    //环绕通知
    //ProceedingJoinPoint 只有环绕通知有
    @Around("execution(public void com.yuki.demo.aop.aspect.LoginController.*(String,String))")
    public void around(ProceedingJoinPoint joinPoint) throws Throwable {
        System.out.println("LogAspectA#around开始...");
        //代理方法的执行,如果没有joinPoint.proceed() ,则前置通知@Before 不会执行,其它的通知正常
        joinPoint.proceed();
        //执行方法之后,如果joinPoint.proceed() 抛出了异常,则该句不会执行,抛出异常后直接跳出了aroud方法了
        System.out.println("LogAspectA#around结束...");
    }
    //后置通知(只要连接点被执行,不管是否抛出异常)
    @After("execution(public void com.yuki.demo.aop.aspect.LoginController.*(String,String))")
    public void after() {
        System.out.println("LogAspect#after...");
    }
    //异常通知(只有在joinPoint.proceed()方法执行向外面抛出了异常,才会执行该通知)
    @AfterThrowing("execution(public void com.yuki.demo.aop.aspect.LoginController.*(String,String))")
    public void afterThrowing() {
        System.out.println("LogAspect#afterThrowing...");
    }
    //正常的返回通知通知(正常结束了才会执行该通知)
    @AfterReturning("execution(public void com.yuki.demo.aop.aspect.LoginController.*(String,String))")
    public void afterReturning() {
        System.out.println("LogAspect#afterReturning...");
    }
}
【切面类】
/**
 * 判断请求参数的sign是否正确的 切面类
 */
@Order(1)
@Aspect
@Component
public class SignAspect {
    @Around("execution(public void com.yuki.demo.aop.aspect.LoginController.*(String,String))")
    public void around(ProceedingJoinPoint joinPoint) throws Throwable {
        System.out.println("SignAspect#around开始...");
        joinPoint.proceed();
        System.out.println("SignAspect#around结束...");
    }
}
【启动配置】
省略。。。非重点
【测试类】
@SpringBootTest
class AopApplicationTests {
    @Autowired
    private LoginController loginController;
    @Test
    void contextLoads() {
        loginController.loginWithTryCatch("yuki", "1234");
    }
}
【控制台输出】
LogAspectA#around开始...
LogAspect#before...
SignAspect#around开始...
LoginController#login...
SignAspect#around结束...
LogAspectA#around结束...
LogAspect#after...
LogAspect#afterReturning...
小结


spring AspectJ order(顺序)
@Aspect
@Order(2)
public class HelloWorldAspectAnnotation {
	/**
	 * JoinPoint接口
	 * @param joinPoint
	 */
	/*public interface JoinPoint {
	    String toString();         //连接点所在位置的相关信息
	    String toShortString();     //连接点所在位置的简短相关信息
	    String toLongString();     //连接点所在位置的全部相关信息
	    Object getThis();         //返回AOP代理对象
	    Object getTarget();       //返回目标对象
	    Object[] getArgs();       //返回被通知方法参数列表
	    Signature getSignature();  //返回当前连接点签名
	    SourceLocation getSourceLocation();//返回连接点方法所在类文件中的位置
	    String getKind();        //连接点类型
	    StaticPart getStaticPart(); //返回连接点静态部分
	}*/

    //定义前置通知,注意这里是sayHello2
	//使用@Before进行前置通知声明,其中value用于定义切入点表达式或引用命名切入点
	@Before(value="execution(* com.boventech..*.sayHello2(..))&& args(param)",argNames="param")
	public void beforeAdvice(JoinPoint joinPoint,String param) {
		System.out.println(1);
		System.out.println("=======================");
		System.out.println("===param:" + param);
		System.out.println("=======================");
		System.out.println(joinPoint.getArgs().length);
		System.out.println("=======================");
		System.out.println(joinPoint.toString());
		System.out.println("=======================");
		System.out.println(joinPoint.getTarget());
		System.out.println("=======================");
		System.out.println(joinPoint.getThis());
		System.out.println("=======================");
		System.out.println("===========before advice");
	}
	/*value:指定切入点表达式或命名切入点;
    pointcut:同样是指定切入点表达式或命名切入点,如果指定了将覆盖value属性指定的,pointcut具有高优先级;*/
	@AfterReturning(value="execution(* com.boventech..*.sayHello2(..))&& args(param)",argNames="param",pointcut="execution(* com.boventech..*.sayHello2(..))&& args(param)")
	public void afterFinallyAdvice(JoinPoint joinPoint,String param) {
		System.out.println("param:"+param);
		System.out.println("===========");
		System.out.println("===========after finally advice");
	}
}
@Aspect
@Order(1)
public class HelloWorldAspectAnnotation2 {
	/**
	 * JoinPoint接口
	 * @param joinPoint
	 */
	/*public interface JoinPoint {
	    String toString();         //连接点所在位置的相关信息
	    String toShortString();     //连接点所在位置的简短相关信息
	    String toLongString();     //连接点所在位置的全部相关信息
	    Object getThis();         //返回AOP代理对象
	    Object getTarget();       //返回目标对象
	    Object[] getArgs();       //返回被通知方法参数列表
	    Signature getSignature();  //返回当前连接点签名
	    SourceLocation getSourceLocation();//返回连接点方法所在类文件中的位置
	    String getKind();        //连接点类型
	    StaticPart getStaticPart(); //返回连接点静态部分
	}*/

    //定义前置通知,注意这里是sayHello2
	//使用@Before进行前置通知声明,其中value用于定义切入点表达式或引用命名切入点
	@Before(value="execution(* com.boventech..*.sayHello2(..))&& args(param)",argNames="param")
	public void beforeAdvice(JoinPoint joinPoint,String param) {
		System.out.println(2);
		System.out.println("=======================");
	}

	/*value:指定切入点表达式或命名切入点;
    pointcut:同样是指定切入点表达式或命名切入点,如果指定了将覆盖value属性指定的,pointcut具有高优先级;*/
	@AfterReturning(value="execution(* com.boventech..*.sayHello2(..))&& args(param)",argNames="param",pointcut="execution(* com.boventech..*.sayHello2(..))&& args(param)")
	public void afterFinallyAdvice(JoinPoint joinPoint,String param) {
		System.out.println("order:" + 2);
	}
}
public class AopAnnotationTest {
	@Test
    public void testHelloworld() {
        ApplicationContext ctx =  new ClassPathXmlApplicationContext("/helloWorld2.xml");
        IHelloWorld2Service helloworldService =ctx.getBean("helloWorld2Service", IHelloWorld2Service.class);
        String param = "12";
        helloworldService.sayHello2(param);
    }
}
<aop:aspectj-autoproxy/>
	<bean id="helloWorld2Service" class="com.boventech.learning.serviceImpl.HelloWorld2ServiceImpl"/>

    <bean id="aspect"
             class="com.boventech.learning.aspect.HelloWorldAspectAnnotation"/>

    <bean id="aspect2"
             class="com.boventech.learning.aspect.HelloWorldAspectAnnotation2"/>
以上为个人经验,希望能给大家一个参考,也希望大家多多支持我们。
赞 (0)

