如何利用python将Xmind用例转为Excel用例
目录
- 1、Xmind用例编写规范
- 2、转换代码
- 3、使用
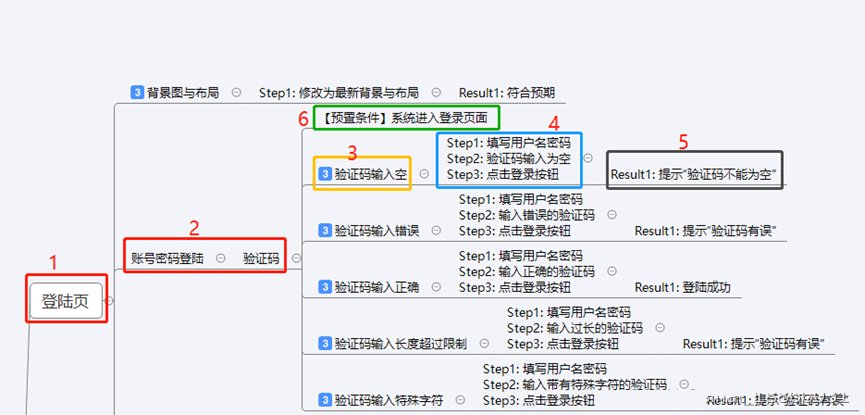
1、Xmind用例编写规范

- 1:需求大模块
- 2:大模块中的小模块(需要根据需求来看需要多少层)
- 3:用例等级和用例名称
- 用例等级(转换成Excel文件后,1为High, 2 为 Middle, 3为Low)
- 转换成excel时,用例的名称为(框出来的1-2-3组合而成),意味着在标等级及之前的节点会组合成用例名称
- 4:步骤
- 5:期望结果
- 6:预置条件,转换成excel时相同层级下的用例会为同一个预置条件
2、转换代码
需要安装python3环境
需要安装 xlwt、xmindparser 这两个第三方包
XmindExcel.py 文件代码
# coding=utf-8
import time
import xlwt
from past.builtins import raw_input
from xmindparser import xmind_to_dict
def resolvePath(dict, lists, title):
    # title去除首尾空格
    title = title.strip()
    # 如果title是空字符串,则直接获取value
    if len(title) == 0:
        concatTitle = dict['title'].strip()
    elif "makers" in dict.keys():
        if "priority-" in str(dict["makers"]):
            concatTitle = title + '\t' + dict['title'].strip() + "\t" + str(dict["makers"])
        else:
            concatTitle = title + '\t' + dict['title'].strip()
    else:
        concatTitle = title + '\t' + dict['title'].strip()

    if dict.__contains__('topics') == False:
        lists.append(concatTitle)
    else:
        for d in dict['topics']:
            resolvePath(d, lists, concatTitle
def xmind_cat(list, excelname, groupname):
    f = xlwt.Workbook()
    sheet = f.add_sheet(groupname, cell_overwrite_ok=True)
    row0 = ["测试用例编号", "用例标题", "预置条件", "执行方式", "优先级", "测试步骤", "预期结果", "所属项目"]
    # 生成第一行中固定表头内容
    for i in range(0, len(row0)):
        sheet.write(0, i, row0[i])

    # 增量索引
    index = 0
    # case级别
    case_leve_index = ""
    # 前置条件
    case_pre_condition = []
    pre_num = 0

    for h in range(0, len(list)):
        # print("list:",list)
        lists = []
        resolvePath(list[h], lists, '')
        for j in range(0, len(lists)):
            # 将xmind转成excel
            lists[j] = lists[j].split('\t')
            try:
                # print(index)
                if "【预置条件】" in lists[j][-1] or "【前置条件】" in lists[j][-1]:
                    case_pre_condition.append(lists[j])
                    pre_num += 1
                else:
                    case_leve = ""
                    for n in range(len(lists[j])):
                        if 'priority-' in str(lists[j][n]):
                            case_leve_index = n-1
                            if "priority-1" in str(lists[j][n]):
                                case_leve = "High"
                            elif "priority-2" in str(lists[j][n]):
                                case_leve = "Middle"
                            elif "priority-3" in str(lists[j][n]):
                                case_leve = "Low"
                            lists[j].pop(n)
                            break
                    case_name = "-".join(lists[j][:case_leve_index+1])
                    sheet.write(j + index + 1 - pre_num, 1, case_name)  # 标题
                    if len(lists[j][case_leve_index:-1]) < 2:
                        sheet.write(j + index + 1 - pre_num, 6, lists[j][case_leve_index + 1])   # 期望结果
                    else:
                        sheet.write(j + index + 1- pre_num, 5, lists[j][case_leve_index + 1])  # 步骤
                        sheet.write(j + index + 1- pre_num, 6, lists[j][case_leve_index + 2])  # 期望结果
                    sheet.write(j + index + 1- pre_num, 3, "手动")  # 执行方式
                    sheet.write(j + index + 1 - pre_num, 4, case_leve)

                    # 预置条件
                    if len(case_pre_condition) > 0:
                        for pre_list in case_pre_condition:
                            if set(pre_list[:-1]) < set(lists[j]):
                                sheet.write(j + index + 1 - pre_num, 2, pre_list[-1])
            except:
                print("请检查编写的用例是否符合规范:", lists[j])

            # 遍历结束lists,给增量索引赋值,跳出for j循环,开始for h循环
            if j == len(lists) - 1:
                index += len(lists)

        f.save(excelname)
def maintest(filename, excelname):
    out = xmind_to_dict(filename)
    groupname = out[0]['topic']['title']
    xmind_cat(out[0]['topic']['topics'], excelname, groupname)
if __name__ == '__main__':
    try:
        path = raw_input("请输入Xmind用例文件路径,可将文件拖拽到此处:")
        filename = path
        excelname = path.rstrip('xmind') + 'xls'
        maintest(filename, excelname)
        print('SUCCESS!\n生成用例成功,用例目录:%s' % excelname)
    except:
        print('请确认后重试:\n1.用例文件路径中不能有空格换行符\n2.请使用python3运行\n3.检查xmind文件中不能有乱码或无法识别的字符(xmind自带表情字符除外)\n4.检查是否将已生成的excel文件未关闭')
3、使用
运行XmindExcel.py文件,输入文件目录运行即可。生成的Excel文件会在Xmind文件的同路径下,文件名称与Xmind文件名称一致

到此这篇关于如何利用python将Xmind用例转为Excel用例的文章就介绍到这了,更多相关python Excel用例内容请搜索我们以前的文章或继续浏览下面的相关文章希望大家以后多多支持我们!
赞 (0)

