我劝你谨慎使用Spring中的@Scheduled注解
目录
- 引言
- 1.@Scheduled失效原因
- 2.解析流程图
- 3.使用新的方法
- schedule定时任务修改表达式无效
引言
在一些业务场景中需要执行定时操作来完成一些周期性的任务,比如每隔一周删除一周前的某些历史数据以及定时进行某项检测任务等等。
在日常开发中比较简单的实现方式就是使用Spring的@Scheduled(具体使用方法不再赘述)注解。
但是在修改服务器时间时会导致定时任务不执行情况的发生,解决的办法是当修改服务器时间后,将服务进行重启就可以避免此现象的发生。
本文将主要探讨服务器时间修改导致@Scheduled注解失效的原因,同时找到在修改服务器时间后不重启服务的情况下,定时任务仍然正常执行的方法。
- @Scheduled失效原因分析
- 解析流程图
- 使用新的方法
1.@Scheduled失效原因
(1)首先我们一起看一下@Scheduled注解的源码,主要说明了注解可使用的参数形式,在注解中使用了Schedules这个类。
@Target({ElementType.METHOD, ElementType.ANNOTATION_TYPE})
@Retention(RetentionPolicy.RUNTIME)
@Documented
@Repeatable(Schedules.class)
public @interface Scheduled {
 /**
  * A cron-like expression, extending the usual UN*X definition to include
  * triggers on the second as well as minute, hour, day of month, month
  * and day of week.  e.g. {@code "0 * * * * MON-FRI"} means once per minute on
  * weekdays (at the top of the minute - the 0th second).
  * @return an expression that can be parsed to a cron schedule
  * @see org.springframework.scheduling.support.CronSequenceGenerator
  */
 String cron() default "";
 /**
  * A time zone for which the cron expression will be resolved. By default, this
  * attribute is the empty String (i.e. the server's local time zone will be used).
  * @return a zone id accepted by {@link java.util.TimeZone#getTimeZone(String)},
  * or an empty String to indicate the server's default time zone
  * @since 4.0
  * @see org.springframework.scheduling.support.CronTrigger#CronTrigger(String, java.util.TimeZone)
  * @see java.util.TimeZone
  */
 String zone() default "";
 /**
  * Execute the annotated method with a fixed period in milliseconds between the
  * end of the last invocation and the start of the next.
  * @return the delay in milliseconds
  */
 long fixedDelay() default -1;
 /**
  * Execute the annotated method with a fixed period in milliseconds between the
  * end of the last invocation and the start of the next.
  * @return the delay in milliseconds as a String value, e.g. a placeholder
  * @since 3.2.2
  */
 String fixedDelayString() default "";
 /**
  * Execute the annotated method with a fixed period in milliseconds between
  * invocations.
  * @return the period in milliseconds
  */
 long fixedRate() default -1;
 /**
  * Execute the annotated method with a fixed period in milliseconds between
  * invocations.
  * @return the period in milliseconds as a String value, e.g. a placeholder
  * @since 3.2.2
  */
 String fixedRateString() default "";
 /**
  * Number of milliseconds to delay before the first execution of a
  * {@link #fixedRate()} or {@link #fixedDelay()} task.
  * @return the initial delay in milliseconds
  * @since 3.2
  */
 long initialDelay() default -1;
 /**
  * Number of milliseconds to delay before the first execution of a
  * {@link #fixedRate()} or {@link #fixedDelay()} task.
  * @return the initial delay in milliseconds as a String value, e.g. a placeholder
  * @since 3.2.2
  */
 String initialDelayString() default "";
}
(2)接下来我们来看下,Spring容器是如何解析@Scheduled注解的。
public class ScheduledAnnotationBeanPostProcessor
  implements MergedBeanDefinitionPostProcessor, DestructionAwareBeanPostProcessor,
  Ordered, EmbeddedValueResolverAware, BeanNameAware, BeanFactoryAware, ApplicationContextAware,
  SmartInitializingSingleton, ApplicationListener<ContextRefreshedEvent>, DisposableBean {
  ...
  }
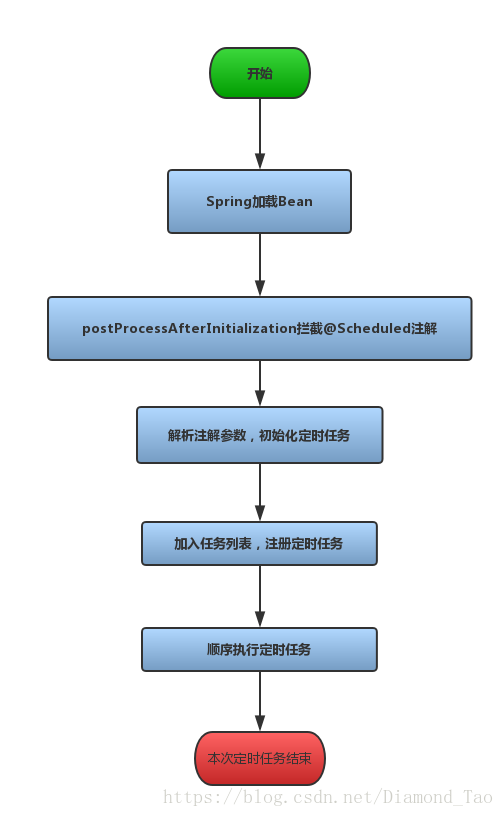
Spring容器加载完bean之后,postProcessAfterInitialization将拦截所有以@Scheduled注解标注的方法。
 @Override
 public Object postProcessAfterInitialization(final Object bean, String beanName) {
  Class<?> targetClass = AopProxyUtils.ultimateTargetClass(bean);
  if (!this.nonAnnotatedClasses.contains(targetClass)) {
   //获取含有@Scheduled注解的方法
   Map<Method, Set<Scheduled>> annotatedMethods = MethodIntrospector.selectMethods(targetClass,
     (MethodIntrospector.MetadataLookup<Set<Scheduled>>) method -> {
      Set<Scheduled> scheduledMethods = AnnotatedElementUtils.getMergedRepeatableAnnotations(
        method, Scheduled.class, Schedules.class);
      return (!scheduledMethods.isEmpty() ? scheduledMethods : null);
     });
   if (annotatedMethods.isEmpty()) {
    this.nonAnnotatedClasses.add(targetClass);
    if (logger.isTraceEnabled()) {
     logger.trace("No @Scheduled annotations found on bean class: " + bean.getClass());
    }
   }
   else {

    // 循环处理包含@Scheduled注解的方法
    annotatedMethods.forEach((method, scheduledMethods) ->
      scheduledMethods.forEach(scheduled -> processScheduled(scheduled, method, bean)));
    if (logger.isDebugEnabled()) {
     logger.debug(annotatedMethods.size() + " @Scheduled methods processed on bean '" + beanName +
       "': " + annotatedMethods);
    }
   }
  }
  return bean;
 }
再往下继续看,Spring是如何处理带有@Schedule注解的方法的。processScheduled获取scheduled类参数,之后根据参数类型、相应的延时时间、对应的时区将定时任务放入不同的任务列表中。
protected void processScheduled(Scheduled scheduled, Method method, Object bean) {
  try {
   Assert.isTrue(method.getParameterCount() == 0,
     "Only no-arg methods may be annotated with @Scheduled");
   //获取调用的方法
   Method invocableMethod = AopUtils.selectInvocableMethod(method, bean.getClass());
   //处理线程
   Runnable runnable = new ScheduledMethodRunnable(bean, invocableMethod);
   boolean processedSchedule = false;
   String errorMessage =
     "Exactly one of the 'cron', 'fixedDelay(String)', or 'fixedRate(String)' attributes is required";
   Set<ScheduledTask> tasks = new LinkedHashSet<>(4);
   // Determine initial delay
   long initialDelay = scheduled.initialDelay();
   String initialDelayString = scheduled.initialDelayString();
   if (StringUtils.hasText(initialDelayString)) {
    Assert.isTrue(initialDelay < 0, "Specify 'initialDelay' or 'initialDelayString', not both");
    if (this.embeddedValueResolver != null) {
     initialDelayString = this.embeddedValueResolver.resolveStringValue(initialDelayString);
    }
    if (StringUtils.hasLength(initialDelayString)) {
     try {
      initialDelay = parseDelayAsLong(initialDelayString);
     }
     catch (RuntimeException ex) {
      throw new IllegalArgumentException(
        "Invalid initialDelayString value \"" + initialDelayString + "\" - cannot parse into long");
     }
    }
   }
   // 获取cron参数
   String cron = scheduled.cron();
   if (StringUtils.hasText(cron)) {
    String zone = scheduled.zone();
    if (this.embeddedValueResolver != null) {
     cron = this.embeddedValueResolver.resolveStringValue(cron);
     zone = this.embeddedValueResolver.resolveStringValue(zone);
    }
    if (StringUtils.hasLength(cron)) {
     Assert.isTrue(initialDelay == -1, "'initialDelay' not supported for cron triggers");
     processedSchedule = true;
     TimeZone timeZone;
     if (StringUtils.hasText(zone)) {
      timeZone = StringUtils.parseTimeZoneString(zone);
     }
     else {
      timeZone = TimeZone.getDefault();
     }
     //加入到定时任务列表中
     tasks.add(this.registrar.scheduleCronTask(new CronTask(runnable, new CronTrigger(cron, timeZone))));
    }
   }
   // At this point we don't need to differentiate between initial delay set or not anymore
   if (initialDelay < 0) {
    initialDelay = 0;
   }
   // Check fixed delay
   long fixedDelay = scheduled.fixedDelay();
   if (fixedDelay >= 0) {
    Assert.isTrue(!processedSchedule, errorMessage);
    processedSchedule = true;
    tasks.add(this.registrar.scheduleFixedDelayTask(new FixedDelayTask(runnable, fixedDelay, initialDelay)));
   }
   String fixedDelayString = scheduled.fixedDelayString();
   if (StringUtils.hasText(fixedDelayString)) {
    if (this.embeddedValueResolver != null) {
     fixedDelayString = this.embeddedValueResolver.resolveStringValue(fixedDelayString);
    }
    if (StringUtils.hasLength(fixedDelayString)) {
     Assert.isTrue(!processedSchedule, errorMessage);
     processedSchedule = true;
     try {
      fixedDelay = parseDelayAsLong(fixedDelayString);
     }
     catch (RuntimeException ex) {
      throw new IllegalArgumentException(
        "Invalid fixedDelayString value \"" + fixedDelayString + "\" - cannot parse into long");
     }
     tasks.add(this.registrar.scheduleFixedDelayTask(new FixedDelayTask(runnable, fixedDelay, initialDelay)));
    }
   }
   // 执行频率的类型为long
   long fixedRate = scheduled.fixedRate();
   if (fixedRate >= 0) {
    Assert.isTrue(!processedSchedule, errorMessage);
    processedSchedule = true;
    tasks.add(this.registrar.scheduleFixedRateTask(new FixedRateTask(runnable, fixedRate, initialDelay)));
   }
   String fixedRateString = scheduled.fixedRateString();
   if (StringUtils.hasText(fixedRateString)) {
    if (this.embeddedValueResolver != null) {
     fixedRateString = this.embeddedValueResolver.resolveStringValue(fixedRateString);
    }
    if (StringUtils.hasLength(fixedRateString)) {
     Assert.isTrue(!processedSchedule, errorMessage);
     processedSchedule = true;
     try {
      fixedRate = parseDelayAsLong(fixedRateString);
     }
     catch (RuntimeException ex) {
      throw new IllegalArgumentException(
        "Invalid fixedRateString value \"" + fixedRateString + "\" - cannot parse into long");
     }
     tasks.add(this.registrar.scheduleFixedRateTask(new FixedRateTask(runnable, fixedRate, initialDelay)));
    }
   }
   // Check whether we had any attribute set
   Assert.isTrue(processedSchedule, errorMessage);
   // Finally register the scheduled tasks
   synchronized (this.scheduledTasks) {
    Set<ScheduledTask> registeredTasks = this.scheduledTasks.get(bean);
    if (registeredTasks == null) {
     registeredTasks = new LinkedHashSet<>(4);
     this.scheduledTasks.put(bean, registeredTasks);
    }
    registeredTasks.addAll(tasks);
   }
  }
  catch (IllegalArgumentException ex) {
   throw new IllegalStateException(
     "Encountered invalid @Scheduled method '" + method.getName() + "': " + ex.getMessage());
  }
 }
满足条件时将定时任务添加到定时任务列表中,在加入任务列表的同时对定时任务进行注册。ScheduledTaskRegistrar这个类为Spring容器的定时任务注册中心。以下为ScheduledTaskRegistrar部分源码,主要说明该类中包含的属性。Spring容器通过线程处理注册的定时任务。
public class ScheduledTaskRegistrar implements InitializingBean, DisposableBean {
 private TaskScheduler taskScheduler;
 private ScheduledExecutorService localExecutor;
 private List<TriggerTask> triggerTasks;
 private List<CronTask> cronTasks;
 private List<IntervalTask> fixedRateTasks;
 private List<IntervalTask> fixedDelayTasks;
 private final Map<Task, ScheduledTask> unresolvedTasks = new HashMap<Task, ScheduledTask>(16);
 private final Set<ScheduledTask> scheduledTasks = new LinkedHashSet<ScheduledTask>(16);

 ......
}
ScheduledTaskRegistrar类中在处理定时任务时会调用scheduleCronTask方法初始化定时任务。
public ScheduledTask scheduleCronTask(CronTask task) {
  ScheduledTask scheduledTask = this.unresolvedTasks.remove(task);
  boolean newTask = false;
  if (scheduledTask == null) {
   scheduledTask = new ScheduledTask();
   newTask = true;
  }
  if (this.taskScheduler != null) {
   scheduledTask.future = this.taskScheduler.schedule(task.getRunnable(), task.getTrigger());
  }
  else {
   addCronTask(task);
   this.unresolvedTasks.put(task, scheduledTask);
  }
  return (newTask ? scheduledTask : null);
 }
在ThreadPoolTaskShcedule这个类中,进行线程池的初始化。在创建线程池时会创建 DelayedWorkQueue()阻塞队列,定时任务会被提交到线程池,由线程池进行相关的操作,线程池初始化大小为1。当有多个线程需要执行时,是需要进行任务等待的,前面的任务执行完了才可以进行后面任务的执行。
@Override
 protected ExecutorService initializeExecutor(
   ThreadFactory threadFactory, RejectedExecutionHandler rejectedExecutionHandler) {
  this.scheduledExecutor = createExecutor(this.poolSize, threadFactory, rejectedExecutionHandler);
  if (this.removeOnCancelPolicy) {
   if (this.scheduledExecutor instanceof ScheduledThreadPoolExecutor) {
    ((ScheduledThreadPoolExecutor) this.scheduledExecutor).setRemoveOnCancelPolicy(true);
   }
   else {
    logger.info("Could not apply remove-on-cancel policy - not a Java 7+ ScheduledThreadPoolExecutor");
   }
  }
  return this.scheduledExecutor;
 }
根本原因,jvm启动之后会记录系统时间,然后jvm根据CPU ticks自己来算时间,此时获取的是定时任务的基准时间。如果此时将系统时间进行了修改,当Spring将之前获取的基准时间与当下获取的系统时间进行比对时,就会造成Spring内部定时任务失效。因为此时系统时间发生变化了,不会触发定时任务。
public ScheduledFuture<?> schedule() {
  synchronized (this.triggerContextMonitor) {
   this.scheduledExecutionTime = this.trigger.nextExecutionTime(this.triggerContext);
   if (this.scheduledExecutionTime == null) {
    return null;
   }
   //获取时间差
   long initialDelay = this.scheduledExecutionTime.getTime() - System.currentTimeMillis();
   this.currentFuture = this.executor.schedule(this, initialDelay, TimeUnit.MILLISECONDS);
   return this;
  }
 }
2.解析流程图
3.使用新的方法
为了避免使用@Scheduled注解,在修改服务器时间导致定时任务不执行情况的发生。在项目中需要使用定时任务场景的情况下,使ScheduledThreadPoolExecutor进行替代,它任务的调度是基于相对时间的,原因是它在任务的内部 存储了该任务距离下次调度还需要的时间(使用的是基于 System.nanoTime实现的相对时间 ,不会因为系统时间改变而改变,如距离下次执行还有10秒,不会因为将系统时间调前6秒而变成4秒后执行)。
schedule定时任务修改表达式无效
真是鬼了。 就那么个cron表达式,难道还能错了。
对了无数遍,cron表达式没问题。 但就是无效。
扩展下思路,有没有用到zookeeper,zookeeper是会缓存配置信息的。
看了下,果然是缓存了。 清空后,重启项目有效了。
以上为个人经验,希望能给大家一个参考,也希望大家多多支持我们。
相关推荐
-

SpringBoot整合定时任务之实现Scheduled注解的过程(一个注解全解决)
目录 一.使用场景 二.准备工作 三.开始搭建配置配置启动项 四.结果展示 五.总结 一.使用场景 定时任务在开发中还是比较常见的,比如:定时发送邮件,定时发送信息,定时更新资源,定时更新数据等等... 二.准备工作 在Spring Boot程序中不需要引入其他Maven依赖 (因为spring-boot-starter-web传递依赖了spring-context模块) <dependency> <groupId>org.springframework.boot</grou
-
详解在Spring3中使用注解(@Scheduled)创建计划任务
Spring3中加强了注解的使用,其中计划任务也得到了增强,现在创建一个计划任务只需要两步就完成了: 创建一个Java类,添加一个无参无返回值的方法,在方法上用@Scheduled注解修饰一下: 在Spring配置文件中添加三个<task:**** />节点: 最后说明一下,第一步创建的Java类要成为spring可管理的Bean,可以直接写在XML里,也可以@Component一下 示例如下 计划任务类: /** * com.zywang.spring.task.SpringTaskDemo
-
spring-boot通过@Scheduled配置定时任务及定时任务@Scheduled注解的方法
串行的定时任务 @Component public class ScheduledTimer { private Logger logger = Logger.getLogger(this.getClass()); /** * 定时任务,1分钟执行1次,更新潜在客户超时客户共享状态 */ @Scheduled(cron="0 0/1 8-20 * * ?") public void executeUpdateCuTask() { Thread current = Thread.curr
-
我劝你谨慎使用Spring中的@Scheduled注解
目录 引言 1.@Scheduled失效原因 2.解析流程图 3.使用新的方法 schedule定时任务修改表达式无效 引言 在一些业务场景中需要执行定时操作来完成一些周期性的任务,比如每隔一周删除一周前的某些历史数据以及定时进行某项检测任务等等. 在日常开发中比较简单的实现方式就是使用Spring的@Scheduled(具体使用方法不再赘述)注解. 但是在修改服务器时间时会导致定时任务不执行情况的发生,解决的办法是当修改服务器时间后,将服务进行重启就可以避免此现象的发生. 本文将主要探讨服务器
-
快速理解spring中的各种注解
Spring中的注解大概可以分为两大类: 1)spring的bean容器相关的注解,或者说bean工厂相关的注解: 2)springmvc相关的注解. spring的bean容器相关的注解,先后有:@Required, @Autowired, @PostConstruct, @PreDestory,还有Spring3.0开始支持的JSR-330标准javax.inject.*中的注解(@Inject, @Named, @Qualifier, @Provider, @Scope, @Singlet
-
spring中的特殊注解@RequiredArgsConstructor详解
目录 1.注解注入: 2.构造器注入: 3.setter注入: Lombok在spring中的特殊注解@RequiredArgsConstructor 在了解lombok中的特殊注解之前:了解一下spring的常用注入方式戳这里 1.注解注入: Controller public class FooController { @Autowired //@Inject private FooService fooService; //简单的使用例子,下同 public List<Foo> list
-
SpringBoot中使用@Scheduled注解创建定时任务的实现
在项目日常开发过程中,经常需要定时任务来帮我们做一些工作,如清理日志.定时任务的实现方法主要有 Timer.Quartz 以及 elastic-job Timer 实现定时任务 只执行一次的定时任务 Timer timer = new Timer(); timer.schedule(new TimerTask() { @Override public void run() { System.out.println("2000毫米后执行一次."); } }, 2000); timer.s
-
SpringBoot中定时任务@Scheduled注解的使用解读
目录 概述 注解定义 参数说明 源码解析 使用详解 定时任务同步/异步执行 fixedRate/fixedDelay区别 项目开发中,经常会遇到定时任务的场景,Spring提供了@Scheduled注解,方便进行定时任务的开发 概述 要使用@Scheduled注解,首先需要在启动类添加@EnableScheduling,启用Spring的计划任务执行功能,这样可以在容器中的任何Spring管理的bean上检测@Scheduled注解,执行计划任务 注解定义 @Target({ElementTyp
-
关于spring中aop的注解实现方法实例详解
前言 在之前的一篇文章中我们讲到spring的xml实现,这里我们讲讲使用注解如何实现aop呢.前面已经讲过aop的简单理解了,这里就不在赘述了.话不多说,来一起看看详细的介绍: 注解方式实现aop我们主要分为如下几个步骤: 1.在切面类(为切点服务的类)前用@Aspect注释修饰,声明为一个切面类. 2.用@Pointcut注释声明一个切点,目的是为了告诉切面,谁是它的服务对象.(此注释修饰的方法的方法体为空,不需要写功能比如 public void say(){};就可以了,方法名可以被候命
-
spring中使用@Autowired注解无法注入的情况及解决
目录 spring @Autowired注解无法注入 问题简述 原因:(此处只说第二种) 解决方案 @Autowired注解注入失败,提示could not autowire spring @Autowired注解无法注入 问题简述 在使用spring框架的过程中,常会遇到这种两情况: 1.在扫描的包以外使用需要使用mapper 2.同目录下两个controller或者两个service,在使用@Autowired注解注入mapper或者service时,其中一个可以注入,另一个却为空. 原因:
-
在spring中使用自定义注解注册监听器的方法
接口回调 监听器本质上就是利用回调机制,在某个动作发生前或后,执行我们自己的一些代码.在Java语言中,可以使用接口来实现. 实现一个监听器案例 为了方便,直接在spring环境中定义:以工作(work)为例,定义工作开始时(或结束时)的监听器. 1. 定义回调的接口 package com.yawn.demo.listener; /** * @author Created by yawn on 2018-01-21 13:53 */ public interface WorkListener
-
详解Spring中的@PropertySource注解使用
@PropertySource注解是Spring用于加载配置文件,默认支持.properties与.xml两种配置文件.@PropertySource属性如下: name:默认为空,不指定Spring自动生成 value:配置文件 ignoreResourceNotFound:没有找到配置文件是否忽略,默认false,4.0版本加入 encoding:配置文件编码格式,默认UTF-8 4.3版本才加入 factory:配置文件解析工厂,默认:PropertySourceFactory.class
-
详解Spring中的JavaConfig注解
前言 大家都知道传统spring一般都是基于xml配置的,不过后来新增了许多JavaConfig的注解.特别是springboot,基本都是清一色的java config,不了解一下,还真是不适应.这里备注一下. @RestController spring4为了更方便的支持restfull应用的开发,新增了RestController的注解,比Controller注解多的功能就是给底下的RequestMapping方法默认都加上ResponseBody注解,省得自己再去每个去添加该注解. @C