ASP.NET Core Authentication认证实现方法
追本溯源,从使用开始
首先看一下我们通常是如何使用微软自带的认证,一般在Startup里面配置我们所需的依赖认证服务,这里通过JWT的认证方式讲解
public void ConfigureServices(IServiceCollection services)
{
  services.AddAuthentication(authOpt =>
  {
    authOpt.DefaultAuthenticateScheme = JwtBearerDefaults.AuthenticationScheme;
    authOpt.DefaultChallengeScheme = JwtBearerDefaults.AuthenticationScheme;
  })
  .AddJwtBearer(o =>
  {
    o.TokenValidationParameters = new TokenValidationParameters
    {
      //配置自己所要验证的参数

    };
  });
}
我们来看一下源码AddAuthentication主要做了什么
public static class AuthenticationServiceCollectionExtensions
 {
  public static AuthenticationBuilder AddAuthentication( this IServiceCollection services, Action<AuthenticationOptions> configureOptions)
  {
   if (services == null)
    throw new ArgumentNullException(nameof (services));
   if (configureOptions == null)
    throw new ArgumentNullException(nameof (configureOptions));
   AuthenticationBuilder authenticationBuilder = services.AddAuthentication();
   services.Configure<AuthenticationOptions>(configureOptions);
   return authenticationBuilder;
  }

  public static AuthenticationBuilder AddAuthentication( this IServiceCollection services)
  {
   if (services == null)
    throw new ArgumentNullException(nameof (services));
   services.AddAuthenticationCore();
   services.AddDataProtection();
   services.AddWebEncoders();
   services.TryAddSingleton<ISystemClock, SystemClock>();
   return new AuthenticationBuilder(services);
  }

  public static AuthenticationBuilder AddAuthentication(
   this IServiceCollection services,
   string defaultScheme)
  {
   return services.AddAuthentication((Action<AuthenticationOptions>) (o => o.DefaultScheme = defaultScheme));
  }

 .....
}
ConfigureServices方法基本都是服务的注册,基于微软的风格,这里的AddAuthenticationCore肯定是我们的认证服务注册方法,来看一下
public static class AuthenticationCoreServiceCollectionExtensions
 {
  /// <summary>
  /// Add core authentication services needed for <see cref="T:Microsoft.AspNetCore.Authentication.IAuthenticationService" />.
  /// </summary>
  public static IServiceCollection AddAuthenticationCore(
   this IServiceCollection services)
  {
   if (services == null)
    throw new ArgumentNullException(nameof (services));
   services.TryAddScoped<IAuthenticationService, AuthenticationService>();
   services.TryAddSingleton<IClaimsTransformation, NoopClaimsTransformation>();
   services.TryAddScoped<IAuthenticationHandlerProvider, AuthenticationHandlerProvider>();
   services.TryAddSingleton<IAuthenticationSchemeProvider, AuthenticationSchemeProvider>();
   return services;
  }

  /// <summary>
  /// Add core authentication services needed for <see cref="T:Microsoft.AspNetCore.Authentication.IAuthenticationService" />.
  /// </summary>
  public static IServiceCollection AddAuthenticationCore(
   this IServiceCollection services,
   Action<AuthenticationOptions> configureOptions)
  {
   if (services == null)
    throw new ArgumentNullException(nameof (services));
   if (configureOptions == null)
    throw new ArgumentNullException(nameof (configureOptions));
   services.AddAuthenticationCore();
   services.Configure<AuthenticationOptions>(configureOptions);
   return services;
  }
 }
我们看到这里主要注册了AuthenticationService, AuthenticationHandlerProvider, AuthenticationSchemeProvider这三个对象,如文章开头所说,追本溯源,从使用开始,我们先看一下这三个对象是如何在认证体系中使用的,且是如何发挥作用的。
从使用开始
看一下我们的认证管道构建
public void Configure(IApplicationBuilder app, IHostingEnvironment env, ILoggerFactory loggerFactory)
  {
    ...
    app.UseAuthentication();
    ...
  }

 public static class AuthAppBuilderExtensions
 {
  public static IApplicationBuilder UseAuthentication( this IApplicationBuilder app)
  {
   if (app == null)
    throw new ArgumentNullException(nameof (app));
   return app.UseMiddleware<AuthenticationMiddleware>();
  }
 }
这里使用了约定的注册方式UseMiddleware,并且指定使用中间件AuthenticationMiddleware
public class AuthenticationMiddleware
 {
  private readonly RequestDelegate _next;

  public AuthenticationMiddleware(RequestDelegate next, IAuthenticationSchemeProvider schemes)
  {
   if (next == null)
    throw new ArgumentNullException(nameof (next));
   if (schemes == null)
    throw new ArgumentNullException(nameof (schemes));
   this._next = next;
   this.Schemes = schemes;
  }

  public IAuthenticationSchemeProvider Schemes { get; set; }

  public async Task Invoke(HttpContext context)
  {
   context.Features.Set<IAuthenticationFeature>((IAuthenticationFeature) new AuthenticationFeature()
   {
    OriginalPath = context.Request.Path,
    OriginalPathBase = context.Request.PathBase
   });
   IAuthenticationHandlerProvider handlers = context.RequestServices.GetRequiredService<IAuthenticationHandlerProvider>();
   foreach (AuthenticationScheme authenticationScheme in await this.Schemes.GetRequestHandlerSchemesAsync())
   {
    IAuthenticationRequestHandler handlerAsync = await handlers.GetHandlerAsync(context, authenticationScheme.Name) as IAuthenticationRequestHandler;
    bool flag = handlerAsync != null;
    if (flag)
     flag = await handlerAsync.HandleRequestAsync();
    if (flag)
     return;
   }
   AuthenticationScheme authenticateSchemeAsync = await this.Schemes.GetDefaultAuthenticateSchemeAsync();
   if (authenticateSchemeAsync != null)
   {
    AuthenticateResult authenticateResult = await context.AuthenticateAsync(authenticateSchemeAsync.Name);  //实际的认证业务
    if (authenticateResult?.Principal != null)
     context.User = authenticateResult.Principal;
   }
   await this._next(context);
  }
 }
在继续往下之前,我们先看一下这个认证中间件的作用结果,当认证通过时,在HttpContext的User属性(ClaimPrincipal)赋予身份标识,所以在后续的请求管道中都是基于认证结果中的身份标识做鉴权,这个我们会在后面的实际操作中会提到。
言归正传,在这里引出了我们的两个对象AuthenticationHandlerProvider,AuthenticationSchemeProvider。
重要对象讲解
IAuthenticationSchemeProvider
从名字来看,IAuthenticationSchemeProvider的作用应该是提供Scheme的,这也是Provider在微软的风格里面起的作用(类似于工厂模式)。
这个Scheme是什么呢?很明显,在Framework时代,也是有基于不同Scheme验证的,比如Bearer,Cookie,在Aspnet Core中定义不同的Scheme代表着不同的认证处理方式,具体体现是在每个Scheme中包含对应的IAuthenticationHandler类型的Handler,由它来完成跟自身Scheme相关的认证处理。如果没有定义会怎么样?仔细看上面这块源码,只有当AuthenticationScheme不为空时才会做认证,否则一旦在Controller打上鉴权标签[Authorize],将会直接返回401,所以我们必须指定自己的Scheme。
那么我们在哪里指定我们的Scheme类似呢?我们先返回到ConfigureService的AddJwtBearer,使用过的朋友们肯定知道,这里获取的Scheme是我们在ConfigureService通过Addxxx scheme指定的Scheme类型。这里我们是使用JWT的
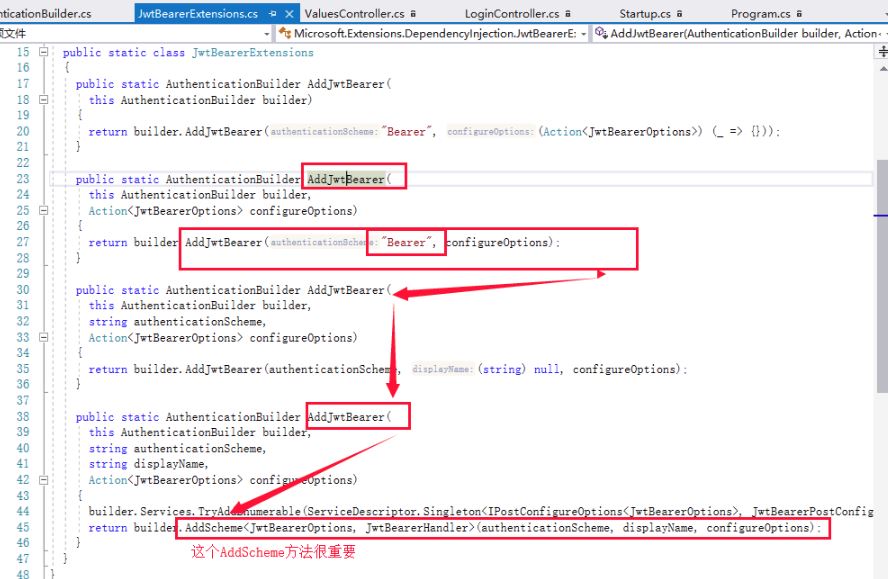
在这里指定了TOptions 为JwtBearerOptions,而THandler为JwtBearerHandler。
public virtual AuthenticationBuilder AddScheme<TOptions, THandler>(
   string authenticationScheme,
   string displayName,
   Action<TOptions> configureOptions)
   where TOptions : AuthenticationSchemeOptions, new()
   where THandler : AuthenticationHandler<TOptions>
  {
   return this.AddSchemeHelper<TOptions, THandler>(authenticationScheme, displayName, configureOptions);
  }

  private AuthenticationBuilder AddSchemeHelper<TOptions, THandler>(
   string authenticationScheme,
   string displayName,
   Action<TOptions> configureOptions)
   where TOptions : class, new()
   where THandler : class, IAuthenticationHandler
  {
   this.Services.Configure<AuthenticationOptions>((Action<AuthenticationOptions>) (o => o.AddScheme(authenticationScheme, (Action<AuthenticationSchemeBuilder>) (scheme =>
   {
    scheme.HandlerType = typeof (THandler);
    scheme.DisplayName = displayName;
   }))));
   if (configureOptions != null)
    this.Services.Configure<TOptions>(authenticationScheme, configureOptions);
   this.Services.AddTransient<THandler>();
   return this;
  }
注意这里TOptions 是需要继承AuthenticationSchemeOptions的,在这里是JwtBearerOptions,而THandler是AuthenticationHandler<TOptions>类型的Handler,在这里是JwtBearerHandler。

我们回到Scheme的分析继续往下,首先看一下AuthenticationScheme的定义
public class AuthenticationScheme
 {
  /// <summary>Constructor.</summary>
  public AuthenticationScheme(string name, string displayName, Type handlerType)
  {
   if (name == null)
    throw new ArgumentNullException(nameof (name));
   if (handlerType == (Type) null)
    throw new ArgumentNullException(nameof (handlerType));
   if (!typeof (IAuthenticationHandler).IsAssignableFrom(handlerType))
    throw new ArgumentException("handlerType must implement IAuthenticationHandler.");
   this.Name = name;
   this.HandlerType = handlerType;
   this.DisplayName = displayName;
  }

  /// <summary>The name of the authentication scheme.</summary>
  public string Name { get; }

  /// <summary>
  /// The display name for the scheme. Null is valid and used for non user facing schemes.
  /// </summary>
  public string DisplayName { get; }

  /// <summary>
  /// The <see cref="T:Microsoft.AspNetCore.Authentication.IAuthenticationHandler" /> type that handles this scheme.
  /// </summary>
  public Type HandlerType { get; }
 }
在这里可以看到,如果要使用Aspnet Core自身的认证体系,需先注册Scheme,并且该Scheme必须指定一个类型为IAuthenticationHandler的Handler,否则会抛出异常。(这个其实在AddxxxScheme的时候已经指定了AuthenticationHandler)
我们再看一下IAuthenticationSchemeProvider的GetRequestHandlerSchemesAsync方法做了什么
  public virtual Task<IEnumerable<AuthenticationScheme>> GetRequestHandlerSchemesAsync()
  {
   return Task.FromResult<IEnumerable<AuthenticationScheme>>((IEnumerable<AuthenticationScheme>) this._requestHandlers);
  }
这东西返回了_requestHandlers,这是什么?看代码
public class AuthenticationSchemeProvider : IAuthenticationSchemeProvider
 {
  private readonly object _lock = new object();
  private readonly AuthenticationOptions _options;
  private readonly IDictionary<string, AuthenticationScheme> _schemes;
  private readonly List<AuthenticationScheme> _requestHandlers;

  /// <summary>
  /// Creates an instance of <see cref="T:Microsoft.AspNetCore.Authentication.AuthenticationSchemeProvider" />
  /// using the specified <paramref name="options" />,
  /// </summary>
  public AuthenticationSchemeProvider(IOptions<AuthenticationOptions> options)
   : this(options, (IDictionary<string, AuthenticationScheme>) new Dictionary<string, AuthenticationScheme>((IEqualityComparer<string>) StringComparer.Ordinal))
  {
  }

  /// <summary>
  /// Creates an instance of <see cref="T:Microsoft.AspNetCore.Authentication.AuthenticationSchemeProvider" />
  /// using the specified <paramref name="options" /> and <paramref name="schemes" />.
  /// </summary>
  protected AuthenticationSchemeProvider(
   IOptions<AuthenticationOptions> options,
   IDictionary<string, AuthenticationScheme> schemes)
  {
   this._options = options.Value;
   IDictionary<string, AuthenticationScheme> dictionary = schemes;
   if (dictionary == null)
    throw new ArgumentNullException(nameof (schemes));
   this._schemes = dictionary;
   this._requestHandlers = new List<AuthenticationScheme>();
   foreach (AuthenticationSchemeBuilder scheme in this._options.Schemes)
    this.AddScheme(scheme.Build());
  }

  public virtual void AddScheme(AuthenticationScheme scheme)
  {
   if (this._schemes.ContainsKey(scheme.Name))
    throw new InvalidOperationException("Scheme already exists: " + scheme.Name);
   lock (this._lock)
   {
    if (this._schemes.ContainsKey(scheme.Name))
     throw new InvalidOperationException("Scheme already exists: " + scheme.Name);
    if (typeof (IAuthenticationRequestHandler).IsAssignableFrom(scheme.HandlerType))
     this._requestHandlers.Add(scheme);
    this._schemes[scheme.Name] = scheme;
   }
  }
.....
}
这东西就是把我们在认证注册服务中指定的scheme,通过解析出的AuthenticationSchemeProvider 的构造函数加载来的,进而返回一系列的List<AuthenticationScheme>,OK拿到这些scheme之后有什么用呢?这里引出了我们的第二个对象AuthenticationHandlerProvider,下面我们来了解一下。
IAuthenticationHandlerProvider
我们看到,AuthenticationMiddleware中用到了IAuthenticationHandlerProvider的GetHandlerAsync方法,那我们先看一下这个方法的作用
public class AuthenticationHandlerProvider : IAuthenticationHandlerProvider
 {
  private Dictionary<string, IAuthenticationHandler> _handlerMap = new Dictionary<string, IAuthenticationHandler>((IEqualityComparer<string>) StringComparer.Ordinal);

  /// <summary>Constructor.</summary>
  public AuthenticationHandlerProvider(IAuthenticationSchemeProvider schemes)
  {
   this.Schemes = schemes;
  }

  /// <summary>
  /// The <see cref="T:Microsoft.AspNetCore.Authentication.IAuthenticationHandlerProvider" />.
  /// </summary>
  public IAuthenticationSchemeProvider Schemes { get; }

  /// <summary>Returns the handler instance that will be used.</summary>
  public async Task<IAuthenticationHandler> GetHandlerAsync( HttpContext context, string authenticationScheme)
  {
   if (this._handlerMap.ContainsKey(authenticationScheme))
    return this._handlerMap[authenticationScheme];
   AuthenticationScheme schemeAsync = await this.Schemes.GetSchemeAsync(authenticationScheme);
   if (schemeAsync == null)
    return (IAuthenticationHandler) null;
   IAuthenticationHandler handler = (context.RequestServices.GetService(schemeAsync.HandlerType) ?? ActivatorUtilities.CreateInstance(context.RequestServices, schemeAsync.HandlerType)) as IAuthenticationHandler;
   if (handler != null)
   {
    await handler.InitializeAsync(schemeAsync, context);
    this._handlerMap[authenticationScheme] = handler;
   }
   return handler;
  }
 }
在创建Handler的时候,是先从AuthenticationScheme中获取,如果不存在则通过ActivatorUtilities创建。 获取到Handle后,将会放在_handlerMap字典里面,当下次获取Handler的时候,将直接从缓存中获取。
IAuthenticationService
这个对象是在AuthenticationMiddleware中最后才用到的,而且是基于HttpContext的扩展被调用
public static class AuthenticationHttpContextExtensions
{
  public static Task<AuthenticateResult> AuthenticateAsync(this HttpContext context, string scheme) =>
    context.RequestServices.GetRequiredService<IAuthenticationService>().AuthenticateAsync(context, scheme);

 ....
}
这里主要调用了IAuthenticationService的AuthenticateAsync方法,看一下这个方法做了什么
public class AuthenticationService : IAuthenticationService
{
  public IAuthenticationSchemeProvider Schemes { get; }
  public IAuthenticationHandlerProvider Handlers { get; }
  public IClaimsTransformation Transform { get; }

  public virtual async Task<AuthenticateResult> AuthenticateAsync(HttpContext context, string scheme)
  {
    if (scheme == null)
    {
      var scheme = (await this.Schemes.GetDefaultAuthenticateSchemeAsync())?.Name;
      if (scheme == null)
        throw new InvalidOperationException($"No authenticationScheme was specified, and there was no DefaultAuthenticateScheme found.");
    }

    var handler = await Handlers.GetHandlerAsync(context, scheme);
    if(handler == null)
      throw await this.CreateMissingHandlerException(scheme);
    AuthenticateResult result = await handler.AuthenticateAsync();
    if (result != null && result.Succeeded)
      return AuthenticateResult.Success(new AuthenticationTicket(await Transform.TransformAsync(result.Principal), result.Properties, result.Ticket.AuthenticationScheme));

    return result;
  }
}
这里其实就是我们在前面讲的根据Scheme获取对应的AuthenticationHandler,然后调用AuthenticateAsync()方法,这个方法调用了核心方法HandleAuthenticateOnceAsync,然后再调用HandleAuthenticateAsync()这个核心的认证方法。
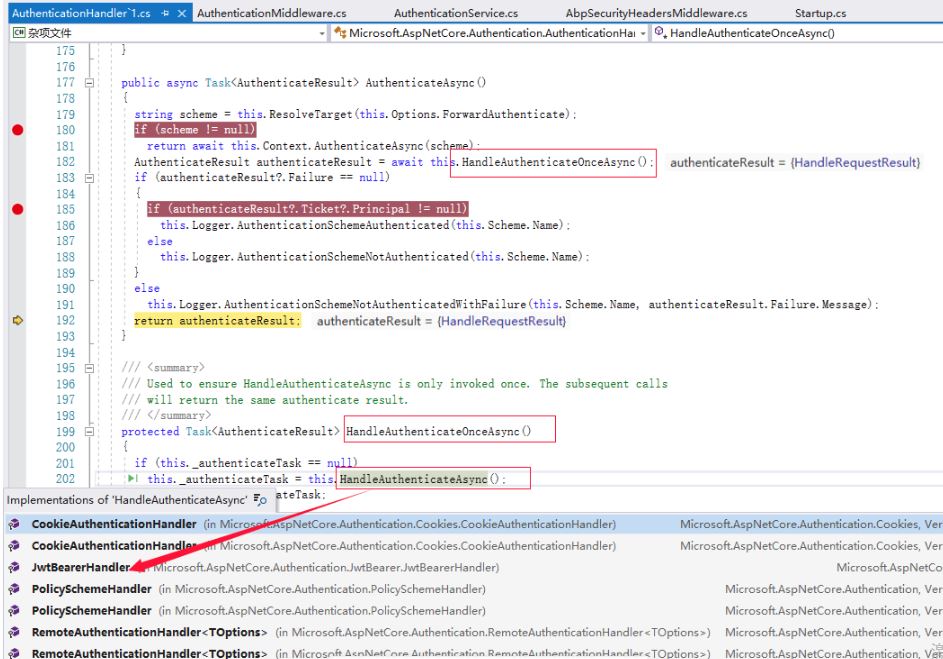
从上图看到这个HandleAuthenticateAsync是个抽象方法,我们的子类都需要实现这个方法的动作,基于本文的例子,我们看一下JwtBearerHandler的一个实际认证。
public class JwtBearerHandler : AuthenticationHandler<JwtBearerOptions>
{
  protected override async Task<AuthenticateResult> HandleAuthenticateAsync()
  {
   JwtBearerHandler jwtBearerHandler = this;
   string token = (string) null;
   object obj;
   AuthenticationFailedContext authenticationFailedContext;
   int num;
   try
   {
    MessageReceivedContext messageReceivedContext = new MessageReceivedContext(jwtBearerHandler.Context, jwtBearerHandler.Scheme, jwtBearerHandler.Options);
    await jwtBearerHandler.Events.MessageReceived(messageReceivedContext);
    if (messageReceivedContext.Result != null)
     return messageReceivedContext.Result;
    token = messageReceivedContext.Token;
    if (string.IsNullOrEmpty(token))
    {
     string header = (string) jwtBearerHandler.Request.Headers["Authorization"];
     if (string.IsNullOrEmpty(header))
      return AuthenticateResult.NoResult();
     if (header.StartsWith("Bearer ", StringComparison.OrdinalIgnoreCase))
      token = header.Substring("Bearer ".Length).Trim();
     if (string.IsNullOrEmpty(token))
      return AuthenticateResult.NoResult();
    }
    if (jwtBearerHandler._configuration == null && jwtBearerHandler.Options.ConfigurationManager != null)
    {
     OpenIdConnectConfiguration configurationAsync = await jwtBearerHandler.Options.ConfigurationManager.GetConfigurationAsync(jwtBearerHandler.Context.RequestAborted);
     jwtBearerHandler._configuration = configurationAsync;
    }
    TokenValidationParameters validationParameters1 = jwtBearerHandler.Options.TokenValidationParameters.Clone();
    if (jwtBearerHandler._configuration != null)
    {
     string[] strArray = new string[1]
     {
      jwtBearerHandler._configuration.Issuer
     };
     TokenValidationParameters validationParameters2 = validationParameters1;
     IEnumerable<string> validIssuers = validationParameters1.get_ValidIssuers();
     object obj1 = (validIssuers != null ? (object) validIssuers.Concat<string>((IEnumerable<string>) strArray) : (object) null) ?? (object) strArray;
     validationParameters2.set_ValidIssuers((IEnumerable<string>) obj1);
     TokenValidationParameters validationParameters3 = validationParameters1;
     IEnumerable<SecurityKey> issuerSigningKeys = validationParameters1.get_IssuerSigningKeys();
     IEnumerable<SecurityKey> securityKeys = (issuerSigningKeys != null ? issuerSigningKeys.Concat<SecurityKey>((IEnumerable<SecurityKey>) jwtBearerHandler._configuration.get_SigningKeys()) : (IEnumerable<SecurityKey>) null) ?? (IEnumerable<SecurityKey>) jwtBearerHandler._configuration.get_SigningKeys();
     validationParameters3.set_IssuerSigningKeys(securityKeys);
    }
    List<Exception> exceptionList = (List<Exception>) null;
    foreach (ISecurityTokenValidator securityTokenValidator in (IEnumerable<ISecurityTokenValidator>) jwtBearerHandler.Options.SecurityTokenValidators)
    {
     if (securityTokenValidator.CanReadToken(token))
     {
      SecurityToken securityToken;
      ClaimsPrincipal claimsPrincipal;
      try
      {
       claimsPrincipal = securityTokenValidator.ValidateToken(token, validationParameters1, ref securityToken);
      }
      catch (Exception ex)
      {
       jwtBearerHandler.Logger.TokenValidationFailed(ex);
       if (jwtBearerHandler.Options.RefreshOnIssuerKeyNotFound && jwtBearerHandler.Options.ConfigurationManager != null && ex is SecurityTokenSignatureKeyNotFoundException)
        jwtBearerHandler.Options.ConfigurationManager.RequestRefresh();
       if (exceptionList == null)
        exceptionList = new List<Exception>(1);
       exceptionList.Add(ex);
       continue;
      }
      jwtBearerHandler.Logger.TokenValidationSucceeded();
      TokenValidatedContext validatedContext = new TokenValidatedContext(jwtBearerHandler.Context, jwtBearerHandler.Scheme, jwtBearerHandler.Options);
      validatedContext.Principal = claimsPrincipal;
      validatedContext.SecurityToken = securityToken;
      TokenValidatedContext tokenValidatedContext = validatedContext;
      await jwtBearerHandler.Events.TokenValidated(tokenValidatedContext);
      if (tokenValidatedContext.Result != null)
       return tokenValidatedContext.Result;
      if (jwtBearerHandler.Options.SaveToken)
       tokenValidatedContext.Properties.StoreTokens((IEnumerable<AuthenticationToken>) new AuthenticationToken[1]
       {
        new AuthenticationToken()
        {
         Name = "access_token",
         Value = token
        }
       });
      tokenValidatedContext.Success();
      return tokenValidatedContext.Result;
     }
    }
    if (exceptionList == null)
     return AuthenticateResult.Fail("No SecurityTokenValidator available for token: " + token ?? "[null]");
    authenticationFailedContext = new AuthenticationFailedContext(jwtBearerHandler.Context, jwtBearerHandler.Scheme, jwtBearerHandler.Options)
    {
     Exception = exceptionList.Count == 1 ? exceptionList[0] : (Exception) new AggregateException((IEnumerable<Exception>) exceptionList)
    };
    await jwtBearerHandler.Events.AuthenticationFailed(authenticationFailedContext);
    return authenticationFailedContext.Result == null ? AuthenticateResult.Fail(authenticationFailedContext.Exception) : authenticationFailedContext.Result;
   }
   catch (Exception ex)
   {
    obj = (object) ex;
    num = 1;
   }
   if (num == 1)
   {
    Exception ex = (Exception) obj;
    jwtBearerHandler.Logger.ErrorProcessingMessage(ex);
    authenticationFailedContext = new AuthenticationFailedContext(jwtBearerHandler.Context, jwtBearerHandler.Scheme, jwtBearerHandler.Options)
    {
     Exception = ex
    };
    await jwtBearerHandler.Events.AuthenticationFailed(authenticationFailedContext);
    if (authenticationFailedContext.Result != null)
     return authenticationFailedContext.Result;
    Exception source = obj as Exception;
    if (source == null)
     throw obj;
    ExceptionDispatchInfo.Capture(source).Throw();
    authenticationFailedContext = (AuthenticationFailedContext) null;
   }
   obj = (object) null;
   token = (string) null;
   AuthenticateResult authenticateResult;
   return authenticateResult;
  }
}
这个方法有点长,主要是从Request.Headers里面获取Authorization的Bearer出来解析,再在AddJwtBearer中传入的委托参数JwtBearerOptions的TokenValidationParameters属性作为依据进行对比来进行认证是否通过与否。
总结
本文对 ASP.NET Core 的认证流程做了一个源码分析流程介绍,由于是源码分析篇,所以可能会比较枯燥和苦涩难懂。在后面的真正使用过程中,然后再结合本篇的一个总结流程,相信大家会逐渐开朗。
- 在Startup类中的ConfigureServices方法通过添加AddAuthentication注册我们最主要的三个对象AuthenticationService, AuthenticationHandlerProvider, AuthenticationSchemeProvider
- 通过AddAuthentication返回的AuthenticationBuilder 通过AddJwtBearer(或者AddCookie)来指定Scheme类型和需要验证的参数
- 在Startup类中的Configure方法通过添加UseAuthentication注册认证中间件
- 在认证过程中,通过AuthenticationSchemeProvider获取正确的Scheme,在AuthenticationService中通过Scheme和AuthenticationHandlerProvider获取正确的AuthenticationHandler,最后通过对应的AuthenticationHandler的AuthenticateAsync方法进行认证流程
到此这篇关于ASP.NET Core Authentication认证实现方法的文章就介绍到这了,更多相关ASP.NET Core Authentication认证内容请搜索我们以前的文章或继续浏览下面的相关文章希望大家以后多多支持我们!
相关推荐
-

浅谈如何在ASP.NET Core中实现一个基础的身份认证
ASP.NET终于可以跨平台了,但是不是我们常用的ASP.NET, 而是叫一个ASP.NET Core的新平台,他可以跨Windows, Linux, OS X等平台来部署你的web应用程序,你可以理解为,这个框架就是ASP.NET的下一个版本,相对于传统ASP.NET程序,它还是有一些不同的地方的,比如很多类库在这两个平台之间是不通用的. 今天首先我们在ASP.NET Core中来实现一个基础的身份认证,既登陆功能. 前期准备: 1.推荐使用 VS 2015 Update3 作为你的IDE,下
-
详解ASP.NET Core Token认证
令牌认证(Token Authentication)已经成为单页应用(SPA)和移动应用事实上的标准.即使是传统的B/S应用也能利用其优点.优点很明白:极少的服务端数据管理.可扩展性.可以使用单独的认证服务器和应用服务器分离. 如果你对令牌(token)不是太了解,可以看这篇文章( overview of token authentication and JWTs) 令牌认证在asp.net core中集成.其中包括保护Bearer Jwt的路由功能,但是移除了生成token和验证token的部
-
ASP.Net Core3.0中使用JWT认证的实现
JWT认证简单介绍 关于Jwt的介绍网上很多,此处不在赘述,我们主要看看jwt的结构. JWT主要由三部分组成,如下: HEADER.PAYLOAD.SIGNATURE HEADER 包含token的元数据,主要是加密算法,和签名的类型,如下面的信息,说明了 加密的对象类型是JWT,加密算法是HMAC SHA-256 {"alg":"HS256","typ":"JWT"} 然后需要通过BASE64编码后存入token中 eyJ
-
ASP.NET学习CORE中使用Cookie身份认证方法
大家在使用ASP.NET的时候一定都用过FormsAuthentication做登录用户的身份认证,FormsAuthentication的核心就是Cookie,ASP.NET会将用户名存储在Cookie中. 现在到了ASP.NET CORE的时代,但是ASP.NET CORE中没有FormsAuthentication这个东西,那么怎么做身份认证呢?答案是ASP.NET CORE已经为我们内置了Cookie身份认证的功能,而且使用起来非常方便,注意本文是基于ASP.NET CORE 2.0版本
-
Asp.net Core中实现自定义身份认证的示例代码
Asp.Net Core中虽然集成了许多常用的身份认证,但很多时候,我们还是需要实现自己的身份认证接口,本文这里就简单的介绍下如何实现自定义身份认证接口. 首先写一个简单的接口. [Authorize] [HttpGet] public object Foo() { return DateTime.Now.ToString(); } 由于有Authorize标记,访问函数体前会判断用户是否通过认证,由于这里没有通过认证,会的得到一个500错误. 自定义认证处理类: 实现一个IAuthentica
-
在ASP.NET Core中实现一个Token base的身份认证实例
以前在web端的身份认证都是基于Cookie | Session的身份认证, 在没有更多的终端出现之前,这样做也没有什么问题,但在Web API时代,你所需要面对的就不止是浏览器了,还有各种客户端,这样就有了一个问题,这些客户端是不知道cookie是什么鬼的. (cookie其实是浏览器搞出来的小猫腻,用来保持会话的,但HTTP本身是无状态的, 各种客户端能提供的无非也就是HTTP操作的API) 而基于Token的身份认证就是应对这种变化而生的,它更开放,安全性也更高. 基于Token的身份认证
-
浅谈ASP.NET Core 中jwt授权认证的流程原理
1,快速实现授权验证 什么是 JWT ?为什么要用 JWT ?JWT 的组成? 这些百度可以直接找到,这里不再赘述. 实际上,只需要知道 JWT 认证模式是使用一段 Token 作为认证依据的手段. 我们看一下 Postman 设置 Token 的位置. 那么,如何使用 C# 的 HttpClient 访问一个 JWT 认证的 WebAPI 呢? 下面来创建一个 ASP.NET Core 项目,尝试添加 JWT 验证功能. 1.1 添加 JWT 服务配置 在 Startup.cs 的 Confi
-
ASP.NET Core Authentication认证实现方法
追本溯源,从使用开始 首先看一下我们通常是如何使用微软自带的认证,一般在Startup里面配置我们所需的依赖认证服务,这里通过JWT的认证方式讲解 public void ConfigureServices(IServiceCollection services) { services.AddAuthentication(authOpt => { authOpt.DefaultAuthenticateScheme = JwtBearerDefaults.AuthenticationScheme;
-
深入解读ASP.NET Core身份认证过程实现
长话短说:上文我们讲了 ASP.NET Core 基于声明的访问控制到底是什么鬼? 今天我们乘胜追击:聊一聊ASP.NET Core 中的身份验证. 身份验证是确定用户身份的过程. 授权是确定用户是否有权访问资源的过程. 1. 万变不离其宗 显而易见,一个常规的身份认证用例包括两部分: ① 对用户进行身份验证 ② 在未经身份验证的用户试图访问受限资源时作出反应 已注册的身份验证处理程序及其配置选项被称为"方案",方案可用作一种机制,供用户参考相关处理程序的身份验证.挑战和禁止行为. 我
-
在IIS上部署ASP.NET Core Web API的方法步骤
对于本文,我想与您分享有关如何在IIS上部署ASP.NET Core Web API的指南.我将指导您安装Visual Studio 2019,.NET Core Runtime 3.0.我还确保我逐步引导您在服务器(Web IIS)中启用它,使用no受管代码选项创建新的应用程序池,创建ASP.NET Core Web API项目以及发布ASP.NET Core Web API. 了解并遵循正确的步骤来准备开发和部署环境后,在IIS上部署ASP.NET Core Web API就是一件容易的事.
-
ASP.NET Core基础之Main方法讲解
为什么ASP.NET Core采用Main方法? 需要记住的最重要的一点是,ASP.NET Core Web 应用程序最初作为控制台应用程序启动,Main() 方法是应用程序的入口点.因此,当我们执行ASP.NET Core Web应用程序时,首先它寻找 Main() 方法,这是执行开始的方法.然后,Main()方法将ASP.NET配置并启动它.此时,应用程序将成为ASP.NET Core Web应用程序. 如果进一步查看 Main() 方法的正文,则会发现它通过将命令行参数 args 作为参数
-
ASP.NET Core托管模型CreateDefaultBuilder()方法
让我们讨论一下 CreateDefaultBuilder() 方法究竟对配置和设置 Web 服务器的作用.从托管的角度来看,一个ASP.NET Web 应用程序可以通过两种方式托管,即进程托管(InProcess)或进程外托管(OutOfProcess). 注:当我们使用任何模板创建新 ASP.NET Core Web 应用程序时,默认情况下,使用InProcess 托管创建项目文件,该托管用于在 IIS 或 IIS Express 方案中托管应用程序. 如何验证是否在进程内? 为了验证上面的观
-
基于 .NET 6 的ASP.NET Core启动地址配置方法及优先级顺序
目录 前言: 一.设置方法 1.applicationUrl属性 2.环境变量 3.命令行参数 4.UseUrls方法 .NET5版本 .NET6版本 5.UseKestrel方法 6.WebApplication.Urls.Add方法 7.appsettings.json文件 二.优先级 三.结论 前言: 上次,我们讨论了如何通过配置或代码方式修改启动地址:< ASP.NET Core启动地址配置方法及优先级顺序>.不过是基于 .NET 5 版本的. 由于
-
ASP.NET Core启动地址配置方法及优先级顺序
目录 一.设置方法 1.applicationUrl属性 2.环境变量 3.命令行参数 4.UseUrls方法 5.UseKestrel方法 二.优先级 结论: 默认情况下,ASP.NET Core使用下列2个启动地址: http://localhost:5000https://localhost:5001 同时,我们也可以通过配置或代码方式修改启动地址. 那么,这几种修改方式都是什么?谁最后起作用呢? 一.设置方法 1.applicationUrl属性 launchSettings.json文
-
基于 .NET 6 的ASP.NET Core启动地址配置方法及优先级顺序
目录 前言: 一.设置方法 1. applicationUrl 属性 2.环境变量 3.命令行参数 4. UseUrls 方法 .NET 5 版本 .NET 6 版本 5. UseKestrel 方法 6. WebApplication.Urls.Add 方法 7. appsettings.json 文件 二.优先级 三.结论 前言: 上次,我们讨论了如何通过配置或代码方式修改启动地址:<ASP.NET Core启动地址配置方法及优先级顺序>.不过是基于 .
-
CSRF在ASP.NET Core中的处理方法详解
前言 前几天,有个朋友问我关于AntiForgeryToken问题,由于对这一块的理解也并不深入,所以就去研究了一番,梳理了一下. 在梳理之前,还需要简单了解一下背景知识. AntiForgeryToken 可以说是处理/预防CSRF的一种处理方案. 那么什么是CSRF呢? CSRF(Cross-site request forgery)是跨站请求伪造,也被称为One Click Attack或者Session Riding,通常缩写为CSRF或者XSRF,是一种对网站的恶意利用. 简单理解的话