angular内容投影详解
目录
- 单内容投影
- 多内容投影
- 单个条件的内容投影
- app-persons - html
- app-persons - ts
- 使用
- 效果图
- 多个条件内容投影
- appChildRef 调整
- app-persons - html
- app-persons - ts
- 使用
- 效果图
- 总结
单内容投影
利用ng-content来实现
<!-- 组件 - app-content-single -->
<div>
  <h2>标题</h2>
  <!-- 投影内容显示位置 -->
  <ng-content></ng-content>
</div>
<!-- 使用 -->
<app-content-single>
  <div>this is content</div>
</app-content-single>
多内容投影
利用ng-content来实现
<!-- 组件 - app-content-more -->
<div>
  <h3>Herder Title</h3>
  <ng-content select=".header"></ng-content>
  <h3>Body Title</h3>
  <ng-content select="[body]"></ng-content>
  <h3>Default Title</h3>
  <ng-content></ng-content>
  <h3>Footer Title</h3>
  <ng-content select="footer"></ng-content>
</div>
<!-- 使用 -->
<app-content-more>
  <div>this is default01</div>
  <div class="header">this is header</div>
  <div>this is default02</div>
  <div body>this is body</div>
  <div>this is default03</div>
  <footer>this is footer</footer>
  <div>this is default04</div>
</app-content-more>
有条件的内容投影-ng-template, ng-container, directive 等来配合实现
单个条件的内容投影
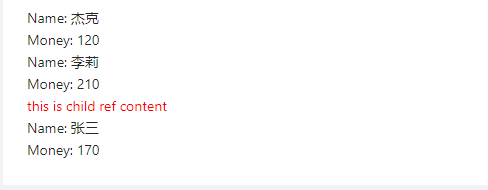
eg: 假设现在有一个人员列表,当某个人的money大于200的时候,额外添加组件中模板定义的内容
定义一个 appChildRef 指令来配合 ng-template 获取模板
import { Directive, TemplateRef } from '@angular/core';
@Directive({
  selector: '[appChildRef]'
})
export class ChildRefDirective {
  constructor(public templateRef: TemplateRef<any>) { }
}
app-persons - html
<div class="list-item" *ngFor="let person of persons;">
  <div>Name: {{ person.name }}</div>
  <div>Money: {{ person.money }}</div>
  <div *ngIf="person.money > 200">
    <ng-container *ngIf="childRef" [ngTemplateOutlet]="childRef.templateRef"></ng-container>
  </div>
</div>
app-persons - ts
import { Component, ContentChild, OnInit } from '@angular/core';
import { ChildRefDirective } from '../../../../directives/child-ref.directive';
@Component({
  selector: 'app-persons',
  templateUrl: './persons.component.html',
  styleUrls: ['./persons.component.scss']
})
export class PersonsComponent implements OnInit {
  persons: { name: string; money: number; }[] = [
    { name: '杰克', money: 120 },
    { name: '李莉', money: 210 },
    { name: '张三', money: 170 },
  ];
  @ContentChild(ChildRefDirective, { static: true }) childRef!: ChildRefDirective;
  constructor() { }
  ngOnInit(): void { }
}
使用
<app-persons>
  <ng-template appChildRef>
    <div style="font-size: 14px; color: red;">this is child ref content</div>
  </ng-template>
</app-persons>
效果图
多个条件内容投影
eg: 现在希望通过 persons 数据中的字段进行绑定内嵌的模板来显示
appChildRef 调整
import { Directive, Input, TemplateRef } from '@angular/core';
@Directive({
  selector: '[appChildRef]'
})
export class ChildRefDirective {
  // 接受定义模板名称-通过这个名称和 persons 中的render字段对应进行显示对应的模板内容
  @Input() appChildRef!: string;
  constructor(public templateRef: TemplateRef<any>) { }
}
app-persons - html
<div class="list-item" *ngFor="let person of persons;let i=index;">
  <div>Name: {{ person.name }}</div>
  <div>Money: {{ person.money }}</div>
  <!-- <div *ngIf="person.money > 200">
    <ng-container *ngIf="childRef" [ngTemplateOutlet]="childRef.templateRef"></ng-container>
  </div> -->
  <div *ngIf="person.render && tempRefs[person.render]">
    <!-- 配合 ngTemplateOutlet 指令给template传递当前person的数据 -->
    <ng-container *ngTemplateOutlet="tempRefs[person.render].templateRef; context: { $implicit: person, i: i }"></ng-container>
  </div>
</div>
app-persons - ts
import { Component, ContentChild, ContentChildren, OnInit, QueryList } from '@angular/core';
import { ChildRefDirective } from '../../../../directives/child-ref.directive';
@Component({
  selector: 'app-form-unit',
  templateUrl: './form-unit.component.html',
  styleUrls: ['./form-unit.component.scss']
})
export class FormUnitComponent implements OnInit {
  persons: { name: string; money: number; render?: string; }[] = [
    { name: '杰克', money: 120, render: 'temp1' },
    { name: '李莉', money: 210, render: 'temp2' },
    { name: '张三', money: 170, render: 'temp3' },
  ];
  // @ContentChild(ChildRefDirective, { static: true }) childRef!: ChildRefDirective;
  @ContentChildren(ChildRefDirective) childrenRef!: QueryList<ChildRefDirective>;
  get tempRefs() {
    const aObj: any = {};
    this.childrenRef.forEach(template => {
      const key: string = template.appChildRef;
      aObj[key] = template;
    })
    return aObj;
  }
  constructor() { }
  ngOnInit(): void { }
}
使用
<app-persons>
  <ng-template appChildRef="temp1" let-person let-index="i">
    <div style="font-size: 14px; color: red;">{{index}}-{{person.name}}: this is temp1</div>
  </ng-template>
  <ng-template appChildRef="temp2" let-person let-index="i">
    <div style="font-size: 14px; color: green;">{{index}}-{{person.name}}: this is temp2</div>
  </ng-template>
  <ng-template appChildRef="temp3" let-person let-index="i">
    <div style="font-size: 14px; color: orange;">{{index}}-{{person.name}}: this is temp3</div>
  </ng-template>
</app-persons>
效果图

总结
本篇文章就到这里了,希望能够给你带来帮助,也希望您能够多多关注我们的更多内容!
相关推荐
-

详解Angular之路由基础
目录 一.路由相关对象 二.路由对象的位置 三.路由配置 四.代码中通过Router对象导航 五.配置不存在的路径 六.重定向路由 七.在路由时候传递数据 一.路由相关对象 Router和RouterLink作用一样,都是导航.Router是在Controller中用的,RouterLink是在模版中用到. 二.路由对象的位置 1.Routes对象 配置在模块中.Routes由一组配置信息组成,每个配置信息至少包含两个属性,Path和Component. 2.RouterOutlet 在模版中
-
详解Angular组件之投影
概述 运行时动态改变组件模版的内容.没路由那么复杂,只是一段html,没有业务逻辑. ngContent指令将父组件模版上的任意片段投影到子组件上. 一.简单例子 1.子组件中使用<ng-content>指令来标记投影点 <div class="wrapper"> <h2>我是子组件</h2> <div>这个div定义在子组件中</div> <ng-content></ng-content>
-
详解Angular组件生命周期(一)
概述 组件声明周期以及angular的变化发现机制 红色方法只执行一次. 变更检测执行的绿色方法和和组件初始化阶段执行的绿色方法是一个方法. 总共9个方法. 每个钩子都是@angular/core库里定义的接口. import { Component, OnInit } from '@angular/core'; @Component({ selector: 'app-life', templateUrl: './life.component.html', styleUrls: ['./life
-
详解Angular路由之子路由
目录 一.子路由语法 二.实例 1.新建2个组件修改其内容 2.修改路由配置 3.修改product.component.ts的模版 一.子路由语法 二.实例 在商品详情页面,除了显示商品id信息,还显示了商品描述,和销售员的信息. 通过子路由实现商品描述组件和销售员信息组件展示在商品详情组件内部. 1.新建2个组件修改其内容 ng g component productDesc ng g component sellerInfo 重点是修改销售员信息组件,显示销售员ID. import { C
-
详解Angular组件之生命周期(二)
一.view钩子 view钩子有2个,ngAfterViewInit和ngAfterViewChecked钩子. 1.实现ngAfterViewInit和ngAfterViewChecked钩子时注意事项 以父组件调用子组件方法中例子为基础,在父组件中实现ngAfterViewInit和ngAfterViewChecked钩子. 这两个钩子是在组件的模版所有内容组装完成后,组件模版已经呈现给用户看了,之后这两个钩子方法会被调用. @ViewChild('child1') child1:Child
-
详解Angular组件之中间人模式
一.中间人模式 该组件树中除了组件1以外,每个组件都有一个父组件可以扮演中间人的角色.顶级的中间人是组件1,它可以使组件2,组件3,组件6之间互相通讯.依次类推,组件2是组件4和组件5的中间人.组件3是组件7和组件8的中间人. 中间人负责从一个组件接收数据并将其传递给另一个组件. 二.例子 股票报价组件为例,假设交易员在监看着报价组件的价格,当股票价格达到某一个值的时候,交易员会点一个购买按钮,来购买股票.问题:报价组件并不知道应该如何下单来买股票,它只是用来监控股票价格的.所以报价组件在这时应
-
详解Angular项目中共享模块的实现
目录 一.共享CommonModule 二.共享MaterialModule 三.共享ConfirmDialog 一.共享CommonModule 创建share Modele:ng g m share import进来所有需要共享的模块都export出去, 暂时只有CommonModule,以后会有一些需要共享的组件. import { NgModule } from '@angular/core'; import { CommonModule } from '@angular/common'
-
angular内容投影详解
目录 单内容投影 多内容投影 单个条件的内容投影 app-persons - html app-persons - ts 使用 效果图 多个条件内容投影 appChildRef 调整 app-persons - html app-persons - ts 使用 效果图 总结 单内容投影 利用ng-content来实现 <!-- 组件 - app-content-single --> <div> <h2>标题</h2> <!-- 投影内容显示位置 --&
-
Angular17之Angular自定义指令详解
1 什么是HTML HTML文档就是一个纯文本文件,该文件包含了HTML元素.CSS样式以及JavaScript代码:HTML元素是由标签呈现,浏览器会为每个标签创建带有属性的DOM对象,浏览器通过渲染这些DOM节点来呈现内容,用户在浏览器中看到的内容就是浏览器渲染DOM对象后的结果. 2 指令的分类 组件.属性指令.结构性指令 3 指定义指令常用到的一些常量 3.1 Directive 用于装饰控制器类来指明该控制器类是一个自定义指令控制器类 3.2 ElementRef 作为DOM对象的引用
-
monaco editor在Angular的使用详解
目录 正文 安装依赖 使用 正文 本篇文章主要记录下最近的一次业务中用到的 monaco-editor 在 angular 中的使用 安装依赖 在 angular12 及之前你可以选择 monaco-editor ngx-monaco-editor 这是没有问题的 但是如果你使用了更高版本的 angular 在使用 npm 安装 ngx-monaco-editor 时 会报错 因为原作者似乎已经停止了对这个库的维护 最终的支持停留在了 angular12 版本 当然 你选择可以选择正如提示那样
-
Angular排序实例详解
说点小案例angular的排序 <!DOCTYPE html> <html ng-app="mk"> <head> <meta charset="UTF-8"> <title></title> <style type="text/css"> *{ margin: 0px; padding: 0px; } nav{ text-align: center; } nav
-
使用Angular Cli如何创建Angular私有库详解
前言 在实际开发中,会发现我们好多工作都是重复的,在代码层面,发现好多代码是可以被重用的.这样我们就可以建一个库,类似于java的库,来提高工作效率. 下面话不多说了,来一起看看详细的介绍吧 创建Angular项目 打开命令行终端, cd 到用于创建应用的目录下,执行创建Angular项目命令: ng new arsprojects -S 此命令将会创建一个新的Angular项目,文件夹名为 arsprojects . -S 参数表示不创建测试文件.我们创建的ng库都将依托于 arsprojec
-
angular双向绑定详解
目录 双向绑定原理 ngModel 效果图 自定义双向绑定属性 组件-html 组件-ts 外部使用 效果图 总结 双向绑定原理 双向绑定将属性绑定与事件绑定结合在一起. Angular 的双向绑定语法是方括号和圆括号的组合 [()]. [] 进行属性绑定,() 进行事件绑定. 名称规则为 [输入名] + Change. 属性绑定(@Input-输入) - 设置特定的元素属性. 事件绑定(@Output-输出) - 侦听元素更改事件. 所以表单双向绑定中有 ngModel 和 ngModelCh
-
vue如何使用 Slot 分发内容实例详解
vue我自己还在摸索学习中,今天学习了使用 Slot 分发内容,给自己留个小笔记 使用slot分发内容我们要注意2点 <app> 组件不知道它会收到什么内容.这是由使用 <app> 的父组件决定的. <app> 组件很可能有它自己的模板. 为了让组件可以组合,我们需要一种方式来混合父组件的内容与子组件自己的模板. [案例] <!DOCTYPE html> <html lang="en"> <head> <me
-
python 根据正则表达式提取指定的内容实例详解
python 根据正则表达式提取指定的内容 正则表达式是极其强大的,利用正则表达式来提取想要的内容是很方便的事. 下面演示了在python里,通过正则表达式来提取符合要求的内容. 实例代码: import re # 正则表达式是极其强大的,利用正则表达式来提取想要的内容是很方便的事. # 下面演示了在python里,通过正则表达式来提取符合要求的内容.有几个要注意 # 的地方就是: # [1] 要用()将需要的内容包含起来 # [2] 编号为0的group是整个符合正则表达式的内容,编号为1的是
-
基于PHP读取csv文件内容的详解
一次性读取csv文件内所有行的数据 复制代码 代码如下: <?php $file = fopen('windows_2011_s.csv','r'); while ($data = fgetcsv($file)) { //每次读取CSV里面的一行内容//print_r($data); //此为一个数组,要获得每一个数据,访问数组下标即可$goods_list[] = $data; }//print_r($goods_list);/* foreach ($goods_list as $arr){
-
基于python框架Scrapy爬取自己的博客内容过程详解
前言 python中常用的写爬虫的库常有urllib2.requests,对于大多数比较简单的场景或者以学习为目的,可以用这两个库实现.这里有一篇我之前写过的用urllib2+BeautifulSoup做的一个抓取百度音乐热门歌曲的例子,有兴趣可以看一下. 本文介绍用Scrapy抓取我在博客园的博客列表,只抓取博客名称.发布日期.阅读量和评论量这四个简单的字段,以求用较简单的示例说明Scrapy的最基本的用法. 环境配置说明 操作系统:Ubuntu 14.04.2 LTS Python:Pyth