剖析Android Activity侧滑返回的实现原理
简介
使用侧滑Activity返回很常见,例如微信就用到了。那么它是怎么实现的呢。本文带你剖析一下实现原理。我在github上找了一个star有2.6k的开源,我们分析他是怎么实现的
//star 2.6k
'com.r0adkll:slidableactivity:2.0.5'
Slidr使用示例
它的使用很简单,首先要设置透明的窗口背景
 <style name="AppTheme"  parent="Theme.AppCompat.Light.DarkActionBar">
        <!-- Customize your theme here. -->
        <item name="android:textAllCaps">false</item>
        <item name="android:windowActionBar">false</item>
        <item name="windowActionBar">false</item>
        <item name="windowNoTitle">true</item>
        <item name="colorPrimary">@color/colorPrimary</item>
        <item name="colorPrimaryDark">@color/colorPrimaryDark</item>
        <item name="colorAccent">@color/colorAccent</item>
        <item name="android:windowIsTranslucent">true</item>
        <item name="android:windowBackground">@android:color/transparent</item>
    </style>
然后
//setContent(View view)后
Slidr.attach(this);

下面可以从三个步骤看其原理
步骤一 重新包裹界面
Slidr.class
 public static SlidrInterface attach(final Activity activity, final int statusBarColor1, final int statusBarColor2){
        //0  创建滑动嵌套界面SliderPanel
		final SliderPanel panel = initSliderPanel(activity, null);

        //7 Set the panel slide listener for when it becomes closed or opened
        // 监听回调
        panel.setOnPanelSlideListener(new SliderPanel.OnPanelSlideListener() {
			...
            //open close等
        });

		// Return the lock interface
		return initInterface(panel);
    }

	private static SliderPanel initSliderPanel(final Activity activity, final SlidrConfig config) {
		//3 获取decorview
		ViewGroup decorView = (ViewGroup)activity.getWindow().getDecorView();

        //4 获取我们布局的内容并删除
		View oldScreen = decorView.getChildAt(0);
		decorView.removeViewAt(0);

		//5 Setup the slider panel and attach it to the decor
        // 建立滑动嵌套视图SliderPanel并且添加到DecorView中
		SliderPanel panel = new SliderPanel(activity, oldScreen, config);
		panel.setId(R.id.slidable_panel);
		oldScreen.setId(R.id.slidable_content);

        //6 把我们的界面布局添加到SliderPanel,并且把SliderPanel添加到decorView中
		panel.addView(oldScreen);
		decorView.addView(panel, 0);
		return panel;
	}
步骤二 使用ViewDragHelper.class处理滑动手势
SliderPanel.class
private void init(){
    ...
    //1 ViewDragHelper创建
    mDragHelper = ViewDragHelper.create(this, mConfig.getSensitivity(), callback);
    mDragHelper.setMinVelocity(minVel);
    mDragHelper.setEdgeTrackingEnabled(mEdgePosition);

    //2 Setup the dimmer view 添加用于指示滑动过程的View到底层
    mDimView = new View(getContext());
    mDimView.setBackgroundColor(mConfig.getScrimColor());
    mDimView.setAlpha(mConfig.getScrimStartAlpha());
    addView(mDimView);
}
步骤三 在ViewDragHelper.Callback中处理我们的界面的拖动
我们首先明确ViewDragHelper仅仅是处理ParentView与它子View的关系,不会一直遍历到最顶层的View。ViewDragHelper的捕获capture是这样实现的
  @Nullable
    public View findTopChildUnder(int x, int y) {
        final int childCount = mParentView.getChildCount();
        for (int i = childCount - 1; i >= 0; i--) {
            final View child = mParentView.getChildAt(mCallback.getOrderedChildIndex(i));
            if (x >= child.getLeft() && x < child.getRight()
                    && y >= child.getTop() && y < child.getBottom()) {
                return child;
            }
        }
        return null;
    }
重点在SliderPanel.class的ViewDragHelper.Callback callback的实现,作者实现实现了很多个方向的滑动处理mLeftCallback、mRightCallback、mTopCallback、mBottomCallback、mVerticalCallback、mHorizontalCallback, 我们取mLeftCallback来分析
private ViewDragHelper.Callback mLeftCallback = new ViewDragHelper.Callback() {

    //捕获View
    @Override
    public boolean tryCaptureView(View child, int pointerId) {
        boolean edgeCase = !mConfig.isEdgeOnly() || mDragHelper.isEdgeTouched(mEdgePosition, pointerId);
        //像前面说的,我们的内容是最上层子View,mDecorView这里指的是我们的contentView
        return child.getId() == mDecorView.getId() && edgeCase;
    }

    //拖动, 最终是通过view.offsetLeftAndRight(offset)实现移动
    @Override
    public int clampViewPositionHorizontal(View child, int left, int dx) {
        return clamp(left, 0, mScreenWidth);
    }

    //滑动范围
    @Override
    public int getViewHorizontalDragRange(View child) {
        return mScreenWidth;
    }

    //释放处理,判断是滚回屏幕
    @Override
    public void onViewReleased(View releasedChild, float xvel, float yvel) {
        super.onViewReleased(releasedChild, xvel, yvel);

        int left = releasedChild.getLeft();
        int settleLeft = 0;
        int leftThreshold = (int) (getWidth() * mConfig.getDistanceThreshold());
        boolean isVerticalSwiping = Math.abs(yvel) > mConfig.getVelocityThreshold();

        if(xvel > 0){

            if(Math.abs(xvel) > mConfig.getVelocityThreshold() && !isVerticalSwiping){
                settleLeft = mScreenWidth;
            }else if(left > leftThreshold){
                settleLeft = mScreenWidth;
            }

        }else if(xvel == 0){
            if(left > leftThreshold){
                settleLeft = mScreenWidth;
            }
        }

        //滚动到left=0(正常布局) 或者 滚动到left=mScreenWidth(滚出屏幕)关闭Activity
        mDragHelper.settleCapturedViewAt(settleLeft, releasedChild.getTop());
        invalidate();
    }

    //转换位置百分比,确定指示层的透明度
    @Override
    public void onViewPositionChanged(View changedView, int left, int top, int dx, int dy) {
        super.onViewPositionChanged(changedView, left, top, dx, dy);
        float percent = 1f - ((float)left / (float)mScreenWidth);

        if(mListener != null) mListener.onSlideChange(percent);

        // Update the dimmer alpha
        applyScrim(percent);
    }

    //回调到Slidr处理Activity状态
    @Override
    public void onViewDragStateChanged(int state) {
        super.onViewDragStateChanged(state);
        if(mListener != null) mListener.onStateChanged(state);
        switch (state){
            case ViewDragHelper.STATE_IDLE:
                if(mDecorView.getLeft() == 0){
                    // State Open
                    if(mListener != null) mListener.onOpened();
                }else{
                    // State Closed  这里回调到Slidr处理activity.finish()
                    if(mListener != null) mListener.onClosed();
                }
                break;
            case ViewDragHelper.STATE_DRAGGING:

                break;
            case ViewDragHelper.STATE_SETTLING:

                break;
        }
    }
};
对于mDragHelper.settleCapturedViewAt(settleLeft, releasedChild.getTop());内部是使用Scroller.class辅助滚动,所以要在SliderPanel中重写View.computeScroll()
@Override
public void computeScroll() {
    super.computeScroll();
    if(mDragHelper.continueSettling(true)){
        ViewCompat.postInvalidateOnAnimation(this);
    }
}
总结
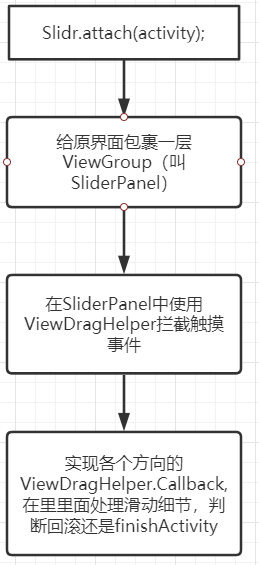
整体方案如下图所示

总体来看原理并不复杂, 就是通过ViewDragHelper对View进行拖动。
以上就是Android Activity侧滑返回的实现原理的详细内容,更多关于Activity侧滑返回的资料请关注我们其它相关文章!
赞 (0)

