element中的el-upload附件上传与附件回显
目录
- 1、上传
- 2、附件回显
开发中经常也会遇到附件的上传和回显,最方便的就是我们封装一个公共组件在页面中引用
1、上传
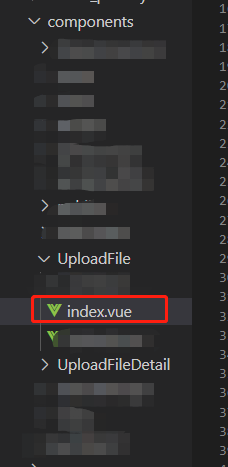
在src里面新建一个文件夹

<template>
  <el-upload class="upload-demo"
             multiple
             :limit="limit"
             :accept="accept"
             :headers="headers"
             :file-list="fileList"
             :action="uploadImgUrl"
             :on-exceed="handleExceed"
             :on-remove="handleRemove"
             :on-success="handleSuccess"
             :before-upload="beforeUpload"
             :on-error="handleUploadError">
    <!-- :on-preview="handlePreview" -->
    <el-button size="small"
               type="primary">点击上传</el-button>
    <div slot="tip"
         class="el-upload__tip"
         style="color:#909399">
      支持上传{{ accept === "*" ? "所有" : accept }}文件,且不超过20MB,附件名称不能超过50字
    </div>
  </el-upload>
</template>
<script>
import { getToken } from '@/utils/auth'
export default {
  components: {},
  props: {
    value: {
      type: String,
      default: null
    },
    accept: {
      type: String,
      default: '*'
    },
    limit: {
      type: Number,
      default: 1
    }
  },
  data () {
    return {
      uploadImgUrl: process.env.VUE_APP_BASE_API + '/common/upload', // 上传的图片服务器地址
      headers: {
        Authorization: 'Bearer ' + getToken()
      },
      fileList: [],
      returnData: []
    }
  },
  watch: {},
  mounted () {
    this.value === null && this.value === '' ? (this.fileList = []) : this.getFileList()
  },
  methods: {
    getFileList () {
      if (this.value !== null && this.value !== '') {
        const accessory = JSON.parse(this.value)
        this.fileList = []
        accessory.map(val => {
          this.fileList.push({
            name: val.name,
            // 编辑修改
            // response: {
            //   fileName: val.url
            // },
            response: {
              data: {
                fileName: val.url
              }
            }
          })
        })
      }
    },
    // 删除上传文件后
    handleRemove (file, fileList) {
      this.getReturnData(fileList)
    },
    // 上传前------------文件大小和格式校验
    beforeUpload (file) {
      if (this.accept !== '*') {
        var fileType = file.name.substring(file.name.lastIndexOf('.') + 1)
        const accept = this.accept.split(',')
        if (accept.indexOf('.' + fileType) < 0) {
          this.$message.warning('请选择正确的文件格式')
          return false
        }
      }
      const isLt50M = file.size / 1024 / 1024 < 20
      if (!isLt50M) {
        this.$message.warning('上传附件大小不能超过 20MB!')
        return false
      }
      return true
    },
    // 附件上传成功后的钩子
    handleSuccess (response, file, fileList) {
      if (response.code === 200) {
        this.getReturnData(fileList)
      } else {
        this.$message.error(response.msg)
        this.fileList=[]
      }
    },
    handleUploadError () {
      this.$message({
        type: 'error',
        message: '上传失败'
      })
    },
    // 获取附件信息后进行返回处理
    getReturnData (fileList) {
      this.returnData = []
      console.log(fileList)
      fileList.map(val => {
        this.returnData.push({
          name: val.name,
          url: val.response.data.fileName
        })
      })
      this.$emit('input', JSON.stringify(this.returnData))
    },
    // 点击上传文件的钩子
    handlePreview (file) {
      var a = document.createElement('a', '_bank')
      var event = new MouseEvent('click')
      a.download = file.name
      a.href = file.response.url
      a.dispatchEvent(event)
    },
    // 文件超出个数限制时的钩子
    handleExceed (files, fileList) {
      this.$message.warning(`当前限制只能上传 ` + this.limit + ` 个文件`)
    },
    // 删除文件之前的钩子,参数为上传的文件和文件列表,若返回 false 或者返回 Promise 且被 reject,则停止删除。
    beforeRemove (file, fileList) {
      return this.$confirm(`确定移除 ${file.name}?`)
    }
  }
}
</script>
代码中这个import { getToken } from ‘@/utils/auth’,其实是获取的存在Cookies里面的token的值,大家可以根据自己项目情况进行修改使用
在页面中直接引入使用就可以了:


2、附件回显
和上传一样同样新建一个文件夹

<template>
  <div class="upload-detail">
    <div class="detail"
         style="line-height:20px"
         v-if="accessory === '[]' || accessory === null">无</div>
    <div v-else>
      <template v-for="(val,key) in upload.fileList">
        <el-link :key="key"
                 class="detail"
                 :underline="false"
                 @click="handlePreview(val)">{{val.name}}
          <span class="icon-emad- icon-emad-xiazai"> 下载</span>
        </el-link>
      </template>
    </div>
  </div>
</template>
<script>
export default {
  data () {
    return {
      upload: {
        // 上传的地址
        url: process.env.VUE_APP_BASE_API + "/common/upload",
        // 上传的文件列表
        fileList: []
      }
    }
  },
  props: {
    accessory: {
      type: String,
      default: '[]'
    }
  },
  created () {
    this.getInfo(this.accessory)
  },
  methods: {
    getInfo (accessory) {
      this.upload.fileList = []
      if (accessory !== '[]' || accessory !== null) {
        let list = JSON.parse(accessory)
        list.map(val => {
          this.upload.fileList.push({
            name: val.name,
            url:process.env.VUE_APP_BASE_API + val.url
          })
        })
      }
    },
    // 点击上传----------------文件下载
    handlePreview (file) {
      var a = document.createElement('a');
      var event = new MouseEvent('click');
      a.download = file.name;
      a.href = file.url;
      a.dispatchEvent(event);
    }
  }
};
</script>
<style lang="scss"   scoped>
::v-deep .el-upload-list {
  height: auto;
  overflow: hidden;
}
.detail {
  line-height: 20px;
  display: block;
  .icon-emad- {
    color: rgba(98, 173, 255, 1);
  }
}
</style>
页面中引入使用:


以上为个人经验,希望能给大家一个参考,也希望大家多多支持我们。
赞 (0)

