1秒钟实现Springboot 替换/写入 word文档里面的文字、图片功能
目录
- 前言
- 正文
前言

图片加水印:
Springboot 图片需要添加水印,怎么办? 1秒就实现
那么word文档替换文字、插入图片,当然也是1秒钟了(jar包引入,工具类代码复制粘贴,调试,完事)。
事不宜迟,开始敲代码。
正文
本篇内容:
1.word文档 替换内容里面的文字 (模板占位符方式传参替换)
2.word文档 插入图片 (指定位置传参插入)
① pom.xml 引入依赖:
<dependency>
            <groupId>org.apache.poi</groupId>
            <artifactId>poi-ooxml</artifactId>
            <version>3.15</version>
        </dependency>

        <dependency>
            <groupId>org.apache.poi</groupId>
            <artifactId>poi-scratchpad</artifactId>
            <version>3.15</version>
        </dependency>
② 工具类 MyDocxUtil.java
import org.apache.poi.POIXMLDocument;
import org.apache.poi.xwpf.usermodel.*;
import java.io.FileOutputStream;
import java.util.*;
import java.util.Map.Entry;
import java.io.FileNotFoundException;
import java.io.IOException;
import java.util.HashMap;
import java.util.Map;

public class MyDocxUtil {
    /**
     * 文字替换
     * @param srcPath
     * @param destPath
     * @param map
     */
    public static void searchAndReplace(String srcPath, String destPath, Map<String, String> map) {
        try {
            //doc文件使用HWPFDocument读取,docx文件使用XWPFDocument读取。
            XWPFDocument document = new XWPFDocument(POIXMLDocument.openPackage(srcPath));
            /**
             * 替换段落中的指定文字
             */
            Iterator<XWPFParagraph> itPara = document.getParagraphsIterator();
            while (itPara.hasNext()) {
                XWPFParagraph paragraph = (XWPFParagraph) itPara.next();
                Set<String> set = map.keySet();
                Iterator<String> iterator = set.iterator();
                while (iterator.hasNext()) {
                    String key = iterator.next();
                    List<XWPFRun> run=paragraph.getRuns();
                    for(int i=0;i<run.size();i++)
                    {
                        if(run.get(i).getText(run.get(i).getTextPosition())!=null &&
                                run.get(i).getText(run.get(i).getTextPosition()).equals(key))
                        {
                            /**
                             * 参数0表示生成的文字是要从哪一个地方开始放置,设置文字从位置0开始
                             * 就可以把原来的文字全部替换掉了
                             */
                            run.get(i).setText(map.get(key),0);
                        }
                    }
                }
            }

            /**
             * 替换表格中的指定文字
             */
            Iterator<XWPFTable> itTable = document.getTablesIterator();
            while (itTable.hasNext()) {
                XWPFTable table = (XWPFTable) itTable.next();
                int count = table.getNumberOfRows();
                for (int i = 0; i < count; i++) {
                    XWPFTableRow row = table.getRow(i);
                    List<XWPFTableCell> cells = row.getTableCells();
                    for (XWPFTableCell cell : cells) {
                        for (Entry<String, String> e : map.entrySet()) {
                            if (cell.getText().equals(e.getKey())) {
                                cell.removeParagraph(0);
                                cell.setText(e.getValue());
                            }
                        }
                    }
                }
            }
            FileOutputStream outStream = null;
            outStream = new FileOutputStream(destPath);
            document.write(outStream);
            outStream.close();
        } catch (Exception e) {
            e.printStackTrace();
        }

    }

    public static void main(String[] args) {
        Map<String, String> map = new HashMap<>();
        map.put("<v1>", "认可");
        map.put("<phone>", "136919xxxxx");
        map.put("<地址>", "中国广东省深圳市");
        String srcPath = "D:\\test.docx";
        String destPath = "D:\\mytestNew.docx";
        searchAndReplace(srcPath, destPath, map);
        System.out.println("操作完毕");
    }
}
③ 调试
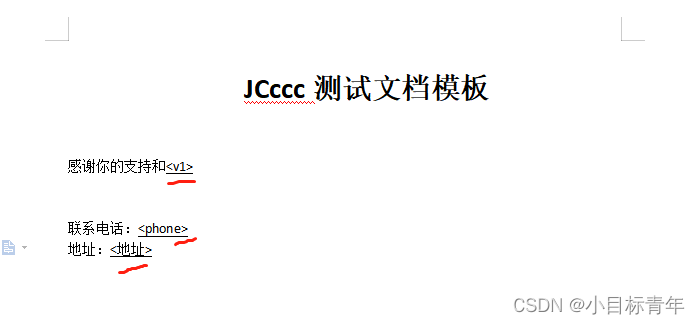
准备一个简单的word内容文档, 假装这就是我们业务需求使用的模板内容:
可以看到 我这个模板内容里面,有三个类似站位符的内容(红色标识)
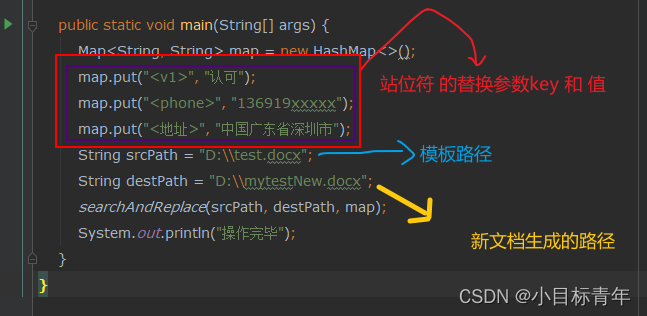
然后对照看下怎么用这个工具类,传参来替换这个模板内容的文字:
    public static void main(String[] args) {
        Map<String, String> map = new HashMap<>();
        map.put("<v1>", "认可");
        map.put("<phone>", "136919xxxxx");
        map.put("<地址>", "中国广东省深圳市");
        String srcPath = "D:\\test.docx";
        String destPath = "D:\\mytestNew.docx";
        searchAndReplace(srcPath, destPath, map);
        System.out.println("操作完毕");
    }
代码简析:
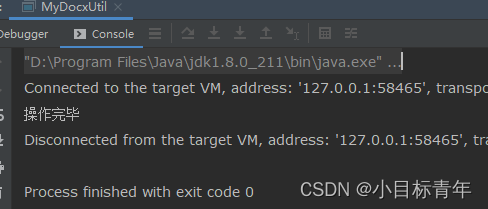
运行方法,看看效果:
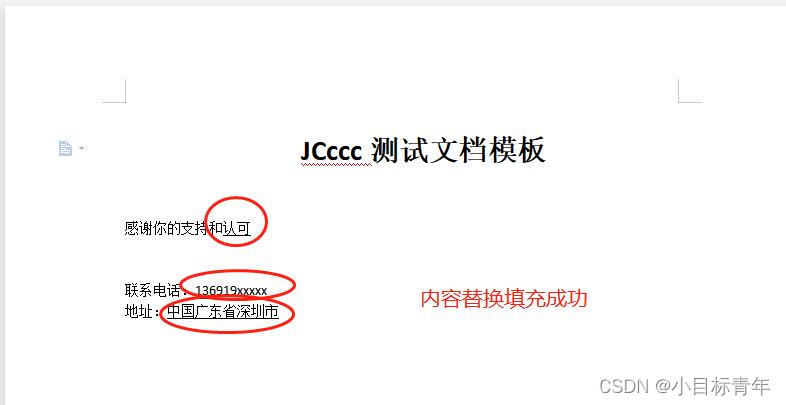
效果:
好了文字替换玩了一下,接下来玩下插入图片:
先准备一张 ‘公章’图片:

然后在模板文档里面, 需要盖章的地方 ,设置一个占位标识 :
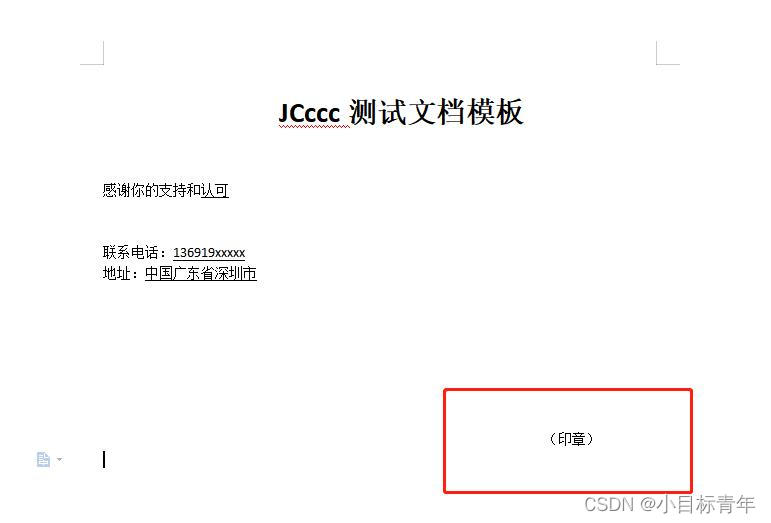
然后加下插入图片的函数代码:
    /**
     * <b> Word中添加图章
     * </b><br><br><i>Description</i> :
     * String srcPath, 源Word路径
     * String storePath, 添加图章后的路径
     * String sealPath, 图章路径(即图片)
     * tString abText, 在Word中盖图章的标识字符串,如:(签字/盖章)
     * int width, 图章宽度
     * int height, 图章高度
     * int leftOffset, 图章在编辑段落向左偏移量
     * int topOffset, 图章在编辑段落向上偏移量
     * boolean behind,图章是否在文字下面
     *
     * @return void
     * <br><br>Date: 2019/12/26 15:12     <br>Author : dxl
     */
    public static void sealInWord(String srcPath, String storePath, String sealPath, String tabText,
                                  int width, int height, int leftOffset, int topOffset, boolean behind) throws Exception {
        File fileTem = new File(srcPath);
        InputStream is = new FileInputStream(fileTem);
        XWPFDocument document = new XWPFDocument(is);
        List<XWPFParagraph> paragraphs = document.getParagraphs();
        XWPFRun targetRun = null;
        for (XWPFParagraph paragraph : paragraphs) {
            if (!"".equals(paragraph.getText()) && paragraph.getText().contains(tabText)) {
                List<XWPFRun> runs = paragraph.getRuns();
                targetRun = runs.get(runs.size() - 1);
            }
        }
        if (targetRun != null) {
            InputStream in = new FileInputStream(sealPath);//设置图片路径
            if (width <= 0) {
                width = 100;
            }
            if (height <= 0) {
                height = 100;
            }
            //创建Random类对象
            Random random = new Random();
            //产生随机数
            int number = random.nextInt(999) + 1;
            targetRun.addPicture(in, Document.PICTURE_TYPE_PNG, "Seal" + number, Units.toEMU(width), Units.toEMU(height));
            in.close();
            // 2. 获取到图片数据
            CTDrawing drawing = targetRun.getCTR().getDrawingArray(0);
            CTGraphicalObject graphicalobject = drawing.getInlineArray(0).getGraphic();

            //拿到新插入的图片替换添加CTAnchor 设置浮动属性 删除inline属性
            CTAnchor anchor = getAnchorWithGraphic(graphicalobject, "Seal" + number,
                    Units.toEMU(width), Units.toEMU(height),//图片大小
                    Units.toEMU(leftOffset), Units.toEMU(topOffset), behind);//相对当前段落位置 需要计算段落已有内容的左偏移
            drawing.setAnchorArray(new CTAnchor[]{anchor});//添加浮动属性
            drawing.removeInline(0);//删除行内属性
        }
        document.write(new FileOutputStream(storePath));
        document.close();
    }

    /**
     * @param ctGraphicalObject 图片数据
     * @param deskFileName      图片描述
     * @param width             宽
     * @param height            高
     * @param leftOffset        水平偏移 left
     * @param topOffset         垂直偏移 top
     * @param behind            文字上方,文字下方
     * @return
     * @throws Exception
     */
    public static CTAnchor getAnchorWithGraphic(CTGraphicalObject ctGraphicalObject,
                                                String deskFileName, int width, int height,
                                                int leftOffset, int topOffset, boolean behind) {
        System.out.println(">>width>>" + width + "; >>height>>>>" + height);
        String anchorXML =
                "<wp:anchor xmlns:wp=\"http://schemas.openxmlformats.org/drawingml/2006/wordprocessingDrawing\" "
                        + "simplePos=\"0\" relativeHeight=\"0\" behindDoc=\"" + ((behind) ? 1 : 0) + "\" locked=\"0\" layoutInCell=\"1\" allowOverlap=\"1\">"
                        + "<wp:simplePos x=\"0\" y=\"0\"/>"
                        + "<wp:positionH relativeFrom=\"column\">"
                        + "<wp:posOffset>" + leftOffset + "</wp:posOffset>"
                        + "</wp:positionH>"
                        + "<wp:positionV relativeFrom=\"paragraph\">"
                        + "<wp:posOffset>" + topOffset + "</wp:posOffset>" +
                        "</wp:positionV>"
                        + "<wp:extent cx=\"" + width + "\" cy=\"" + height + "\"/>"
                        + "<wp:effectExtent l=\"0\" t=\"0\" r=\"0\" b=\"0\"/>"
                        + "<wp:wrapNone/>"
                        + "<wp:docPr id=\"1\" name=\"Drawing 0\" descr=\"" + deskFileName + "\"/><wp:cNvGraphicFramePr/>"
                        + "</wp:anchor>";

        CTDrawing drawing = null;
        try {
            drawing = CTDrawing.Factory.parse(anchorXML);
        } catch (XmlException e) {
            e.printStackTrace();
        }
        CTAnchor anchor = drawing.getAnchorArray(0);
        anchor.setGraphic(ctGraphicalObject);
        return anchor;
    }
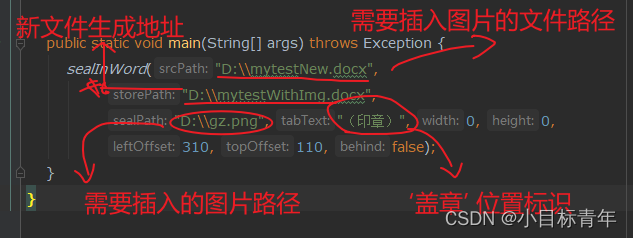
调用一下函数玩下:
    public static void main(String[] args) throws Exception {
        sealInWord("D:\\mytestNew.docx",
                "D:\\mytestWithImg.docx",
                "D:\\gz.png", "(印章)", 0, 0,
                310, 110, false);
    }
代码简析:
运行一下,打开新文件看看效果:

好了,该篇就到这吧。
到此这篇关于Springboot 替换/写入 word文档里面的文字、图片,1秒钟实现的文章就介绍到这了,更多相关Springboot 替换word文档文字内容请搜索我们以前的文章或继续浏览下面的相关文章希望大家以后多多支持我们!
赞 (0)

