TypeScript利用TS封装Axios实战
目录
- 简介
- Axios几个常用类型
- AxiosRequestConfig
- AxiosInstance
- AxiosStatic
- AxiosResponse
- AxiosError
- 基础封装
- 拦截器封装
- 常用方法封装
- 总结
简介
这是TypeScript实战的第三篇文章。前面两篇笔者分别介绍了在Vuex和Pinia中怎么使用TypeScript以及Vuex和Pinia的区别。今天我们再用TypeScript封装一遍Axios。希望能进一步巩固TypeScript的基础知识。
Axios几个常用类型
在使用TypeScript封装Axios之前我们先来看看Axios几个重要的类型。
AxiosRequestConfig
AxiosRequestConfig是我们使用axios发送请求传递参数的类型。当然它也是我们请求拦截器里面的参数类型。
axios(config: AxiosRequestConfig)
可以看到,这个config里面的参数还是挺多的。我们常用的有url、method、params、data、headers、baseURL、timeout。
export interface AxiosRequestConfig {
  url?: string;
  method?: Method;
  baseURL?: string;
  transformRequest?: AxiosTransformer | AxiosTransformer[];
  transformResponse?: AxiosTransformer | AxiosTransformer[];
  headers?: any;
  params?: any;
  paramsSerializer?: (params: any) => string;
  data?: any;
  timeout?: number;
  timeoutErrorMessage?: string;
  withCredentials?: boolean;
  adapter?: AxiosAdapter;
  auth?: AxiosBasicCredentials;
  responseType?: ResponseType;
  xsrfCookieName?: string;
  xsrfHeaderName?: string;
  onUploadProgress?: (progressEvent: any) => void;
  onDownloadProgress?: (progressEvent: any) => void;
  maxContentLength?: number;
  validateStatus?: ((status: number) => boolean) | null;
  maxBodyLength?: number;
  maxRedirects?: number;
  socketPath?: string | null;
  httpAgent?: any;
  httpsAgent?: any;
  proxy?: AxiosProxyConfig | false;
  cancelToken?: CancelToken;
  decompress?: boolean;
  transitional?: TransitionalOptions
}
AxiosInstance
AxiosInstance是我们使用axios实例对象类型。
我们使用axios.create(config?: AxiosRequestConfig)创建出来的对象都是AxiosInstance类型
export interface AxiosInstance {
  (config: AxiosRequestConfig): AxiosPromise;
  (url: string, config?: AxiosRequestConfig): AxiosPromise;
  defaults: AxiosRequestConfig;
  interceptors: {
    request: AxiosInterceptorManager<AxiosRequestConfig>;
    response: AxiosInterceptorManager<AxiosResponse>;
  };
  getUri(config?: AxiosRequestConfig): string;
  request<T = any, R = AxiosResponse<T>> (config: AxiosRequestConfig): Promise<R>;
  get<T = any, R = AxiosResponse<T>>(url: string, config?: AxiosRequestConfig): Promise<R>;
  delete<T = any, R = AxiosResponse<T>>(url: string, config?: AxiosRequestConfig): Promise<R>;
  head<T = any, R = AxiosResponse<T>>(url: string, config?: AxiosRequestConfig): Promise<R>;
  options<T = any, R = AxiosResponse<T>>(url: string, config?: AxiosRequestConfig): Promise<R>;
  post<T = any, R = AxiosResponse<T>>(url: string, data?: any, config?: AxiosRequestConfig): Promise<R>;
  put<T = any, R = AxiosResponse<T>>(url: string, data?: any, config?: AxiosRequestConfig): Promise<R>;
  patch<T = any, R = AxiosResponse<T>>(url: string, data?: any, config?: AxiosRequestConfig): Promise<R>;
}
可以发现,我们可以使用axios.create、axios.all、axios.spread方法,但是AxiosInstance 上并没有create、all、spread等方法,那我们的axios到底是什么类型呢?
AxiosStatic
export interface AxiosStatic extends AxiosInstance {
  create(config?: AxiosRequestConfig): AxiosInstance;
  Cancel: CancelStatic;
  CancelToken: CancelTokenStatic;
  isCancel(value: any): boolean;
  all<T>(values: (T | Promise<T>)[]): Promise<T[]>;
  spread<T, R>(callback: (...args: T[]) => R): (array: T[]) => R;
  isAxiosError(payload: any): payload is AxiosError;
}
declare const axios: AxiosStatic;
可以发现,axios其实是AxiosStatic类型,并且继承了AxiosInstance类型。所以是两者的结合。相较axios.create(config?: AxiosRequestConfig)创建出来的实例对象,axios功能是更强大的。
AxiosResponse
AxiosResponse是非常重要的,我们的axios请求返回值类型都是AxiosResponse类型。并且我们可以发现AxiosResponse是一个接口泛型,这个泛型会应用到后端返回的data上。所以这块我们可以根据后端接口返回定义不同的类型传递进去。后面笔者在封装常用方法的时候会细说。
export interface AxiosResponse<T = any>  {
  data: T;
  status: number;
  statusText: string;
  headers: any;
  config: AxiosRequestConfig;
  request?: any;
}
AxiosError
AxiosError这个类型也是我们必须要知道的。在我们响应拦截器里面的错误就是AxiosError类型。
export interface AxiosError<T = any> extends Error {
  config: AxiosRequestConfig;
  code?: string;
  request?: any;
  response?: AxiosResponse<T>;
  isAxiosError: boolean;
  toJSON: () => object;
}
说完了Axios的几个常用类型,接下来我们正式开始使用TS来封装我们的Axios。
基础封装
首先我们实现一个最基本的版本,实例代码如下:
// index.ts
import axios from 'axios'
import type { AxiosInstance, AxiosRequestConfig, AxiosResponse } from 'axios'

class Request {
  // axios 实例
  instance: AxiosInstance
  // 基础配置,url和超时时间
  baseConfig: AxiosRequestConfig = {baseURL: "/api", timeout: 60000}

  constructor(config: AxiosRequestConfig) {
    // 使用axios.create创建axios实例
    this.instance = axios.create(Object.assign(this.baseConfig, config))
  }
  // 定义请求方法
  public request(config: AxiosRequestConfig): Promise<AxiosResponse> {
    return this.instance.request(config)
  }
}
export default Request
在实际项目中有了基本的请求方法还是远远不够的,我们还需要封装拦截器和一些常用方法。
拦截器封装
拦截器封装只需要在类中对axios.create()创建的实例调用interceptors下的两个拦截器即可,
实例代码如下:
// index.ts
constructor(config: AxiosRequestConfig) {
  this.instance = axios.create(Object.assign(this.baseConfig, config))
  this.instance.interceptors.request.use(
    (config: AxiosRequestConfig) => {
      // 一般会请求拦截里面加token
      const token = localStorage.getItem("token")
      config.headers["Authorization"] = token;

      return config
    },
    (err: any) => {
      return Promise.reject(err)
    },
  )
  this.instance.interceptors.response.use(
    (res: AxiosResponse) => {
      // 直接返回res,当然你也可以只返回res.data
      return res
    },
    (err: any) => {
      // 这里用来处理http常见错误,进行全局提示
      let message = "";
      switch (err.response.status) {
        case 400:
          message = "请求错误(400)";
          break;
        case 401:
          message = "未授权,请重新登录(401)";
          // 这里可以做清空storage并跳转到登录页的操作
          break;
        case 403:
          message = "拒绝访问(403)";
          break;
        case 404:
          message = "请求出错(404)";
          break;
        case 408:
          message = "请求超时(408)";
          break;
        case 500:
          message = "服务器错误(500)";
          break;
        case 501:
          message = "服务未实现(501)";
          break;
        case 502:
          message = "网络错误(502)";
          break;
        case 503:
          message = "服务不可用(503)";
          break;
        case 504:
          message = "网络超时(504)";
          break;
        case 505:
          message = "HTTP版本不受支持(505)";
          break;
        default:
          message = `连接出错(${err.response.status})!`;
      }
      // 这里错误消息可以使用全局弹框展示出来
      // 比如element plus 可以使用 ElMessage
      ElMessage({
        showClose: true,
        message: `${message},请检查网络或联系管理员!`,
        type: "error",
      });
      // 这里是AxiosError类型,所以一般我们只reject我们需要的响应即可
      return Promise.reject(err.response)
    },
  )
}
在这里我们分别对请求拦截器和响应拦截器做了处理。在请求拦截器我们给请求头添加了token。
在响应拦截器,我们返回了整个response对象,当然你也可以只返回后端返回的response.data,这里可以根据个人喜好来处理。其次对http错误进行了全局处理。
常用方法封装
在基础封装的时候我们封装了一个request通用方法,其实我们还可以更具体的封装get、post、put、delete方法,让我们使用更方便。
并且,我们前面分析到,AxiosResponse其实是一个泛型接口,他可以接受一个泛型并应用到我们的data上。所以我们可以在这里再定义一个后端通用返回的数据类型。
比如假设我们某个项目后端接口不管请求成功与失败,返回的结构永远是code、message、results的话我们可以定义一个这样的数据类型。
type Result<T> = {
  code: number,
  message: string,
  result: T
}
然后传递个各个方法:
public get<T = any>(
  url: string,
  config?: AxiosRequestConfig
): Promise<AxiosResponse<Result<T>>> {
  return this.instance.get(url, config);
}
public post<T = any>(
  url: string,
  data?: any,
  config?: AxiosRequestConfig
): Promise<AxiosResponse<Result<T>>> {
  return this.instance.post(url, data, config);
}
public put<T = any>(
  url: string,
  data?: any,
  config?: AxiosRequestConfig
): Promise<AxiosResponse<Result<T>>> {
  return this.instance.put(url, data, config);
}
public delete<T = any>(
  url: string,
  config?: AxiosRequestConfig
): Promise<AxiosResponse<Result<T>>> {
  return this.instance.delete(url, config);
}
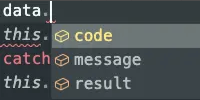
这样当我们调用接口的时候就可以看到我们返回的data的类型啦。就是我们定义的Result类型。

所以我们可以直接得到自动提示:

上面调用接口的时候并没有传递接口数据类型,所以我们的result是any类型,要想要每个接口都有类型提示,我们还需要给方法传递泛型。
我们再改进下,我们再定义一个login接口返回值类型loginType
type loginType = {
  token: string;
};
然后再调用方法的地方传递进去,然后我们再看看返回值data的类型。

可以看到他是Result<loginType>类型,这个loginType就是result的类型。
所以我们的result还可以进一步的得到提示

当然每个接口都定义返回值类型固然好,但是会大大加大前端的工作量。我们在写请求方法的时候也可以不传递接口返回值类型,这样result的类型就是any。这个可以根据自身项目需求来选择使用。
看到这小伙伴们是不是都弄懂了呢?如还有疑问欢迎留言。
总结
说了这么多,有些小伙伴们可能有点晕了,下面笔者总结下整个axios的封装。
// index.ts
import axios from "axios";
import type { AxiosInstance, AxiosRequestConfig, AxiosResponse } from "axios";
type Result<T> = {
  code: number;
  message: string;
  result: T;
};
class Request {
  // axios 实例
  instance: AxiosInstance;
  // 基础配置,url和超时时间
  baseConfig: AxiosRequestConfig = { baseURL: "/api", timeout: 60000 };

  constructor(config: AxiosRequestConfig) {
    // 使用axios.create创建axios实例
    this.instance = axios.create(Object.assign(this.baseConfig, config));

    this.instance.interceptors.request.use(
      (config: AxiosRequestConfig) => {
        // 一般会请求拦截里面加token
        const token = localStorage.getItem("token");
        config.headers["Authorization"] = token;

        return config;
      },
      (err: any) => {
        return Promise.reject(err);
      }
    );

    this.instance.interceptors.response.use(
      (res: AxiosResponse) => {
        // 直接返回res,当然你也可以只返回res.data
        return res;
      },
      (err: any) => {
        // 这里用来处理http常见错误,进行全局提示
        let message = "";
        switch (err.response.status) {
          case 400:
            message = "请求错误(400)";
            break;
          case 401:
            message = "未授权,请重新登录(401)";
            // 这里可以做清空storage并跳转到登录页的操作
            break;
          case 403:
            message = "拒绝访问(403)";
            break;
          case 404:
            message = "请求出错(404)";
            break;
          case 408:
            message = "请求超时(408)";
            break;
          case 500:
            message = "服务器错误(500)";
            break;
          case 501:
            message = "服务未实现(501)";
            break;
          case 502:
            message = "网络错误(502)";
            break;
          case 503:
            message = "服务不可用(503)";
            break;
          case 504:
            message = "网络超时(504)";
            break;
          case 505:
            message = "HTTP版本不受支持(505)";
            break;
          default:
            message = `连接出错(${err.response.status})!`;
        }
        // 这里错误消息可以使用全局弹框展示出来
        // 比如element plus 可以使用 ElMessage
        ElMessage({
          showClose: true,
          message: `${message},请检查网络或联系管理员!`,
          type: "error",
        });
        // 这里是AxiosError类型,所以一般我们只reject我们需要的响应即可
        return Promise.reject(err.response);
      }
    );
  }

  // 定义请求方法
  public request(config: AxiosRequestConfig): Promise<AxiosResponse> {
    return this.instance.request(config);
  }

  public get<T = any>(
    url: string,
    config?: AxiosRequestConfig
  ): Promise<AxiosResponse<Result<T>>> {
    return this.instance.get(url, config);
  }
  public post<T = any>(
    url: string,
    data?: any,
    config?: AxiosRequestConfig
  ): Promise<AxiosResponse<Result<T>>> {
    return this.instance.post(url, data, config);
  }
  public put<T = any>(
    url: string,
    data?: any,
    config?: AxiosRequestConfig
  ): Promise<AxiosResponse<Result<T>>> {
    return this.instance.put(url, data, config);
  }

  public delete<T = any>(
    url: string,
    config?: AxiosRequestConfig
  ): Promise<AxiosResponse<Result<T>>> {
    return this.instance.delete(url, config);
  }
}
export default Request;
到此这篇关于TypeScript利用TS封装Axios实战的文章就介绍到这了,更多相关TypeScript封装Axios内容请搜索我们以前的文章或继续浏览下面的相关文章希望大家以后多多支持我们!

