@FeignClient注解中属性contextId的使用说明
目录
- 一、概述
- 二、解决方案
- 2.1 方案1
- 2.2 方案2
- 三、源代码分析
- 相关代码1
- 相关代码2
一、概述
如果我们使用Feign定义了两个接口,但是目标服务是同一个,那么在SpringBoot启动时就会遇到一个问题:
Description:
The bean 'xxxxxxxx.FeignClientSpecification', defined in null, could not be registered. A bean with that name has already been defined in null and overriding is disabled.
Action:
Consider renaming one of the beans or enabling overriding by setting spring.main.allow-bean-definition-overriding=true
二、解决方案
2.1 方案1
修改yml配置:spring.main.allow-bean-definition-overriding=true
spring:
  main:
    allow-bean-definition-overriding: true
2.2 方案2
在每个Feign的接口中,在注解上加 contextId属性
contextId在Feign Client的作用是在注册Feign Client Configuration的时候需要一个名称,名称是通过getClientName方法获取的
@FeignClient(name = "sale-service",contextId= "saleservice1")

public interface saleClient{

    @RequestMapping(value = "/sale/add", method = RequestMethod.GET)

    String add(@RequestParam("saleNum") String queryStr);

}
备注:contextId= "名称" 中的名称,不能用“_”会报错,可以用“-”
三、源代码分析
- 包名:spring-cloud-openfeign-core-2.2.5.RELEASE.jar
- 类路径:org.springframework.cloud.openfeign.FeignClientsRegistrar
相关代码1
 private void registerFeignClient(BeanDefinitionRegistry registry, AnnotationMetadata annotationMetadata, Map<String, Object> attributes) {
        String className = annotationMetadata.getClassName();
        BeanDefinitionBuilder definition = BeanDefinitionBuilder.genericBeanDefinition(FeignClientFactoryBean.class);
        this.validate(attributes);
        definition.addPropertyValue("url", this.getUrl(attributes));
        definition.addPropertyValue("path", this.getPath(attributes));
        String name = this.getName(attributes);
        definition.addPropertyValue("name", name);
        String contextId = this.getContextId(attributes);
        definition.addPropertyValue("contextId", contextId);
        definition.addPropertyValue("type", className);
        definition.addPropertyValue("decode404", attributes.get("decode404"));
        definition.addPropertyValue("fallback", attributes.get("fallback"));
        definition.addPropertyValue("fallbackFactory", attributes.get("fallbackFactory"));
        definition.setAutowireMode(2);
        String alias = contextId + "FeignClient";
        AbstractBeanDefinition beanDefinition = definition.getBeanDefinition();
        beanDefinition.setAttribute("factoryBeanObjectType", className);
        boolean primary = (Boolean)attributes.get("primary");
        beanDefinition.setPrimary(primary);
        String qualifier = this.getQualifier(attributes);
        if (StringUtils.hasText(qualifier)) {
            alias = qualifier;
        }

        BeanDefinitionHolder holder = new BeanDefinitionHolder(beanDefinition, className, new String[]{alias});
        BeanDefinitionReaderUtils.registerBeanDefinition(holder, registry);
    }
代码截图:

相关代码2
可以看到, name应该是从注解中的属性取值来的, 再看看getClientName()方法.
 private String getClientName(Map<String, Object> client) {
        if (client == null) {
            return null;
        } else {
            String value = (String)client.get("contextId");
            if (!StringUtils.hasText(value)) {
                value = (String)client.get("value");
            }

            if (!StringUtils.hasText(value)) {
                value = (String)client.get("name");
            }

            if (!StringUtils.hasText(value)) {
                value = (String)client.get("serviceId");
            }

            if (StringUtils.hasText(value)) {
                return value;
            } else {
                throw new IllegalStateException("Either 'name' or 'value' must be provided in @" + FeignClient.class.getSimpleName());
            }
        }
    }
代码截图:
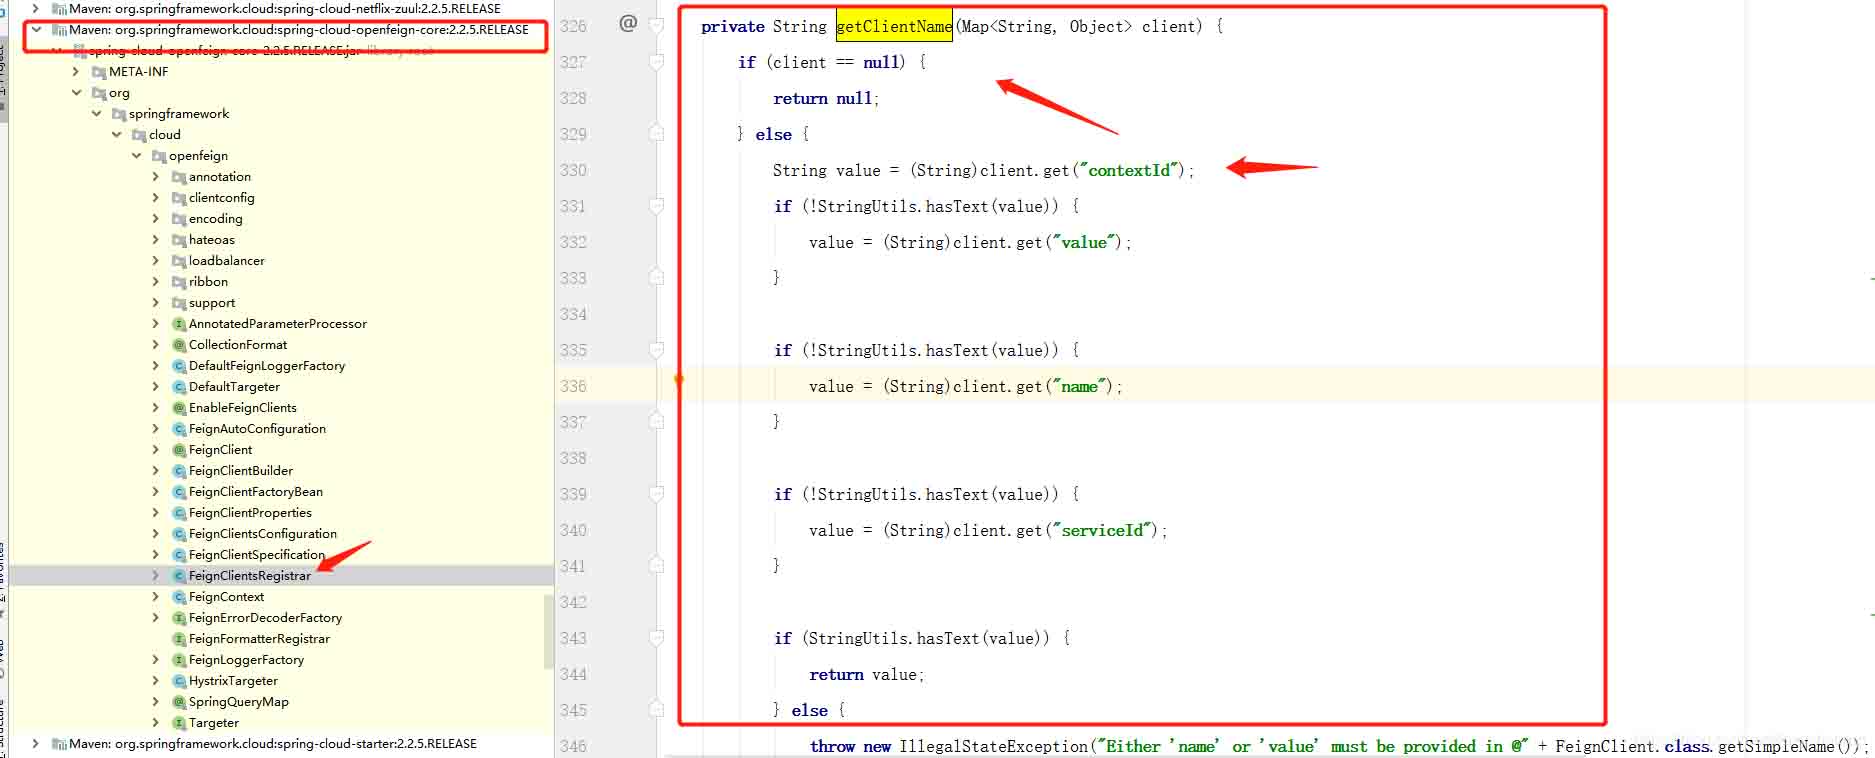
一目了然了, 我们声明@FeignClient注解时, 只使用了value属性, 所以产生了冲突, 只要加上contextId就好了.
以上为个人经验,希望能给大家一个参考,也希望大家多多支持我们。
相关推荐
-
Spring Cloud 中@FeignClient注解中的contextId属性详解
目录 @FeignClient注解中的contextId属性 解决方法一 解决方法二 FeignClient注解及参数问题 问题背景 解决办法 @FeignClient注解中的contextId属性 在使用@FeignClient注解前,我们需要先引入其相关依赖,版本为3.0.1 <dependency> <groupId>org.springframework.cloud</groupId> <artifactId>spring-cloud-starter
-

@feignclient名字冲突的解决方案
目录 @feignclient名字冲突 经过研究,解决方法如下 @FeignClient同一个name,多个配置类 解决方案 @feignclient名字冲突 在启动springcloud项目是遇到 Consider renaming one of the beans or enabling overriding by setting spring.main.allow-bean-definition-overriding=true 这样一个异常 经过研究,解决方法如下 1.在配置文件中增加配置
-
关于注解FeignClient的使用规范
注解FeignClient使用规范 首先是对FeignClient里的常用属性 contextId:当有多个服务调用方法不想写在一个接口里,就要使用到 name:指定FeignClient的名称,如果项目使用了Ribbon,name属性会作为微服务的名称,用于服务发现 url:url一般用于调试,可以手动指定@FeignClient调用的地址 fallback:定义容错的处理类,当调用远程接口失败或超时时,会调用对应接口的容错逻辑,fallback指定的类必须实现@FeignClient标记的接
-
@FeignClient注解中属性contextId的使用说明
目录 一.概述 二.解决方案 2.1 方案1 2.2 方案2 三.源代码分析 相关代码1 相关代码2 一.概述 如果我们使用Feign定义了两个接口,但是目标服务是同一个,那么在SpringBoot启动时就会遇到一个问题: Description:The bean 'xxxxxxxx.FeignClientSpecification', defined in null, could not be registered. A bean with that name has already been
-
SpringCloud之@FeignClient()注解的使用方式
目录 @FeignClient()注解的使用 @FeignClient标签的常用属性如下 SpringCloud 服务间互相调用 @FeignClient注解 我在FEIGN-CONSUMER 在FEIGN-CONSUMER 这是项目中的Controller层 @FeignClient()注解的使用 由于SpringCloud采用分布式微服务架构,难免在各个子模块下存在模块方法互相调用的情况.比如service-admin服务要调用service-card 服务的方法. @FeignClient
-
springboot FeignClient注解及参数
一.FeignClient注解 FeignClient注解被@Target(ElementType.TYPE)修饰,表示FeignClient注解的作用目标在接口上 @FeignClient(name = "github-client", url = "https://api.github.com", configuration = GitHubExampleConfig.class) public interface GitHubClient { @Request
-
Spring Cloud @EnableFeignClients注解的属性字段basePacka详解
@EnableFeignClients注解的属性字段basePacka 一般情况下,我们在启动类上面添加了@EnableFeignClients注解就是表明当前应用服务(我们称之为服务A)中有的地方想要引用其它应用服务(我们称之为服务B)中的接口. 如果服务B可以单独启动起来并且注册到注册中心,则我们仅仅在服务A的启动类中添加@EnableFeignClients注解即可:如果服务B没有单独启动起来,而是以Jar包的形式被引入到服务A中,则服务A在启动的时候是不会主动去加载服务B中标注了@Fei
-
Spring中属性文件properties的读取与使用详解
Spring中属性文件properties的读取与使用详解 实际项目中,通常将一些可配置的定制信息放到属性文件中(如数据库连接信息,邮件发送配置信息等),便于统一配置管理.例中将需配置的属性信息放在属性文件/WEB-INF/configInfo.properties中. 其中部分配置信息(邮件发送相关): #邮件发送的相关配置 email.host = smtp.163.com email.port = xxx email.username = xxx email.password = xxx
-
通过@Resource注解实现属性装配代码详解
本文主要探究的问题时使用@Resource注解实现属性装配,当中涉及依赖注入-手工装配,@Autowired和@Resource注解的区别等相关内容,具体如下. 使用Field注入(用于注解方式):注入依赖对象可以采用手工装配或者手工自动装配.在实际应用中建议使用手工装配,因为自动装配会产生未知情况,开发人员无法预见最终的装配结果. 依赖注入-手工装配 手工装配依赖对象,在这种方式中又有两种编程方式. 1.在xml配置文件中,通过bean节点配置,如: <bean id="orderSer
-
Spring通过配置文件和注解实现属性赋值
前言 在实际开发当中,Spring中bean的属性直接赋值用的不是太多,整理这方面的资料,做一个小结,以备后续更深入的学习. 通过配置文件的方式 以配置文件的方式启动spring容器时,可以使用property标签的value给bean的属性赋值,赋值的形式有以下几种: <--通过context:property-placeholder将properties文件中的值加载的环境变量中(properties中的属性值最终是以环境变量的形式存储的)> <context:property-pl
-
关于springboot 配置文件中属性变量引用方式@@解析
这种属性应用方式是 field_name=@field_value@. 两个@符号是springboot为替代${}属性占位符产生,原因是${}会被maven处理,所以应该是起不到引用变量的作用. @@方式可以引用springboot非默认配置文件(即其他配置文件)中的变量: springboot默认配置文件是 src/main/resources/application.properties 补充知识:springboot项目使用@Value注解获取配置文件中的配置信息 application
-
基于Spring boot @Value 注解注入属性值的操作方法
本文主要介绍Spring @Value 注解注入属性值的使用方法的分析,文章通过示例代码非常详细地介绍,对于每个人的学习或工作都有一定的参考学习价值 在使用spring框架的项目中,@Value是经常使用的注解之一.其功能是将与配置文件中的键对应的值分配给其带注解的属性.在日常使用中,我们常用的功能相对简单.本文使您系统地了解@Value的用法. @Value注入形式 根据注入的内容来源,@ Value属性注入功能可以分为两种:通过配置文件进行属性注入和通过非配置文件进行属性注入. 非配置文件注