Android自定义控件之圆形进度条动画
本文实例为大家分享了Android实现圆形进度条动画的具体代码,供大家参考,具体内容如下
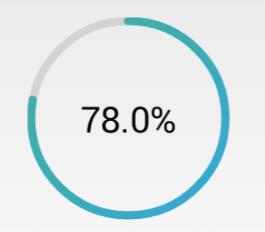
首先贴上图片:

额,感觉还行吧,就是进度条的颜色丑了点,不过咱是程序员,不是美工,配色这种问题当然不在考虑范围之内了。
下面说重点,如何来写一个这样的自定义控件。
首先,需要有一个灰色的底图,来作为未填充时的进度条;
然后,根据传入的当前进度值,绘制填充时的进度圆弧,这段圆弧所对应的圆心角,由当前进度与进度的最大值(一般是100)的比值计算得出;
其次,根据进度值绘制文字提示;
最后,重绘控件,加上动画,从而达到显示进度的效果。
代码如下:
1、attrs.xml
<?xml version="1.0" encoding="utf-8"?>
<resources>

  <declare-styleable name="circleProgressBar">
    <attr name="circleWidth" format="dimension" />
    <attr name="betaAngle" format="integer" />
    <attr name="firstColor" format="color" />
    <attr name="secondColor" format="color" />
  </declare-styleable>

</resources>
2、CircleProgressBar.java
package com.ctgu.circleprogressbar;

import android.animation.ValueAnimator;
import android.content.Context;
import android.content.res.TypedArray;
import android.graphics.Canvas;
import android.graphics.Color;
import android.graphics.LinearGradient;
import android.graphics.Paint;
import android.graphics.Paint.FontMetricsInt;
import android.graphics.Rect;
import android.graphics.RectF;
import android.graphics.Shader;
import android.util.AttributeSet;
import android.util.TypedValue;
import android.view.View;
import android.view.animation.OvershootInterpolator;

public class CircleProgressBar extends View
{
 /**
 * 进度条最大值,默认为100
 */
 private int maxValue = 100;

 /**
 * 当前进度值
 */
 private int currentValue = 0;

 /**
 * 每次扫过的角度,用来设置进度条圆弧所对应的圆心角,alphaAngle=(currentValue/maxValue)*360
 */
 private float alphaAngle;

 /**
 * 底部圆弧的颜色,默认为Color.LTGRAY
 */
 private int firstColor;

 /**
 * 进度条圆弧块的颜色
 */
 private int secondColor;

 /**
 * 圆环的宽度
 */
 private int circleWidth;

 /**
 * 画圆弧的画笔
 */
 private Paint circlePaint;

 /**
 * 画文字的画笔
 */
 private Paint textPaint;

 /**
 * 渐变圆周颜色数组
 */
 private int[] colorArray = new int[] { Color.parseColor("#27B197"), Color.parseColor("#00A6D5") };//

 /**
 * 通过代码创建时才使用
 *
 * @param context
 */
 public CircleProgressBar(Context context)
 {
 this(context, null);
 }

 /**
 * 当从xml中加载view的时候,这个构造器才会被调用。其第二个参数中就包含自定义的属性。
 *
 * @param context
 *      上下文
 * @param attrs
 *      自定义属性
 */
 public CircleProgressBar(Context context, AttributeSet attrs)
 {
 this(context, attrs, 0);
 }

 /**
 * 从xml加载时执行和应用一个特定的风格。这里有两种方式,一是从theme中获得,二是从style中获得。
 * 第三个参数官方有这样的说明: defStyle - The default style to apply to this view. If 0,
 * no style will be applied (beyond what is included in the theme). This may
 * either be an attribute resource, whose value will be retrieved from the
 * current theme, or an explicit style resource.
 * 默认的风格会被应用到这个view上。如果是0,没有风格将会被应用
 * (除了被包含在主题中)。这个也许是一个属性的资源,它的值是从当前的主题中检索,或者是一个明确的风格资源。
 *
 * @param context
 *      上下文
 * @param attrs
 *      自定义的属性
 * @param defStyleAttr
 *      自定义风格
 */
 public CircleProgressBar(Context context, AttributeSet attrs, int defStyleAttr)
 {
 super(context, attrs, defStyleAttr);

 TypedArray ta = context.getTheme().obtainStyledAttributes(attrs, R.styleable.circleProgressBar,
  defStyleAttr, 0);
 int n = ta.getIndexCount();

 for (int i = 0; i < n; i++)
 {
  int attr = ta.getIndex(i);
  switch (attr)
  {
  case R.styleable.circleProgressBar_firstColor:
   firstColor = ta.getColor(attr, Color.LTGRAY); // 默认底色为亮灰色
   break;
  case R.styleable.circleProgressBar_secondColor:
   secondColor = ta.getColor(attr, Color.BLUE); // 默认进度条颜色为蓝色
   break;
  case R.styleable.circleProgressBar_circleWidth:
   circleWidth = ta.getDimensionPixelSize(attr, (int) TypedValue.applyDimension(
    TypedValue.COMPLEX_UNIT_DIP, 6, getResources().getDisplayMetrics())); // 默认圆弧宽度为6dp
   break;
  default:
   break;
  }
 }
 ta.recycle();

 circlePaint = new Paint();
 circlePaint.setAntiAlias(true); // 抗锯齿
 circlePaint.setDither(true); // 防抖动
 circlePaint.setStrokeWidth(circleWidth);

 textPaint = new Paint();
 textPaint.setAntiAlias(true);
 textPaint.setDither(true);
 }

 @Override
 protected void onMeasure(int widthMeasureSpec, int heightMeasureSpec)
 {// 分别获取期望的宽度和高度,并取其中较小的尺寸作为该控件的宽和高
 int measureWidth = MeasureSpec.getSize(widthMeasureSpec);
 int measureHeight = MeasureSpec.getSize(heightMeasureSpec);
 setMeasuredDimension(Math.min(measureWidth, measureHeight), Math.min(measureWidth, measureHeight));
 }

 @Override
 protected void onDraw(Canvas canvas)
 {
 int center = this.getWidth() / 2;
 int radius = center - circleWidth / 2;

 drawCircle(canvas, center, radius); // 绘制进度圆弧
 drawText(canvas, center, radius);
 }

 /**
 * 绘制进度圆弧
 *
 * @param canvas
 *      画布对象
 * @param center
 *      圆心的x和y坐标
 * @param radius
 *      圆的半径
 */
 private void drawCircle(Canvas canvas, int center, int radius)
 {
 circlePaint.setShader(null); // 清除上一次的shader
 circlePaint.setColor(firstColor); // 设置底部圆环的颜色,这里使用第一种颜色
 circlePaint.setStyle(Paint.Style.STROKE); // 设置绘制的圆为空心
 canvas.drawCircle(center, center, radius, circlePaint); // 画底部的空心圆
 RectF oval = new RectF(center - radius, center - radius, center + radius, center + radius); // 圆的外接正方形

 // 绘制颜色渐变圆环
 // shader类是Android在图形变换中非常重要的一个类。Shader在三维软件中我们称之为着色器,其作用是来给图像着色。
 LinearGradient linearGradient = new LinearGradient(circleWidth, circleWidth, getMeasuredWidth()
  - circleWidth, getMeasuredHeight() - circleWidth, colorArray, null, Shader.TileMode.MIRROR);
 circlePaint.setShader(linearGradient);
 circlePaint.setShadowLayer(10, 10, 10, Color.RED);
 circlePaint.setColor(secondColor); // 设置圆弧的颜色
 circlePaint.setStrokeCap(Paint.Cap.ROUND); // 把每段圆弧改成圆角的

 alphaAngle = currentValue * 360.0f / maxValue * 1.0f; // 计算每次画圆弧时扫过的角度,这里计算要注意分母要转为float类型,否则alphaAngle永远为0
 canvas.drawArc(oval, -90, alphaAngle, false, circlePaint);
 }

 /**
 * 绘制文字
 *
 * @param canvas
 *      画布对象
 * @param center
 *      圆心的x和y坐标
 * @param radius
 *      圆的半径
 */
 private void drawText(Canvas canvas, int center, int radius)
 {
 float result = (currentValue * 100.0f / maxValue * 1.0f); // 计算进度
 String percent = String.format("%.1f", result) + "%";

 textPaint.setTextAlign(Paint.Align.CENTER); // 设置文字居中,文字的x坐标要注意
 textPaint.setColor(Color.BLACK); // 设置文字颜色
 textPaint.setTextSize(40); // 设置要绘制的文字大小
 textPaint.setStrokeWidth(0); // 注意此处一定要重新设置宽度为0,否则绘制的文字会重叠
 Rect bounds = new Rect(); // 文字边框
 textPaint.getTextBounds(percent, 0, percent.length(), bounds); // 获得绘制文字的边界矩形
 FontMetricsInt fontMetrics = textPaint.getFontMetricsInt(); // 获取绘制Text时的四条线
 int baseline = center + (fontMetrics.bottom - fontMetrics.top) / 2 - fontMetrics.bottom; // 计算文字的基线,方法见http://blog.csdn.net/harvic880925/article/details/50423762
 canvas.drawText(percent, center, baseline, textPaint); // 绘制表示进度的文字
 }

 /**
 * 设置圆环的宽度
 *
 * @param width
 */
 public void setCircleWidth(int width)
 {
 this.circleWidth = (int) TypedValue.applyDimension(TypedValue.COMPLEX_UNIT_DIP, width, getResources()
  .getDisplayMetrics());
 circlePaint.setStrokeWidth(circleWidth);
 invalidate();
 }

 /**
 * 设置圆环的底色,默认为亮灰色LTGRAY
 *
 * @param color
 */
 public void setFirstColor(int color)
 {
 this.firstColor = color;
 circlePaint.setColor(firstColor);
 invalidate();
 }

 /**
 * 设置进度条的颜色,默认为蓝色<br>
 *
 * @param color
 */
 public void setSecondColor(int color)
 {
 this.secondColor = color;
 circlePaint.setColor(secondColor);
 invalidate();
 }

 /**
 * 设置进度条渐变色颜色数组
 *
 * @param colors
 *      颜色数组,类型为int[]
 */
 public void setColorArray(int[] colors)
 {
 this.colorArray = colors;
 invalidate();
 }

 /**
 * 按进度显示百分比
 *
 * @param progress
 *      进度,值通常为0到100
 */
 public void setProgress(int progress)
 {
 int percent = progress * maxValue / 100;
 if (percent < 0)
 {
  percent = 0;
 }
 if (percent > 100)
 {
  percent = 100;
 }
 this.currentValue = percent;
 invalidate();
 }

 /**
 * 按进度显示百分比,可选择是否启用数字动画
 *
 * @param progress
 *      进度,值通常为0到100
 * @param useAnimation
 *      是否启用动画,true为启用
 */
 public void setProgress(int progress, boolean useAnimation)
 {
 int percent = progress * maxValue / 100;
 if (percent < 0)
 {
  percent = 0;
 }
 if (percent > 100)
 {
  percent = 100;
 }
 if (useAnimation) // 使用动画
 {
  ValueAnimator animator = ValueAnimator.ofInt(0, percent);
  animator.addUpdateListener(new ValueAnimator.AnimatorUpdateListener()
  {
  @Override
  public void onAnimationUpdate(ValueAnimator animation)
  {
   currentValue = (int) animation.getAnimatedValue();
   invalidate();
  }
  });
  animator.setInterpolator(new OvershootInterpolator());
  animator.setDuration(1000);
  animator.start();
 }
 else
 {
  setProgress(progress);
 }
 }
}
3、activity_main.xml
<RelativeLayout xmlns:android="http://schemas.android.com/apk/res/android"
  xmlns:tools="http://schemas.android.com/tools"
  xmlns:lh2="http://schemas.android.com/apk/res/com.ctgu.circleprogressbar"
  android:layout_width="match_parent"
  android:layout_height="match_parent" >

  <com.ctgu.circleprogressbar.CircleProgressBar
    android:id="@+id/circleProgressBar"
    android:layout_width="150dp"
    android:layout_height="150dp"
    android:layout_centerHorizontal="true"
    android:layout_gravity="center"
    android:layout_marginTop="20dp"
    lh2:circleWidth="6dp"
    lh2:firstColor="#d3d3d3"
    lh2:secondColor="#3B95C8" />

  <SeekBar
    android:id="@+id/seekbar"
    android:layout_width="match_parent"
    android:layout_height="wrap_content"
    android:layout_alignParentBottom="true"
    android:layout_marginBottom="40dp"
    android:layout_marginLeft="10dp"
    android:layout_marginRight="10dp"
    android:background="#778899" />

</RelativeLayout>
4、MainActivity.java
package com.ctgu.circleprogressbar;

import android.app.Activity;
import android.graphics.Color;
import android.os.Bundle;
import android.os.Handler;
import android.widget.SeekBar;

public class MainActivity extends Activity
{
 private CircleProgressBar circleProgressBar; // 自定义的进度条
 private SeekBar seekbar; // 拖动条

 private int[] colors = new int[] { Color.parseColor("#27B197"), Color.parseColor("#00A6D5") };

 @Override
 protected void onCreate(Bundle savedInstanceState)
 {
 super.onCreate(savedInstanceState);
 setContentView(R.layout.activity_main);

 circleProgressBar = (CircleProgressBar) findViewById(R.id.circleProgressBar);
// circleProgressBar.setFirstColor(Color.LTGRAY);
// circleProgressBar.setColorArray(colors); //觉得进度条颜色丑的,这里可以自行传入一个颜色渐变数组。
// circleProgressBar.setCircleWidth(6);

 seekbar = (SeekBar) findViewById(R.id.seekbar);
 seekbar.setMax(100);
 seekbar.setOnSeekBarChangeListener(new SeekBar.OnSeekBarChangeListener()
 {
  @Override
  public void onStopTrackingTouch(SeekBar seekBar)
  {

  }

  @Override
  public void onStartTrackingTouch(SeekBar seekBar)
  {

  }

  @Override
  public void onProgressChanged(SeekBar seekBar, int progress, boolean fromUser)
  {
  if (fromUser)
  {
   // circleProgressBar.setProgress(progress); //不使用动画
   circleProgressBar.setProgress(progress, true); // 使用数字过渡动画
  }
  }
 });
 }
}
代码注释很详细了,基本上了解自定义控件的都看得懂。
以上就是本文的全部内容,希望对大家的学习有所帮助,也希望大家多多支持我们。
赞 (0)

