Js Snowflake(雪花算法)生成随机ID的实现方法
1、snowflake-id插件
import SnowflakeId from "snowflake-id";

const guid = num => {
 const id= new SnowflakeId();
 return id.generate();
};
2、原生使用
var Snowflake = /** @class */ (function() {
	function Snowflake(_workerId, _dataCenterId, _sequence) {
		this.twepoch = 1288834974657n;
		//this.twepoch = 0n;
		this.workerIdBits = 5n;
		this.dataCenterIdBits = 5n;
		this.maxWrokerId = -1n ^ (-1n << this.workerIdBits); // 值为:31
		this.maxDataCenterId = -1n ^ (-1n << this.dataCenterIdBits); // 值为:31
		this.sequenceBits = 12n;
		this.workerIdShift = this.sequenceBits; // 值为:12
		this.dataCenterIdShift = this.sequenceBits + this.workerIdBits; // 值为:17
		this.timestampLeftShift = this.sequenceBits + this.workerIdBits + this.dataCenterIdBits; // 值为:22
		this.sequenceMask = -1n ^ (-1n << this.sequenceBits); // 值为:4095
		this.lastTimestamp = -1n;
		//设置默认值,从环境变量取
		this.workerId = 1n;
		this.dataCenterId = 1n;
		this.sequence = 0n;
		if(this.workerId > this.maxWrokerId || this.workerId < 0) {
			thrownew Error('_workerId must max than 0 and small than maxWrokerId-[' + this.maxWrokerId + ']');
		}
		if(this.dataCenterId > this.maxDataCenterId || this.dataCenterId < 0) {
			thrownew Error('_dataCenterId must max than 0 and small than maxDataCenterId-[' + this.maxDataCenterId + ']');
		}

		this.workerId = BigInt(_workerId);
		this.dataCenterId = BigInt(_dataCenterId);
		this.sequence = BigInt(_sequence);
	}
	Snowflake.prototype.tilNextMillis = function(lastTimestamp) {
		var timestamp = this.timeGen();
		while(timestamp <= lastTimestamp) {
			timestamp = this.timeGen();
		}
		return BigInt(timestamp);
	};
	Snowflake.prototype.timeGen = function() {
		return BigInt(Date.now());
	};
	Snowflake.prototype.nextId = function() {
		var timestamp = this.timeGen();
		if(timestamp < this.lastTimestamp) {
			thrownew Error('Clock moved backwards. Refusing to generate id for ' +
				(this.lastTimestamp - timestamp));
		}
		if(this.lastTimestamp === timestamp) {
			this.sequence = (this.sequence + 1n) & this.sequenceMask;
			if(this.sequence === 0n) {
				timestamp = this.tilNextMillis(this.lastTimestamp);
			}
		} else {
			this.sequence = 0n;
		}
		this.lastTimestamp = timestamp;
		return((timestamp - this.twepoch) << this.timestampLeftShift) |
			(this.dataCenterId << this.dataCenterIdShift) |
			(this.workerId << this.workerIdShift) |
			this.sequence;
	};
	return Snowflake;
}());

console.log(new Snowflake(1n, 1n, 0n).nextId());
//1141531990672150528n
控制台输出1141531990672150528n为bigint格式, .toString()转为字符串格式即可
3、ES6使用
import bigInt from "big-integer";

const guid = () => {
 const Snowflake = /** @class */ (function() {
  function Snowflake(_workerId, _dataCenterId, _sequence) {
   // this.twepoch = 1288834974657;
   this.twepoch = 0;
   this.workerIdBits = 5;
   this.dataCenterIdBits = 5;
   this.maxWrokerId = -1 ^ (-1 << this.workerIdBits); // 值为:31
   this.maxDataCenterId = -1 ^ (-1 << this.dataCenterIdBits); // 值为:31
   this.sequenceBits = 12;
   this.workerIdShift = this.sequenceBits; // 值为:12
   this.dataCenterIdShift = this.sequenceBits + this.workerIdBits; // 值为:17
   this.timestampLeftShift = this.sequenceBits + this.workerIdBits + this.dataCenterIdBits; // 值为:22
   this.sequenceMask = -1 ^ (-1 << this.sequenceBits); // 值为:4095
   this.lastTimestamp = -1;
   //设置默认值,从环境变量取
   this.workerId = 1;
   this.dataCenterId = 1;
   this.sequence = 0;
   if (this.workerId > this.maxWrokerId || this.workerId < 0) {
    throw new Error(
     'config.worker_id must max than 0 and small than maxWrokerId-[' + this.maxWrokerId + ']'
    );
   }
   if (this.dataCenterId > this.maxDataCenterId || this.dataCenterId < 0) {
    throw new Error(
     'config.data_center_id must max than 0 and small than maxDataCenterId-[' +
      this.maxDataCenterId +
      ']'
    );
   }
   this.workerId = _workerId;
   this.dataCenterId = _dataCenterId;
   this.sequence = _sequence;
  }
  Snowflake.prototype.tilNextMillis = function(lastTimestamp) {
   var timestamp = this.timeGen();
   while (timestamp <= lastTimestamp) {
    timestamp = this.timeGen();
   }
   return timestamp;
  };
  Snowflake.prototype.timeGen = function() {
   //new Date().getTime() === Date.now()
   return Date.now();
  };
  Snowflake.prototype.nextId = function() {
   var timestamp = this.timeGen();
   if (timestamp < this.lastTimestamp) {
    throw new Error(
     'Clock moved backwards. Refusing to generate id for ' + (this.lastTimestamp - timestamp)
    );
   }
   if (this.lastTimestamp === timestamp) {
    this.sequence = (this.sequence + 1) & this.sequenceMask;
    if (this.sequence === 0) {
     timestamp = this.tilNextMillis(this.lastTimestamp);
    }
   } else {
    this.sequence = 0;
   }
   this.lastTimestamp = timestamp;
   var shiftNum =
    (this.dataCenterId << this.dataCenterIdShift) |
    (this.workerId << this.workerIdShift) |
    this.sequence; // dataCenterId:1,workerId:1,sequence:0 shiftNum:135168
   var nfirst = new bigInt(String(timestamp - this.twepoch), 10);
   nfirst = nfirst.shiftLeft(this.timestampLeftShift);
   var nnextId = nfirst.or(new bigInt(String(shiftNum), 10)).toString(10);
   return nnextId;
  };
  return Snowflake;
 })();

 return new Snowflake(1, 1, 0).nextId();
};
guid()即可调用
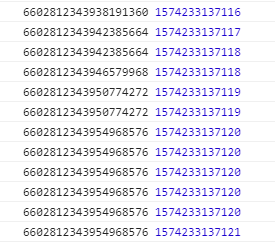
4、多次重复调用出现一样id的bug
  console.log(guid(), new Date().getTime());
  console.log(guid(), new Date().getTime());
  console.log(guid(), new Date().getTime());
  console.log(guid(), new Date().getTime());
  console.log(guid(), new Date().getTime());
  console.log(guid(), new Date().getTime());
  console.log(guid(), new Date().getTime());
  console.log(guid(), new Date().getTime());
  console.log(guid(), new Date().getTime());
  console.log(guid(), new Date().getTime());
  console.log(guid(), new Date().getTime());
  console.log(guid(), new Date().getTime());

修改如下
import SnowflakeId from "snowflake-id";

const guid = num => {
 const snowflake = new SnowflakeId();
 let arr = [];
 for (let i = 0; i < num; i++) {
  arr.push(snowflake.generate());
 }
 return num ? arr : snowflake.generate();
};
单个调用 guid()
n个调用 guid(n)
到此这篇关于Js Snowflake(雪花算法)生成随机ID的实现方法的文章就介绍到这了,更多相关Js 雪花算法生成随机ID内容请搜索我们以前的文章或继续浏览下面的相关文章希望大家以后多多支持我们!
赞 (0)

