关于WPF WriteableBitmap类直接操作像素点的问题
WPF(Windows Presentation Foundation)是微软推出的基于Windows 的用户界面框架,属于.NET Framework 3.0的一部分。它提供了统一的编程模型、语言和框架,真正做到了分离界面设计人员与开发人员的工作;同时它提供了全新的多媒体交互用户图形界面。
还是话不多说,直接上码:
1.新建WpfApp应用程序
2.MainWindow.xaml文件代码如下:
<Window x:Class="WpfApp1.MainWindow"
        xmlns="http://schemas.microsoft.com/winfx/2006/xaml/presentation"
        xmlns:x="http://schemas.microsoft.com/winfx/2006/xaml"
        xmlns:d="http://schemas.microsoft.com/expression/blend/2008"
        xmlns:mc="http://schemas.openxmlformats.org/markup-compatibility/2006"
        xmlns:local="clr-namespace:WpfApp1"
        mc:Ignorable="d"
        Title="MainWindow" Height="450" Width="800">
    <Grid>
        <Grid.RowDefinitions>
            <RowDefinition Height="*"></RowDefinition>
            <RowDefinition Height="10*" ></RowDefinition>
        </Grid.RowDefinitions>

        <Button Name="button" Grid.Row="0" HorizontalAlignment="Center" Content="generate_bitmap" MinWidth="120"  MinHeight="30" Click="Button_Click"></Button>
        <Grid x:Name="imgGrid" Grid.Row="1">
            <Viewbox>
                <Image x:Name="img"  Width="{Binding RelativeSource={RelativeSource Self}, Path=Source.PixelWidth}"
                       Height="{Binding RelativeSource={RelativeSource Self}, Path=Source.PixelHeight}"
                        Source="{Binding CtrlImage, IsAsync=True}"
                      Stretch="None" />
            </Viewbox>
        </Grid>
    </Grid>
</Window>
3.MainWindow.xaml.cs文件代码如下:
using System;
using System.Collections.Generic;
using System.Globalization;
using System.Linq;
using System.Text;
using System.Windows;
using System.Windows.Controls;
using System.Windows.Data;
using System.Windows.Documents;
using System.Windows.Input;
using System.Windows.Media;
using System.Windows.Media.Imaging;
using System.Windows.Navigation;
using System.Windows.Shapes;
using System.Drawing;
using System.Drawing.Drawing2D;

namespace WpfApp1
{
    /// <summary>
    /// Interaction logic for MainWindow.xaml
    /// </summary>
    public partial class MainWindow : Window
    {
        public MainWindow()
        {
            InitializeComponent();
        }
        public void Button_Click(object sender, RoutedEventArgs e)
            WriteableBitmap wb = new WriteableBitmap((int)imgGrid.ActualWidth, (int)imgGrid.ActualHeight, 96, 96, PixelFormats.Pbgra32, null);
            wb.Lock();
            Bitmap backBitmap = new Bitmap((int)imgGrid.ActualWidth, (int)imgGrid.ActualHeight, wb.BackBufferStride, System.Drawing.Imaging.PixelFormat.Format32bppArgb, wb.BackBuffer);
            Int32Rect rect = new Int32Rect(0, 0, (int)imgGrid.ActualWidth, (int)imgGrid.ActualHeight);
            byte[] pixels = new byte[(int)imgGrid.ActualWidth * (int)imgGrid.ActualHeight * wb.Format.BitsPerPixel / 8];
            Random rand = new Random();
            for (int y = 0; y < wb.PixelHeight; y++)
            {
                for (int x = 0; x < wb.PixelWidth; x++)
                {
                    int alpha = 0;
                    int red = 0;
                    int green = 0;
                    int blue = 0;
                    if ((x % 5 == 0) || (y % 7 == 0))
                    {
                        red = (int)((double)y / wb.PixelHeight * 255);
                        green = rand.Next(100, 255);
                        blue = (int)((double)x / wb.PixelWidth * 255);
                        alpha = 255;
                    }
                    else
                        red = (int)((double)x / wb.PixelWidth * 255);
                        blue = (int)((double)y / wb.PixelHeight * 255);
                        alpha = 50;
                    int pixeloffset = (x + y * wb.PixelWidth) * wb.Format.BitsPerPixel / 8;
                    pixels[pixeloffset] = (byte)blue;
                    pixels[pixeloffset + 1] = (byte)green;
                    pixels[pixeloffset + 2] = (byte)red;
                    pixels[pixeloffset + 3] = (byte)alpha;
                }
                int stride = (wb.PixelWidth * wb.Format.BitsPerPixel) / 8;
                wb.WritePixels(rect, pixels, stride, 0);
            }
            wb.Unlock();
            backBitmap.Dispose();
            backBitmap = null;
            img.Source = wb;
    }
}
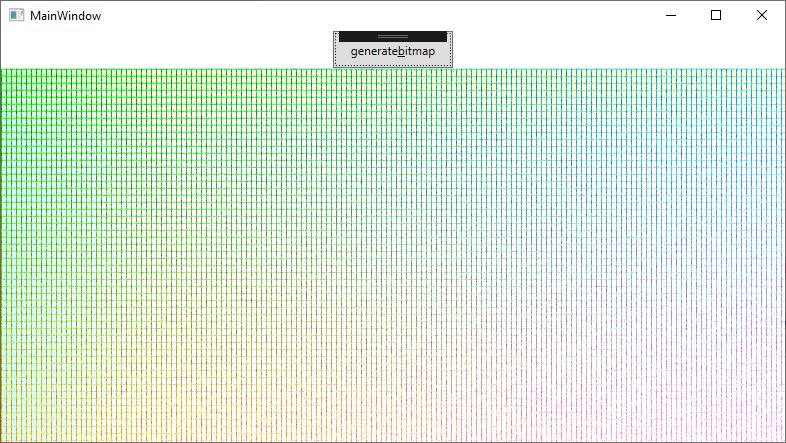
效果如下:
到此这篇关于C#中WPF WriteableBitmap类直接操作像素点的文章就介绍到这了,更多相关WPF WriteableBitmap类内容请搜索我们以前的文章或继续浏览下面的相关文章希望大家以后多多支持我们!
相关推荐
-

对WPF中Expander控件美化
示例图: Expander控件功能很常见, 一般用于系统左侧的菜单收缩面板. 主要的组成 一个头部(header) 和 一个 内容(content) 组成. <Expander ExpandDirection="Down" SnapsToDevicePixels="True" VerticalAlignment="Top" Style="{DynamicResource ExpanderStyle1}" > <
-
WPF常用控件用法及介绍
1.GroupBox 注意: GroupBox仍然需要布局容器来放置元素.如: StackPanel面板 <GroupBox Header="select number?"> <StackPanel> <RadioButton>one</RadioButton> <RadioButton>two</RadioButton> <RadioButton>three</RadioButton> &
-
WPF常见布局面板用法及介绍
目录 常见的几个布局面板 1.StackPanel面板 2.WarpPanel面板 3.DockPanel面板 5.UniformGrid面板 6.Canvas面板 常见的几个布局面板 1.StackPanel面板 StackPanel面板能够简单根据单行或者单列进行元素排列, StackPanel 默认的布局方向为垂直方向(Vertical), 由Orientation属性控制. Orientation属性: 用户控制布局方向是垂直还是横向排列.分别有两个值可选:Vertical.Horizo
-
关于WPF WriteableBitmap类直接操作像素点的问题
WPF(Windows Presentation Foundation)是微软推出的基于Windows 的用户界面框架,属于.NET Framework 3.0的一部分.它提供了统一的编程模型.语言和框架,真正做到了分离界面设计人员与开发人员的工作:同时它提供了全新的多媒体交互用户图形界面. 还是话不多说,直接上码: 1.新建WpfApp应用程序 2.MainWindow.xaml文件代码如下: <Window x:Class="WpfApp1.MainWindow" xmlns
-
C# WPF数据绑定模板化操作的完整步骤
目录 前言: 具体实例代码如下: 总结 前言: WPF数据绑定对于WPF应用程序来说尤为重要,本文将讲述使用MVVM模式进行数据绑定的四步走用法: 具体实例代码如下: public class NotifyPropertyObject : INotifyPropertyChanged { public event PropertyChangedEventHandler PropertyChanged; public void RaisePropertyChanged(string propert
-
WPF+WriteableBitmap实现高性能曲线图的绘制
目录 一.前言 二.正文 三.运行效果 一.前言 之前分享过一期关于DrawingVisual来绘制高性能曲线的博客,今天再分享一篇通过另一种方式来绘制高性能曲线的方法,也就是通过WriteableBitmap的方式:具体的一些细节这里就不啰嗦了,同样是局部绘制的思想,滚动条拖动到哪里,就只绘制那一部分的曲线,直接贴代码:(该程序在英特尔11代CPU的电脑可能会遇到拖动滚动条曲线图卡住不动的情况,这个是显卡驱动的问题,官方已经修复了,遇到这问题的记得更新一下驱动) 二.正文 1.新建一个类,继承
-
Java中Properties类的操作实例详解
Java中Properties类的操作实例详解 知识学而不用,就等于没用,到真正用到的时候还得重新再学.最近在看几款开源模拟器的源码,里面涉及到了很多关于Properties类的引用,由于Java已经好久没用了,而这些模拟器大多用Java来写,外加一些脚本语言Python,Perl之类的,不得已,又得重新拾起.本文通过看<Java编程思想>和一些网友的博客总结而来,只为简单介绍Properties类的相关操作. 一.Java Properties类 Java中有个比较重要的类Properti
-
Java NIO Path接口和Files类配合操作文件的实例
Path接口 1.Path表示的是一个目录名序列,其后还可以跟着一个文件名,路径中第一个部件是根部件时就是绝对路径,例如 / 或 C:\ ,而允许访问的根部件取决于文件系统: 2.以根部件开始的路径是绝对路径,否则就是相对路径: 3.静态的Paths.get方法接受一个或多个字符串,字符串之间自动使用默认文件系统的路径分隔符连接起来(Unix是 /,Windows是 \ ),这就解决了跨平台的问题,接着解析连接起来的结果,如果不是合法路径就抛出InvalidPathException异常,否则就
-
Java数组高级算法与Arrays类常见操作小结【排序、查找】
本文实例讲述了Java数组高级算法与Arrays类常见操作.分享给大家供大家参考,具体如下: 冒泡排序 冒泡排序原理 冒泡排序代码: package cn.itcast_01; /* * 数组排序之冒泡排序: * 相邻元素两两比较,大的往后放,第一次完毕,最大值出现在了最大索引处 */ public class ArrayDemo { public static void main(String[] args) { // 定义一个数组 int[] arr = { 24, 69, 80, 57,
-
Java String类正则操作示例
本文实例讲述了Java String类正则操作.分享给大家供大家参考,具体如下: 一 应用正则表达式 1 代码 public class RegExp { public static void main(String[] args) throws Exception { if ("123".matches("\\d+")) { System.out.println("由数字组成!"); } else { System.out.println(&q
-
python3 配置logging日志类的操作
配置类config_file: from configparser import ConfigParser class config_file: def __init__(self,conf_filePath,encoding="utf-8"): #打开配置文件,实例化ConfigParser类,并以默认utf-8的编码格式读取文件 self.cf = ConfigParser() self.cf.read(conf_filePath,encoding) def get_Int_Val
-
python3中的logging记录日志实现过程及封装成类的操作
作用: 主要记录信息,便于定位查看问题. python logging模块官网: https://docs.python.org/zh-cn/3.7/library/logging.html#formatter-objects 三种定位问题方法: print debug调试:代码写好后,就不需要再进行调试了,所以引入了logger logging.debug() – 一般在测试环境中用 logger:当生产环境中有问题时,可以查看logger定位问题 步骤: 1.初始化日志 收集器 2.设置日志
-
PHP数组array类常见操作示例
本文实例讲述了PHP数组array类常见操作.分享给大家供大家参考,具体如下: array_merge($arr1,$arr2....);//合并一个或多个数组 例: 1. <?php $beginning = 'foo'; $end = array(1 => 'bar'); $result = array_merge((array)$beginning, (array)$end); print_r($result); ?> 以上例程会输出: Array ( [0