Java SpringBoot容器注入对象详解
目录
- 1.注入的方式
- 方式一:使用Import注解
- 方式二:使用@Service 或者@Component等注解注入到容器中
- 方式三:使用@Configuration和@Bean组合实现
- 2.注入是增加条件判断注解
- 3.构造方法时带参数注入
- 方式1:使用spring xml实现
- 方式2:使用@Autowired
- 方式3使用@Configuration和@Bean组合
- 4.对象注入时的一些总结
- 总结
1.注入的方式
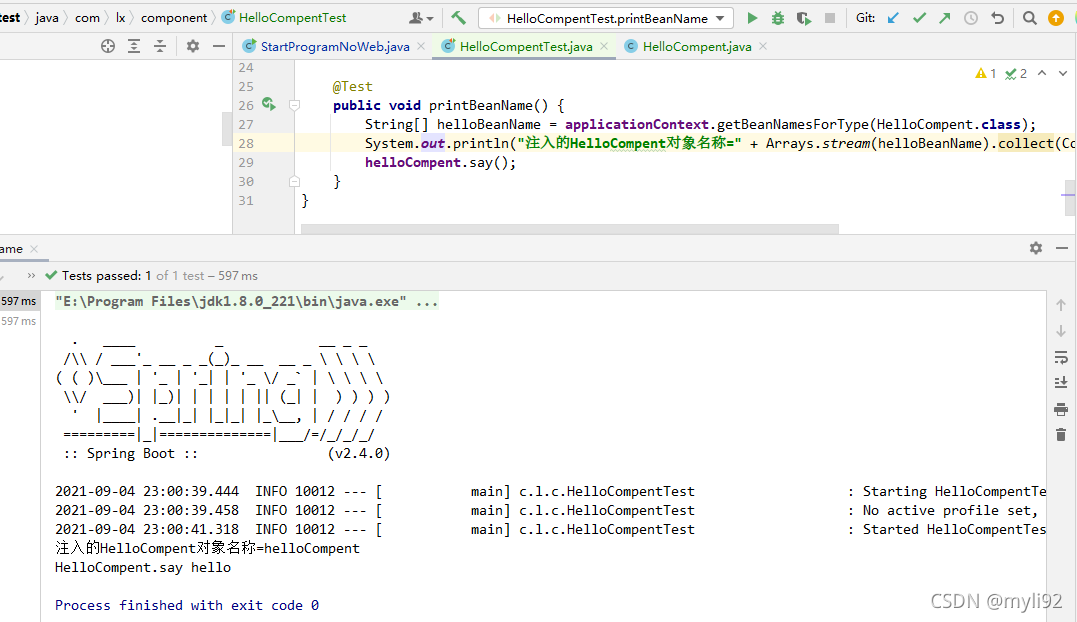
方式一:使用Import注解
增加一个类HelloCompent
package com.lx.component;
public class HelloCompent {
    public void say() {
        System.out.println("HelloCompent.say hello");
    }
}
@SpringBootApplication
@Import(HelloCompent.class)
public class StartProgramNoWeb {
    public static void main(String[] args) {
        System.out.println("启动");
        SpringApplication.run(StartProgramNoWeb.class, args);
    }
}
使用@Import就可以将HelloCompent注入到容器中。(HelloCompent类不需要增加@Service ,
@Component等注解)

方式二:使用@Service 或者@Component等注解注入到容器中
在需要注入的类增加注解,修改HelloCompent类
package com.lx.component;
import org.springframework.stereotype.Component;
@Component
public class HelloCompent {
    public void say() {
        System.out.println("HelloCompent.say hello");
    }
}
方式三:使用@Configuration和@Bean组合实现
使用@Configuration和@Bean组合注入可以将对象注入到容器中,我主要生效的还是@Bean,如果将@Configuration换成@Component也是可以正常注入的。
增加一个CustomConfig类
package com.lx.config;
import com.lx.component.HelloCompent;
import org.springframework.context.annotation.Bean;
import org.springframework.context.annotation.Configuration;
@Configuration
public class CustomConfig {
    @Bean("helloCompentConfig")
    public HelloCompent helloCompent() {
        return  new HelloCompent();
    }
}
这里我使用了方式2和3同时注入了,会导致重复注入而发生异常。所以我在bean是增加一个名称,所以打印容器里对象的名称也就是设置的名称。
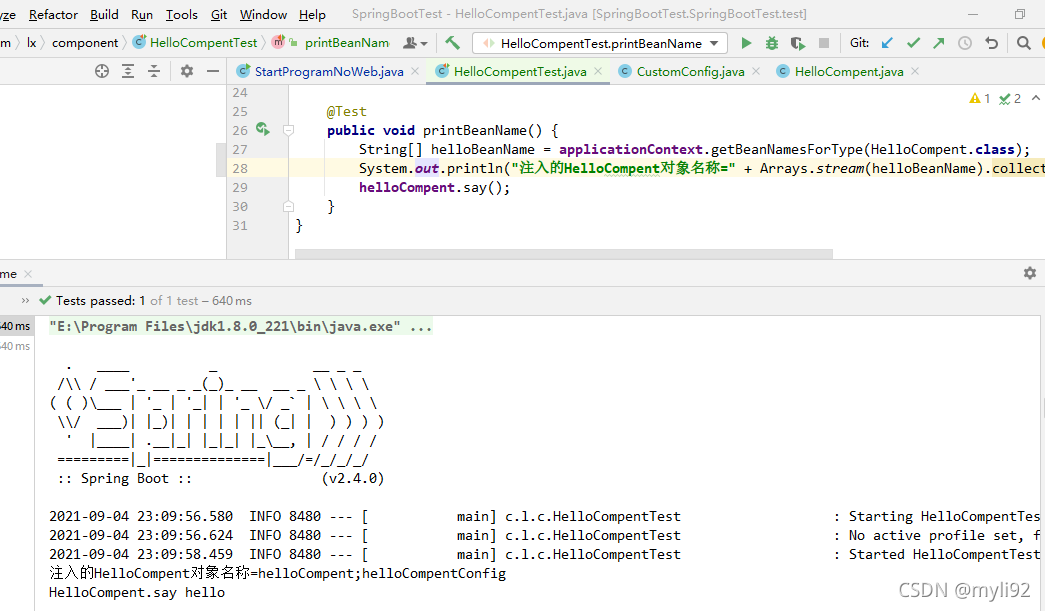
springboot自动配置注入对象就是使用的方式3实现注入对象到容器中,平时最常用的就是方式2和方式3,如果同时使用方式2和方式3注入会出现注入重复的对象。
2.注入是增加条件判断注解
@ComponentScan:声明作用域
@ConditionalOnBean:当容器里有指定Bean的条件下
@ConditionalOnClass:当类路径下有指定的类的条件下
@ConditionalOnExpression:基于SpEL表达式为true的时候作为判断条件才去实例化
@ConditionalOnJava:基于JVM版本作为判断条件
@ConditionalOnJndi:在JNDI存在的条件下查找指定的位置
@ConditionalOnMissingBean:当容器里没有指定Bean的情况下
@ConditionalOnMissingClass:当容器里没有指定类的情况下
@ConditionalOnWebApplication:当前项目时Web项目的条件下
@ConditionalOnNotWebApplication:当前项目不是Web项目的条件下
@ConditionalOnProperty:指定的属性是否有指定的值
@ConditionalOnProperty(prefix = "customconfig",name = "enable",havingValue = "true") 等效于@ConditionalOnProperty(value = "customconfig.enable",havingValue = "true")
@ConditionalOnResource:类路径是否有指定的值
@ConditionalOnOnSingleCandidate:当指定Bean在容器中只有一个,或者有多个但是指定首选的Bean
这些注解都组合了@Conditional注解,只是使用了不同的条件组合最后为true时才会去实例化需要实例化的类,否则忽略
3.构造方法时带参数注入
有时候在实际工作中,我们需要在构造方法是增加一些处理逻辑,同事也需要从容器中获取对象,但是这时候我们在构造方式时想从容器中获取对象,实际上并不能获取到。因为这个spring的注解优先级有关系。当构造方法使用字段时,spring并没有将对象注入成功,所有构造方式取值也就是用。
package com.lx.component;
import com.lx.service.HelloService;
import org.springframework.beans.factory.annotation.Autowired;
import org.springframework.beans.factory.annotation.Value;
import org.springframework.stereotype.Component;
@Component
public class HelloTwoCompent {
    @Value("${proper.name}")
    private String name;
    @Autowired
    private HelloService helloService;
    public HelloTwoCompent() {
       System.out.println("hellotwo 无参");
        System.out.println("name=" + name + ";helloService=" + helloService);
        if (helloService != null) {
            helloService.print();
        }
    }
}

方式1:使用spring xml实现
新增加一个用于测试的类HelloTwoCompent
在xml bean节点上增加构造方法参数配置即可。然后在springboot启动类上增加@ImportResource(locations= {"classpath:application-bean.xml"})。这里我不喜欢用,暂时就不写测试代码了。
方式2:使用@Autowired
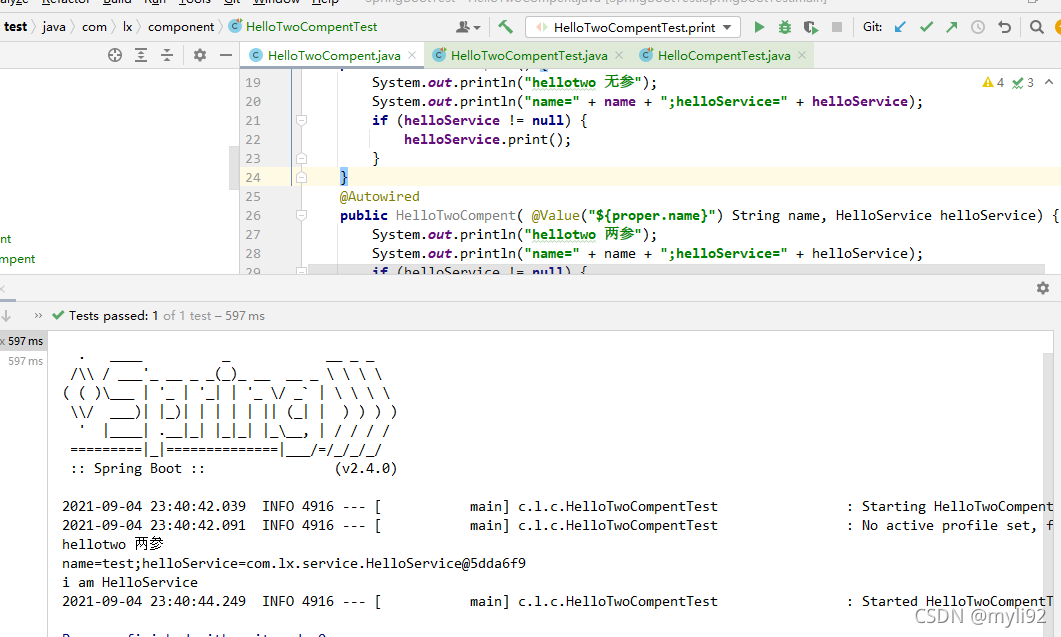
修改HelloTwoCompent 类在构造方法上增加@Autowired
    @Autowired
    public HelloTwoCompent( @Value("${proper.name}") String name, HelloService helloService) {
        System.out.println("hellotwo 两参");
        System.out.println("name=" + name + ";helloService=" + helloService);
        if (helloService != null) {
            helloService.print();
        }
    }
方式3使用@Configuration和@Bean组合
增加一个配置了 HelloConfig
package com.lx.config;
import com.lx.component.HelloTwoCompent;
import com.lx.service.HelloService;
import org.springframework.beans.factory.annotation.Autowired;
import org.springframework.beans.factory.annotation.Value;
import org.springframework.context.annotation.Bean;
import org.springframework.context.annotation.Configuration;
@Configuration
public class HelloConfig {
    @Value("${proper.name}")
    private String name;
    @Autowired
    private HelloService helloService;
    @Bean("helloTwoCompentBean")
    public HelloTwoCompent helloTwoCompent() {
        return  new HelloTwoCompent(name,helloService,"config-bean");
    }
}
修改一下HelloTwoCompent,增加一个三个参数的构造方法,并且构造方法上不增加任何的注解。
    public HelloTwoCompent(String name, HelloService helloService,String type) {
        System.out.println("hellotwo 三参;type="+type);
        System.out.println("name=" + name + ";helloService=" + helloService);
        if (helloService != null) {
            helloService.print();
        }
    }

4.对象注入时的一些总结
1.静态字段不支持@Autowired和@Resource实现自动装配,因为自动装配依赖于set和get方法,@Autowired和@Resource就是消除set和get方法。
2.自动装配的字段可以为private,因为自动装配依赖于set和get方法。所以和字段的作用域无关。
总结
本篇文章就到这里了,希望能够给你带来帮助,也希望您能够多多关注我们的更多内容!
相关推荐
-

spring boot容器启动流程
一.前言 spring cloud大行其道的当下,如果不了解基本原理那么是很纠结的(看见的都是 约定大于配置 ,但是原理呢?为什么要这么做?).spring cloud是基于spring boot快速搭建的,今天咱们就看看spring boot容器启动流程.(本文不讲解如何快速启动spring boot,那些直接官方看即可, 官网文档飞机票 ) 二.容器启动 spring boot一般是 指定容器启动main方法,然后以命令行方式启动Jar包 ,如下图: @SpringBootApplicati
-
spring boot基于Java的容器配置讲解
spring容器是负责实例化.配置.组装组件的容器. 容器的配置有很多,常用的是xml.Java注解和Java代码. 在spring中Ioc容器相关部分是context和beans中.其中context-support保存着许多线程的容器实现.比如AnnotationConfigApplicationContext或者ClassPathXmlApplicationContext.两者只有接收的目标不同,前者接收Java类后者接收Xml文件.但作为spring容器的不同实现殊途同归. 下面我通过s
-
spring boot 监听容器启动代码实例
在使用Spring框架开发时, 有时我们需要在spring容器初始化完成后做一些操作, 那么我们可以通过自定义ApplicationListener 来实现. 自定义监听器 @Component public class MyApplicationListener implements ApplicationListener<ContextRefreshedEvent> { @Override public void onApplicationEvent(ContextRefreshedEve
-
SpringBoot 项目如何在tomcat容器中运行的实现方法
一. SpringBoot内嵌容器的部署方式 SpringBoot内部默认提供内嵌的tomcat容器,所以可以直接打成jar包,丢到服务器上的任何一个目录,然后在当前目录下执行java -jar demo.jar即可运行,但是这种方式的运行退出进程就结束了.如果想在后台可以运行,则需要执行 java -jar demo.jar > log_demo.file 2>&1 & 即可在后台运行该服务了,log_demo.file是日志文件.如需停止该进程 执行ps -ef|grep
-
springboot关于容器启动事件总结
在springboot 容器启动时,我们需要在启动过程中做一些操作,比如启动容器后,执行某些代码. spring 提供了监听器,我们可以方便的实现这些操作. 在容器启动开始时: package com.neo.filter; import org.springframework.boot.context.event.ApplicationStartingEvent; import org.springframework.context.ApplicationListener; public cl
-
关于Springboot如何获取IOC容器
目录 Springboot项目中获取IOC容器的方式 方法一(不实用,不推荐): 方法二(强烈推荐): 总结 Springboot项目中获取IOC容器的方式 在Springboot项目中如果要获取IOC容器目前有两种方法. 方法一(不实用,不推荐): 在Springboot项目中都会存在一个SpringApplication的启动类,我们通过以下代码启动IOC容器. SpringApplication.run(Application.class, args); 其实run方法会将创建的IOC容器
-
Java SpringBoot容器注入对象详解
目录 1.注入的方式 方式一:使用Import注解 方式二:使用@Service 或者@Component等注解注入到容器中 方式三:使用@Configuration和@Bean组合实现 2.注入是增加条件判断注解 3.构造方法时带参数注入 方式1:使用spring xml实现 方式2:使用@Autowired 方式3使用@Configuration和@Bean组合 4.对象注入时的一些总结 总结 1.注入的方式 方式一:使用Import注解 增加一个类HelloCompent package
-
Java SpringBoot Validation用法案例详解
目录 constraints分类 对象集成constraints示例 SpringBoot集成自动验证 集成maven依赖 验证RequestBody.Form对象参数 验证简单参数 验证指定分组 全局controller验证异常处理 自定义constraints @DateFormat @PhoneNo 使用自定义constraint注解 问题 提到输入参数的基本验证(非空.长度.大小.格式-),在以前我们还是通过手写代码,各种if.else.StringUtils.isEmpty.Colle
-
Java SpringBoot自动装配原理详解及源码注释
目录 一.pom.xml文件 1.父依赖 2.启动器: 二.主程序: 剖析源码注解: 三.结论: 一.pom.xml文件 1.父依赖 主要是依赖一个父项目,管理项目的资源过滤以及插件! 资源过滤已经配置好了,无需再自己配置 在pom.xml中有个父依赖:spring-boot-dependencies是SpringBoot的版本控制中心! 因为有这些版本仓库,我们在写或者引入一些springboot依赖的时候,不需要指定版本! 2.启动器: 启动器也就是Springboot的启动场景; 比如sp
-
Java Springboot websocket使用案例详解
什么是WebSocket WebSocket是一种在单个TCP连接上进行全双工通信的协议 - 为什么要实现握手监控管理 如果说,连接随意创建,不管的话,会存在错误,broken pipe 表面看单纯报错,并没什么功能缺陷等,但实际,请求数增加,容易导致系统奔溃.这边画重点. 出现原因有很多种,目前我这边出现的原因,是因为客户端已关闭连接,服务端还持续推送导致. 如何使用 下面将使用springboot集成的webSocket 导入Maven 首先SpringBoot版本 <parent> &l
-
Java SpringBoot的相关知识点详解
目录 1. IOC和DI 2. Spring容器加载Bean/创建对象的时机 3. @Autowired注解 4. @Configuration配置类 5. @Conditional条件注解 6. SpringBoot的自动配置/自动装配 总结 1. IOC和DI 首先,我们应该明确,IOC是一种思想,并不是Spring特有的,而是软件工程逐步发展的一种产物,是一种优秀的编程思想,之所以我们经常会把IOC理解成是Spring特有的东西,是因为Spring框架可以帮助我们很好的去实现IOC.IOC
-
Java SpringBoot核心源码详解
目录 SpringBoot源码主线分析 1.SpringBoot启动的入口 2.run方法 3.SpringApplication构造器 4.run方法 总结 SpringBoot源码主线分析 我们要分析一个框架的源码不可能通过一篇文章就搞定的,本文我们就来分析下SpringBoot源码中的主线流程.先掌握SpringBoot项目启动的核心操作,然后我们再深入每一个具体的实现细节,注:本系列源码都以SpringBoot2.2.5.RELEASE版本来讲解 1.SpringBoot启动的入口 当我
-
四种引用类型在JAVA Springboot中的使用详解
目录 概念介绍 01. 强引用 02. 软引用 03. 弱引用 04. 虚引用 对象可达性 Springboot源码中的使用 总结 概念介绍 不同的引用类型,主要体现的是对象不同的可达性(reachable)状态和对垃圾收集的影响. 01. 强引用 这个就是我们创建的普通对象了~ 当该对象被显示地赋值为 null 时,或者没有被其他存活的对象继续引用时,它就会成为垃圾收集器的目标,等待被收回 02. 软引用 软引用( SoftReference ) , 当内存不足 时会被回收 比如
-
Java SpringBoot+vue+实战项目详解
目录 1.<锋迷商城>业务流程设计-接⼝规范 1.1 前后端分离与单体架构流程实现的区别 1.1.1单体架构 1.1.2 前后端分离架构 1.2 接口介绍 1.2.1接口概念 1.2.2接口规范 1.3 Swagger 1.3.1作用 1.3.2 Swagger整合 1.3.3 Swagger注解说明 1.3.4 Swagger-ui 插件 1.4 RESTful 总结 1.<锋迷商城>业务流程设计-接⼝规范 在企业项⽬开发中,当完成项⽬的需求分析.功能分析.数据库分析与设计之后,
-
Java Springboot自动装配原理详解
目录 Debug路线图 让我们从run说起 归属 小结 run 再说说注解 总结 Debug路线图 说多都是泪,大家看图. 让我们从run说起 用了这么多年的的Springboot,这个 run() 方法到底做了些什么事呢? @SpringBootApplication public class SpringbootDemoApplication { public static void main(String[] args) { SpringApplication.run(Springboot
-
四种引用类型在JAVA Springboot中的使用详解
目录 概念介绍 01. 强引用 02. 软引用 03. 弱引用 04. 虚引用 对象可达性 Springboot源码中的使用 总结 概念介绍 不同的引用类型,主要体现的是对象不同的可达性(reachable)状态和对垃圾收集的影响. 01. 强引用 这个就是我们创建的普通对象了~ 当该对象被显示地赋值为 null 时,或者没有被其他存活的对象继续引用时,它就会成为垃圾收集器的目标,等待被收回 02. 软引用 软引用( SoftReference ) , 当内存不足 时会被回收 比如