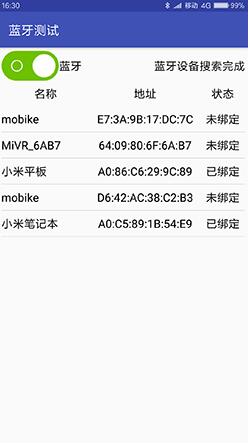
Android实现蓝牙(BlueTooth)设备检测连接
无论是WIFI还是4G网络,建立网络连接后都是访问互联网资源,并不能直接访问局域网资源。比如两个人在一起,A要把手机上的视频传给B,通常情况是打开手机QQ,通过QQ传送文件给对方。不过上传视频很耗流量,如果现场没有可用的WIFI,手机的数据流量又不足,那又该怎么办呢?为了解决这种邻近传输文件的问题,蓝牙技术应运而生。蓝牙技术是一种无线技术标准,可实现设备之间的短距离数据交换。
Android为蓝牙技术提供了4个工具类,分别是蓝牙适配器BluetoothAdapter、蓝牙设备BluetoothDevice、蓝牙服务端套接字BluetoothServerSocket和蓝牙客户端套接字BluetoothSocket。
蓝牙适配器BluetoothAdapter
BluetoothAdapter的作用其实跟其它的**Manger差不多,可以把它当作蓝牙管理器。下面是BluetoothAdapter的常用方法说明。
getDefaultAdapter:静态方法,获取默认的蓝牙适配器对象;
enable:打开蓝牙功能;
disable:关闭蓝牙功能;
isEnable:判断蓝牙功能是否打开;
startDiscovery:开始搜索周围的蓝牙设备;
cancelDiscovery:取消搜索操作;
isDiscovering:判断当前是否正在搜索设备;
getBondedDevices:获取已绑定的设备列表;
setName:设置本机的蓝牙名称;
getName:获取本机的蓝牙名称;
getAddress:获取本机的蓝牙地址;
getRemoteDevice:根据蓝牙地址获取远程的蓝牙设备;
getState:获取本地蓝牙适配器的状态;
listenUsingRfcommWithServiceRecord:根据名称和UUID创建并返回BluetoothServiceSocket;
listenUsingRfcommOn:根据渠道编号创建并返回BluetoothServiceSocket。
蓝牙设备BluetoothDevice
BluetoothDevice用于指代某个蓝牙设备,通常表示对方设备。BluetoothAdapter管理的是本机蓝牙设备。下面是BluetoothDevice的常用方法说明。
- getName:获得该设备的名称;
- getAddress:获得该设备的地址;
- getBondState:获得该设备的绑定状态;
- createBond:创建匹配对象;
- createRfcommSocketToServiceRecord:根据UUID创建并返回一个BluetoothSocket。
蓝牙服务器套接字BluetoothServiceSocket
BluetoothServiceSocket是服务端的Socket,用来接收客户端的Socket连接请求。下面是常用的方法说明。
accept:监听外部的蓝牙连接请求;
close:关闭服务端的蓝牙监听。
蓝牙客户端套接字BluetoothSocket
BluetoothSocket是客户端的Socket,用于与对方设备进行数据通信。下面是常用的方法说明。
- connect:建立蓝牙的socket连接;
- close:关闭蓝牙的socket连接;
- getInputStream:获取socket连接的输入流对象;
- getOutputStream:获取socket连接的输出流对象;
- getRemoteDevice:获取远程设备信息。
layout\activity_bluetooth.xml界面布局代码如下:界面布局代码如下:
<LinearLayout xmlns:android="http://schemas.android.com/apk/res/android"
  android:layout_width="match_parent"
  android:layout_height="match_parent"
  android:orientation="vertical"
  android:padding="5dp">

  <LinearLayout
    android:layout_width="match_parent"
    android:layout_height="wrap_content"
    android:orientation="horizontal">

    <CheckBox
      android:id="@+id/ck_bluetooth"
      android:layout_width="wrap_content"
      android:layout_height="wrap_content"
      android:button="@null"
      android:checked="false"
      android:drawableLeft="@drawable/ck_status_selector"
      android:text="蓝牙"
      android:textColor="#ff000000"
      android:textSize="17sp" />

    <TextView
      android:id="@+id/tv_discovery"
      android:layout_width="0dp"
      android:layout_height="match_parent"
      android:layout_weight="1"
      android:gravity="right|center"
      android:textColor="#ff000000"
      android:textSize="17sp" />
  </LinearLayout>

  <LinearLayout
    android:layout_width="match_parent"
    android:layout_height="40dp"
    android:orientation="horizontal">

    <TextView
      android:layout_width="0dp"
      android:layout_height="match_parent"
      android:layout_weight="4"
      android:gravity="center"
      android:text="名称"
      android:textColor="#ff000000"
      android:textSize="17sp" />

    <TextView
      android:layout_width="0dp"
      android:layout_height="match_parent"
      android:layout_weight="5"
      android:gravity="center"
      android:text="地址"
      android:textColor="#ff000000"
      android:textSize="17sp" />

    <TextView
      android:layout_width="0dp"
      android:layout_height="match_parent"
      android:layout_weight="2"
      android:gravity="center"
      android:text="状态"
      android:textColor="#ff000000"
      android:textSize="17sp" />
  </LinearLayout>

  <ListView
    android:id="@+id/lv_bluetooth"
    android:layout_width="match_parent"
    android:layout_height="match_parent" />

</LinearLayout>
BluetoothActivity.java逻辑代码如下:
package com.fukaimei.bluetoothtest;

import java.io.IOException;
import java.lang.reflect.Method;
import java.util.ArrayList;

import android.app.AlertDialog;
import android.bluetooth.BluetoothAdapter;
import android.bluetooth.BluetoothDevice;
import android.bluetooth.BluetoothSocket;
import android.content.BroadcastReceiver;
import android.content.Context;
import android.content.Intent;
import android.content.IntentFilter;
import android.content.pm.PackageManager;
import android.os.AsyncTask;
import android.os.Bundle;
import android.os.Handler;
import android.os.Message;
import android.support.annotation.NonNull;
import android.support.v4.app.ActivityCompat;
import android.support.v4.content.ContextCompat;
import android.support.v7.app.AppCompatActivity;
import android.util.Log;
import android.view.View;
import android.view.View.OnClickListener;
import android.widget.AdapterView;
import android.widget.AdapterView.OnItemClickListener;
import android.widget.CheckBox;
import android.widget.CompoundButton;
import android.widget.ListView;
import android.widget.CompoundButton.OnCheckedChangeListener;
import android.widget.TextView;
import android.widget.Toast;

import com.fukaimei.bluetoothtest.adapter.BlueListAdapter;
import com.fukaimei.bluetoothtest.bean.BlueDevice;
import com.fukaimei.bluetoothtest.task.BlueAcceptTask;
import com.fukaimei.bluetoothtest.task.BlueConnectTask;
import com.fukaimei.bluetoothtest.task.BlueReceiveTask;
import com.fukaimei.bluetoothtest.util.BluetoothUtil;
import com.fukaimei.bluetoothtest.widget.InputDialogFragment;

public class BluetoothActivity extends AppCompatActivity implements
    OnClickListener, OnItemClickListener, OnCheckedChangeListener,
    BlueConnectTask.BlueConnectListener, InputDialogFragment.InputCallbacks, BlueAcceptTask.BlueAcceptListener {
  private static final String TAG = "BluetoothActivity";
  private CheckBox ck_bluetooth;
  private TextView tv_discovery;
  private ListView lv_bluetooth;
  private BluetoothAdapter mBluetooth;
  private ArrayList<BlueDevice> mDeviceList = new ArrayList<BlueDevice>();

  @Override
  protected void onCreate(Bundle savedInstanceState) {
    super.onCreate(savedInstanceState);
    setContentView(R.layout.activity_bluetooth);
    bluetoothPermissions();
    ck_bluetooth = (CheckBox) findViewById(R.id.ck_bluetooth);
    tv_discovery = (TextView) findViewById(R.id.tv_discovery);
    lv_bluetooth = (ListView) findViewById(R.id.lv_bluetooth);
    if (BluetoothUtil.getBlueToothStatus(this) == true) {
      ck_bluetooth.setChecked(true);
    }
    ck_bluetooth.setOnCheckedChangeListener(this);
    tv_discovery.setOnClickListener(this);
    mBluetooth = BluetoothAdapter.getDefaultAdapter();
    if (mBluetooth == null) {
      Toast.makeText(this, "本机未找到蓝牙功能", Toast.LENGTH_SHORT).show();
      finish();
    }
  }

  // 定义获取基于地理位置的动态权限
  private void bluetoothPermissions() {
    if (ContextCompat.checkSelfPermission(this, android.Manifest.permission.ACCESS_COARSE_LOCATION)
        != PackageManager.PERMISSION_GRANTED) {
      ActivityCompat.requestPermissions(this, new String[]{
          android.Manifest.permission.ACCESS_COARSE_LOCATION}, 1);
    }
  }

  /**
   * 重写onRequestPermissionsResult方法
   * 获取动态权限请求的结果,再开启蓝牙
   */
  @Override
  public void onRequestPermissionsResult(int requestCode, @NonNull String[] permissions, @NonNull int[] grantResults) {
    if (requestCode == 1 && grantResults[0] == PackageManager.PERMISSION_GRANTED) {
      if (BluetoothUtil.getBlueToothStatus(this) == true) {
        ck_bluetooth.setChecked(true);
      }
      ck_bluetooth.setOnCheckedChangeListener(this);
      tv_discovery.setOnClickListener(this);
      mBluetooth = BluetoothAdapter.getDefaultAdapter();
      if (mBluetooth == null) {
        Toast.makeText(this, "本机未找到蓝牙功能", Toast.LENGTH_SHORT).show();
        finish();
      }
    } else {
      Toast.makeText(this, "用户拒绝了权限", Toast.LENGTH_SHORT).show();
    }
    super.onRequestPermissionsResult(requestCode, permissions, grantResults);
  }

  @Override
  public void onCheckedChanged(CompoundButton buttonView, boolean isChecked) {
    if (buttonView.getId() == R.id.ck_bluetooth) {
      if (isChecked == true) {
        beginDiscovery();
        Intent intent = new Intent(BluetoothAdapter.ACTION_REQUEST_DISCOVERABLE);
        startActivityForResult(intent, 1);
        // 下面这行代码为服务端需要,客户端不需要
        mHandler.postDelayed(mAccept, 1000);
      } else {
        cancelDiscovery();
        BluetoothUtil.setBlueToothStatus(this, false);
        mDeviceList.clear();
        BlueListAdapter adapter = new BlueListAdapter(this, mDeviceList);
        lv_bluetooth.setAdapter(adapter);
      }
    }
  }

  private Runnable mAccept = new Runnable() {
    @Override
    public void run() {
      if (mBluetooth.getState() == BluetoothAdapter.STATE_ON) {
        BlueAcceptTask acceptTask = new BlueAcceptTask(true);
        acceptTask.setBlueAcceptListener(BluetoothActivity.this);
        acceptTask.executeOnExecutor(AsyncTask.THREAD_POOL_EXECUTOR);
      } else {
        mHandler.postDelayed(this, 1000);
      }
    }
  };

  @Override
  public void onClick(View v) {
    if (v.getId() == R.id.tv_discovery) {
      beginDiscovery();
    }
  }

  @Override
  protected void onActivityResult(int requestCode, int resultCode, Intent intent) {
    super.onActivityResult(requestCode, resultCode, intent);
    if (requestCode == 1) {
      if (resultCode == RESULT_OK) {
        Toast.makeText(this, "允许本地蓝牙被附近的其它蓝牙设备发现", Toast.LENGTH_SHORT).show();
      } else if (resultCode == RESULT_CANCELED) {
        Toast.makeText(this, "不允许蓝牙被附近的其它蓝牙设备发现", Toast.LENGTH_SHORT).show();
      }
    }
  }

  private Runnable mRefresh = new Runnable() {
    @Override
    public void run() {
      beginDiscovery();
      mHandler.postDelayed(this, 2000);
    }
  };

  private void beginDiscovery() {
    if (mBluetooth.isDiscovering() != true) {
      mDeviceList.clear();
      BlueListAdapter adapter = new BlueListAdapter(BluetoothActivity.this, mDeviceList);
      lv_bluetooth.setAdapter(adapter);
      tv_discovery.setText("正在搜索蓝牙设备");
      mBluetooth.startDiscovery();
    }
  }

  private void cancelDiscovery() {
    mHandler.removeCallbacks(mRefresh);
    tv_discovery.setText("取消搜索蓝牙设备");
    if (mBluetooth.isDiscovering() == true) {
      mBluetooth.cancelDiscovery();
    }
  }

  @Override
  protected void onStart() {
    super.onStart();
    mHandler.postDelayed(mRefresh, 50);
    blueReceiver = new BluetoothReceiver();
    //需要过滤多个动作,则调用IntentFilter对象的addAction添加新动作
    IntentFilter foundFilter = new IntentFilter(BluetoothDevice.ACTION_FOUND);
    foundFilter.addAction(BluetoothAdapter.ACTION_DISCOVERY_FINISHED);
    foundFilter.addAction(BluetoothDevice.ACTION_BOND_STATE_CHANGED);
    registerReceiver(blueReceiver, foundFilter);
  }

  @Override
  protected void onStop() {
    super.onStop();
    cancelDiscovery();
    unregisterReceiver(blueReceiver);
  }

  private BluetoothReceiver blueReceiver;

  private class BluetoothReceiver extends BroadcastReceiver {
    @Override
    public void onReceive(Context context, Intent intent) {
      String action = intent.getAction();
      Log.d(TAG, "onReceive action=" + action);
      // 获得已经搜索到的蓝牙设备
      if (action.equals(BluetoothDevice.ACTION_FOUND)) {
        BluetoothDevice device = intent.getParcelableExtra(BluetoothDevice.EXTRA_DEVICE);
        BlueDevice item = new BlueDevice(device.getName(), device.getAddress(), device.getBondState() - 10);
        mDeviceList.add(item);
        BlueListAdapter adapter = new BlueListAdapter(BluetoothActivity.this, mDeviceList);
        lv_bluetooth.setAdapter(adapter);
        lv_bluetooth.setOnItemClickListener(BluetoothActivity.this);
      } else if (action.equals(BluetoothAdapter.ACTION_DISCOVERY_FINISHED)) {
        mHandler.removeCallbacks(mRefresh);
        tv_discovery.setText("蓝牙设备搜索完成");
      } else if (action.equals(BluetoothDevice.ACTION_BOND_STATE_CHANGED)) {
        BluetoothDevice device = intent.getParcelableExtra(BluetoothDevice.EXTRA_DEVICE);
        if (device.getBondState() == BluetoothDevice.BOND_BONDING) {
          tv_discovery.setText("正在配对" + device.getName());
        } else if (device.getBondState() == BluetoothDevice.BOND_BONDED) {
          tv_discovery.setText("完成配对" + device.getName());
          mHandler.postDelayed(mRefresh, 50);
        } else if (device.getBondState() == BluetoothDevice.BOND_NONE) {
          tv_discovery.setText("取消配对" + device.getName());
        }
      }
    }
  }

  @Override
  public void onItemClick(AdapterView<?> parent, View view, int position, long id) {
    cancelDiscovery();
    BlueDevice item = mDeviceList.get(position);
    BluetoothDevice device = mBluetooth.getRemoteDevice(item.address);
    try {
      if (device.getBondState() == BluetoothDevice.BOND_NONE) {
        Method createBondMethod = BluetoothDevice.class.getMethod("createBond");
        Log.d(TAG, "开始配对");
        Boolean result = (Boolean) createBondMethod.invoke(device);
      } else if (device.getBondState() == BluetoothDevice.BOND_BONDED &&
          item.state != BlueListAdapter.CONNECTED) {
        tv_discovery.setText("开始连接");
        BlueConnectTask connectTask = new BlueConnectTask(item.address);
        connectTask.setBlueConnectListener(this);
        connectTask.executeOnExecutor(AsyncTask.THREAD_POOL_EXECUTOR, device);
      } else if (device.getBondState() == BluetoothDevice.BOND_BONDED &&
          item.state == BlueListAdapter.CONNECTED) {
        tv_discovery.setText("正在发送消息");
        InputDialogFragment dialog = InputDialogFragment.newInstance(
            "", 0, "请输入要发送的消息");
        String fragTag = getResources().getString(R.string.app_name);
        dialog.show(getFragmentManager(), fragTag);
      }
    } catch (Exception e) {
      e.printStackTrace();
      tv_discovery.setText("配对异常:" + e.getMessage());
    }
  }

  //向对方发送消息
  @Override
  public void onInput(String title, String message, int type) {
    Log.d(TAG, "onInput message=" + message);
    Log.d(TAG, "mBlueSocket is " + (mBlueSocket == null ? "null" : "not null"));
    BluetoothUtil.writeOutputStream(mBlueSocket, message);
  }

  private BluetoothSocket mBlueSocket;

  //客户端主动连接
  @Override
  public void onBlueConnect(String address, BluetoothSocket socket) {
    mBlueSocket = socket;
    tv_discovery.setText("连接成功");
    refreshAddress(address);
  }

  //刷新已连接的状态
  private void refreshAddress(String address) {
    for (int i = 0; i < mDeviceList.size(); i++) {
      BlueDevice item = mDeviceList.get(i);
      if (item.address.equals(address) == true) {
        item.state = BlueListAdapter.CONNECTED;
        mDeviceList.set(i, item);
      }
    }
    BlueListAdapter adapter = new BlueListAdapter(this, mDeviceList);
    lv_bluetooth.setAdapter(adapter);
  }

  //服务端侦听到连接
  @Override
  public void onBlueAccept(BluetoothSocket socket) {
    Log.d(TAG, "onBlueAccept socket is " + (socket == null ? "null" : "not null"));
    if (socket != null) {
      mBlueSocket = socket;
      BluetoothDevice device = mBlueSocket.getRemoteDevice();
      refreshAddress(device.getAddress());
      BlueReceiveTask receive = new BlueReceiveTask(mBlueSocket, mHandler);
      receive.start();
    }
  }

  //收到对方发来的消息
  private Handler mHandler = new Handler() {
    @Override
    public void handleMessage(Message msg) {
      if (msg.what == 0) {
        byte[] readBuf = (byte[]) msg.obj;
        String readMessage = new String(readBuf, 0, msg.arg1);
        Log.d(TAG, "handleMessage readMessage=" + readMessage);
        AlertDialog.Builder builder = new AlertDialog.Builder(BluetoothActivity.this);
        builder.setTitle("我收到消息啦").setMessage(readMessage).setPositiveButton("确定", null);
        builder.create().show();
      }
    }
  };

  @Override
  protected void onDestroy() {
    super.onDestroy();
    if (mBlueSocket != null) {
      try {
        mBlueSocket.close();
      } catch (IOException e) {
        e.printStackTrace();
      }
    }
  }
}
添加蓝牙所需的相应权限:
 <!-- 蓝牙 -->
  <uses-permission android:name="android.permission.BLUETOOTH_ADMIN" />
  <uses-permission android:name="android.permission.BLUETOOTH" />
  <!--基于地理位置-->
  <uses-permission android:name="android.permission.ACCESS_COARSE_LOCATION" />
Demo程序运行效果界面截图如下:

以上就是本文的全部内容,希望对大家的学习有所帮助,也希望大家多多支持我们。

