Spring Security 图片验证码功能的实例代码
验证码逻辑
以前在项目中也做过验证码,生成验证码的代码网上有很多,也有一些第三方的jar包也可以生成漂亮的验证码。验证码逻辑很简单,就是在登录页放一个image标签,src指向一个controller,这个Controller返回把生成的图片以输出流返回给页面,生成图片的同时把图片上的文本放在session,登录的时候带过来输入的验证码,从session中取出,两者对比。这位老师讲的用Spring Security集成验证码,大体思路和我说的一样,但更加规范和通用些。
spring security是一系列的过滤器链,所以在这里验证码也声明为过滤器,加在过滤器链的 登录过滤器之前,然后自定义一个异常类,来响应验证码的错误信息。

代码结构:
验证码代码放在core项目,在browser项目做一下配置。
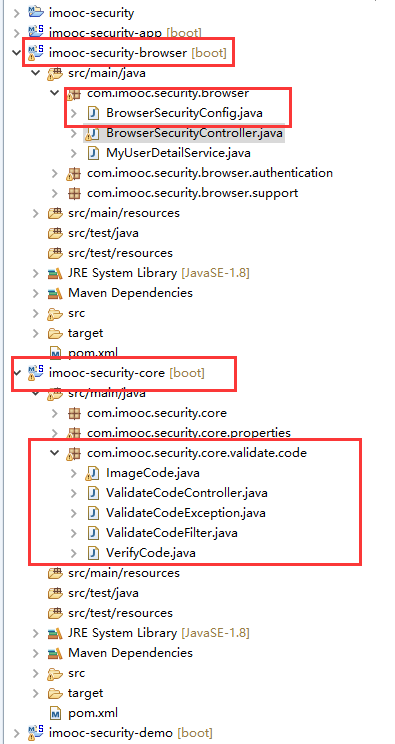
主要代码:
1,ImageCode:
首先是ImageCode类,封装验证码图片、文本、过期时间
package com.imooc.security.core.validate.code;
import java.awt.image.BufferedImage;
import java.time.LocalDateTime;
import java.time.LocalTime;
/**
 * 验证码
 * ClassName: ImageCode
 * @Description: 验证码
 * @author lihaoyang
 * @date 2018年3月1日
 */
public class ImageCode {
 private BufferedImage image;
 private String code;
 private LocalDateTime expireTime;//过期时间点
 /**
 *
 * <p>Description: </p>
 * @param image
 * @param code
 * @param expireTn 多少秒过期
 */
 public ImageCode(BufferedImage image, String code, int expireTn) {
 super();
 this.image = image;
 this.code = code;
 //过期时间=当前时间+过期秒数
 this.expireTime = LocalDateTime.now().plusSeconds(expireTn);
 }
 public ImageCode(BufferedImage image, String code, LocalDateTime expireTime) {
 super();
 this.image = image;
 this.code = code;
 this.expireTime = expireTime;
 }
 /**
 * 验证码是否过期
 * @Description: 验证码是否过期
 * @param @return true 过期,false 没过期
 * @return boolean true 过期,false 没过期
 * @throws
 * @author lihaoyang
 * @date 2018年3月2日
 */
 public boolean isExpired(){
 return LocalDateTime.now().isAfter(expireTime);
 }
 public BufferedImage getImage() {
 return image;
 }
 public void setImage(BufferedImage image) {
 this.image = image;
 }
 public String getCode() {
 return code;
 }
 public void setCode(String code) {
 this.code = code;
 }
 public LocalDateTime getExpireTime() {
 return expireTime;
 }
 public void setExpireTime(LocalDateTime expireTime) {
 this.expireTime = expireTime;
 }
}
VerifyCode:生成验证码的工具类,在这里http://www.cnblogs.com/lihaoyang/p/7131512.html 当然也可以使用第三方jar包,无所谓。
ValidateCodeException:封装验证码异常
/**
 * @Title: ValidateCodeException.java
 * @Package com.imooc.security.core.validate.code
 * @Description: TODO
 * @author lihaoyang
 * @date 2018年3月2日
 */
package com.imooc.security.core.validate.code;
import org.springframework.security.core.AuthenticationException;
/**
 * ClassName: ValidateCodeException
 * @Description: 验证码错误异常,继承spring security的认证异常
 * @author lihaoyang
 * @date 2018年3月2日
 */
public class ValidateCodeException extends AuthenticationException {
 /**
 * @Fields serialVersionUID : TODO
 */
 private static final long serialVersionUID = 1L;
 public ValidateCodeException(String msg) {
 super(msg);
 }
}
ValidateCodeFilter:验证码过滤器
逻辑:继承OncePerRequestFilter 保证过滤器每次只会被调用一次(不太清楚为什么),注入认证失败处理器,在验证失败时调用。
package com.imooc.security.core.validate.code;
import java.io.IOException;
import javax.servlet.FilterChain;
import javax.servlet.ServletException;
import javax.servlet.http.HttpServletRequest;
import javax.servlet.http.HttpServletResponse;
import org.apache.commons.lang.StringUtils;
import org.springframework.security.web.authentication.AuthenticationFailureHandler;
import org.springframework.social.connect.web.HttpSessionSessionStrategy;
import org.springframework.social.connect.web.SessionStrategy;
import org.springframework.web.bind.ServletRequestBindingException;
import org.springframework.web.bind.ServletRequestUtils;
import org.springframework.web.context.request.ServletWebRequest;
import org.springframework.web.filter.OncePerRequestFilter;
/**
 * 处理登录验证码过滤器
 * ClassName: ValidateCodeFilter
 * @Description:
 * OncePerRequestFilter:spring提供的工具,保证过滤器每次只会被调用一次
 * @author lihaoyang
 * @date 2018年3月2日
 */
public class ValidateCodeFilter extends OncePerRequestFilter{
 //认证失败处理器
 private AuthenticationFailureHandler authenticationFailureHandler;
 //获取session工具类
 private SessionStrategy sessionStrategy = new HttpSessionSessionStrategy();
 @Override
 protected void doFilterInternal(HttpServletRequest request, HttpServletResponse response, FilterChain filterChain)
  throws ServletException, IOException {
 //如果是 登录请求 则执行
 if(StringUtils.equals("/authentication/form", request.getRequestURI())
  &&StringUtils.equalsIgnoreCase(request.getMethod(), "post")){
  try {
  validate(new ServletWebRequest(request));
  } catch (ValidateCodeException e) {
  //调用错误处理器,最终调用自己的
  authenticationFailureHandler.onAuthenticationFailure(request, response, e);
  return ;//结束方法,不再调用过滤器链
  }
 }
 //不是登录请求,调用其它过滤器链
 filterChain.doFilter(request, response);
 }
 /**
 * 校验验证码
 * @Description: 校验验证码
 * @param @param request
 * @param @throws ServletRequestBindingException
 * @return void
 * @throws ValidateCodeException
 * @author lihaoyang
 * @date 2018年3月2日
 */
 private void validate(ServletWebRequest request) throws ServletRequestBindingException {
 //拿出session中的ImageCode对象
 ImageCode imageCodeInSession = (ImageCode) sessionStrategy.getAttribute(request, ValidateCodeController.SESSION_KEY);
 //拿出请求中的验证码
 String imageCodeInRequest = ServletRequestUtils.getStringParameter(request.getRequest(), "imageCode");
 //校验
 if(StringUtils.isBlank(imageCodeInRequest)){
  throw new ValidateCodeException("验证码不能为空");
 }
 if(imageCodeInSession == null){
  throw new ValidateCodeException("验证码不存在,请刷新验证码");
 }
 if(imageCodeInSession.isExpired()){
  //从session移除过期的验证码
  sessionStrategy.removeAttribute(request, ValidateCodeController.SESSION_KEY);
  throw new ValidateCodeException("验证码已过期,请刷新验证码");
 }
 if(!StringUtils.equalsIgnoreCase(imageCodeInSession.getCode(), imageCodeInRequest)){
  throw new ValidateCodeException("验证码错误");
 }
 //验证通过,移除session中验证码
 sessionStrategy.removeAttribute(request, ValidateCodeController.SESSION_KEY);
 }
 public AuthenticationFailureHandler getAuthenticationFailureHandler() {
 return authenticationFailureHandler;
 }
 public void setAuthenticationFailureHandler(AuthenticationFailureHandler authenticationFailureHandler) {
 this.authenticationFailureHandler = authenticationFailureHandler;
 }
}
ValidateCodeController:生成验证码Control
package com.imooc.security.core.validate.code;
import java.io.IOException;
import javax.imageio.ImageIO;
import javax.servlet.http.HttpServletRequest;
import javax.servlet.http.HttpServletResponse;
import org.springframework.social.connect.web.HttpSessionSessionStrategy;
import org.springframework.social.connect.web.SessionStrategy;
import org.springframework.web.bind.annotation.GetMapping;
import org.springframework.web.bind.annotation.RestController;
import org.springframework.web.context.request.ServletWebRequest;
/**
 * 验证码Control
 * ClassName: ValidateCodeController
 * @Description: TODO
 * @author lihaoyang
 * @date 2018年3月1日
 */
@RestController
public class ValidateCodeController {
 public static final String SESSION_KEY = "SESSION_KEY_IMAGE_CODE";
 //获取session
 private SessionStrategy sessionStrategy = new HttpSessionSessionStrategy();
 @GetMapping("/verifycode/image")
 public void createCode(HttpServletRequest request,HttpServletResponse response) throws IOException{
 ImageCode imageCode = createImageCode(request, response);
 sessionStrategy.setAttribute(new ServletWebRequest(request), SESSION_KEY, imageCode);
 ImageIO.write(imageCode.getImage(), "JPEG", response.getOutputStream());
 }
 private ImageCode createImageCode(HttpServletRequest request, HttpServletResponse response) {
 VerifyCode verifyCode = new VerifyCode();
 return new ImageCode(verifyCode.getImage(),verifyCode.getText(),60);
 }
}
BrowserSecurityConfig里进行过滤器配置:
package com.imooc.security.browser;
import org.springframework.beans.factory.annotation.Autowired;
import org.springframework.context.annotation.Bean;
import org.springframework.context.annotation.Configuration;
import org.springframework.security.config.annotation.web.builders.HttpSecurity;
import org.springframework.security.config.annotation.web.configuration.WebSecurityConfigurerAdapter;
import org.springframework.security.crypto.bcrypt.BCryptPasswordEncoder;
import org.springframework.security.crypto.password.PasswordEncoder;
import org.springframework.security.web.authentication.AuthenticationFailureHandler;
import org.springframework.security.web.authentication.AuthenticationSuccessHandler;
import org.springframework.security.web.authentication.UsernamePasswordAuthenticationFilter;
import com.imooc.security.core.properties.SecurityProperties;
import com.imooc.security.core.validate.code.ValidateCodeFilter;
@Configuration //这是一个配置
public class BrowserSecurityConfig extends WebSecurityConfigurerAdapter{
 //读取用户配置的登录页配置
 @Autowired
 private SecurityProperties securityProperties;
 //自定义的登录成功后的处理器
 @Autowired
 private AuthenticationSuccessHandler imoocAuthenticationSuccessHandler;
 //自定义的认证失败后的处理器
 @Autowired
 private AuthenticationFailureHandler imoocAuthenticationFailureHandler;
 //注意是org.springframework.security.crypto.password.PasswordEncoder
 @Bean
 public PasswordEncoder passwordencoder(){
 //BCryptPasswordEncoder implements PasswordEncoder
 return new BCryptPasswordEncoder();
 }
 //版本二:可配置的登录页
 @Override
 protected void configure(HttpSecurity http) throws Exception {
 //验证码过滤器
 ValidateCodeFilter validateCodeFilter = new ValidateCodeFilter();
 //验证码过滤器中使用自己的错误处理
 validateCodeFilter.setAuthenticationFailureHandler(imoocAuthenticationFailureHandler);

 //实现需要认证的接口跳转表单登录,安全=认证+授权
 //http.httpBasic() //这个就是默认的弹框认证
 //
 http.addFilterBefore(validateCodeFilter, UsernamePasswordAuthenticationFilter.class)//把验证码过滤器加载登录过滤器前边
  .formLogin() //表单认证
  .loginPage("/authentication/require") //处理用户认证BrowserSecurityController
  //登录过滤器UsernamePasswordAuthenticationFilter默认登录的url是"/login",在这能改
  .loginProcessingUrl("/authentication/form")
  .successHandler(imoocAuthenticationSuccessHandler)//自定义的认证后处理器
  .failureHandler(imoocAuthenticationFailureHandler) //登录失败后的处理
  .and()
  .authorizeRequests() //下边的都是授权的配置
  // /authentication/require:处理登录,securityProperties.getBrowser().getLoginPage():用户配置的登录页
  .antMatchers("/authentication/require",
   securityProperties.getBrowser().getLoginPage(),//放过登录页不过滤,否则报错
   "/verifycode/image").permitAll() //验证码
  .anyRequest() //任何请求
  .authenticated() //都需要身份认证
  .and()
  .csrf().disable() //关闭csrf防护
  ;
 }
}
登陆页:登陆页做的比较粗糙,其实验证码可以在验证码input失去焦点的时候做校验,还可以做个点击图片刷新验证码功能,这里就不做了。
<body>
 demo 登录页. <br>
 <form action="/authentication/form" method="post">
 <table>
  <tr>
  <td>用户名:</td>
  <td><input type="text" name="username"/></td>
  <td></td>
  </tr>
  <tr>
  <td>密码:</td>
  <td><input type="password" name="password"/></td>
  <td></td>
  </tr>
  <tr>
  <td>验证码:</td>
  <td>
   <input width="100" type="text" name="imageCode"/>
  </td>
  <td>
   <img src="/verifycode/image"/>
  </td>
  </tr>
  <tr>
  <td colspan="2" align="right"><button type="submit">登录</button></td>
  </tr>
 </table>
 </form>
 </body>
访问 http://localhost:8080/demo-login.html:
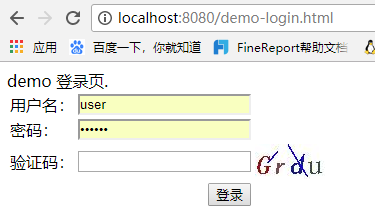
响应自定义的异常信息

大体功能已经没问题了。但是不够通用,比如验证码图片的宽高、过期时间、过滤的url、验证码成逻辑都是写死的。这些可以做成活的,现在把验证码做成一个过滤器的好处体现出来了。我们可以配置需要过滤的url,有时候可能不只是登陆页需要验证码,这样更加通用。
1,通用性改造 之 验证码基本参数可配
做成可配置的,那个应用引用该模块,他自己配置去,不配置就使用默认配置。而且,配置既可以在请求url中声明,也可以在应用中声明,老师的确是老师,代码通用性真好!
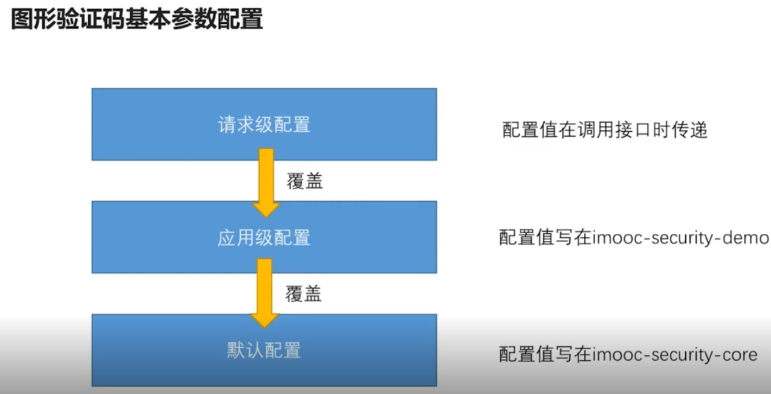
想要实现的效果是,在application.properties里做这样的配置:
#验证码 图片宽、高、字符个数
imooc.security.code.image.width = 100
imooc.security.code.image.height = 30
imooc.security.code.image.length = 6
然后就能控制验证码的效果,因为验证码还分图片验证码、短信验证码,所以多做了一级.code.image,这就用到了springboot的自定义配置文件,需要声明对应的java类:
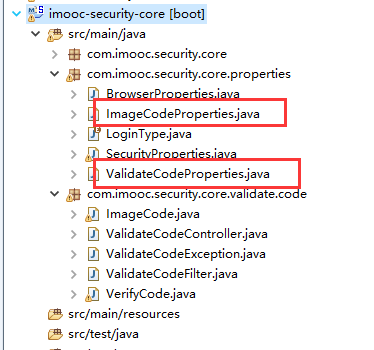
需要在SecurityProperties里声明code属性:
package com.imooc.security.core.properties;
import org.springframework.boot.context.properties.ConfigurationProperties;
import org.springframework.context.annotation.Configuration;
/**
 * 自定义配置项
 * ClassName: SecurityProperties
 * @Description: 自定义配置项
 * 这个类会读取application.properties里所有以imooc.security开头的配置项
 *
 * imooc.security.browser.loginPage = /demo-login.html
 * 其中的browser的配置会读取到BrowserProperties中去
 * 这是以点分割的,一级一级的和类的属性对应
 * @author lihaoyang
 * @date 2018年2月28日
 */
@ConfigurationProperties(prefix="imooc.security")
public class SecurityProperties {
 private BrowserProperties browser = new BrowserProperties();
 private ValidateCodeProperties code = new ValidateCodeProperties();
 public BrowserProperties getBrowser() {
 return browser;
 }
 public void setBrowser(BrowserProperties browser) {
 this.browser = browser;
 }
 public ValidateCodeProperties getCode() {
 return code;
 }
 public void setCode(ValidateCodeProperties code) {
 this.code = code;
 }
}
ValidateCodeProperties:
package com.imooc.security.core.properties;
/**
 * 验证码配置
 * ClassName: ValidateCodeProperties
 * @Description: 验证码配置,验证码有图片验证码、短信验证码等,所以再包一层
 * @author lihaoyang
 * @date 2018年3月2日
 */
public class ValidateCodeProperties {
 //默认配置
 private ImageCodeProperties image = new ImageCodeProperties();
 public ImageCodeProperties getImage() {
 return image;
 }
 public void setImage(ImageCodeProperties image) {
 this.image = image;
 }
}
ImageCodeProperties:
package com.imooc.security.core.properties;
/**
 * 图片验证码配置类
 * ClassName: ImageCodeProperties
 * @Description: 图片验证码配置类
 * @author lihaoyang
 * @date 2018年3月2日
 */
public class ImageCodeProperties {
 //图片宽
 private int width = 67;
 //图片高
 private int height = 23;
 //验证码字符个数
 private int length = 4;
 //过期时间
 private int expireIn = 60;
 public int getWidth() {
 return width;
 }
 public void setWidth(int width) {
 this.width = width;
 }
 public int getHeight() {
 return height;
 }
 public void setHeight(int height) {
 this.height = height;
 }
 public int getLength() {
 return length;
 }
 public void setLength(int length) {
 this.length = length;
 }
 public int getExpireIn() {
 return expireIn;
 }
 public void setExpireIn(int expireIn) {
 this.expireIn = expireIn;
 }
}
请求级的配置,如果请求里带的有验证码的参数,就用请求里的:

在ValidateCodeController的createImageCode方法做控制,判断请求参数是否有这些参数,有的话,传给验证码生成类VerifyCode,在生成的时候就能动态控制了。
private ImageCode createImageCode(HttpServletRequest request, HttpServletResponse response) {
 //先从request里读取有没有长、宽、字符个数参数,有的话就用,没有用默认的
 int width = ServletRequestUtils.getIntParameter(request, "width",securityProperties.getCode().getImage().getWidth());

 int height = ServletRequestUtils.getIntParameter(request, "height",securityProperties.getCode().getImage().getHeight());

 int charLength = this.securityProperties.getCode().getImage().getLength();
 VerifyCode verifyCode = new VerifyCode(width,height,charLength);
 return new ImageCode(verifyCode.getImage(),verifyCode.getText(),this.securityProperties.getCode().getImage().getExpireIn());
 }
VerifyCode:
public VerifyCode(int w, int h, int charLength) {
 super();
 this.w = w;
 this.h = h;
 this.charLength = charLength;
 }
实验:在demo项目做应用级配置

登录表单做请求级配置
<img src="/verifycode/image?width=200"/>
访问:
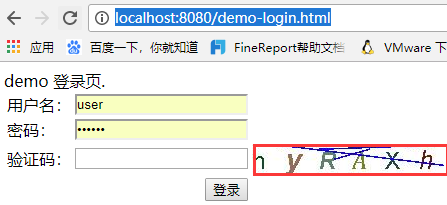
长度为请求级带的参数200,高为30,字符为配置的6个。
2,通用性改造 之 验证码拦截的接口可配置
先要的效果就是再application.properties里能动态配置需要拦截的接口:

ImageCodeProperties新增一个属性:private String url; //拦截的url,来匹配上图的配置。
核心,验证码过滤器需要修改:
1,在拦截器里声明一个set集合,用来存储配置文件里配置的需要拦截的urls。
2,实现InitializingBean接口,目的: 在其他参数都组装完毕的时候,初始化需要拦截的urls的值,重写afterPropertiesSet方法来实现。
3,注入SecurityProperties,读取配置文件
4,实例化AntPathMatcher工具类,这是一个匹配器
5,在browser项目的BrowserSecurityConfig里设置调用一下afterPropertiesSet方法。
6,在引用该模块的demo项目的application.properties里配置要过滤的url
ValidateCodeFilter:
/**
 * 处理登录验证码过滤器
 * ClassName: ValidateCodeFilter
 * @Description:
 * 继承OncePerRequestFilter:spring提供的工具,保证过滤器每次只会被调用一次
 * 实现 InitializingBean接口的目的:
 * 在其他参数都组装完毕的时候,初始化需要拦截的urls的值
 * @author lihaoyang
 * @date 2018年3月2日
 */
public class ValidateCodeFilter extends OncePerRequestFilter implements InitializingBean{
 //认证失败处理器
 private AuthenticationFailureHandler authenticationFailureHandler;
 //获取session工具类
 private SessionStrategy sessionStrategy = new HttpSessionSessionStrategy();
 //需要拦截的url集合
 private Set<String> urls = new HashSet<>();
 //读取配置
 private SecurityProperties securityProperties;
 //spring工具类
 private AntPathMatcher antPathMatcher = new AntPathMatcher();
 @Override
 public void afterPropertiesSet() throws ServletException {
 super.afterPropertiesSet();
 //读取配置的拦截的urls
 String[] configUrls = StringUtils.splitByWholeSeparatorPreserveAllTokens(securityProperties.getCode().getImage().getUrl(), ",");
 for (String configUrl : configUrls) {
  urls.add(configUrl);
 }
 //登录的请求一定拦截
 urls.add("/authentication/form");
 }
 @Override
 protected void doFilterInternal(HttpServletRequest request, HttpServletResponse response, FilterChain filterChain)
  throws ServletException, IOException {
 /**
  * 可配置的验证码校验
  * 判断请求的url和配置的是否有匹配的,匹配上了就过滤
  */
 boolean action = false;
 for(String url:urls){
  if(antPathMatcher.match(url, request.getRequestURI())){
  action = true;
  }
 }
 if(action){
  try {
  validate(new ServletWebRequest(request));
  } catch (ValidateCodeException e) {
  //调用错误处理器,最终调用自己的
  authenticationFailureHandler.onAuthenticationFailure(request, response, e);
  return ;//结束方法,不再调用过滤器链
  }
 }
 //不是登录请求,调用其它过滤器链
 filterChain.doFilter(request, response);
 }
 //省略无关代码,,,
}
BrowserSecurityConfig:

配置url:
#验证码拦截的接口配置
imooc.security.code.image.url = /user,/user/*
测试:/user /user/1 被拦截了


访问登录页,不写验证码:

和预期一致。至此,动态配置拦截接口完成
3,验证码的生成逻辑可配置
写的比较好的程序,一般都开放接口,可以让用户去自定义实现,如果不实现就用默认的实现,下面来做这件事,使验证码的生成可以自己实现。如果要想把验证码的生成逻辑做成可配置的,就不能只写一个图片验证码生成器的类了,需要把验证码生成提取成一个接口ValidateCodeGenerator,一个生成验证码的方法generator()。因为验证码还有图片验证码、短信验证码等,这样,我们在自己的验证模块里做一个默认的实现,如图片验证码的实现ImageCodeGenerator,在ImageCodeGenerator里我们不在该类上加@Component注解。然后使用写一个验证码bean的配置类ValidateCodeBeanConfig,这个配置类配置各种需要的验证码实现类bean如图片验证码实现imageCodeGenerator、短信验证码等,他们返回类型都是ValidateCodeGenerator,使用@ConditionalOnMissingBean(name="imageCodeGenerator")注解,可以判断如果当前spring容器有名字为imageCodeGenerator的bean时,就使用,没有的话再配置,这样如果别人引用了你的该模块,如果别人自己实现了验证码生成ValidateCodeGenerator接口,他们配置了实现类的name为imageCodeGenerator,就用他们自己的实现,这样就做到了程序的可扩展性。
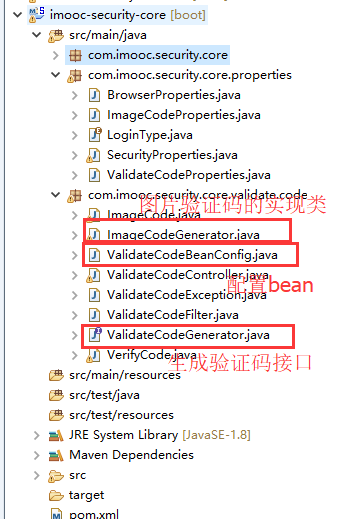
主要代码:
代码生成器接口ValidateCodeGenerator:
package com.imooc.security.core.validate.code;
import org.springframework.web.context.request.ServletWebRequest;
/**
 * 验证码生成接口
 * ClassName: ValidateCodeGenerator
 * @Description: TODO
 * @author lihaoyang
 * @date 2018年3月2日
 */
public interface ValidateCodeGenerator {

 /**
 * 图片验证码生成接口
 * @Description: TODO
 * @param @param request
 * @param @return
 * @return ImageCode
 * @throws
 * @author lihaoyang
 * @date 2018年3月2日
 */
 ImageCode generator(ServletWebRequest request);
}
图片验证码生成器实现ImageCodeGenerator:
package com.imooc.security.core.validate.code;
import org.springframework.beans.factory.annotation.Autowired;
import org.springframework.stereotype.Component;
import org.springframework.web.bind.ServletRequestUtils;
import org.springframework.web.context.request.ServletWebRequest;
import com.imooc.security.core.properties.SecurityProperties;
/**
 * 图片验证码生成类
 * ClassName: ImageCodeGenerator
 * @Description: TODO
 * @author lihaoyang
 * @date 2018年3月2日
 */
public class ImageCodeGenerator implements ValidateCodeGenerator {
 @Autowired
 private SecurityProperties securityProperties;
 @Override
 public ImageCode generator(ServletWebRequest request) {
 //先从request里读取有没有长、宽、字符个数参数,有的话就用,没有用默认的
 int width = ServletRequestUtils.getIntParameter(request.getRequest(), "width",securityProperties.getCode().getImage().getWidth());
 int height = ServletRequestUtils.getIntParameter(request.getRequest(), "height",securityProperties.getCode().getImage().getHeight());
 int charLength = this.securityProperties.getCode().getImage().getLength();
 VerifyCode verifyCode = new VerifyCode(width,height,charLength);
 return new ImageCode(verifyCode.getImage(),verifyCode.getText(),this.securityProperties.getCode().getImage().getExpireIn());
 }
 public SecurityProperties getSecurityProperties() {
 return securityProperties;
 }
 public void setSecurityProperties(SecurityProperties securityProperties) {
 this.securityProperties = securityProperties;
 }
}
ValidateCodeBeanConfig:
package com.imooc.security.core.validate.code;
import org.springframework.beans.factory.annotation.Autowired;
import org.springframework.boot.autoconfigure.condition.ConditionalOnMissingBean;
import org.springframework.context.annotation.Bean;
import org.springframework.context.annotation.Configuration;
import com.imooc.security.core.properties.SecurityProperties;
/**
 * 配置验证码生成接口ValidateCodeGenerator的实际实现类的Bean
 * ClassName: ValidateCodeBeanConfig
 * @Description:
 * 配置验证码生成接口ValidateCodeGenerator的实际实现类的Bean
 * 如图片验证码的实现、短信验证码的实现
 * @author lihaoyang
 * @date 2018年3月5日
 */
@Configuration
public class ValidateCodeBeanConfig {
 @Autowired
 private SecurityProperties securityProperties;
 /**
 * @Description:
 * @ConditionalOnMissingBean注解意思是当spring容器不存在imageCodeGenerator时才给配置一个该bean
 * 作用是使程序更具可扩展性,该配置类是配置在core模块,这就意味着,如果引用该模块的项目
 * 如果有一个自己的实现,实现了ValidateCodeGenerator接口,定义了自己的实现,名字也叫imageCodeGenerator时,
 * 就用应用级别的实现,没有的话就用这个默认实现。
 * @param @return
 * @return ValidateCodeGenerator
 * @throws
 * @author lihaoyang
 * @date 2018年3月5日
 */
 @Bean
 @ConditionalOnMissingBean(name="imageCodeGenerator")
 public ValidateCodeGenerator imageCodeGenerator(){
 ImageCodeGenerator codeGenerator = new ImageCodeGenerator();
 codeGenerator.setSecurityProperties(securityProperties);
 return codeGenerator;
 }
}
这样,如果哪个模块引用了这个验证码模块,他自定义了实现,如:
package com.imooc.code;
import org.springframework.stereotype.Component;
import org.springframework.web.context.request.ServletWebRequest;
import com.imooc.security.core.validate.code.ImageCode;
import com.imooc.security.core.validate.code.ValidateCodeGenerator;
@Component("imageCodeGenerator")
public class DemoImageCodeGenerator implements ValidateCodeGenerator {
 @Override
 public ImageCode generator(ServletWebRequest request) {
 System.err.println("demo项目实现的生成验证码,,,");
 return null;
 }
}
这样ValidateCodeBeanConfig在配置验证码bean时,就会使用使用者自定义的实现。
完整代码放在了github:https://github.com/lhy1234/spring-security
总结
以上所述是小编给大家介绍的Spring Security 图片验证码功能的实例代码,希望对大家有所帮助,如果大家有任何疑问请给我留言,小编会及时回复大家的。在此也非常感谢大家对我们网站的支持!
您可能感兴趣的文章:
- spring security4 添加验证码的示例代码
- Spring Security Oauth2.0 实现短信验证码登录示例
- 详解使用Spring Security进行自动登录验证
- Spring Boot中整合Spring Security并自定义验证代码实例
- Spring Security验证流程剖析及自定义验证方法

