Maven2 plugin开发教程详解
首先,创建项目,创建一个文件夹:mkdir yakov
进入yakov目录,然后创建一个pom.xml:touch pom.xml,这个xml文件的结构会在另外的章节详细说一下。
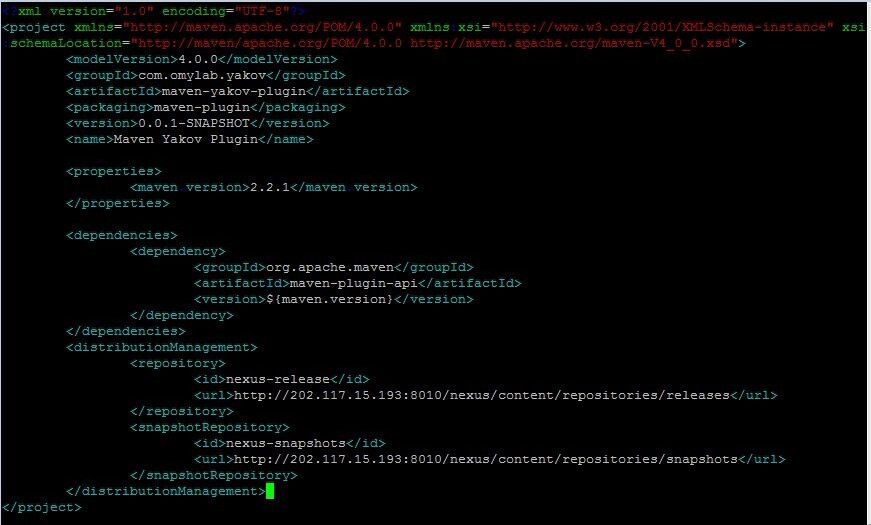
使用vi编辑pom.xml,写入基本的项目信息,如下图:

单单是这些还是不够的,接下来需要,配置一些私服和集成。
注:上面的version改为3.0
有关的私服和集成服务在上一篇中写过:http://www.cnblogs.com/yakov/archive/2011/11/19/maven2_shi_jian.html
设置Maven从Nexus私服下载构件
可以设置某个项目从私服下载,设置项目的pom.xml如下:
<project>
...
  <repositories>
    <repository>
      <id>nexus</id>
      <name>Nexus</name>
      <url>http://202.117.15.193:8010/nexus/content/groups/public/</url>
      <releases><enabled>true</enabled></releases>
      <snapshots><enabled>true</enabled></snapshots>
    </repository>
  </repositories>
  <pluginRepositories>
    <pluginRepository>
      <id>nexus</id>
      <name>Nexus</name>
      <url>http://202.117.15.193:8010/nexus/content/groups/public/</url>
      <releases><enabled>true</enabled></releases>
      <snapshots><enabled>true</enabled></snapshots>
    </pluginRepository>
  </pluginRepositories>
...
</project>
但是这需要为每个项目配置一下,有可能你仅仅需要为你开发的所有项目都用这同一个私服,那么很好,settings.xml提供了profile来设置:
<settings>
  ...
  <profiles>
    <profile>
      <id>nexus</id>
      <repositories>
        <repository>
          <id>nexus</id>
          <name>Nexus</name>
          <url>http://202.117.15.193:8010/nexus/content/groups/public/</url>
          <releases><enabled>true</enabled></releases>
          <snapshots><enabled>true</enabled></snapshots>
        </repository>
      </repositories>
      <pluginRepositories>
        <pluginRepository>
          <id>nexus</id>
          <name>Nexus</name>
          <url>http://202.117.15.193:8010/nexus/content/groups/public/</url>
          <releases><enabled>true</enabled></releases>
          <snapshots><enabled>true</enabled></snapshots>
        </pluginRepository>
      </pluginRepositories>
    </profile>
  </profiles>
  <activeProfiles>
    <activeProfile>nexus</activeProfile>
  </activeProfiles>
  ...
</settings>
上面的配置是针对下载构件的,如果所有的下载都从私服上进行,就需要配置镜像了!如下所示:
<settings>
  ...
  <mirrors>
    <mirror>
      <id>nexus</id>
      <mirrorOf>*</mirrorOf>
      <url>http://202.117.15.193:8010/nexus/content/groups/public/</url>
    </mirror>
  </mirrors>
  <profiles>
    <profile>
      <id>nexus</id>
      <repositories>
        <repository>
          <id>central</id>
          <url>http://central</url>
          <releases><enabled>true</enabled></releases>
          <snapshots><enabled>true</enabled></snapshots>
        </repository>
      </repositories>
      <pluginRepositories>
        <pluginRepository>
          <id>central</id>
          <url>http://central</url>
          <releases><enabled>true</enabled></releases>
          <snapshots><enabled>true</enabled></snapshots>
        </pluginRepository>
      </pluginRepositories>
    </profile>
  </profiles>
  <activeProfiles>
    <activeProfile>nexus</activeProfile>
  </activeProfiles>
  ...
</settings>
以上几个任选一种就可以了,我这里使用了最后一种。
部署自己的构件至Nexus
直接在要部署的项目的pom.xml中写入如下代码:

还需要在settings.xml中设置用户名和密码,因为Nexus的仓库对于匿名用户是readonly的:

至此,有关私服已经设置好了!
在目录src/main/java下编写plugin
在yakov下创建src/main/java目录
写一个YakovMojo的类:
import java.io.BufferedReader;
import java.io.File;
import java.io.FileReader;
import java.io.IOException;
import java.util.ArrayList;
import java.util.List;
import org.apache.maven.model.Resource;
import org.apache.maven.plugin.AbstractMojo;
import org.apache.maven.plugin.MojoExecutionException;
import org.apache.maven.plugin.MojoFailureException;
/**
 *
 * @author org.omylab.yakov
 * @goal yakov
*/
public class YakovMojo extends AbstractMojo{
  private final String[] INCLUDES_DEFAULT={"java","xml","properties"};

  /**
   * @parameter expression="${project.basedir}"
   * @required
   * @readonly
*/
  private File basedir;
  /**
   * @parameter expression ="${project.build.sourceDirectory}"
   * @required
   * @readonly
*/
  private File sourceDirectory;
  /**
   * @parameter expression ="${project.biuld.testSourceDirectory}"
   * @required
   * @readonly
*/
  private File testSourceDirectory;
  /**
   * @parameter expression ="${project.build.resources}"
   * @required
   * @readonly
*/
  private List<Resource> resources;
  /**
   * @parameter expression "${project.build.testResources}"
   * @required
   * @readonly
*/
  private List<Resource> testResources;
  /**
   * The file types which will be included for counting
   *
   * @parameter
*/
  private String[] includes;
  public void execute() throws MojoExecutionException, MojoFailureException{
    if(includes==null||includes.length==0){
      includes=INCLUDES_DEFAULT;
    }
    try{
      countDir(sourceDirectory);
      countDir(testSourceDirectory);
      for(Resource resource:resources){
        countDir(new File(resource.getDirectory()));
      }
      for(Resource resource:testResources){
        countDir(new File(resource.getDirectory()));
      }
    }catch(IOException e){
      throw new MojoExecutionException("Unable to count lines of code.",e);
    }
  }

  private void countDir(File dir)throws IOException{
    if(!dir.exists())return;
    List<File> collected=new ArrayList<File>();
    collectFiles(collected,dir);
    int lines=0;
    for(File sourceFile:collected){
      lines+=countLine(sourceFile);
    }
    String path=dir.getAbsolutePath().substring(basedir.getAbsolutePath().length());
    getLog().info(path+" : "+lines+" lines of code in "+collected.size()+" files");
  }

  private void collectFiles(List<File> collected,File file){
    if(file.isFile()){
      for(String include:includes){
        if(file.getName().endsWith("."+include)){
          collected.add(file);
          break;
        }
      }
    }else{
      for(File sub:file.listFiles()){
        collectFiles(collected,sub);
      }
    }
  }
  private int countLine(File file)throws IOException{
    BufferedReader reader=new BufferedReader(new FileReader(file));
    int line =0;
    try{
      while(reader.ready()){
        reader.readLine();
        line++;
      }
    }finally{
      reader.close();
    }
    return line;
  }

}
然后运行mvn clean compile,运行结果如下:


编译完成,这里可移执行安装了,事实上,还应该有对应的测试代码,以后再讲。
运行mvn clean install完后就安装成功了。
最后运行mvn clean deploy 完成发布,查看Nexus如下:

以上就是本文的全部内容,希望对大家的学习有所帮助,也希望大家多多支持我们。

