微信小程序实现即时通信聊天功能的实例代码
项目背景:小程序中实现实时聊天功能
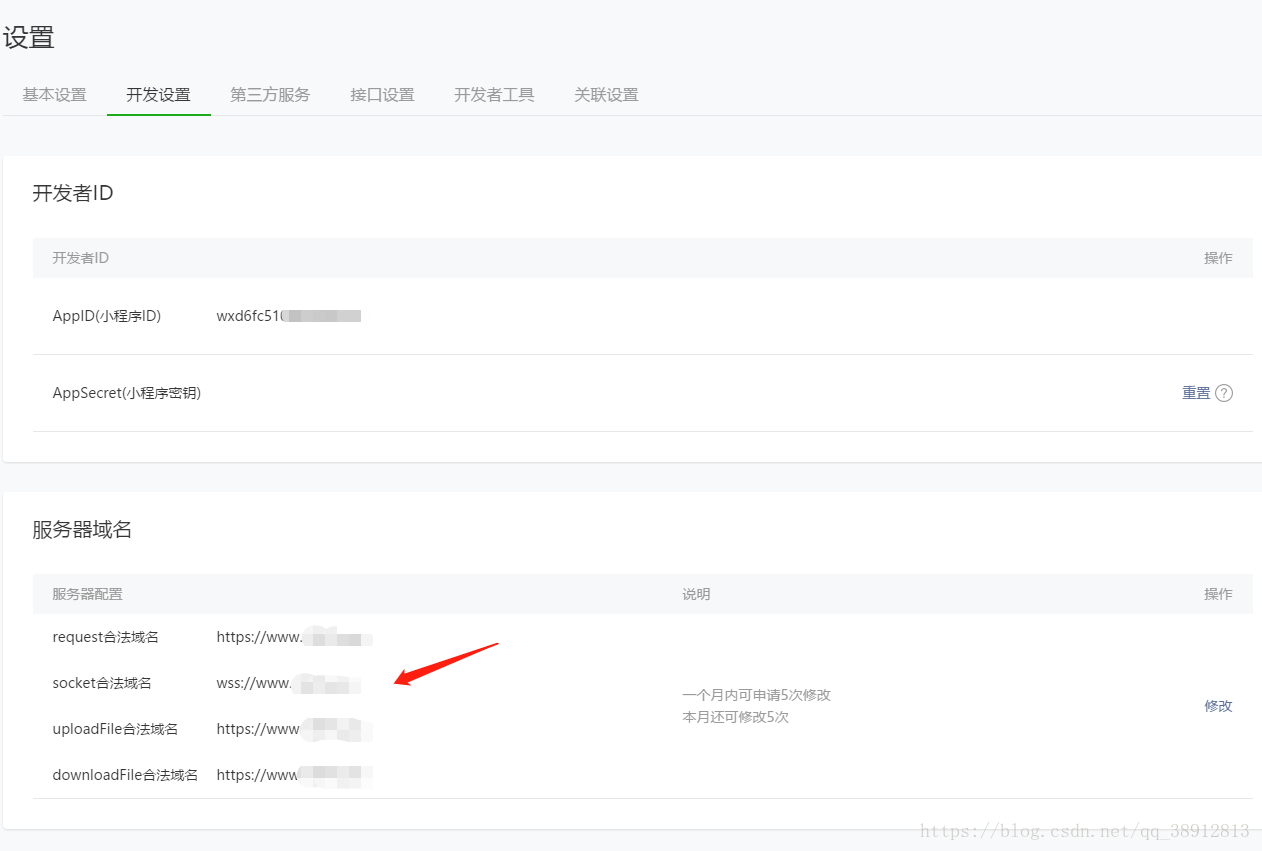
一、服务器域名配置
配置流程

配置参考URL:https://developers.weixin.qq.com/miniprogram/dev/api/api-network.html
二、nginx中配置反向代理加密websocket(wss)
upstream websocket{
 hash $remote_addr consistent;
 server 127.0.0.1:9090 weight=5 max_fails=3 fail_timeout=30s;
}
server {
 listen 80;
 server_name www.xxxx.cn;
 rewrite ^(.*)$ https://$host$1 permanent;
}
server
 {
 listen 443;
  server_name www.xxxx.cn;
  ssl on;
  root /home/wwwroot/yzcp;
  index index.php index.html index.htm;
  ssl_certificate /usr/local/nginx/conf/cert/1526060965511.pem;#这里是服务端证书路径
  ssl_certificate_key /usr/local/nginx/conf/cert/1526060965511.key;#这里是密钥路径
  ssl_session_timeout 5m;
  ssl_ciphers ECDHE-RSA-AES128-GCM-SHA256:ECDHE:ECDH:AES:HIGH:!NULL:!aNULL:!MD5:!ADH:!RC4;
  ssl_protocols TLSv1 TLSv1.1 TLSv1.2;
  ssl_prefer_server_ciphers on;
  ssl_verify_client off;
 #隐藏index.php
  location / {
 #index index.php;
 deny 127.0.0.1;
   if (!-e $request_filename) {
    #一级目录
    rewrite ^(.*)$ /index.php?s=$1 last;
    break;
   }
   #wss配置
   client_max_body_size 100m;
   proxy_redirect off;
   proxy_pass http://websocket;#反向代理转发地址
   proxy_set_header Host $host;# http请求的主机域名
   proxy_set_header X-Real-IP $remote_addr;# 远程真实IP地址
   proxy_set_header X-Forwarded-For $proxy_add_x_forwarded_for;#反向代理之后转发之前的IP地址
   proxy_read_timeout 604800s;#websocket心跳时间,默认是60s
   proxy_http_version 1.1;
   proxy_set_header Upgrade $http_upgrade;
   proxy_set_header Connection "Upgrade";
  }
  location ~ .+\.php {
   fastcgi_pass unix:/tmp/php-cgi.sock;
   fastcgi_index index.php;
   include fastcgi_params;
   set $path_info "";
   set $real_script_name $fastcgi_script_name;
    if ($fastcgi_script_name ~ "^(.+?\.php)(/.+)$") {
    set $real_script_name $1;
    set $path_info $2;
   }
   fastcgi_param SCRIPT_FILENAME $document_root$real_script_name;
   fastcgi_param SCRIPT_NAME $real_script_name;
   fastcgi_param PATH_INFO $path_info;
  }

  #防盗链开始
  location ~ .*\.(gif|jpg|jpeg|png|bmp|swf)$
 {
 expires  30d;
 }
 location ~ .*\.(js|css)?$
 {
 expires  12h;
 }
 access_log /home/wwwlogs/www1537ucn.log;
 }
三、安装swoole
编译安装:
wget http://pecl.php.net/get/swoole-1.9.3.tgz  //下载swoole
tar -zvxf swoole-1.9.3.tgz  //解压swoole
cd swoole-1.9.3/;  //进入swoole
/usr/local/php54/bin/phpize;  //生成configure
./configure --with-php-config=/usr/local/php/bin/php-config
make && make install   //安装
cd /phpstudy/server/php/lib/php/extensions/no-debug-non-zts-20121212 //查看是否安转上了swoole.so (注意:此文件下边都是你安装的拓展)
vim /phpstudy/server/php/etc/php.ini  //在php.ini添加extension=swoole.so加入到文件最后一行
lnmp restart; //重启nginx
php -m; //查看phpinfo,这时候swoole拓展已经装上了
四、服务器端运行程序
1、创建server.php放到项目的根目录即可
<?php
//实例化一个swoole的websocket服务监听本机的9501端口
$server = new swoole_websocket_server("服务器IP", 9090);
//只需要绑定要监听的ip和端口。如果ip指定为127.0.0.1,则表示客户端只能位于本机才能连接,其他计算机无法连接。
//端口这里指定为9090,可以通过netstat查看下该端口是否被占用。如果该端口被占用,可更改为其他端口,如9502,9503等。
$server->on('open', function (swoole_websocket_server $server, $request) {
 echo "你好连接成功{$request->fd}\n";
});
$server->on('message', function (swoole_websocket_server $server, $frame) {
 foreach($server->connections as $key => $fd) {
  $user_message = $frame->data;
  $server->push($fd, $user_message);
 }
});
$server->on('close', function ($ser, $fd) {
 echo "client {$fd} closed\n";
});
$server->start();
?>
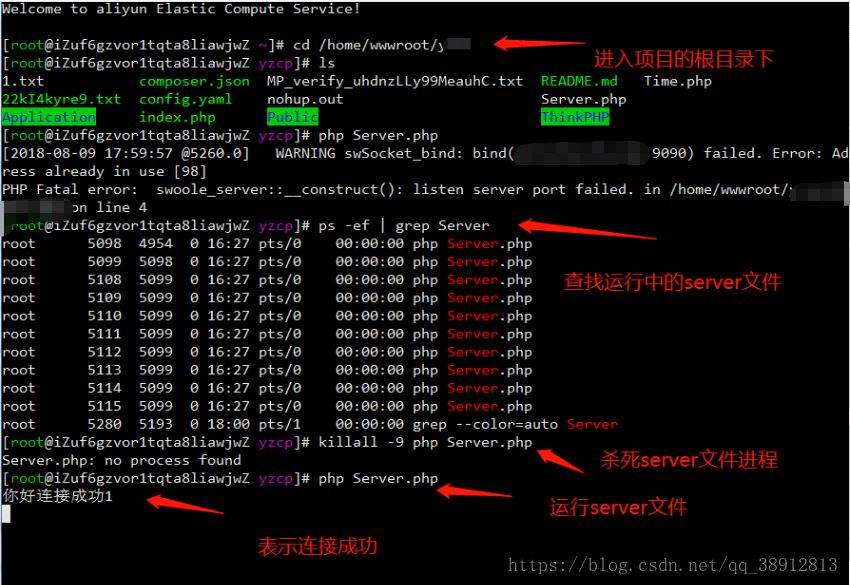
2、由于swoole_server只能运行在CLI模式下,所以不要试图通过浏览器进行访问,这样是无效的,我们在命令行下面执行,注意一定要找到php的绝对路径php server.php (这行代码的意思是,把程序在服务器跑起来)
注意:php server.php命令运行后,下面的黑框关闭后将无法聊天。所以一般使用命令:nohup php server.php &

五、客户端
1、网页代码
<!DOCTYPE html>
<html>
<head>
 <meta charset="utf-8">
 <title>聊天</title>
 <style type="text/css">
  #show{
   width: 600px;
   height: 300px;
   overflow-y: scroll;
  }
  .my-message{
   background-color: rgba(105, 105, 105, 0.64);
   color: #9e0505;
   width: 200px;
   float: right;
   padding: 10px;
  }
  .other-message{
   background-color: rgba(105, 105, 105, 0.64);
   color: #9e0505;
   width: 200px;
   float: left;
   padding: 10px;
  }
 </style>
</head>
<body>
 <div id="show"></div>
 <div class="panel">
  内容:<textarea id="content"></textarea>
  收信人:<input type="text" id="touser">
  <input type="button" id="send-btn" value="发送">
  <input type="button" id="close-btn" value="关闭">
 </div>
</body>
<script src="__PUBLIC__/js/jquery-1.10.2.min.js" charset="utf-8"></script>
<script type="text/javascript">
 var socket = new WebSocket("wss://域名");
 $("#close-btn").click(function () {
  socket.close();
 })
 $("#send-btn").click(function () {
  var touser = $("#touser").val();
  var content = $("#content").val();
  var htmlstr = "<div><p class='my-message'>我:"+content+"</p></div>";
  $("#show").append(htmlstr);
  socket.send(content+"@"+touser);
 })
 socket.onmessage = function (p1) {
  var htmlstr = "<div><p class='other-message'>"+p1.data+"</p></div>";
  $("#show").append(htmlstr);
 }
</script>
</html>
2、小程序端的代码
Uitls/websocket.js:
var url = 'wss://www.xxx.cn';//服务器地址
function connect(user, func) {
 wx.connectSocket({
 url: url,
 header: { 'content-type': 'application/json' },
 success: function () {
  console.log('websocket连接成功~')
 },
 fail: function () {
  console.log('websocket连接失败~')
 }
 })
 wx.onSocketOpen(function (res) {
 wx.showToast({
  title: 'websocket已开通~',
  icon: "success",
  duration: 2000
 })
 //接受服务器消息
 wx.onSocketMessage(func);//func回调可以拿到服务器返回的数据
 });
 wx.onSocketError(function (res) {
 wx.showToast({
  title: 'websocket连接失败,请检查!',
  icon: "none",
  duration: 2000
 })
 })
}
//发送消息
function send(msg) {
 wx.sendSocketMessage({
 data: msg
 });
}
module.exports = {
 connect: connect,
 send: send
}
JS:
// pages/socks/socks.js
const app = getApp()
var websocket = require('../../utils/websocket.js');
var utils = require('../../utils/util.js');
Page({
 /**
 * 页面的初始数据
 */
 data: {
 newslist: [],
 userInfo: {},
 scrollTop: 0,
 increase: false,//图片添加区域隐藏
 aniStyle: true,//动画效果
 message: "",
 previewImgList: []
 },
 /**
 * 生命周期函数--监听页面加载
 */
 onLoad: function () {
 var that = this
 if (app.globalData.userInfo) {
  this.setData({
  userInfo: app.globalData.userInfo
  })
 }
 //调通接口
 websocket.connect(this.data.userInfo, function (res) {
  // console.log(JSON.parse(res.data))
  var list = []
  list = that.data.newslist
  list.push(JSON.parse(res.data))
  that.setData({
  newslist: list
  })
 })
 },
 // 页面卸载
 onUnload() {
 wx.closeSocket();
 wx.showToast({
  title: '连接已断开~',
  icon: "none",
  duration: 2000
 })
 },
 //事件处理函数
 send: function () {
 var flag = this
 if (this.data.message.trim() == "") {
  wx.showToast({
  title: '消息不能为空哦~',
  icon: "none",
  duration: 2000
  })
 } else {
  setTimeout(function () {
  flag.setData({
   increase: false
  })
  }, 500)
  websocket.send('{ "content": "' + this.data.message + '", "date": "' + utils.formatTime(new Date()) + '","type":"text", "nickName": "' + this.data.userInfo.nickName + '", "avatarUrl": "' + this.data.userInfo.avatarUrl + '" }')
  this.bottom()
 }
 },
 //监听input值的改变
 bindChange(res) {
 this.setData({
  message: res.detail.value
 })
 },
 cleanInput() {
 //button会自动清空,所以不能再次清空而是应该给他设置目前的input值
 this.setData({
  message: this.data.message
 })
 },
 increase() {
 this.setData({
  increase: true,
  aniStyle: true
 })
 },
 //点击空白隐藏message下选框
 outbtn() {
 this.setData({
  increase: false,
  aniStyle: true
 })
 },
 //发送图片
 chooseImage() {
 var that = this
 wx.chooseImage({
  count: 1, // 默认9
  sizeType: ['original', 'compressed'], // 可以指定是原图还是压缩图,默认二者都有
  sourceType: ['album', 'camera'], // 可以指定来源是相册还是相机,默认二者都有
  success: function (res) {
  // 返回选定照片的本地文件路径列表,tempFilePath可以作为img标签的src属性显示图片
  var tempFilePaths = res.tempFilePaths
  // console.log(tempFilePaths)
  wx.uploadFile({
   url: 'wss://www.xxx.cn', //服务器地址
   filePath: tempFilePaths[0],
   name: 'file',
   headers: {
   'Content-Type': 'form-data'
   },
   success: function (res) {
   if (res.data) {
    that.setData({
    increase: false
    })
    websocket.send('{"images":"' + res.data + '","date":"' + utils.formatTime(new Date()) + '","type":"image","nickName":"' + that.data.userInfo.nickName + '","avatarUrl":"' + that.data.userInfo.avatarUrl + '"}')
    that.bottom()
   }
   }
  })
  }
 })
 },
 //图片预览
 previewImg(e) {
 var that = this
 //必须给对应的wxml的image标签设置data-set=“图片路径”,否则接收不到
 var res = e.target.dataset.src
 var list = this.data.previewImgList //页面的图片集合数组
 //判断res在数组中是否存在,不存在则push到数组中, -1表示res不存在
 if (list.indexOf(res) == -1) {
  this.data.previewImgList.push(res)
 }
 wx.previewImage({
  current: res, // 当前显示图片的http链接
  urls: that.data.previewImgList // 需要预览的图片http链接列表
 })
 },
 //聊天消息始终显示最底端
 bottom: function () {
 var query = wx.createSelectorQuery()
 query.select('#flag').boundingClientRect()
 query.selectViewport().scrollOffset()
 query.exec(function (res) {
  wx.pageScrollTo({
  scrollTop: res[0].bottom // #the-id节点的下边界坐标
  })
  res[1].scrollTop // 显示区域的竖直滚动位置
 })
 },
})
WXML:
<!--pages/socks/socks.wxml-->
<view class="news" bindtap='outbtn'>
<view class="chat-notice" wx:if="{{userInfo}}">系统消息: 欢迎 {{ userInfo.nickName }} 加入聊天室</view>
<view class="historycon">
<scroll-view scroll-y="true" class="history" scroll-top="{{scrollTop}}">
<block wx:for="{{newslist}}" wx:key>
 <!-- 历史消息 -->
<!-- <view class="chat-news">
<view style="text-align: left;padding-left: 20rpx;">
<image class='new_img' src="{{item.avatarUrl? item.avatarUrl:'images/avator.png'}}"></image>
<text class="name">{{ item.nickName }}{{item.date}}</text>
</view>
<view class='you_left'>
<block wx:if="{{item.type=='text'}}">
<view class='new_txt'>{{item.content}}</view>
</block>
<block wx:if="{{item.type=='image'}}">
<image class="selectImg" src="{{item.images}}"></image>
</block>
</view>
</view> -->
<view>{{item.date}}</view>
<!--自己的消息 -->
<view class="chat-news" wx:if="{{item.nickName == userInfo.nickName}}">
<view style="text-align: right;padding-right: 20rpx;">
<text class="name">{{ item.nickName }}</text>
<image class='new_img' src="{{userInfo.avatarUrl}}"></image>
</view>
<view class='my_right'>
<block wx:if="{{item.type=='text'}}">
<view class='new_txt'>{{item.content}}</view>
</block>
<block wx:if="{{item.type=='image'}}">
<image class="selectImg" src="{{item.images}}" data-src="{{item.images}}" lazy-load="true" bindtap="previewImg"></image>
</block>
</view>
</view>
<!-- 别人的消息 -->
<view class="chat-news" wx:else>
<view style="text-align: left;padding-left: 20rpx;">
<image class='new_img' src="{{item.avatarUrl? item.avatarUrl:'images/avator.png'}}"></image>
<text class="name">{{ item.nickName }}</text>
</view>
<view class='you_left'>
<block wx:if="{{item.type=='text'}}">
<view class='new_txt'>{{item.content}}</view>
</block>
<block wx:if="{{item.type=='image'}}">
<image class="selectImg" src="{{item.images}}" data-src="{{item.images}}" lazy-load="true" bindtap="previewImg"></image>
</block>
</view>
</view>
</block>
</scroll-view>
</view>
</view>
<view id="flag"></view>
<!-- 聊天输入 -->
<view class="message">
<form bindreset="cleanInput" class="sendMessage">
<input type="text" placeholder="请输入聊天内容.." value="{{massage}}" bindinput='bindChange'></input>
<view class="add" bindtap='increase'>+</view>
<button type="primary" bindtap='send' formType="reset" size="small" button-hover="blue">发送</button>
</form>
<view class='increased {{aniStyle?"slideup":"slidedown"}}' wx:if="{{increase}}">
<view class="image" bindtap='chooseImage'>相册 </view>
</view>
</view>
WXSS:
/* pages/socks/socks.wxss */
page {
background-color: #f7f7f7;
height: 100%;
}
/* 聊天内容 */
.news {
padding-top: 30rpx;
text-align: center;
/* height:100%; */
box-sizing:border-box;
}
#flag{
margin-bottom: 100rpx;
height: 30rpx;
}
.chat-notice{
text-align: center;
font-size: 30rpx;
padding: 10rpx 0;
color: #666;
}
.historycon {
height: 100%;
width: 100%;
/* flex-direction: column; */
display: flex;
border-top: 0px;
}
/* 聊天 */
.chat-news{
width: 100%;
overflow: hidden;
}
.chat-news .my_right {
float: right;
/* right: 40rpx; */
padding: 10rpx 10rpx;
}
.chat-news .name{
margin-right: 10rpx;
}
.chat-news .you_left {
float: left;
/* left: 5rpx; */
padding: 10rpx 10rpx;
}
.selectImg{
display: inline-block;
width: 150rpx;
height: 150rpx;
margin-left: 50rpx;
}
.my_right .selectImg{
margin-right: 80rpx;
}
.new_img {
width: 60rpx;
height: 60rpx;
border-radius: 50%;
vertical-align: middle;
margin-right: 10rpx;
}
.new_txt {
max-width: 300rpx;
display: inline-block;
border-radius: 6rpx;
line-height: 60rpx;
background-color: #95d4ff;
padding: 5rpx 20rpx;
margin: 0 10rpx;
margin-left: 50rpx;
}
.my_right .new_txt{
margin-right:60rpx;
}
.you{
background-color: lightgreen;
}
.my {
border-color: transparent transparent transparent #95d4ff;
}
.you {
border-color: transparent #95d4ff transparent transparent;
}
.hei{
margin-top: 50px;
height: 20rpx;
}
.history {
height: 100%;
margin-top: 15px;
padding: 10rpx;
font-size: 14px;
line-height: 40px;
word-break: break-all;
}
::-webkit-scrollbar {
width: 0;
height: 0;
color: transparent;
z-index: -1;
}
/* 信息输入区域 */
.message{
position: fixed;
bottom:0;
width: 100%;
}
.sendMessage{
display: block;
height: 80rpx;
padding: 10rpx 10rpx;
background-color: #fff;
border-top: 2rpx solid #eee;
border-bottom: 2rpx solid #eee;
z-index:3;
}
.sendMessage input{
float:left;
width: 66%;
height: 100%;
line-height: 80rpx;
border-bottom: 1rpx solid #ccc;
padding:0 10rpx;
font-size: 35rpx;
color: #666;
}
.sendMessage view{
display: inline-block;
width: 80rpx;
height: 80rpx;
line-height: 80rpx;
font-size: 60rpx;
text-align: center;
color: #999;
border: 1rpx solid #ccc;
border-radius: 50%;
margin-left: 10rpx;
}
.sendMessage button {
float: right;
font-size: 35rpx;
}
.increased{
width:100%;
/* height: 150rpx; */
padding: 40rpx 30rpx;
background-color: #fff;
}
.increased .image{
width: 100rpx;
height: 100rpx;
border: 3rpx solid #ccc;
line-height: 100rpx;
text-align: center;
border-radius: 8rpx;
font-size:35rpx;
}
@keyframes slidedown {
from {
transform: translateY(0);
}
to {
transform: translateY(100%);
}
}
.slidedown {
animation: slidedown 0.5s linear ;
}
.slideup {
animation: slideup 0.5s linear ;
}
@keyframes slideup {
from {
transform: translateY(100%);
}
to {
transform: translateY(0);
}
}
总结
以上所述是小编给大家介绍的微信小程序实现即时通信聊天功能的实例代码,希望对大家有所帮助,如果大家有任何疑问请给我留言,小编会及时回复大家的。在此也非常感谢大家对我们网站的支持!
赞 (0)

