Android 动态添加Fragment的实例代码
1.fragment1布局及代码
布局
<?xml version="1.0" encoding="utf-8"?>
<RelativeLayout xmlns:android="http://schemas.android.com/apk/res/android"
xmlns:tools="http://schemas.android.com/tools"
android:layout_width="match_parent"
android:layout_height="match_parent"
tools:context=".Fragment1Activity">
<fragment
android:layout_width="match_parent"
android:layout_height="100dp"
android:name="com.example.administrator.jreduch06.fragment.TopFragment"
android:id="@+id/top_fragment"
android:layout_alignParentTop="true"
android:layout_alignParentEnd="true">
</fragment>
<fragment
android:layout_width="match_parent"
android:layout_height="300dp"
android:id="@+id/leftfragment"
android:name="com.example.administrator.jreduch06.fragment.LeftFragment"
android:layout_below="@+id/top_fragment"
android:layout_alignParentStart="true">
</fragment>
<FrameLayout
android:layout_width="match_parent"
android:layout_height="match_parent"
android:id="@+id/fl"
android:layout_alignParentStart="true"
android:layout_below="@+id/leftfragment">
</FrameLayout>
</RelativeLayout>
代码
package com.example.administrator.jreduch06;
import android.os.Bundle;
import android.support.v7.app.AppCompatActivity;
import android.support.v4.app.Fragment;
import com.example.administrator.jreduch06.fragment.FirstFragment;
import com.example.administrator.jreduch06.fragment.LeftFragment;
import com.example.administrator.jreduch06.fragment.SecondFragment;
public class Fragment1Activity extends AppCompatActivity implements LeftFragment.Myinterface {
@Override
protected void onCreate(Bundle savedInstanceState) {
super.onCreate(savedInstanceState);
setContentView(R.layout.activity_fragment1);
}
@Override
public void onchangeFragment(int which) {
if(which==1){
Fragment fragment1=new FirstFragment();
getSupportFragmentManager()
.beginTransaction()
.replace(R.id.fl, fragment1)
.commit();
}else if(which==2){
Fragment fragment2=new SecondFragment();
getSupportFragmentManager()
.beginTransaction()
.replace(R.id.fl,fragment2)
.commit();
}
}
}
2.fragment2布局及代码
布局
<?xml version="1.0" encoding="utf-8"?>
<RelativeLayout xmlns:android="http://schemas.android.com/apk/res/android"
xmlns:tools="http://schemas.android.com/tools"
android:layout_width="match_parent"
android:layout_height="match_parent"
tools:context="com.example.administrator.jreduch06.Fragment2Activity">
<fragment
android:layout_width="match_parent"
android:layout_height="wrap_content"
android:id="@+id/one_fragment"
android:name="com.example.administrator.jreduch06.fragmentcallback.OneFragment"
>
</fragment>
<FrameLayout
android:layout_width="match_parent"
android:layout_height="match_parent"
android:id="@+id/fl2"
android:layout_below="@+id/linearlatout"
>
</FrameLayout>
</RelativeLayout>
代码:
package com.example.administrator.jreduch06;
import android.support.v4.app.Fragment;
import android.support.v7.app.AppCompatActivity;
import android.os.Bundle;
import com.example.administrator.jreduch06.fragment.FirstFragment;
import com.example.administrator.jreduch06.fragment.SecondFragment;
import com.example.administrator.jreduch06.fragmentcallback.OneFragment;
public class Fragment2Activity extends AppCompatActivity
implements OneFragment.OnFragmentInteractionListener{
@Override
protected void onCreate(Bundle savedInstanceState) {
super.onCreate(savedInstanceState);
setContentView(R.layout.activity_fragment2);
}
@Override
public void changeFragment(int which) {
if(which==1){
Fragment fragment1=new FirstFragment();
getSupportFragmentManager()
.beginTransaction()
.replace(R.id.fl2, fragment1)
.commit();
}else if(which==2){
Fragment fragment2=new SecondFragment();
getSupportFragmentManager()
.beginTransaction()
.replace(R.id.fl2,fragment2)
.commit();
}
}
}
3.FirstFragment代码及布局
布局:
<FrameLayout xmlns:android="http://schemas.android.com/apk/res/android"
xmlns:tools="http://schemas.android.com/tools"
android:layout_width="match_parent"
android:layout_height="match_parent"
tools:context="com.example.administrator.jreduch06.fragment.FirstFragment">
<TextView
android:layout_width="match_parent"
android:layout_height="match_parent"
android:gravity="center"
android:textSize="30sp"
android:id="@+id/tv"
android:text="我是Fragment1"
android:layout_gravity="center_horizontal|bottom" />
</FrameLayout>
代码:
package com.example.administrator.jreduch06.fragment;
import android.os.Bundle;
import android.support.v4.app.Fragment;
import android.view.LayoutInflater;
import android.view.View;
import android.view.ViewGroup;
import com.example.administrator.jreduch06.R;
/**
* A simple {@link Fragment} subclass.
*/
public class SecondFragment extends Fragment {
public SecondFragment() {
// Required empty public constructor
}
@Override
public View onCreateView(LayoutInflater inflater, ViewGroup container,
Bundle savedInstanceState) {
// Inflate the layout for this fragment
return inflater.inflate(R.layout.fragment_second, container, false);
}
}
4.SecondFragment代码及布局
布局:
<FrameLayout xmlns:android="http://schemas.android.com/apk/res/android"
xmlns:tools="http://schemas.android.com/tools"
android:layout_width="match_parent"
android:layout_height="match_parent"
tools:context="com.example.administrator.jreduch06.fragment.SecondFragment">
<TextView
android:layout_width="match_parent"
android:layout_height="match_parent"
android:gravity="center"
android:textSize="30sp"
android:text="我是Fragment2" />
</FrameLayout>
代码:
package com.example.administrator.jreduch06.fragment;
import android.os.Bundle;
import android.support.v4.app.Fragment;
import android.view.LayoutInflater;
import android.view.View;
import android.view.ViewGroup;
import com.example.administrator.jreduch06.R;
/**
* A simple {@link Fragment} subclass.
*/
public class FirstFragment extends Fragment {
public SecondFragment() {
// Required empty public constructor
}
@Override
public View onCreateView(LayoutInflater inflater, ViewGroup container,
Bundle savedInstanceState) {
// Inflate the layout for this fragment
return inflater.inflate(R.layout.fragment_first, container, false);
}
}
5.LeftFragment布局及代码
布局:
<LinearLayout xmlns:android="http://schemas.android.com/apk/res/android"
xmlns:tools="http://schemas.android.com/tools"
android:layout_width="match_parent"
android:layout_height="match_parent"
android:orientation="vertical"
android:background="#bece0d"
tools:context="com.example.administrator.jreduch06.fragment.LeftFragment">
<Button
android:layout_width="match_parent"
android:layout_height="wrap_content"
android:text="第一个Fragment"
android:id="@+id/bt1"
/>
<Button
android:layout_width="match_parent"
android:layout_height="wrap_content"
android:text="第二个Fragment"
android:id="@+id/bt2"
/>
<Button
android:layout_width="match_parent"
android:layout_height="wrap_content"
android:text="callback1"
android:id="@+id/bt3"
/>
<Button
android:layout_width="match_parent"
android:layout_height="wrap_content"
android:text="callback2"
android:id="@+id/bt4"
/>
<Button
android:layout_width="match_parent"
android:layout_height="wrap_content"
android:text="隐藏"
android:id="@+id/bt5"
/>
<Button
android:layout_width="match_parent"
android:layout_height="wrap_content"
android:text="显示"
android:id="@+id/bt6"
/>
</LinearLayout>
代码:
package com.example.administrator.jreduch06.fragment;
import android.content.Context;
import android.os.Bundle;
import android.support.v4.app.Fragment;
import android.support.v4.app.FragmentManager;
import android.support.v4.app.FragmentTransaction;
import android.view.LayoutInflater;
import android.view.View;
import android.view.ViewGroup;
import android.widget.Button;
import android.widget.Toast;
import com.example.administrator.jreduch06.R;
/**
* A simple {@link Fragment} subclass.
*/
public class LeftFragment extends Fragment {
private Fragment fragment1;
private Fragment fragment2;
private Myinterface myinterface ;
public LeftFragment() {
}
@Override
public void onAttach(Context context) {
super.onAttach(context);
if (context instanceof Myinterface) {
myinterface= (Myinterface) context;
} else {
throw new RuntimeException(context.toString()
+ " must implement OnFragmentInteractionListener");
}
}
@Override
public View onCreateView(LayoutInflater inflater, ViewGroup container,
Bundle savedInstanceState) {
View view=inflater.inflate(R.layout.fragment_left, container, false);
Button bt1= (Button) view.findViewById(R.id.bt1);
Button bt2= (Button) view.findViewById(R.id.bt2);
Button bt3= (Button) view.findViewById(R.id.bt3);
Button bt4= (Button) view.findViewById(R.id.bt4);
Button bt5= (Button) view.findViewById(R.id.bt5);
Button bt6= (Button) view.findViewById(R.id.bt6);
bt1.setOnClickListener(new View.OnClickListener() {
@Override
public void onClick(View v) {
Toast.makeText(getContext(), "点击了按钮1", Toast.LENGTH_SHORT).show();
fragment1=new FirstFragment();
FragmentManager fm=getFragmentManager();
FragmentTransaction fr=fm.beginTransaction();
fr.replace(R.id.fl,fragment1);
fr.commit();
}
});
bt2.setOnClickListener(new View.OnClickListener() {
@Override
public void onClick(View v) {
fragment2 = new SecondFragment();
FragmentManager fm = getFragmentManager();
FragmentTransaction fr = fm.beginTransaction();
fr.replace(R.id.fl, fragment2);
fr.commit();
}
});
bt3.setOnClickListener(new View.OnClickListener() {
@Override
public void onClick(View v) {
myinterface.onchangeFragment(1);
}
});
bt4.setOnClickListener(new View.OnClickListener() {
@Override
public void onClick(View v) {
myinterface.onchangeFragment(2);
}
});
bt5.setOnClickListener(new View.OnClickListener() {
@Override
public void onClick(View v) {
if(fragment1!=null&& !fragment1.isHidden()){
getFragmentManager().beginTransaction()
.hide(fragment1).commit();
}
if(fragment2!=null&& !fragment2.isHidden()){
getFragmentManager().beginTransaction()
.hide(fragment2).commit();
}
}
});
bt6.setOnClickListener(new View.OnClickListener() {
@Override
public void onClick(View v) {
if(fragment1!=null&&fragment1.isHidden()){
getFragmentManager().beginTransaction()
.show(fragment1).commit();
}
if(fragment2!=null&& fragment2.isHidden()){
getFragmentManager().beginTransaction()
.hide(fragment2).commit();
}
}
});
return view;
}
public interface Myinterface {
void onchangeFragment(int which);
}
}
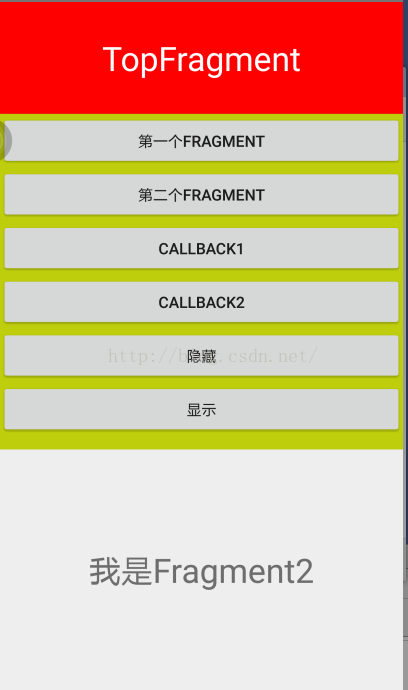
效果:
点击第一个按钮出现Fragment1.
点击第二个按钮出现Fragment2
点击第三个按钮出现Fragment1.(方法不同)
点击第四个按钮出现Fragment2.(方法不同)
点击隐藏,字条消失
点击显示,字条出现

以上所述是小编给大家介绍的Android 动态添加Fragment的实例代码,希望对大家有所帮助,如果大家有任何疑问请给我留言,小编会及时回复大家的。在此也非常感谢大家对我们网站的支持!
赞 (0)

