Android实现通讯录功能
本文实例为大家分享了Android通讯录案例,供大家参考,具体内容如下
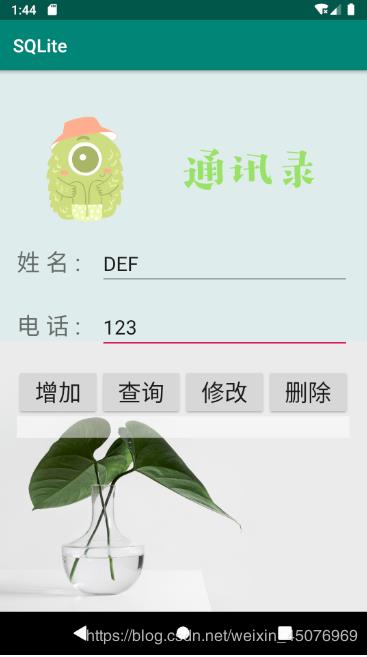
实战演练——通讯录
1、功能描述:通过SQLite实现数据库的增删改查
2、技术要点:SQLite的基本操作
3、实现步骤:
① 创建一个类继承SQLiteOpenHelper
② 重写父类构造方法、onCreate()、onUpgrade()
③ 增删改查
4、效果图

5、案例代码
MyHelper.java
package com.example.sqlite;

import android.content.Context;
import android.database.sqlite.SQLiteDatabase;
import android.database.sqlite.SQLiteOpenHelper;

import androidx.annotation.Nullable;

public class MyHelper extends SQLiteOpenHelper {
  public MyHelper(@Nullable Context context) {
    super(context, "test.db", null, 1);
  }

  //当数据库第一次创建的时候执行
  @Override
  public void onCreate(SQLiteDatabase db) {
    db.execSQL("CREATE TABLE information(_id INTEGER PRIMARY KEY AUTOINCREMENT ,name VARCHAR(20),phone VARCHAR(20))");
  }

  @Override
  public void onUpgrade(SQLiteDatabase db, int oldVersion, int newVersion) {
  }
}
MainActivity.java
package com.example.sqlite;

import androidx.appcompat.app.AppCompatActivity;

import android.content.ContentValues;
import android.database.Cursor;
import android.database.sqlite.SQLiteDatabase;
import android.os.Bundle;
import android.view.View;
import android.widget.Button;
import android.widget.TextView;
import android.widget.Toast;

public class MainActivity extends AppCompatActivity implements View.OnClickListener {
  private TextView name;
  private TextView phone;
  private Button btnAdd;
  private Button btnDel;
  private Button btnUqd;
  private Button btnSel;
  private String uPhone;
  private String uName;
  private MyHelper myHelper;
  private SQLiteDatabase db;
  private TextView show;
  private ContentValues contentValues;

  @Override
  protected void onCreate(Bundle savedInstanceState) {
    super.onCreate(savedInstanceState);
    setContentView(R.layout.activity_main);
    myHelper = new MyHelper(this);
    init();
  }

  private void init() {
    show = findViewById(R.id.show);
    name = findViewById(R.id.name);
    phone = findViewById(R.id.phone);
    btnAdd = findViewById(R.id.insert);
    btnDel = findViewById(R.id.delete);
    btnUqd = findViewById(R.id.update);
    btnSel = findViewById(R.id.select);
    btnAdd.setOnClickListener(this);
    btnDel.setOnClickListener(this);
    btnUqd.setOnClickListener(this);
    btnSel.setOnClickListener(this);
  }

  @Override
  public void onClick(View v) {
    switch (v.getId()) {
      case R.id.select:
        db = myHelper.getReadableDatabase();
        Cursor cursor = db.query("information", null, null, null, null, null, null);
        if (cursor.getCount() == 0) {
          Toast.makeText(this, "没有数据", Toast.LENGTH_LONG).show();
        } else {
          cursor.moveToFirst();
          show.setText("Name:" + cursor.getString(1) + "Tel:" + cursor.getString(2));
        }
        while (cursor.moveToNext()) {
          show.append("\n" + "Name" + cursor.getString(1) + "Tel" + cursor.getString(2));
        }
        cursor.close();
        db.close();
        break;
      case R.id.insert:
        uName = name.getText().toString();
        uPhone = phone.getText().toString();
        db = myHelper.getReadableDatabase();
        contentValues = new ContentValues();
        contentValues.put("name", uName);
        contentValues.put("phone", uPhone);
        db.insert("information", null, contentValues);
        db.close();
        break;
      case R.id.update:
        db = myHelper.getReadableDatabase();
        contentValues = new ContentValues();
        contentValues.put("phone", uPhone = phone.getText().toString());
        db.update("information", contentValues, "name=?", new String[]{name.getText().toString()});
        db.close();
        break;
      case R.id.delete:
        db = myHelper.getReadableDatabase();
        db.delete("information", null, null);
        Toast.makeText(this, "信息已经删除", Toast.LENGTH_LONG).show();
        show.setText("");
        db.close();
        break;
    }
  }
}
activity_main.xml
<?xml version="1.0" encoding="utf-8"?>
<RelativeLayout xmlns:android="http://schemas.android.com/apk/res/android"
  xmlns:app="http://schemas.android.com/apk/res-auto"
  xmlns:tools="http://schemas.android.com/tools"
  android:layout_width="match_parent"
  android:layout_height="match_parent"
  tools:context=".MainActivity"
  android:background="@drawable/background">
  <LinearLayout
    android:layout_width="match_parent"
    android:layout_height="match_parent"
    android:orientation="vertical"
    >
    <LinearLayout
      android:layout_width="match_parent"
      android:layout_height="wrap_content"
      android:orientation="horizontal"
      >

      <ImageView
        android:layout_width="160dp"
        android:layout_height="120dp"
        android:layout_marginTop="50dp"
        android:layout_marginLeft="20dp"
        android:src="@drawable/expression"></ImageView>
      <ImageView
        android:layout_width="160dp"
        android:layout_height="120dp"
        android:layout_marginTop="50dp"
        android:layout_marginLeft="20dp"
        android:src="@drawable/text"></ImageView>
    </LinearLayout>
    <LinearLayout
      android:layout_width="match_parent"
      android:layout_height="wrap_content"
      android:orientation="horizontal"
      android:layout_marginTop="20dp"
      android:paddingHorizontal="20dp"
      >
      <TextView

        android:layout_width="0dp"
        android:layout_height="wrap_content"
        android:layout_weight="1"
        android:text="姓 名 :"
        android:textSize="26sp"
        app:layout_constraintBottom_toBottomOf="parent"
        app:layout_constraintLeft_toLeftOf="parent"
        app:layout_constraintRight_toRightOf="parent"
        app:layout_constraintTop_toTopOf="parent" />
      <EditText
        android:id="@+id/name"
        android:layout_width="0dp"
        android:layout_weight="3"
        android:layout_height="wrap_content"
        android:hint="请输入姓名"
        android:textSize="22sp"
        ></EditText>

    </LinearLayout>
    <LinearLayout
      android:layout_width="match_parent"
      android:layout_height="wrap_content"
      android:orientation="horizontal"
      android:layout_marginTop="20dp"
      android:paddingHorizontal="20dp"
      >
      <TextView
        android:layout_width="0dp"
        android:layout_height="wrap_content"
        android:layout_weight="1"
        android:text="电 话 :"
        android:textSize="26sp"
        app:layout_constraintBottom_toBottomOf="parent"
        app:layout_constraintLeft_toLeftOf="parent"
        app:layout_constraintRight_toRightOf="parent"
        app:layout_constraintTop_toTopOf="parent" />
      <EditText
        android:id="@+id/phone"
        android:layout_width="0dp"
        android:layout_weight="3"
        android:layout_height="wrap_content"
        android:hint="请输入手机号码"
        android:textSize="22sp"
        ></EditText>

    </LinearLayout>
    <LinearLayout
      android:layout_width="match_parent"
      android:layout_height="wrap_content"
      android:orientation="horizontal"
      android:layout_marginTop="20dp"
      android:paddingHorizontal="20dp"
      >
      <Button
        android:id="@+id/insert"
        android:layout_width="0dp"
        android:layout_weight="1"
        android:layout_height="wrap_content"
        android:text="增加"
        android:textSize="26sp"
        ></Button>
      <Button
        android:id="@+id/select"
        android:layout_width="0dp"
        android:layout_weight="1"
        android:layout_height="wrap_content"
        android:text="查询"
        android:textSize="26sp"
        ></Button>
      <Button
        android:id="@+id/update"
        android:layout_width="0dp"
        android:layout_weight="1"
        android:layout_height="wrap_content"
        android:text="修改"
        android:textSize="26sp"
        ></Button>
      <Button
        android:id="@+id/delete"
        android:layout_width="0dp"
        android:layout_weight="1"
        android:layout_height="wrap_content"
        android:text="删除"
        android:textSize="26sp"
        ></Button>
    </LinearLayout>
    <TextView
      android:id="@+id/show"
      android:layout_width="match_parent"
      android:layout_height="wrap_content"
      android:gravity="center"
      android:textSize="18sp"
      android:background="#80ffffff"
      android:layout_marginHorizontal="20dp"

      ></TextView>
  </LinearLayout>
</RelativeLayout>
以上就是本文的全部内容,希望对大家的学习有所帮助,也希望大家多多支持我们。
赞 (0)

