SpringBoot集成FastDFS依赖实现文件上传的示例
前言
对FastDFS文件系统安装后的使用。
FastDFS的安装请参考这篇:Docker中搭建FastDFS文件系统(多图)
本文环境:IDEA + JDK1.8 + Maven
本文项目代码:fastdfs_jb51.rar
1、引入依赖
简单说一下这个依赖部分,目前大部分都是采用的如下依赖:
<!-- https://mvnrepository.com/artifact/net.oschina.zcx7878/fastdfs-client-java -->
<dependency>
    <groupId>net.oschina.zcx7878</groupId>
    <artifactId>fastdfs-client-java</artifactId>
    <version>1.27.0.0</version>
</dependency>
本着不重复造轮子,且为了使用方便我们可以去GitHub找一个集成好的依赖:
https://github.com/tobato/FastDFS_Client
<dependency>
    <groupId>com.github.tobato</groupId>
    <artifactId>fastdfs-client</artifactId>
    <version>1.27.2</version>
</dependency>
2、将Fdfs配置引入项目
只需要创建一个配置类就可以了:
@Configuration
@Import(FdfsClientConfig.class)
@EnableMBeanExport(registration = RegistrationPolicy.IGNORE_EXISTING)
public class ComponetImport {
    // 导入依赖组件
}
参考截图:

3、在application.yml当中配置Fdfs相关参数
根据自己情况修改相应ip地址及端口号:
server:
  port: 8080

ip: 10.211.55.4 # 根据自己FastDFS服务器修改

fdfs:
  so-timeout: 1501
  connect-timeout: 601
  thumb-image:             #缩略图生成参数
    width: 150
    height: 150
  tracker-list:            #TrackerList参数,支持多个
    - 10.211.55.4:22122
  web-server-url: http://${ip}:8888/
4、client封装工具类
创建FastDFSClient.java包装工具类,方便后面使用:
import com.github.tobato.fastdfs.domain.conn.FdfsWebServer;
import com.github.tobato.fastdfs.domain.fdfs.StorePath;
import com.github.tobato.fastdfs.domain.proto.storage.DownloadByteArray;
import com.github.tobato.fastdfs.exception.FdfsUnsupportStorePathException;
import com.github.tobato.fastdfs.service.FastFileStorageClient;
import org.apache.commons.io.FilenameUtils;
import org.apache.commons.lang3.StringUtils;
import org.springframework.beans.factory.annotation.Autowired;
import org.springframework.stereotype.Component;
import org.springframework.web.multipart.MultipartFile;
import java.io.ByteArrayInputStream;
import java.io.File;
import java.io.FileInputStream;
import java.io.IOException;
import java.nio.charset.Charset;

@Component
public class FastDFSClient {

    @Autowired
    private FastFileStorageClient storageClient;

    @Autowired
    private FdfsWebServer fdfsWebServer;

    /**
     * 上传文件
     * @param file 文件对象
     * @return 文件访问地址
     * @throws IOException
     */
    public String uploadFile(MultipartFile file) throws IOException {
        StorePath storePath = storageClient.uploadFile(file.getInputStream(),file.getSize(), FilenameUtils.getExtension(file.getOriginalFilename()),null);
        return getResAccessUrl(storePath);
    }

    /**
     * 上传文件
     * @param file 文件对象
     * @return 文件访问地址
     * @throws IOException
     */
    public String uploadFile(File file) throws IOException {
        FileInputStream inputStream = new FileInputStream (file);
        StorePath storePath = storageClient.uploadFile(inputStream,file.length(), FilenameUtils.getExtension(file.getName()),null);
        return getResAccessUrl(storePath);
    }

    /**
     * 将一段字符串生成一个文件上传
     * @param content 文件内容
     * @param fileExtension
     * @return
     */
    public String uploadFile(String content, String fileExtension) {
        byte[] buff = content.getBytes(Charset.forName("UTF-8"));
        ByteArrayInputStream stream = new ByteArrayInputStream(buff);
        StorePath storePath = storageClient.uploadFile(stream,buff.length, fileExtension,null);
        return getResAccessUrl(storePath);
    }

    /**
     * 封装图片完整URL地址
      */
    private String getResAccessUrl(StorePath storePath) {
        String fileUrl = fdfsWebServer.getWebServerUrl() + storePath.getFullPath();
        return fileUrl;
    }

    /**
     * 删除文件
     * @param fileUrl 文件访问地址
     * @return
     */
    public void deleteFile(String fileUrl) {
        if (StringUtils.isEmpty(fileUrl)) {
            return;
        }
        try {
            StorePath storePath = StorePath.parseFromUrl(fileUrl);
            storageClient.deleteFile(storePath.getGroup(), storePath.getPath());
        } catch (FdfsUnsupportStorePathException e) {
            System.out.println(e.getMessage());
            /** TODO 只是测试,所以未使用,logger,正式环境请修改打印方式 **/
        }
    }
    /**
     * 下载文件
     *
     * @param fileUrl 文件URL
     * @return 文件字节
     * @throws IOException
     */
    public byte[] downloadFile(String fileUrl) throws IOException {
        String group = fileUrl.substring(0, fileUrl.indexOf("/"));
        String path = fileUrl.substring(fileUrl.indexOf("/") + 1);
        DownloadByteArray downloadByteArray = new DownloadByteArray();
        byte[] bytes = storageClient.downloadFile(group, path, downloadByteArray);
        return bytes;
    }

}
5、创建Conttoler测试类
5.1 文件上传测试
@RestController
@RequestMapping("/file")
public class FileUploadController {

    @Autowired
    private FastDFSClient fastDFSClient;

    /**
     * 上传
     * @param file
     * @return
     * @throws IOException
     */
    @RequestMapping("/upload")
    public String uploadFile(MultipartFile file) throws IOException {
        return fastDFSClient.uploadFile(file);
    }

}
执行效果截图:

5.2、下载文件测试
@RestController
@RequestMapping("/file")
public class FileUploadController {

    @Autowired
    private FastDFSClient fastDFSClient;

    /**
     * 下载
     * @param fileUrl
     * @param response
     * @throws IOException
     */
    @RequestMapping("/download")
    public void downloadFile(String fileUrl, HttpServletResponse response) throws IOException {
        byte[] bytes = fastDFSClient.downloadFile(fileUrl);
        /** TODO 这里只是为了整合fastdfs,所以写死了文件格式。需要在上传的时候保存文件名。下载的时候使用对应的格式 **/
        response.setHeader("Content-disposition", "attachment;filename=" + URLEncoder.encode("sb.xlsx", "UTF-8"));
        response.setCharacterEncoding("UTF-8");
        ServletOutputStream outputStream = null;
        try {
            outputStream = response.getOutputStream();
            outputStream.write(bytes);
        } catch (IOException e) {
            e.printStackTrace();
        } finally {
            try {
                outputStream.flush();
                outputStream.close();
            } catch (IOException e) {
                e.printStackTrace();
            }
        }
    }

}
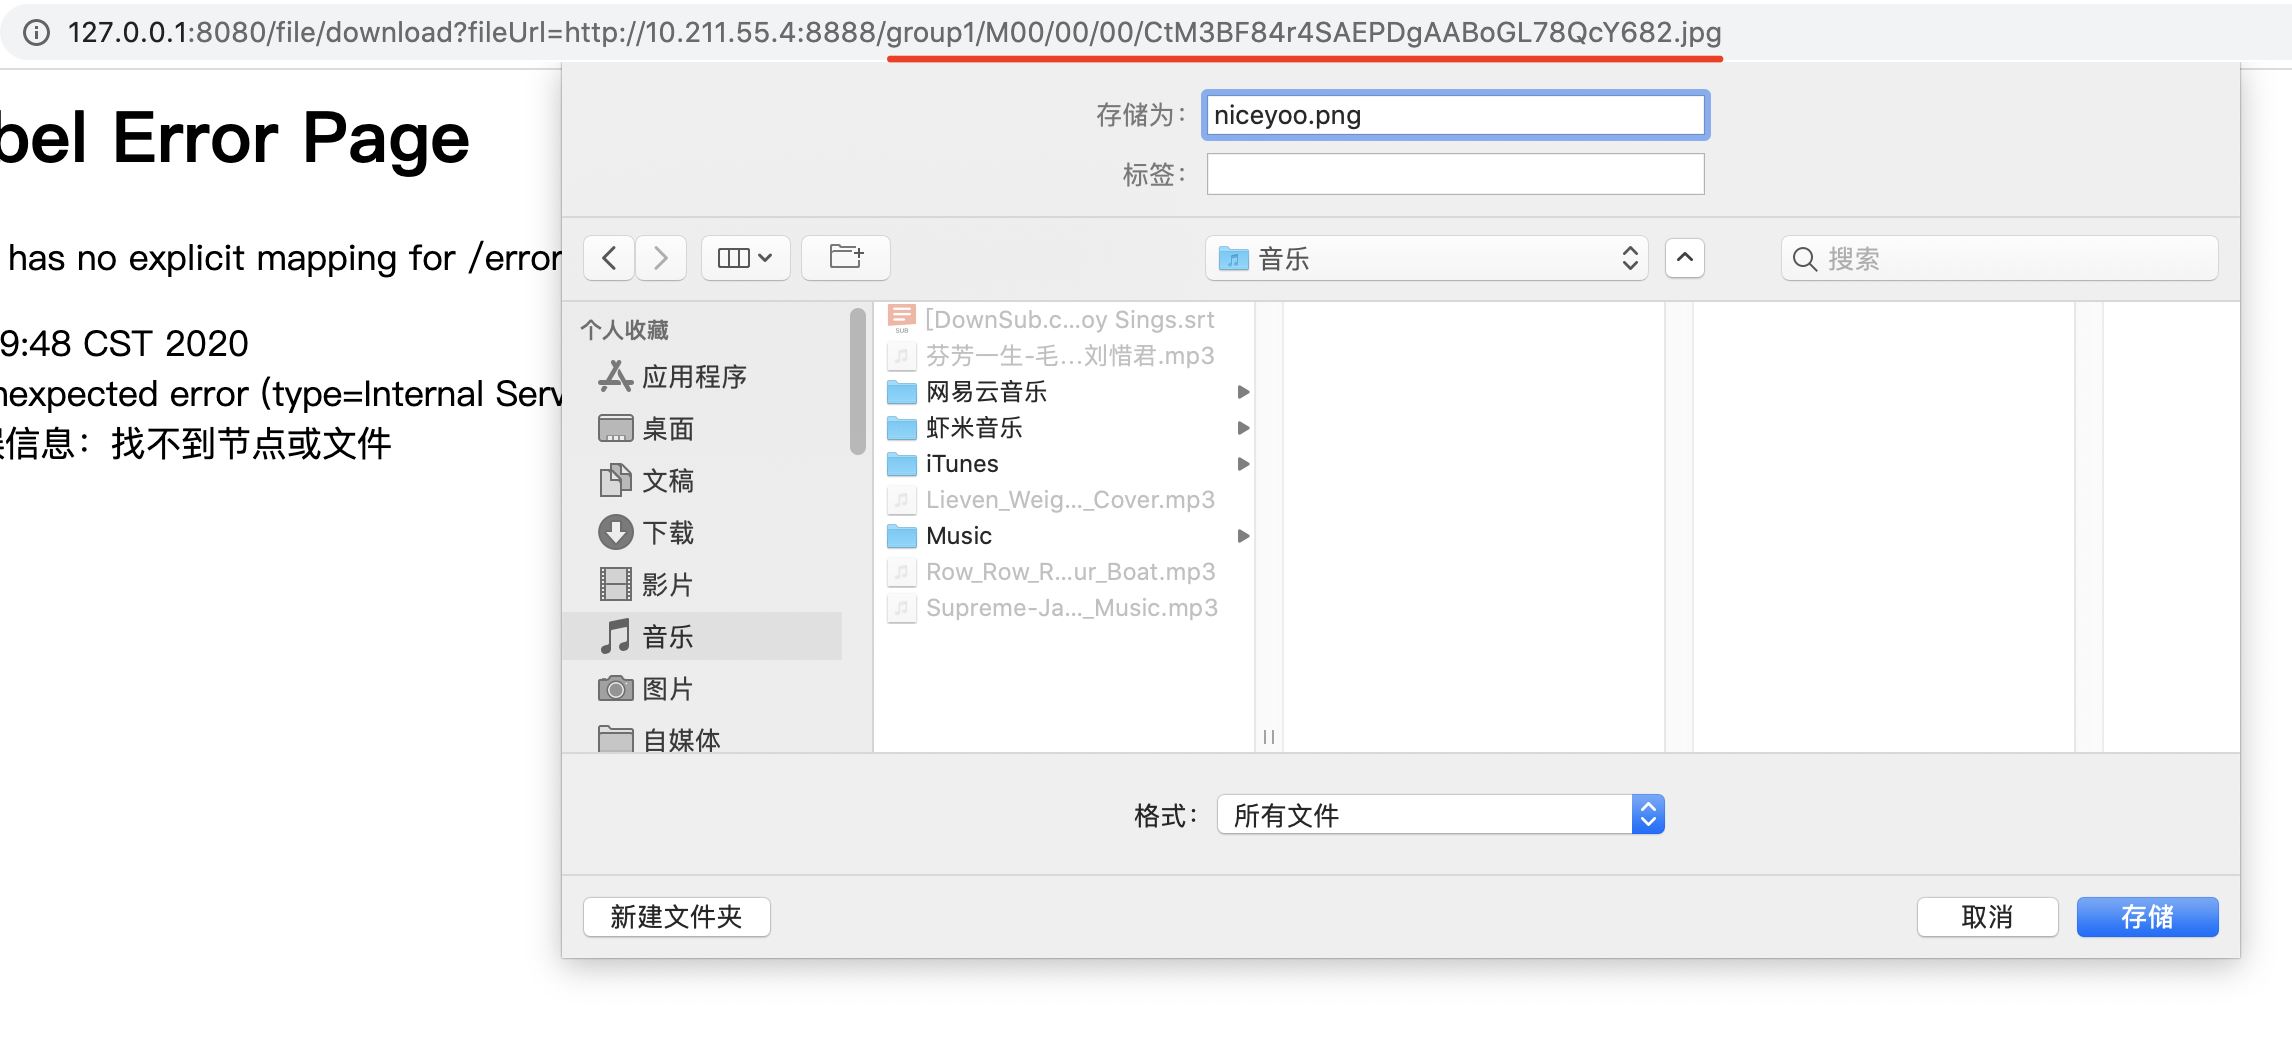
测试下载路径:
http://127.0.0.1:8080/file/download?fileUrl=group1/M00/00/00/CtM3BF84r4SAEPDgAABoGL78QcY682.jpg
拼接的参数为:group1/M00/00/00/CtM3BF84r4SAEPDgAABoGL78QcY682.jpg
大家想修改路径的话,需要同步修改 downloadFile() 方法里的分隔方式。
到此这篇关于SpringBoot集成FastDFS依赖实现文件上传的示例的文章就介绍到这了,更多相关SpringBoot FastDFS文件上传内容请搜索我们以前的文章或继续浏览下面的相关文章希望大家以后多多支持我们!
相关推荐
-

Spring Boot 文件上传原理解析
首先我们要知道什么是Spring Boot,这里简单说一下,Spring Boot可以看作是一个框架中的框架--->集成了各种框架,像security.jpa.data.cloud等等,它无须关心配置可以快速启动开发,有兴趣可以了解下自动化配置实现原理,本质上是 spring 4.0的条件化配置实现,深抛下注解,就会看到了. 说Spring Boot 文件上传原理 其实就是Spring MVC,因为这部分工作是Spring MVC做的而不是Spring Boot,那么,SpringMVC又是怎么
-
SpringBoot实现文件上传下载功能小结
最近做的一个项目涉及到文件上传与下载.前端上传采用百度webUploader插件.有关该插件的使用方法还在研究中,日后整理再记录.本文主要介绍SpringBoot后台对文件上传与下载的处理. 单文件上传 // 单文件上传 @RequestMapping(value = "/upload") @ResponseBody public String upload(@RequestParam("file") MultipartFile file) { try { if (
-
springboot 文件上传大小配置的方法
springboot上传文件大小的配置我这里记录两种,一种是设置在配置文件里只有两行代码,一种是加个Bean 首先第一种: application.properties中添加 spring.http.multipart.maxFileSize=10Mb spring.http.multipart.maxRequestSize=10Mb maxFileSize 是单个文件大小 maxRequestSize是设置总上传的数据大小 这就可以了. 根据自己需求定义吧,Mb和Kb都可以,大小写也都随意,L
-
详解SpringBoot文件上传下载和多文件上传(图文)
最近在学习SpringBoot,以下是最近学习整理的实现文件上传下载的Java代码: 1.开发环境: IDEA15+ Maven+JDK1.8 2.新建一个maven工程: 3.工程框架 4.pom.xml文件依赖项 <project xmlns="http://maven.apache.org/POM/4.0.0" xmlns:xsi="http://www.w3.org/2001/XMLSchema-instance" xsi:schemaLocation
-
Spring boot实现文件上传实例(多文件上传)
文件上传主要分以下几个步骤: (1)新建maven java project: (2)在pom.xml加入相应依赖: (3)新建一个表单页面(这里使用thymleaf); (4)编写controller; (5)测试: (6)对上传的文件做一些限制: (7)多文件上传实现 (1)新建maven Java project 新建一个名称为spring-boot-fileupload maven Java项目: (2)在pom.xml加入相应依赖: 加入相应的maven依赖,具体看以下解释: <pro
-
解决springboot MultipartFile文件上传遇到的问题
1.ajax传过去的参数在controller接受不到 解决:在contoller中增加@RequestParam 例如:saveUploadFile( @RequestParam("file") MultipartFile file,HttpServletRequest request) 2.org.springframework.web.multipart.support.MissingServletRequestPartException: Required request pa
-
详解SpringBoot下文件上传与下载的实现
SpringBoot后台如何实现文件上传下载? 最近做的一个项目涉及到文件上传与下载.前端上传采用百度webUploader插件.有关该插件的使用方法还在研究中,日后整理再记录.本文主要介绍SpringBoot后台对文件上传与下载的处理. 单文件上传 / 单文件上传 @RequestMapping(value = "/upload") @ResponseBody public String upload(@RequestParam("file") Multipart
-
SpringBoot文件上传控制及Java 获取和判断文件头信息
之前在使用SpringBoot进行文件上传时,遇到了很多问题.于是在翻阅了很多的博文之后,总算将上传功能进行了相应的完善,便在这里记录下来,供自己以后查阅. 首先,是建立一个标准的SpringBoot 的工程,这里使用的IDE是Intellij Idea,为了方便配置,将默认的配置文件替换为了application.yml. 1.在index.html中进行文件上传功能,这里使用的文件上传方式是ajax,当然也可以按照自己的具体要求使用传统的表单文件上传. <!DOCTYPE html> &l
-
Spring boot 实现单个或批量文件上传功能
一:添加依赖: <!-- thymeleaf模板插件 --> <dependency> <groupId>org.springframework.boot</groupId> <artifactId>spring-boot-starter-thymeleaf</artifactId> </dependency> <!-- jsp依赖 --> <dependency> <groupId>j
-
springboot实现文件上传和下载功能
spring boot 引入"约定大于配置"的概念,实现自动配置,节约了开发人员的开发成本,并且凭借其微服务架构的方式和较少的配置,一出来就占据大片开发人员的芳心.大部分的配置从开发人员可见变成了相对透明了,要想进一步熟悉还需要关注源码. 1.文件上传(前端页面): <!DOCTYPE html PUBLIC "-//W3C//DTD HTML 4.01 Transitional//EN" "http://www.w3.org/TR/html4/lo