Android itemDecoration接口实现吸顶悬浮标题
目录
- 方案
- 了解ItemDecoration
- 利用ItemDecoration来绘制悬浮标题栏
- 代码
方案
1.设置一个悬浮的视图挂在recycleView顶部,随着item的移动位置,悬浮标题自动跟随移动或者是保持原地不动。
2.使用recyclerView的ItemDecoration,给指定的item设置不同的itemDecoration,并且跟随item的移动而移动或者保持不变。
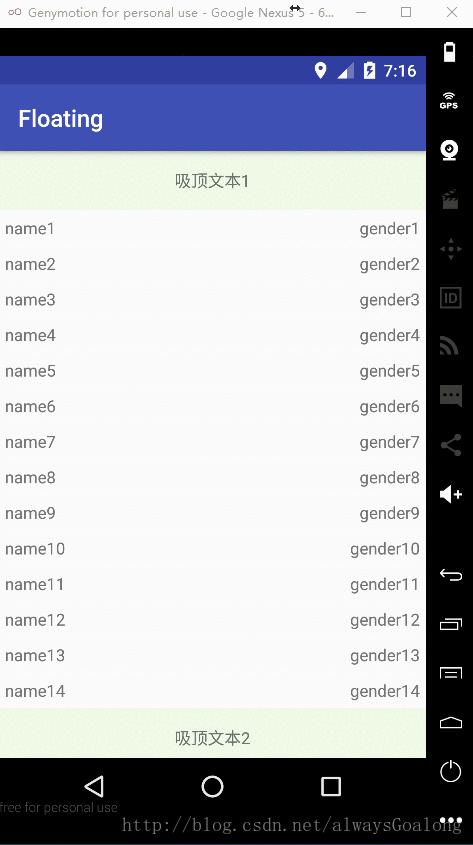
本文采用第二种方式实现,效果图:
了解ItemDecoration
这是个接口,一共有六个方法:
public static abstract class ItemDecoration {
        /**
         * Draw any appropriate decorations into the Canvas supplied to the RecyclerView.
         * Any content drawn by this method will be drawn before the item views are drawn,
         * and will thus appear underneath the views.
         *
         * @param c Canvas to draw into
         * @param parent RecyclerView this ItemDecoration is drawing into
         * @param state The current state of RecyclerView
         */
        public void onDraw(Canvas c, RecyclerView parent, State state) {
            onDraw(c, parent);
        }
        /**
         * Draw any appropriate decorations into the Canvas supplied to the RecyclerView.
         * Any content drawn by this method will be drawn after the item views are drawn
         * and will thus appear over the views.
         *
         * @param c Canvas to draw into
         * @param parent RecyclerView this ItemDecoration is drawing into
         * @param state The current state of RecyclerView.
         */
        public void onDrawOver(Canvas c, RecyclerView parent, State state) {
            onDrawOver(c, parent);
        }
        /**
         * Retrieve any offsets for the given item. Each field of <code>outRect</code> specifies
         * the number of pixels that the item view should be inset by, similar to padding or margin.
         * The default implementation sets the bounds of outRect to 0 and returns.
         *
         * <p>
         * If this ItemDecoration does not affect the positioning of item views, it should set
         * all four fields of <code>outRect</code> (left, top, right, bottom) to zero
         * before returning.
         *
         * <p>
         * If you need to access Adapter for additional data, you can call
         * {@link RecyclerView#getChildAdapterPosition(View)} to get the adapter position of the
         * View.
         *
         * @param outRect Rect to receive the output.
         * @param view    The child view to decorate
         * @param parent  RecyclerView this ItemDecoration is decorating
         * @param state   The current state of RecyclerView.
         */
        public void getItemOffsets(Rect outRect, View view, RecyclerView parent, State state) {
            getItemOffsets(outRect, ((LayoutParams) view.getLayoutParams()).getViewLayoutPosition(),
                    parent);
        }
        /**
         * @deprecated
         * Override {@link #onDrawOver(Canvas, RecyclerView, RecyclerView.State)}
         */
        @Deprecated
        public void onDrawOver(Canvas c, RecyclerView parent) {
        }
        /**
         * @deprecated
         * Override {@link #onDraw(Canvas, RecyclerView, RecyclerView.State)}
         */
        @Deprecated
        public void onDraw(Canvas c, RecyclerView parent) {
        }
        /**
         * @deprecated
         * Use {@link #getItemOffsets(Rect, View, RecyclerView, State)}
         */
        @Deprecated
        public void getItemOffsets(Rect outRect, int itemPosition, RecyclerView parent) {
            outRect.set(0, 0, 0, 0);
        }
    }
其中有三个方法是@deprecated的,那么我们只需要看以下三个方法:
	public void onDraw(Canvas c, RecyclerView parent, State state) {
		onDraw(c, parent);
	}
	public void onDrawOver(Canvas c, RecyclerView parent, State state) {
    	onDrawOver(c, parent);
    }
	public void getItemOffsets(Rect outRect, View view, RecyclerView parent, State state) {
		getItemOffsets(outRect, ((LayoutParams) view.getLayoutParams()).getViewLayoutPosition(),
	                parent);
	}
第一个方法的意思是绘制分割线本身;
第二个方法是在item项目绘制完成之后进行的绘制操作(这个会覆盖在item上面);
第三个方法是设置分割线的左间距,上间距,右间距,下间距,保存在outRect中。
如图所示:
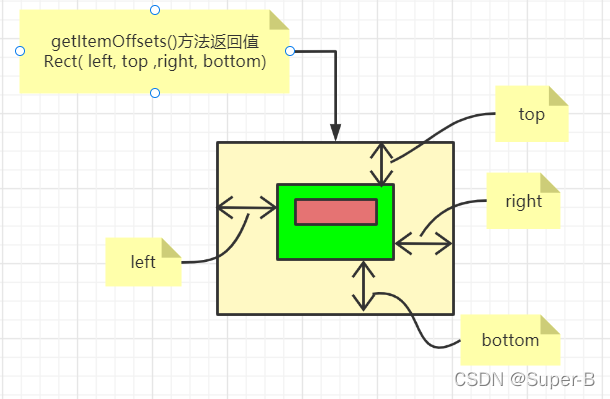
其中最底层黄色部分大小是getItemOffsets方法返回的itemDecoration的矩阵设置边距宽度,onDraw方法根据设置的间距宽度来进行绘制黄色区域,其中棕红色部分是onDrawOver方法覆盖绘制在item上层的部分。
利用ItemDecoration来绘制悬浮标题栏
我们给每个需要title的item设置rect.top = titleHeight(标题栏高度);其他的间距可以先不考虑,不重要;
重写onDraw方法,绘制我们的itemDecoration标题栏;
我们需要重写onDrawOver方法,在滑动的时候去判断,
1)如果顶部标题区域是在该标题的items范围之内的滑动的话,那么我们需要覆盖绘制一个处于recyclerView.getpaddingTop位置的title,这样的话这个范围内滑动就有一个悬停的标题栏;
2)如果顶部的标题栏区域恰好下面紧跟着下一个标题栏,那么继续向上滑动的时候,需要下面的标题栏把上面的标题栏顶出界面之外。那么绘制的顶部标题栏的起始位置就是所处的item.bottom - titleHeight的位置。
使用以上三个步骤就可以做出一个流畅并且定制化很高的悬浮标题栏功能了。
代码
class MyDecoration(context: Context): RecyclerView.ItemDecoration() {
        var mPaint:Paint? = null
        var mPaint2:Paint? = null
        var mTextPaint:Paint? = null
        var mTitleHeight:Int? = null
        var mTitleHeight2:Int? = null
        var mTitleTextSize:Float? = null
        init {
            mTitleHeight =
                TypedValue.applyDimension(
                    TypedValue.COMPLEX_UNIT_DIP,
                    30f,
                    context.getResources().getDisplayMetrics()
                ).toInt()
            mTitleHeight2 =
                TypedValue.applyDimension(
                    TypedValue.COMPLEX_UNIT_DIP,
                    3f,
                    context.getResources().getDisplayMetrics()
                ).toInt()
            mTitleTextSize =
                TypedValue.applyDimension(
                    TypedValue.COMPLEX_UNIT_SP,
                    16f,
                    context.getResources().getDisplayMetrics()
                )
            mTextPaint = Paint()
            mTextPaint?.let {
                it.setTextSize(mTitleTextSize!!)
                it.setAntiAlias(true)
                it.setColor(Color.WHITE)
            }
            mPaint = Paint()
            mPaint?.let {
                it.setAntiAlias(true)
                it.setColor(Color.RED)
            }
            mPaint2 = Paint()
            mPaint2?.let {
                it.setAntiAlias(true)
                it.setColor(Color.BLUE)
            }
        }
        /**
         * recyclerView绘制onDraw -> item.onDraw -> onDrawOver
         */
        override fun onDraw(c: Canvas, parent: RecyclerView, state: RecyclerView.State) {
            for (index in 0 until parent.childCount) {
                val childView = parent.getChildAt(index)
                childView?.let {
                    val rect = Rect()
                    val position = parent.getChildAdapterPosition(it)
                    if (isTitleItem(position)) {
                        rect.top = childView.top - mTitleHeight!!
                        rect.bottom = childView.top
                    } else {
                        rect.top = childView.top - mTitleHeight2!!
                        rect.bottom = childView.top
                    }
                    rect.left = parent.paddingLeft
                    rect.right = parent.width - parent.paddingRight
                    if (isTitleItem(position)) {
                        mPaint?.let { it1 -> c.drawRect(rect, it1) }
                        mTextPaint?.let { it3 ->
                            c.drawText(
                                getTitleStr(position),
                                0f,
                                rect.top.toFloat() + (mTitleHeight?.div(2.00f)?:0f),
                                it3)}
                    } else {
                        mPaint2?.let { it1 -> c.drawRect(rect, it1) }
                    }
                }
            }
        }
        /**
         * recyclerView绘制onDraw -> item.onDraw -> onDrawOver
         * 绘制覆盖在item上面的分割线效果
         */
        override fun onDrawOver(c: Canvas, parent: RecyclerView, state: RecyclerView.State) {
            val childView = parent.getChildAt(0)
            var nextView:View? = null;
            if (1 < parent.childCount) {
                nextView = parent.getChildAt(1)
            }
            childView?.let {
                val rect = Rect()
                val position = parent.getChildAdapterPosition(it)
                mTitleHeight?.let { height ->
                    if (nextView != null
                        && it.bottom - height < parent.paddingTop
                        && isTitleItem(parent.getChildAdapterPosition(nextView))
                        && !isSameTitle(parent.getChildAdapterPosition(nextView),position)) {
                        rect.top = it.bottom - height
                        rect.bottom = it.bottom
                    } else {
                        rect.top = parent.paddingTop
                        rect.bottom = rect.top + height
                    }
                }
                rect.left = parent.paddingLeft
                rect.right = parent.width - parent.paddingRight
                mPaint?.let { it1 -> c.drawRect(rect, it1) }
                mTextPaint?.let { it3 ->
                    c.drawText(
                        getTitleStr(position),
                        0f,
                        rect.top + (mTitleHeight?.div(2.00f)?:0f),
                        it3)}
            }
        }
        /**
         * 用于设置item周围的偏移量的,类似于设置padding喝margin效果,
         * 空出的效果用于绘制分割线
         */
        override fun getItemOffsets(
            outRect: Rect,
            view: View,
            parent: RecyclerView,
            state: RecyclerView.State
        ) {
            val position:Int = parent.getChildAdapterPosition(view)
            if (position % 4 == 0) {
                outRect.top = mTitleHeight!!
            } else{
                outRect.top = mTitleHeight2!!
            }
        }
        fun isTitleItem(position: Int):Boolean {
            return position % 4 == 0
        }
        fun getTitleStr(position: Int):String {
            return "标题:${position / 4}"
        }
        fun isSameTitle(position1: Int,position2: Int):Boolean {
            return (position1 / 4) == (position2 / 4)
        }
    }
到此这篇关于Android itemDecoration接口实现吸顶悬浮标题的文章就介绍到这了,更多相关Android吸顶悬浮标题内容请搜索我们以前的文章或继续浏览下面的相关文章希望大家以后多多支持我们!
相关推荐
-

Android Jetpack架构中ViewModel接口暴露的不合理探究
目录 暴露 Mutable 状态 暴露 Suspend 方法 在 Jetpack 架构规范中, ViewModel 与 View 之间应该遵循单向数据流的通信方式,Events 永远从 View 流向 VM ,而 State 从 VM 流向 View. 如果 ViewModel 对 View 暴露了不适当的接口类型,则会破坏单向数据流的形成.不适当的接口类型常见于以下两点: 暴露 Mutable 状态 暴露 Suspend 方法 暴露 Mutable 状态 ViewModel 对外暴露的数据状态
-
Android实现socket通信统一接口的方法
目录 UDP通信与TCP通信的实现 UDP通信 TCP客户端通信 使用统一接口 定义接口 实现接口 实现应用层 总结 Android实现socket通信统一接口,统一接口之后可以在不需要大量修改应用层代码的情况下,使用与当前功能类似但是底层实现不同的功能,以实现的UDP与TCP两种通信方式的接口为例. UDP通信与TCP通信的实现 UDP通信 我们在使用UDP通信方式时,我们会这样实现 //设置socket val socket = DatagramSocket() val serverPort
-
android post请求接口demo
本文实例为大家分享了android post请求接口demo测试代码,供大家参考,具体内容如下 MainActivity.java package com.tsh.test; import java.io.InputStream; import java.io.OutputStream; import java.io.PrintWriter; import java.net.HttpURLConnection; import java.net.URL; import android.app.Ac
-
Android ApplicationContext接口深入分析
目录 需求 实现方法 代码 调用 Application getApplicationContext() 参考 需求 Android(Kotlin)获取应用全局上下文 ApplicationContext. 希望可以在应用内任意位置获取上下文,而不是仅在 Activity 或 Service 里才能获取. ApplicationContext 是和应用全局相关的. 实现方法 自定义 MyApplication,保存自身的 Application 实例. MyApplication 配置到 And
-
Android序列化实现接口Serializable与Parcelable详解
目录 一.Serializable(对象) 二.Parcelable(属性) 2.1 实现方式(不推荐) 2.2 注解方式(推荐) 一.Serializable(对象) 只需要实现Serializable 接口即可.将一个对象序列化转换成可存储或传输的状态,然后再强转回来使用(反序列化). class Person : Serializable { var name = "" var age = 0 } //传递 OneActivity { val person = Person().
-
Android设置默认锁屏壁纸接口的方法
本文实例为大家分享了Android设置默认锁屏壁纸接口的具体代码,供大家参考,具体内容如下 完成自定义service后,接下来就是具体实现接口 1.在frameworks/base/core/java/android/app/customized/ICustomizedService.aidl中定义接口 boolean setLockScreenWallpaper(String uri); 2.在frameworks/base/core/java/android/app/customized/C
-
Android实现上拉吸顶效果
本文实例为大家分享了Android实现上拉吸顶效果的具体代码,供大家参考,具体内容如下 效果图 1.home_layout.xml 此布局即可实现上拉标题固定在顶部 <?xml version="1.0" encoding="UTF-8"?> <RelativeLayout xmlns:android="http://schemas.android.com/apk/res/android" xmlns:app="
-
Android RecyclerView实现悬浮吸顶、分隔线、到底提示效果
本文中所有效果通过ItemDecoration实现,通过此实现的可以与业务解耦,让RecyclerView的模板更加简洁,不关心任何辅助性ui,github地址 一.顶部吸附效果图 二.顶部不吸附效果图 三.不满一屏效果 四.核心实现点 1.为什么通过ItemDecoration能够实现,原理? ①通过getItemOffsets()方法获取当前模板view的left.top.right.bottom边距,这些留出的间距用于绘制这些辅助性ui. // RecyclerView的measure c
-
Android自定义RecyclerView Item头部悬浮吸顶
本文实例为大家分享了Android自定义RecyclerView Item头部悬浮吸顶的具体代码,供大家参考,具体内容如下 概述 1.自定义了一个FrameLayout,引入条目的头部布局加入到自定义FrameLayout中. 2.将RecyclerView加入FrameLayout 3.条目头部View的Alpha动画以及设置透明和不透明这个时机大多是通过打log来确定的,硬推理还是有些难. 4.当屏幕显示区域的第二条Item距离控件顶端的距离小于条目头部View高度时,就开始移动条目头部Vi
-
android中RecyclerView悬浮吸顶效果
MultiType-Adapter打造悬浮吸顶效果 注:当前版本只适合配合RecyclerView快速打造一款 展示UI 悬浮吸顶效果,如 通讯录效果,由于实现机制的原因,暂时不支持触摸事件. MultiType-Adapter介绍地址:MultiType-Adapter 是一款轻量级支持多数据类型的 RecyclerView 适配器; 使用简单,完全解耦; 悬浮吸顶效果 ```groovy // root build.gradle repositories { jcenter() maven
-
Android Jetpack Compose实现列表吸顶效果
目录 stickyHeader 实体类 加载假数据 吸顶标题 二级条目 完整代码 效果图 安卓传统的 Recyclerview 打造悬浮头部StickyHeader的吸顶效果,十分麻烦,而在Compose中就简单多了 stickyHeader Compose设计的时候考虑得很周到,他们提供了stickyHeader 作用就是添加一个粘性标题项,即使在它后面滚动时也会保持固定.标头将保持固定,直到下一个标头取而代之. 参数key - 表示唯一的密钥键. 它不允许对列表出现使用相同的键.密钥的类型应
-
Android进阶CoordinatorLayout协调者布局实现吸顶效果
目录 引言 1 CoordinatorLayout功能介绍 1.1 CoordinatorLayout的依赖交互原理 1.2 CoordinatorLayout的嵌套滑动原理 2 CoordinatorLayout源码分析 2.1 CoordinatorLayout的依赖交互实现 2.2 CoordinatorLayout交互依赖的源码分析 2.3 CoordinatorLayout子控件拦截事件源码分析 2.4 CoordinatorLayout嵌套滑动原理分析 引言 在上一节Android进
-
RecyclerVIew实现悬浮吸顶效果
RecyclerVIew实现悬浮吸顶效果图 这里写图片描述 主页面布局 <?xml version="1.0" encoding="utf-8"?> <FrameLayout xmlns:android="http://schemas.android.com/apk/res/android" android:layout_width="match_parent" android:layout_height=&
-
Android RecyclerView实现吸顶动态效果流程分析
目录 一.ItemDecoration 二.实现RecyclerView吸顶效果 1.实现一个简单的RecyclerView 2.通过ItemDecoration画分割线 3.画出每个分组的组名 4.实现吸顶效果 完整demo 一.ItemDecoration ItemDecoration 允许应用给具体的 View 添加具体的图画或者 layout 的偏移,对于绘制 View之间的分割线,视觉分组边界等等是非常有用的. 当我们调用 addItemDecoration() 方法添加 decora
-
Android进阶NestedScroll嵌套滑动机制实现吸顶效果详解
目录 引言 1 自定义滑动布局,实现吸顶效果 1.1 滑动容器实现 1.2 嵌套滑动机制完成交互优化 1.2.1 NestedScrollingParent接口和NestedScrollingChild接口 1.2.2 预滚动阶段实现 1.2.3 滚动阶段实现 1.2.4 滚动结束 引言 在上一篇文章Android进阶宝典 -- 事件冲突怎么解决?先从Android事件分发机制开始说起中,我们详细地介绍了Android事件分发机制,其实只要页面结构复杂,联动众多就会产生事件冲突,处理不得当就是b
-
js实现多个标题吸顶效果
对于导航的吸顶效果,pc端和移动端的需求可能有些差异.在pc端,我们通常只需要一个顶部导航:在移动端,在滑动页面的时候,更需要多个标题的吸顶(例如地区的选择,需要将省份吸顶). 单个标题吸顶和多个标题吸顶的区别在于:多个标题吸顶需要确定一个高度范围,在这个范围中只能有一个标题吸顶,其他都是固定效果. 一.页面布局及样式 此处为了测试效果,用了几个重复的section标签,大家根据实际需求编写布局和样式. <body> <ul id="container"> &l