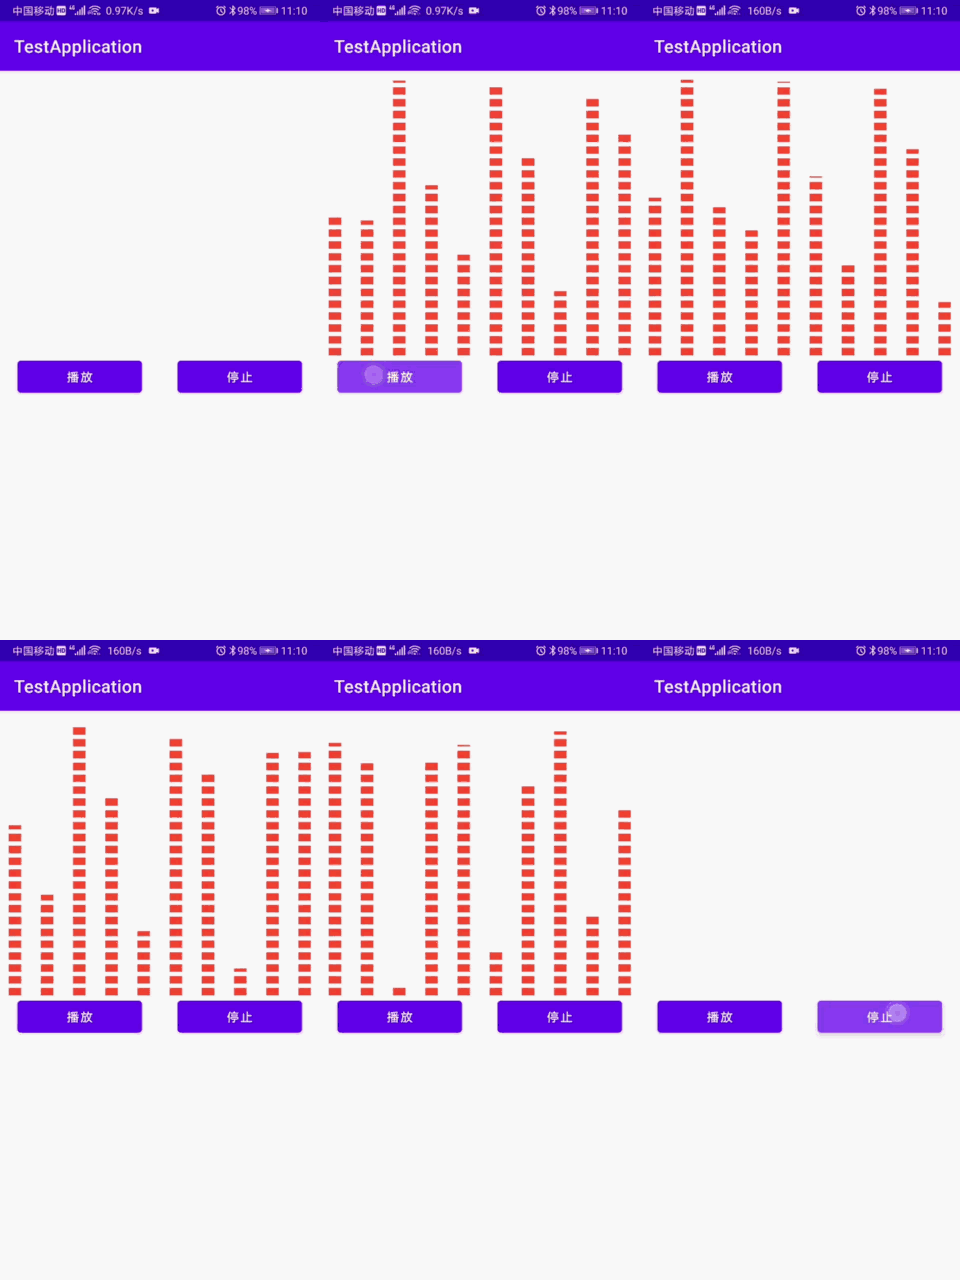
Android简单自定义音乐波动特效图
本文实例为大家分享了Android简单自定义音乐波动特效图的具体代码,供大家参考,具体内容如下
最终效果:

思路:就是绘制一个不断变化高度的矩形或者是宽虚线
1.自定义属性:
<?xml version="1.0" encoding="utf-8"?>
<resources>
    <declare-styleable name="musicPlayViewAttr">
        <!--指针颜色-->
        <attr name="point_color" format="color" />
        <!--指针数量-->
        <attr name="point_num" format="integer" />
        <!--指针宽度-->
        <attr name="point_width" format="float" />
        <!--指针波动速度-->
        <attr name="point_speed" format="integer" />
    </declare-styleable>
</resources>
2.编写自定义MusicPlayview
/**
 * 音乐播放波动动画
 */

public class MusicPlayView extends View {
    //坐标原点x
    private float mBasePointX;

    //坐标原点y
    private float mBasePointY;

    //指针的数量 默认10
    private int mPointNum;

    //指针间的间隙  默认5dp
    private float mPointSpace;

    //每个指针的宽度 默认5dp
    private float mPointWidth;

    //指针的颜色
    private int mPointColor = Color.RED;

    //指针的集合
    private List<Pointer> mPoints;

    //控制开始/停止
    private boolean mIsPlaying = false;

    //播放线程
    private Thread mPlayThread;

    //指针波动速度
    private int mPointSpeed;

    //画笔
    private Paint mPaint;

    public MusicPlayView(Context context) {
        super(context);
        init();
    }

    public MusicPlayView(Context context, @Nullable AttributeSet attrs) {
        super(context, attrs);
        //取出自定义属性
        TypedArray ta = context.obtainStyledAttributes(attrs, R.styleable.musicPlayViewAttr);
        mPointNum = ta.getInt(R.styleable.musicPlayViewAttr_point_num, 10);
        mPointWidth = dp2px(getContext(),
                ta.getFloat(R.styleable.musicPlayViewAttr_point_width, 5f));
        mPointColor = ta.getColor(R.styleable.musicPlayViewAttr_point_color, Color.RED);
        mPointSpeed = ta.getInt(R.styleable.musicPlayViewAttr_point_speed, 40);
        init();
    }

    public MusicPlayView(Context context, @Nullable AttributeSet attrs, int defStyleAttr) {
        super(context, attrs, defStyleAttr);
        TypedArray ta = context.obtainStyledAttributes(attrs, R.styleable.musicPlayViewAttr);
        mPointNum = ta.getInt(R.styleable.musicPlayViewAttr_point_num, 10);
        mPointWidth = dp2px(getContext(), ta.getFloat(R.styleable.musicPlayViewAttr_point_width, 5f));
        mPointColor = ta.getColor(R.styleable.musicPlayViewAttr_point_color, Color.RED);
        mPointSpeed = ta.getInt(R.styleable.musicPlayViewAttr_point_speed, 40);
        init();
    }

    /**
     * 初始化画笔
     */
    private void init() {
        mPoints = new ArrayList<>();
        //绘制虚线
        mPaint = new Paint(Paint.ANTI_ALIAS_FLAG);
        mPaint.setColor(mPointColor);
        mPaint.setAntiAlias(true);
        mPaint.setStrokeWidth(mPointWidth);
        mPaint.setPathEffect(new DashPathEffect(new float[]{25, 15}, 0));//虚线间隔
        setLayerType(LAYER_TYPE_SOFTWARE, null);
    }

    /**
     * 设置指针高度和即那个
     */
    @Override
    protected void onLayout(boolean changed, int left, int top, int right, int bottom) {
        super.onLayout(changed, left, top, right, bottom);
        //获取逻辑原点的Y
        mBasePointY = getHeight() - getPaddingBottom();
        Random random = new Random();
        if (mPoints != null)
            mPoints.clear();
        for (int i = 0; i < mPointNum; i++) {
            //随机高度
            mPoints.add(new Pointer((float) (0.1 * (random.nextInt(10) + 1) * (getHeight() - getPaddingBottom() - getPaddingTop()))));
        }
        //计算每个指针之间的间隔  view宽度 - 左右的padding - 所有指针总共宽度   再除以多少个间隔
        mPointSpace = (getWidth() - getPaddingLeft() - getPaddingRight() - mPointWidth * mPointNum) / (mPointNum - 1);

    }

    /**
     * 开始绘制虚线
     */
    @Override
    protected void onDraw(Canvas canvas) {
        super.onDraw(canvas);
        //指针x位置
        mBasePointX = 0f + getPaddingLeft() + mPointWidth / 2;
        //绘制每一个指针。
        for (int i = 0; i < mPoints.size(); i++) {
            //绘制虚线
            float[] pts = {mBasePointX, getHeight(), mBasePointX, (mBasePointY - mPoints.get(i).getHeight())};//重下往上动画
            canvas.drawLines(pts, mPaint);
            //更新指针x位置
            mBasePointX += (mPointSpace + mPointWidth);
        }
    }

    /**
     * 开始线程 播放
     */
    public void start() {
        setVisibility(VISIBLE);
        if (!mIsPlaying) {
            if (mPlayThread == null) {
                mPlayThread = new Thread(new PlayRunnable());
                mPlayThread.start();
            }
            mIsPlaying = true;//控制子线程中的循环
        }
    }

    /**
     * 停止线程 停止播放
     */
    public void stop() {
        setVisibility(INVISIBLE);
        mIsPlaying = false;
        invalidate();
    }

    /**
     * 更新UI
     */
    private Handler myHandler = new Handler() {
        @Override
        public void handleMessage(Message msg) {
            super.handleMessage(msg);
            invalidate();
        }
    };

    /**
     * 子线程,循环改变每个指针的高度
     */
    public class PlayRunnable implements Runnable {

        @Override
        public void run() {
            for (float i = 0; i < Integer.MAX_VALUE; ) {
                try {
                    for (int j = 0; j < mPoints.size(); j++) {
                        float rate = (float) Math.abs(Math.sin(i + j));//随机数
                        mPoints.get(j).setHeight((mBasePointY - getPaddingTop()) * rate); //每个指针的高度
                    }
                    Thread.sleep(mPointSpeed);//控制动画速度
                    //开始/暂停
                    if (mIsPlaying) {
                        myHandler.sendEmptyMessage(0);
                        i += 0.1;
                    }
                } catch (InterruptedException e) {
                    e.printStackTrace();
                }
            }
        }
    }

    /**
     * 指针对象
     */
    public class Pointer {
        private float height;

        public Pointer(float height) {
            this.height = height;
        }

        public float getHeight() {
            return height;
        }

        public void setHeight(float height) {
            this.height = height;
        }
    }

    /**
     * dp转px
     */
    public static int dp2px(Context context, float dpVal) {
        return (int) TypedValue.applyDimension(TypedValue.COMPLEX_UNIT_DIP, dpVal, context.getResources()
                .getDisplayMetrics());
    }
}
3.在activity_main2布局中使用MusicPlayView
<?xml version="1.0" encoding="utf-8"?>
<LinearLayout xmlns:android="http://schemas.android.com/apk/res/android"
    xmlns:app="http://schemas.android.com/apk/res-auto"
    xmlns:tools="http://schemas.android.com/tools"
    android:layout_width="match_parent"
    android:layout_height="match_parent"
    android:orientation="vertical"
    tools:context=".MainActivity">

    <com.hk.testapplication.MusicPlayView
        android:id="@+id/music_play"
        android:layout_width="match_parent"
        android:layout_height="0dp"
        android:layout_weight="1"
        android:visibility="invisible"
        android:padding="10dp"
        app:point_color="#F44336"
        app:point_num="10"
        app:point_width="14" />
    <LinearLayout
        android:orientation="horizontal"
        android:layout_width="match_parent"
        android:layout_height="0dp"
        android:layout_weight="1">
        <Button
            android:id="@+id/bt_play"
            android:layout_marginLeft="20dp"
            android:layout_marginRight="20dp"
            android:layout_width="0dp"
            android:layout_weight="1"
            android:layout_height="wrap_content"
            android:text="播放"/>
        <Button
            android:id="@+id/bt_stop"
            android:layout_width="0dp"
            android:layout_weight="1"
            android:layout_height="wrap_content"
            android:layout_marginLeft="20dp"
            android:layout_marginRight="20dp"
            android:text="停止"/>

    </LinearLayout>

</LinearLayout>
4.MainActivity中使用
public class MainActivity2 extends AppCompatActivity implements View.OnClickListener {
    private Button mBtPlay,mBtStop;
    private MusicPlayView mMusicPlayView;
    @Override
    protected void onCreate(Bundle savedInstanceState) {
        super.onCreate(savedInstanceState);
        setContentView(R.layout.activity_main2);
        mMusicPlayView = findViewById(R.id.music_play);
        mBtPlay = findViewById(R.id.bt_play);
        mBtStop = findViewById(R.id.bt_stop);
        mBtPlay.setOnClickListener(this);
        mBtStop.setOnClickListener(this);
    }
    @Override
    public void onClick(View v) {
        switch (v.getId()){
            case R.id.bt_play:
                //开始播放
                mMusicPlayView.start();
                break;
            case R.id.bt_stop:
                //停止播放
                mMusicPlayView.stop();
                break;

        }
    }
}
因为注释都挺详细的,就没有做太多的介绍,我这里也只是提供一个思路,里面有很多可以优化的地方比方说线程使用和循环的时候,如果有不懂的地方可以留言。
以上就是本文的全部内容,希望对大家的学习有所帮助,也希望大家多多支持我们。
赞 (0)

