Spring Boot Actuator监控的简单使用方法示例代码详解
Spring Boot Actuator帮助我们实现了许多中间件比如mysql、es、redis、mq等中间件的健康指示器。
通过 Spring Boot 的自动配置,这些指示器会自动生效。当这些组件有问题的时候,HealthIndicator 会返回 DOWN 或 OUT_OF_SERVICE 状态,health 端点 HTTP 响应状态码也会变为 503,我们可以以此来配置程序健康状态监控报警。
使用步骤也非常简单,这里演示的是线程池的监控。模拟线程池满了状态下将HealthInicator指示器变为Down的状态。
pom中引入jar
<dependency>
 <groupId>org.springframework.boot</groupId>
 <artifactId>spring-boot-starter-actuator</artifactId>
</dependency>
引入properties配置
spring.application.name=boot

# server.servlet.context-path=/boot
# management.server.servlet.context-path=/boot
# JVM (Micrometer)要求给应用设置commonTag
management.metrics.tags.application=${spring.application.name}
#去掉重复的metrics
spring.metrics.servo.enabled=false

management.endpoint.metrics.enabled=true
management.endpoint.metrics.sensitive=false
#显式配置不需要权限验证对外开放的端点
management.endpoints.web.exposure.include=*
management.endpoints.jmx.exposure.include=*

management.endpoint.health.show-details=always
#Actuator 的 Web 访问方式的根地址为 /actuator,可以通过 management.endpoints.web.base-path 参数进行修改
management.endpoints.web.base-path=/actuator
management.metrics.export.prometheus.enabled=true
代码
/**
  * @Author jeffSmile
  * @Date 下午 6:10 2020/5/24 0024
  * @Description 定义一个接口,来把耗时很长的任务提交到这个 demoThreadPool 线程池,以模拟线程池队列满的情况
  **/

 @GetMapping("slowTask")
 public void slowTask() {
  ThreadPoolProvider.getDemoThreadPool().execute(() -> {
   try {
    TimeUnit.HOURS.sleep(1);
   } catch (InterruptedException e) {
   }
  });
 }
package com.mongo.boot.service;

import jodd.util.concurrent.ThreadFactoryBuilder;

import java.util.concurrent.ArrayBlockingQueue;
import java.util.concurrent.ThreadPoolExecutor;
import java.util.concurrent.TimeUnit;

public class ThreadPoolProvider {

 //一个工作线程的线程池,队列长度10
 private static ThreadPoolExecutor demoThreadPool = new ThreadPoolExecutor(
   1, 1,
   2, TimeUnit.SECONDS,
   new ArrayBlockingQueue<>(10),
   new ThreadFactoryBuilder().setNameFormat("demo-threadpool-%d").get());
 //核心线程数10,最大线程数50的线程池,队列长度50
 private static ThreadPoolExecutor ioThreadPool = new ThreadPoolExecutor(
   10, 50,
   2, TimeUnit.SECONDS,
   new ArrayBlockingQueue<>(100),
   new ThreadFactoryBuilder().setNameFormat("io-threadpool-%d").get());

 public static ThreadPoolExecutor getDemoThreadPool() {
  return demoThreadPool;
 }

 public static ThreadPoolExecutor getIOThreadPool() {
  return ioThreadPool;
 }
}
package com.mongo.boot.service;

import org.springframework.boot.actuate.health.Health;
import org.springframework.boot.actuate.health.HealthIndicator;

import java.util.HashMap;
import java.util.Map;
import java.util.concurrent.ThreadPoolExecutor;

/**
 * @Author jeffSmile
 * @Date 下午 6:12 2020/5/24 0024
 * @Description 自定义的 HealthIndicator 类,用于单一线程池的健康状态
 **/

public class ThreadPoolHealthIndicator implements HealthIndicator {
 private ThreadPoolExecutor threadPool;

 public ThreadPoolHealthIndicator(ThreadPoolExecutor threadPool) {
  this.threadPool = threadPool;
 }

 @Override
 public Health health() {
  //补充信息
  Map<String, Integer> detail = new HashMap<>();
  //队列当前元素个数
  detail.put("queue_size", threadPool.getQueue().size());
  //队列剩余容量
  detail.put("queue_remaining", threadPool.getQueue().remainingCapacity());

  //如果还有剩余量则返回UP,否则返回DOWN
  if (threadPool.getQueue().remainingCapacity() > 0) {
   return Health.up().withDetails(detail).build();
  } else {
   return Health.down().withDetails(detail).build();
  }
 }
}
package com.mongo.boot.service;

import org.springframework.boot.actuate.health.CompositeHealthContributor;
import org.springframework.boot.actuate.health.HealthContributor;
import org.springframework.boot.actuate.health.NamedContributor;
import org.springframework.stereotype.Component;

import java.util.HashMap;
import java.util.Iterator;
import java.util.Map;

/***
 * @Author jeffSmile
 * @Date 下午 6:13 2020/5/24 0024
 * @Description 定义一个 CompositeHealthContributor,来聚合两个 ThreadPoolHealthIndicator 的实例,
 * 分别对应 ThreadPoolProvider 中定义的两个线程池
 **/

@Component
public class ThreadPoolsHealthContributor implements CompositeHealthContributor {

 //保存所有的子HealthContributor
 private Map<String, HealthContributor> contributors = new HashMap<>();

 ThreadPoolsHealthContributor() {
  //对应ThreadPoolProvider中定义的两个线程池
  this.contributors.put("demoThreadPool", new ThreadPoolHealthIndicator(ThreadPoolProvider.getDemoThreadPool()));
  this.contributors.put("ioThreadPool", new ThreadPoolHealthIndicator(ThreadPoolProvider.getIOThreadPool()));
 }

 @Override
 public HealthContributor getContributor(String name) {
  //根据name找到某一个HealthContributor
  return contributors.get(name);
 }

 @Override
 public Iterator<NamedContributor<HealthContributor>> iterator() {
  //返回NamedContributor的迭代器,NamedContributor也就是Contributor实例+一个命名
  return contributors.entrySet().stream()
    .map((entry) -> NamedContributor.of(entry.getKey(), entry.getValue())).iterator();
 }
}
启动springboot验证
这里我访问:http://localhost:8080/slowTask

每次访问都向demo线程池中提交一个耗时1小时的任务,而demo线程池的核心和最大线程数都是1,队列长度为10,那么当访问11次之后,任务将被直接拒绝掉!


此时访问:http://localhost:8080/actuator/health

demo线程池队列已经满了,状态变为DOWN。

监控内部重要组件的状态数据
通过 Actuator 的 InfoContributor 功能,对外暴露程序内部重要组件的状态数据!
实现一个 ThreadPoolInfoContributor 来展现线程池的信息:
package com.mongo.boot.config;

import com.mongo.boot.service.ThreadPoolProvider;
import org.springframework.boot.actuate.info.Info;
import org.springframework.boot.actuate.info.InfoContributor;
import org.springframework.stereotype.Component;

import java.util.HashMap;
import java.util.Map;
import java.util.concurrent.ThreadPoolExecutor;

/**
 * @Author jeffSmile
 * @Date 下午 6:37 2020/5/24 0024
 * @Description 通过 Actuator 的 InfoContributor 功能,对外暴露程序内部重要组件的状态数据
 **/

@Component
public class ThreadPoolInfoContributor implements InfoContributor {

 private static Map threadPoolInfo(ThreadPoolExecutor threadPool) {
  Map<String, Object> info = new HashMap<>();
  info.put("poolSize", threadPool.getPoolSize());//当前池大小
  info.put("corePoolSize", threadPool.getCorePoolSize());//设置的核心池大小
  info.put("largestPoolSize", threadPool.getLargestPoolSize());//最大达到过的池大小
  info.put("maximumPoolSize", threadPool.getMaximumPoolSize());//设置的最大池大小
  info.put("completedTaskCount", threadPool.getCompletedTaskCount());//总完成任务数
  return info;
 }

 @Override
 public void contribute(Info.Builder builder) {
  builder.withDetail("demoThreadPool", threadPoolInfo(ThreadPoolProvider.getDemoThreadPool()));
  builder.withDetail("ioThreadPool", threadPoolInfo(ThreadPoolProvider.getIOThreadPool()));
 }
}
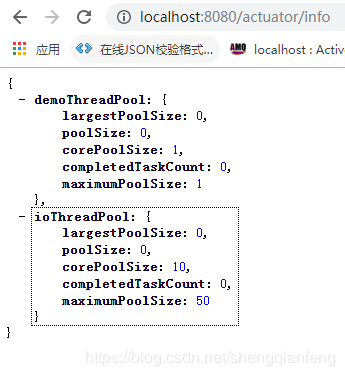
直接访问http://localhost:8080/actuator/info

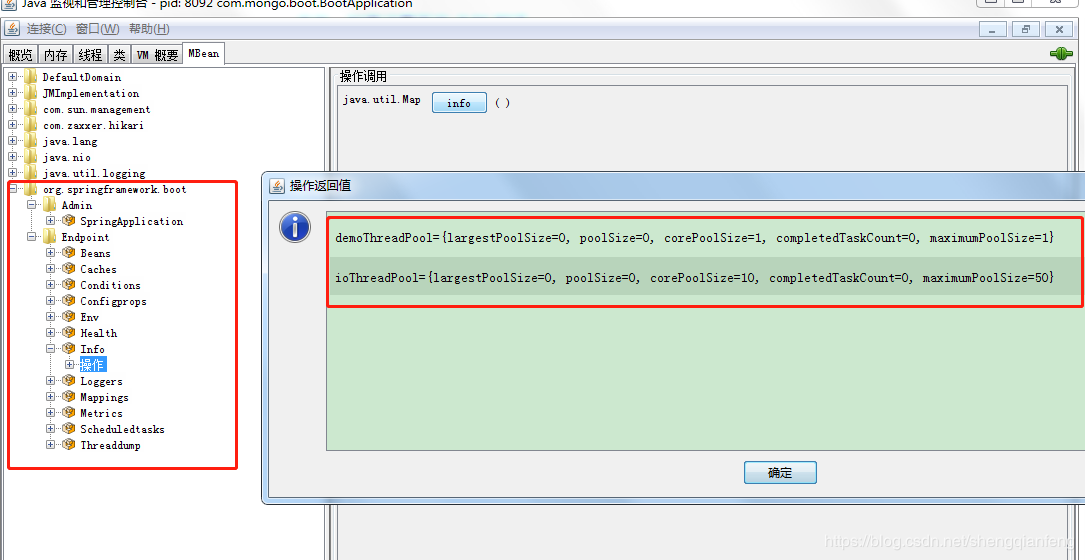
如果开启jmx,还可以使用jconsole来查看线程池的状态信息:
#开启 JMX
spring.jmx.enabled=true
打开jconcole界面之后,进入MBean这个tab,可以在EndPoint下的Info操作这里看到我们的Bean信息。

不过,除了jconsole之外,我们可以把JMX协议转为http协议,这里引入jolokia:
<dependency>
 <groupId>org.jolokia</groupId>
 <artifactId>jolokia-core</artifactId>
</dependency>
重启后访问:http://localhost:8080/actuator/jolokia/exec/org.springframework.boot:type=Endpoint,name=Info/info

监控延伸
通过Micrometer+promethues+grafana的组合也可以进行一些生产级别的实践。
到此这篇关于Spring Boot Actuator监控的简单使用的文章就介绍到这了,更多相关Spring Boot Actuator监控内容请搜索我们以前的文章或继续浏览下面的相关文章希望大家以后多多支持我们!

