Android studio 利用共享存储进行用户的注册和登录验证


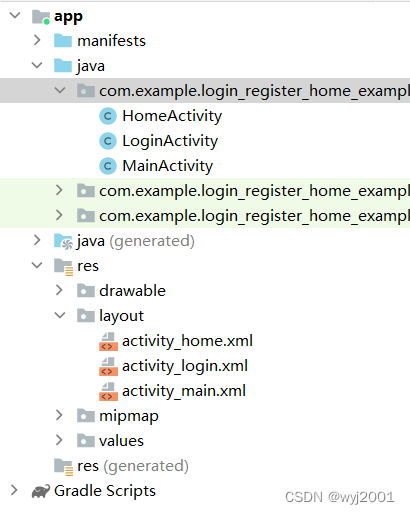
//注册功能public class MainActivity extends AppCompatActivity { //声明共享存储(全局变量) private SharedPreferences spf; @Override protected void onCreate(Bundle savedInstanceState) { super.onCreate(savedInstanceState); setContentView(R.layout.activity_main); //在打开页面时初始化共享存储对象spf "users"表名 spf=getSharedPreferences("users", Context.MODE_PRIVATE); } /** * 注册 * key : value * @param view */ public void register(View view){ //获取页面视图组件 EditText accountEt = findViewById(R.id.account); EditText passwordEt = findViewById(R.id.password); EditText repwdEt = findViewById(R.id.repwd); //获取用户名和密码 String account =accountEt.getText().toString(); String password =passwordEt.getText().toString(); String repwd=repwdEt.getText().toString(); //表单验证 //判断用户名是否为空 if (account!=null && !"".equals(account)){ //用户名不为空 //比较输入的用户名是否已经被注册存在 if (account.equals(spf.getString("account",""))){ //用户名已存在 //Toast.makeText(MainActivity.this, "该用户名已存在!", Toast.LENGTH_SHORT).show(); showDialog("该用户名已经存在"); return;//终止方法执行 } }else{ //用户名为空 //Toast方法适用于不严重的提醒情况 content:上下文 text:提示的信息内容 //Toast.makeText(MainActivity.this, "用户姓名不能为空!", Toast.LENGTH_SHORT).show(); showDialog("用户名不能为空!"); return;//终止方法执行 } //密码验证 //判断密码是否为空 if (password==null || "".equals(password)){ //判断密码不能为空 //Toast.makeText(MainActivity.this, "密码不能为空!", Toast.LENGTH_SHORT).show(); showDialog("密码不能为空"); return; } //验证两次密码是否相同 if (!password.equals(repwd)){ //Toast.makeText(MainActivity.this, "两次密码不一致!", Toast.LENGTH_SHORT).show(); showDialog("两次密码不一致"); return; } //保存用户名和密码 SharedPreferences.Editor editor=spf.edit(); editor.putString("account",account);//账号名 editor.putString("password",password);//密码 editor.apply();//提交数据 Toast.makeText(MainActivity.this, "注册成功!", Toast.LENGTH_SHORT).show(); //跳转到登录页面 Intent intent=new Intent(MainActivity.this,LoginActivity.class); startActivity(intent); } //设置提示框 public void showDialog(String msg){ //1、创建AlertDialog.Builder对象 AlertDialog.Builder builder=new AlertDialog.Builder(MainActivity.this); //2、设置提示窗口相关信息 builder.setTitle("提示"); builder.setMessage(msg);//提示信息 builder.setPositiveButton("确认", new DialogInterface.OnClickListener() { @Override public void onClick(DialogInterface dialogInterface, int i) { } }); builder.setCancelable(false);//点击空白区域不能被关掉 true能被关掉 builder.show();//显示提示框 }}
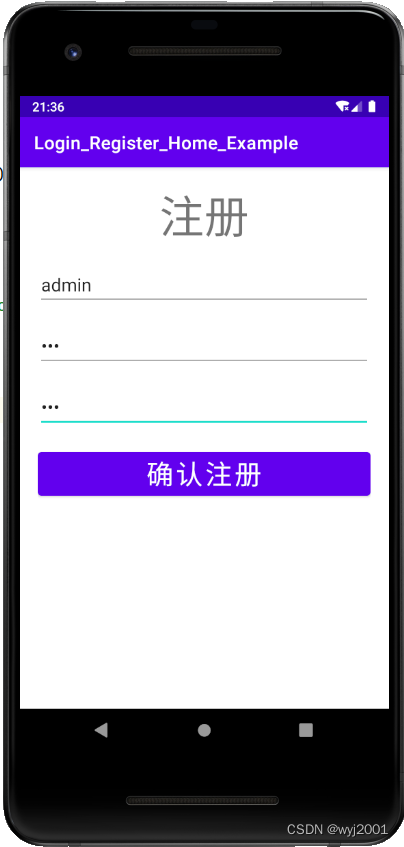
//注册页面布局<LinearLayout xmlns:android="http://schemas.android.com/apk/res/android" xmlns:app="http://schemas.android.com/apk/res-auto" xmlns:tools="http://schemas.android.com/tools" android:layout_width="match_parent" android:layout_height="match_parent" tools:context=".MainActivity" android:orientation="vertical" android:padding="20dp"> <TextView android:layout_width="match_parent" android:layout_height="wrap_content" android:text="注册" android:gravity="center_horizontal" android:textSize="50sp"/> <EditText android:id="@+id/account" android:layout_width="match_parent" android:layout_height="wrap_content" android:layout_marginTop="20dp" android:hint="请输入账号名" android:textSize="20sp"/> <EditText android:id="@+id/password" android:inputType="textPassword" android:layout_width="match_parent" android:layout_height="wrap_content" android:layout_marginTop="20dp" android:hint="请输入密码" android:textSize="20sp"/> <EditText android:id="@+id/repwd" android:inputType="textPassword" android:layout_width="match_parent" android:layout_height="wrap_content" android:layout_marginTop="20dp" android:hint="请确认密码" android:textSize="20sp"/> <Button android:layout_width="match_parent" android:layout_height="wrap_content" android:text="确认注册" android:textSize="30sp" android:layout_marginTop="20dp" android:onClick="register"/></LinearLayout>
//登录页面功能public class LoginActivity extends AppCompatActivity { //声明共享存储(全局变量) private SharedPreferences spf; @Override protected void onCreate(Bundle savedInstanceState) { super.onCreate(savedInstanceState); setContentView(R.layout.activity_login); //在打开页面时初始化共享存储对象spf "users"表名 spf=getSharedPreferences("users", Context.MODE_PRIVATE); } /** * 登录 * @param view */ public void login(View view){ //获取页面视图组件 EditText accountEt=findViewById(R.id.account); EditText passwordEt=findViewById(R.id.password); //获取用户名 String account=accountEt.getText().toString(); String password=passwordEt.getText().toString(); //表单验证 //判断用户名是否为空 if (account==null || "".equals(account)){ showDialog("用户名不能为空!"); return; } //判断密码是否为空 if (password==null || "".equals(password)){ showDialog("密码不能为空!"); return; } //验证登录,将用户输入的用户名和密码和共享存储里面的内容进行比对 if (account.equals(spf.getString("account",""))&& password.equals(spf.getString("password",""))){ showDialog("登录成功!"); //登录成功后跳转到首页 Intent intent=new Intent(LoginActivity.this,HomeActivity.class); //传递登录成功的用户名 intent.putExtra("account",account); startActivity(intent); }else{ showDialog("用户名或密码输入错误!"); } } //设置提示框 public void showDialog(String msg){ //1、创建AlertDialog.Builder对象 AlertDialog.Builder builder=new AlertDialog.Builder(LoginActivity.this); //2、设置提示窗口相关信息 builder.setTitle("提示"); builder.setMessage(msg);//提示信息 builder.setPositiveButton("确认", new DialogInterface.OnClickListener() { @Override public void onClick(DialogInterface dialogInterface, int i) { } }); builder.setCancelable(false);//点击空白区域不能被关掉 true能被关掉 builder.show();//显示提示框 }}
//登录页面布局<RelativeLayout xmlns:android="http://schemas.android.com/apk/res/android" xmlns:app="http://schemas.android.com/apk/res-auto" xmlns:tools="http://schemas.android.com/tools" android:layout_width="match_parent" android:layout_height="match_parent" tools:context=".LoginActivity" android:padding="20dp"> <TextView android:id="@+id/register" android:layout_width="match_parent" android:layout_height="wrap_content" android:text="登录" android:textSize="40sp" android:gravity="center_horizontal"/> <EditText android:id="@+id/account" android:layout_width="match_parent" android:layout_height="wrap_content" android:layout_marginTop="20dp" android:hint="请输入账号名" android:layout_below="@id/register" android:textSize="20sp"/> <EditText android:id="@+id/password" android:layout_width="match_parent" android:layout_height="wrap_content" android:layout_marginTop="20dp" android:hint="请输入密码" android:textSize="20sp" android:layout_below="@id/account"/> <Button android:layout_width="match_parent" android:layout_height="wrap_content" android:text="确认登录" android:textSize="30sp" android:layout_marginTop="20dp" android:layout_below="@id/password" android:onClick="login"/></RelativeLayout>//首页显示欢迎信息public class HomeActivity extends AppCompatActivity { @Override protected void onCreate(Bundle savedInstanceState) { super.onCreate(savedInstanceState); setContentView(R.layout.activity_home); //获取意图 Intent intent=getIntent(); String account=intent.getStringExtra("account"); //页面上显示传递的内容 //设置欢迎信息 TextView tv=findViewById(R.id.welcomMessage); tv.setText("欢迎"+account+"登录本系统!"); }}//首页布局<LinearLayout xmlns:android="http://schemas.android.com/apk/res/android" xmlns:app="http://schemas.android.com/apk/res-auto" xmlns:tools="http://schemas.android.com/tools" android:layout_width="match_parent" android:layout_height="match_parent" tools:context=".HomeActivity" android:orientation="vertical" android:padding="20dp"> <TextView android:id="@+id/welcomMessage" android:layout_width="match_parent" android:layout_height="wrap_content" android:textSize="35dp" android:gravity="center_horizontal" android:textColor="#99CCFF"/></LinearLayout>用户注册信息:

相关推荐
-

Android studio 利用共享存储进行用户的注册和登录验证功能
//注册功能 public class MainActivity extends AppCompatActivity { //声明共享存储(全局变量) private SharedPreferences spf; @Override protected void onCreate(Bundle savedInstanceState) { super.onCreate(savedInstanceState); setContentView(R.layout.activity_main); //
-
Android studio 利用共享存储进行用户的注册和登录验证
//注册功能public class MainActivity extends AppCompatActivity { //声明共享存储(全局变量) private SharedPreferences spf; @Override protected void onCreate(Bundle savedInstanceState) { super.onCreate(savedInstanceState); setContentView(R.layout.activity_main); /
-
Android studio利用gradle打jar包并混淆的方法详解
本文主要介绍了Android studio利用gradle打jar包并混淆的方法,下面话不多说,来看看详细的介绍吧. 首先打jar包的配置很简单,使用jar的task,可以参考gradle官方文档,具体代码如下: task buildJar(type: Jar, dependsOn: ['assembleRelease']) { destinationDir = file('build/outputs/jar/') appendix = "" baseName = "&quo
-
Android Studio 利用Splash制作APP启动界面的方法
最近又开始学习Android studio 了,在制作APP时,都有一个启动的界面,看上去美观且实用(也可以作为以后的广告位← 那怎样制作呢? 第一步:新建Splash 如图,新建一个Empty Activity. 然后将名字改为SplashActivity. 第二步:SplashActivity的内容 如图: 方便起见,我把代码贴出来,代码如下: public class SplashActivity extends Activity { // private final int SPLASH
-
mvc C# JavaScript LigerUI oracle实现用户的注册、登陆验证、登陆
一.登录数据库,在数据库中创建表User00,并且插入数据. 表的字段分别为: Id(编号).Name(姓名).Grid(级别).Score(积分).Password(密码).Age(年龄).Code(邀请码).(其中编号是自动编号) 部分命令如下: select * from User00; /*查询User00*/ insert into User00 values('one','优',10000,'123',24); /*插入一行数据*/ update User00 set Grid='优
-
Android Studio利用AChartEngine制作饼图的方法
前言: 众所周知,大家在很多项目中都会使用到图表,具体表现形式为饼图.折线图.柱状图等,但是网上有很多图表架包都是需要收费的,而Google的AChartEngine是免费的,于是AChartEngine就变成了首选方案,接下来就介绍一下AChartEngine在项目中的具体使用方法.下面话不多说了,来一起看看详细的介绍吧 AChartEngine简介: AChartEngine是一款基于Android的图表绘制引擎: AChartEngine支持绘制饼图.柱状图.折线图.散点图等: AChar
-
Android开发之Android studio的安装与使用
该专题的目的:学习Android studio的特性和技巧,学习Gradle的黑魔法,学习Android的最热框架,学习Android5.0以上的新特性. 该专题的行文顺序:从Android studio的特性和相关技巧以及在工作和学习中使用到的贴心插件和相关小魔法会一一介绍给大家,再根据项目的搭建,介绍给大家gradle的黑魔法,如何加速build过程,如何简单高效的使用gradle.之后,会根据项目的搭建,会向大家介绍Android的相关框架以及使用指南. 该专题的机器配置:Mac pro
-
Mac中配置gradle环境及使用android studio打包jar包与arr包的方法
前言 在Mac中用android studio 导出jar包最重要的是需要配置gradle ,它包的导出也是通过gradle命令进行的. 所以,如果想成功打包,要先配置好gradle环境,这样你才可以在android studio中的terminal中直接使用gradle命令了.下面话不多说了,来一起看看详细的介绍吧. gradle 环境变量的配置 1.这个配置和jdk的环境变量配置类似 启动终端,进入当前用户目录. 2.创建 .bash_profile 文件,如果已经有了就直接打开 3.用命令
-
Android studio 4.1打包失败和插件错误提示的解决
一.Android studio 升级4.1,Android Gradle插件从4.0.2升级到4.1.0后打包失败,回退到4.0.2后打包正常. 错误信息: •What went wrong: Execution failed for task ':app:processDebugManifest'. Could not get unknown property 'manifestOutputDirectory' for task ':app:processDebugManifest' of
-
Android Studio 生成自定义jar包的步骤详解
想要将一个项目导出为jar包,供其它项目使用,在eclipse中可以直接导出该项目为jar包,而 在AS中可以通过修改gradle才处理. 接下来就介绍下具体的步骤: 1.新建一个项目,项目名随意,eg:MakeJarApplication,在项目中新建一个module类型为android-library ,命名为testLibrary.如图: 项目结构图 2.让app依赖这个库,在app下的build.gradle文件中添加compile project(':testlibrary') dep