SpringSecurity自定义成功失败处理器的示例代码
1. 新建SpringBoot工程

2. 项目依赖
<dependencies>
  <!-- security -->
  <dependency>
    <groupId>org.springframework.boot</groupId>
    <artifactId>spring-boot-starter-security</artifactId>
  </dependency>
  <!-- thymeleaf -->
  <dependency>
    <groupId>org.springframework.boot</groupId>
    <artifactId>spring-boot-starter-thymeleaf</artifactId>
  </dependency>
  <!-- web -->
  <dependency>
    <groupId>org.springframework.boot</groupId>
    <artifactId>spring-boot-starter-web</artifactId>
  </dependency>
  <!-- tomcat -->
  <dependency>
    <groupId>org.springframework.boot</groupId>
    <artifactId>spring-boot-starter-tomcat</artifactId>
    <scope>provided</scope>
  </dependency>
  <!-- lombok -->
  <dependency>
    <groupId>org.projectlombok</groupId>
    <artifactId>lombok</artifactId>
  </dependency>
  <!-- test -->
  <dependency>
    <groupId>org.springframework.boot</groupId>
    <artifactId>spring-boot-starter-test</artifactId>
  </dependency>
</dependencies>
3. 定义登录成功处理器
- 新建一个类实现AuthenticationSuccessHandler
- 重写onAuthenticationSuccess方法
package zw.springboot.controller;
import lombok.SneakyThrows;
import org.json.JSONObject;
import org.springframework.security.core.Authentication;
import org.springframework.security.web.authentication.AuthenticationSuccessHandler;
import org.springframework.stereotype.Component;
import javax.servlet.ServletException;
import javax.servlet.http.HttpServletRequest;
import javax.servlet.http.HttpServletResponse;
import java.io.IOException;
import java.io.PrintWriter;
/**
* @className LoginSuccessHandler
* @description 登录成功处理器
* @author 周威
* @date 2020-09-03 13:50
**/
@Component
public class LoginSuccessHandler implements AuthenticationSuccessHandler
{
@SneakyThrows
@Override
public void onAuthenticationSuccess(HttpServletRequest request, HttpServletResponse response, Authentication authentication) throws IOException, ServletException
{
// 设置response缓冲区字符集
response.setCharacterEncoding("UTF-8");
// 定义一个JSONObject对象
JSONObject object = new JSONObject();
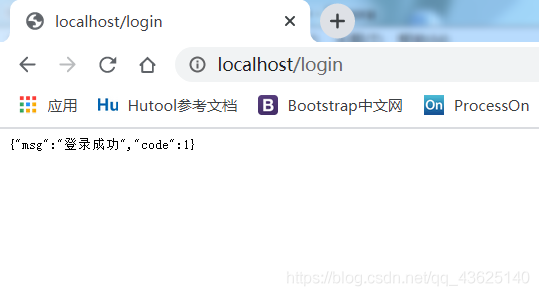
// 填写登录成功响应信息
object.put("code", 1);
object.put("msg", "登录成功");
// 设置响应头
response.setContentType("application/json;charset=utf-8");
// 获得打印输出流
PrintWriter pw = response.getWriter();
// 向客户端写入一个字符串
pw.print(object.toString());
// 关闭流资源
pw.close();
}
}
4. 定义登录失败处理器新建一个类实现AuthenticationFailureHandler接口重写onAuthenticationFailure方法
package zw.springboot.controller;
import lombok.SneakyThrows;
import org.json.JSONObject;
import org.springframework.security.core.AuthenticationException;
import org.springframework.security.web.authentication.AuthenticationFailureHandler;
import org.springframework.stereotype.Component;
import javax.servlet.ServletException;
import javax.servlet.http.HttpServletRequest;
import javax.servlet.http.HttpServletResponse;
import java.io.IOException;
import java.io.PrintWriter;
/**
* @className LoginErrorHandler
* @description 登录失败处理器
* @author 周威
* @date 2020-09-03 13:57
**/
@Component
public class LoginErrorHandler implements AuthenticationFailureHandler
{
@SneakyThrows
@Override
public void onAuthenticationFailure(HttpServletRequest request, HttpServletResponse response, AuthenticationException authenticationException) throws IOException, ServletException
{
// 设置response缓冲区字符集
response.setCharacterEncoding("UTF-8");
// 定义一个JSONObject对象
JSONObject object = new JSONObject();
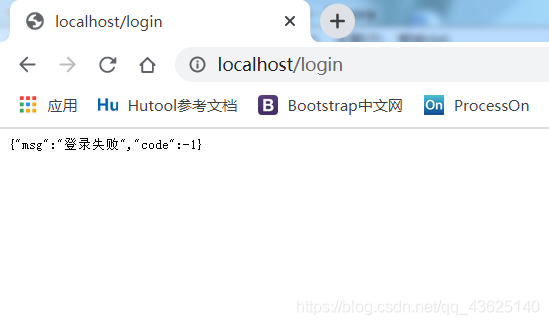
// 填写登录失败响应信息
object.put("code", -1);
object.put("msg", "登录失败");
// 设置响应头
response.setContentType("application/json;charset=utf-8");
// 获得打印输出流
PrintWriter pw = response.getWriter();
// 向客户端写入一个字符串
pw.print(object.toString());
// 关闭流资源
pw.close();
}
}
5. 安全认证配置类
package zw.springboot.config;

import org.springframework.beans.factory.annotation.Autowired;
import org.springframework.context.annotation.Bean;
import org.springframework.security.config.annotation.web.builders.HttpSecurity;
import org.springframework.security.config.annotation.web.configuration.EnableWebSecurity;
import org.springframework.security.config.annotation.web.configuration.WebSecurityConfigurerAdapter;
import org.springframework.security.core.userdetails.User;
import org.springframework.security.core.userdetails.UserDetailsService;
import org.springframework.security.crypto.bcrypt.BCryptPasswordEncoder;
import org.springframework.security.crypto.password.PasswordEncoder;
import org.springframework.security.provisioning.InMemoryUserDetailsManager;
import org.springframework.security.web.authentication.AuthenticationFailureHandler;
import org.springframework.security.web.authentication.AuthenticationSuccessHandler;

/**
 * @className SpringSecurityConfig
 * @description 安全人认证配置类
 * @author 周威
 * @date 2020-09-03 13:42
 **/
@EnableWebSecurity
public class SpringSecurityConfig extends WebSecurityConfigurerAdapter
{
  @Autowired
  private AuthenticationSuccessHandler loginSuccessHandler;

  @Autowired
  private AuthenticationFailureHandler loginErrorHandler;

  // 定义用户信息服务
  @Bean
  @Override
  protected UserDetailsService userDetailsService()
  {
    InMemoryUserDetailsManager manager = new InMemoryUserDetailsManager();
    // 模拟两个用户身份
    manager.createUser(User.withUsername("admin").password(passwordEncoder().encode("123456")).authorities("p1").build());
    manager.createUser(User.withUsername("user").password(passwordEncoder().encode("654321")).authorities("p2").build());
    return manager;
  }

  // 定义密码加密器
  @Bean
  public PasswordEncoder passwordEncoder()
  {
    return new BCryptPasswordEncoder();
  }

  // 定义拦截机制
  @Override
  protected void configure(HttpSecurity http) throws Exception
  {
    http
        .authorizeRequests()
        // 设置哪些请求需要认证
        .antMatchers("/**").authenticated()
    .and()
        // 启用表单登录认证
        .formLogin()
        // 指定登录成功处理器
        .successHandler(loginSuccessHandler)
        // 指定登录失败处理器
        .failureHandler(loginErrorHandler);
  }
}
6. 项目运行测试
7. 登录成功测试
8. 登录失败测试
总结
到此这篇关于SpringSecurity自定义成功失败处理器的示例代码的文章就介绍到这了,更多相关SpringSecurity成功失败处理器内容请搜索我们以前的文章或继续浏览下面的相关文章希望大家以后多多支持我们!
相关推荐
-

spring security自定义登录页面
在项目中我们肯定不能使用Spring自己生成的登录页面,而要用我们自己的登录页面,下面讲一下如何自定义登录页面,先看下配置 <sec:http auto-config="true"> <sec:intercept-url pattern="/app.jsp" access="ROLE_SERVICE"/> <sec:intercept-url pattern="/**" access="
-
Spring Boot中整合Spring Security并自定义验证代码实例
最终效果 1.实现页面访问权限限制 2.用户角色区分,并按照角色区分页面权限 3.实现在数据库中存储用户信息以及角色信息 4.自定义验证代码 效果如下: 1.免验证页面 2.登陆页面 在用户未登录时,访问任意有权限要求的页面都会自动跳转到登陆页面. 3.需登陆才能查看的页面 用户登陆后,可以正常访问页面资源,同时可以正确显示用户登录名: 4.用户有角色区分,可以指定部分页面只允许有相应用户角色的人使用 4.1.只有ADMIN觉得用户才能查看的页面(权限不足) 4.2.只有ADMIN觉得用户才能查
-
spring security自定义认证登录的全过程记录
spring security使用分类: 如何使用spring security,相信百度过的都知道,总共有四种用法,从简到深为: 1.不用数据库,全部数据写在配置文件,这个也是官方文档里面的demo: 2.使用数据库,根据spring security默认实现代码设计数据库,也就是说数据库已经固定了,这种方法不灵活,而且那个数据库设计得很简陋,实用性差: 3.spring security和Acegi不同,它不能修改默认filter了,但支持插入filter,所以根据这个,我们可以插入自己的f
-
java中自定义Spring Security权限控制管理示例(实战篇)
背景描述 项目中需要做细粒的权限控制,细微至url + httpmethod (满足restful,例如: https://.../xxx/users/1, 某些角色只能查看(HTTP GET), 而无权进行增改删(POST, PUT, DELETE)). 表设计 为避嫌,只列出要用到的关键字段,其余敬请自行脑补. 1.admin_user 管理员用户表, 关键字段( id, role_id ). 2.t_role 角色表, 关键字段( id, privilege_id ). 3.t_privi
-
解析SpringSecurity自定义登录验证成功与失败的结果处理问题
一.需要自定义登录结果的场景 在我之前的文章中,做过登录验证流程的源码解析.其中比较重要的就是 当我们登录成功的时候,是由AuthenticationSuccessHandler进行登录结果处理,默认跳转到defaultSuccessUrl配置的路径对应的资源页面(一般是首页index.html). 当我们登录失败的时候,是由AuthenticationfailureHandler进行登录结果处理,默认跳转到failureUrl配置的路径对应的资源页面(一般是登录页login.html). 但是
-
SpringSecurity自定义成功失败处理器的示例代码
1. 新建SpringBoot工程 2. 项目依赖 <dependencies> <!-- security --> <dependency> <groupId>org.springframework.boot</groupId> <artifactId>spring-boot-starter-security</artifactId> </dependency> <!-- thymeleaf -->
-
springsecurity轻松实现角色权限的示例代码
问题: 如何在springboot项目中使用springsecurity去实现角色权限管理呢?本文将尽可能简单的一步步实现对接口的角色权限管理. 项目框架: sql: user表: CREATE TABLE `user` ( `Id` int NOT NULL AUTO_INCREMENT, `UserName` varchar(255) NOT NULL, `CreatedDT` datetime DEFAULT NULL, `Age` int DEFAULT NULL, `Gender` i
-
Android自定义滑动验证条的示例代码
本文介绍了Android自定义滑动验证条的示例代码,分享给大家,具体如下: *注:不知道为什么,h5的标签在这里没用了,所以我也只能用Markdown的语法来写了 项目地址:https://github.com/994866755/handsomeYe.seekbar.github.io 需求: 在我们的某些应用中需要滑动验证.比如说这个样子的: 刚开始我也很懵逼要怎么去弄,结果我去看了一些人的代码,有人是用自定义viewgroup去做,就是viewgroup包含滑动块和滑动条.但我觉得太麻烦,
-
python使用自定义钉钉机器人的示例代码
1.添加自定义机器人 2.编写python代码请求钉钉机器人所给的webhook 钉钉自定义机器人官方文档 安全方式使用加签的方式: 第一步,把timestamp+"\n"+密钥当做签名字符串,使用HmacSHA256算法计算签名,然后进行Base64 encode,最后再把签名参数再进行urlEncode,得到最终的签名(需要使用UTF-8字符集). 参数 说明 timestamp 当前时间戳,单位是毫秒,与请求调用时间误差不能超过1小时 secret 密钥,机器人安全设置页面,加签
-
Flutter实现自定义搜索框AppBar的示例代码
目录 介绍 效果图 实现步骤 完整源码 总结 介绍 开发中,页面头部为搜索样式的设计非常常见,为了可以像系统AppBar那样使用,这篇文章记录下在Flutter中自定义一个通用的搜索框AppBar记录. 功能点: 搜索框.返回键.清除搜索内容功能.键盘处理. 效果图 实现步骤 首先我们先来看下AppBar的源码,实现了PreferredSizeWidget类,我们可以知道这个类主要是控制AppBar的高度的,Scaffold脚手架里的AppBar的参数类型就是PreferredSizeWidge
-
Android自定义View实现多边形统计图示例代码
前言 最近利用空闲时间学习了自定义View的一些知识,为了巩固,写了一个小东西,顺便分享出来,下面话不多说了,来一起看看详细的介绍吧. 简介 一个多边形统计图.边数,每个方向的值,每个点的文字等等都是可以设置的. 下面就来分析一下这个自定义View 这个view由以下几个部分组成 M层N边形 中心到各顶点的连线 填充区域 文字 @Override protected void onDraw(Canvas canvas) { if (!canDraw()) { return; } canv
-
Android实现自定义圆角对话框Dialog的示例代码
前言: 项目中多处用到对话框,用系统对话框太难看,就自己写一个自定义对话框. 对话框包括:1.圆角 2.app图标 , 提示文本,关闭对话框的"确定"按钮 难点:1.对话框边框圆角显示 2.考虑到提示文本字数不确定,在不影响美观的情况下,需要在一行内显示提示的文字信息 3.设置对话框的宽和高 技术储备: 1.安卓开发_使用AlertDialog实现对话框 知道AlertDialog有setView(view) ,Dialog 有ContentView(view) 方法. 2.An
-
微信小程序自定义顶部组件customHeader的示例代码
1.开启配置自定义顶部 { "window": { "navigationStyle":"custom" } } 在app.json的文件window配置"navigationStyle": "custom"属性即可 2.自定义顶部计算原理 2.1 获取系统状态栏的高度和屏幕宽度 使用wx.getSystemInfo这个函数获取系统状态栏的高度和屏幕宽度. 2.2 获取右上角胶囊位置信息 使用wx.getM
-
vue3 自定义图片放大器效果的示例代码
效果 具体代码实现 创建商品图片展示的vue页面:ProductPicShow.vue <script lang="ts" setup> import { ref, computed } from 'vue' import { useMouseInElement } from '@vueuse/core' defineProps<{ images: string[] }>() // 当前显示的图片索引 let active = ref(0) // ref 获取
-
AngularJS 自定义指令详解及示例代码
自定义指令中使用AngularJS扩展HTML的功能.自定义指令使用的"指令"的功能定义.自定义指令只是替换了它被激活的元素.引导过程中AngularJS应用程序找到了匹配的元素,并做好使用自定义指令compile()方法一次活动再处理使用基于指令的范围自定义指令link()方法的元素. AngularJS提供支持,以下列元素的类型来创建自定义指令. Element directives - 指令遇到时激活一个匹配的元素. Attribute - - 指令遇到时激活一个匹配的属性. C