springboot2整合redis使用lettuce连接池的方法(解决lettuce连接池无效问题)
lettuce客户端
Lettuce 和 Jedis 的都是连接Redis Server的客户端程序。Jedis在实现上是直连redis server,多线程环境下非线程安全(即多个线程对一个连接实例操作,是线程不安全的),除非使用连接池,为每个Jedis实例增加物理连接。Lettuce基于Netty的连接实例(StatefulRedisConnection),可以在多个线程间并发访问,且线程安全,满足多线程环境下的并发访问(即多个线程公用一个连接实例,线程安全),同时它是可伸缩的设计,一个连接实例不够的情况也可以按需增加连接实例。
添加依赖
dependencies {
 implementation 'org.springframework.boot:spring-boot-starter-jdbc'
 implementation 'org.springframework.boot:spring-boot-starter-data-redis'
 implementation 'org.springframework.boot:spring-boot-starter-thymeleaf'
 implementation 'org.springframework.boot:spring-boot-starter-web'
 implementation 'org.mybatis.spring.boot:mybatis-spring-boot-starter:2.1.3'
 //lettuce依赖commons-pool2
 compile group: 'org.apache.commons', name: 'commons-pool2', version: '2.6.2'
 runtimeOnly 'mysql:mysql-connector-java'
 compileOnly 'org.projectlombok:lombok'
 annotationProcessor 'org.projectlombok:lombok'
 testImplementation('org.springframework.boot:spring-boot-starter-test') {
  exclude group: 'org.junit.vintage', module: 'junit-vintage-engine'
 }
 compile('org.springframework.boot:spring-boot-starter-cache')
}
application.properties 添加redis连接信息
spring.datasource.driver-class-name=com.mysql.cj.jdbc.Driver
spring.datasource.url=jdbc:mysql://localhost:3306/mytest?useUnicode=true&characterEncoding=utf-8&useSSL=false&serverTimezone=GMT%2B8
spring.datasource.username=root
spring.datasource.password=123456

server.port=8945

#redis数据库默认使用db0
spring.redis.database=2
spring.redis.password=
spring.redis.port=6379
spring.redis.host=127.0.0.1
# 连接超时时间
spring.redis.timeout=5000
# 连接池最大连接数(使用负值表示没有限制)
spring.redis.lettuce.pool.max-active=3
# 连接池中的最小空闲连接
spring.redis.lettuce.pool.min-idle=2
# 连接池中的最大空闲连接
spring.redis.lettuce.pool.max-idle=3
# 连接池最大阻塞等待时间(使用负值表示没有限制)
spring.redis.lettuce.pool.max-wait=-1
#在关闭客户端连接之前等待任务处理完成的最长时间,在这之后,无论任务是否执行完成,都会被执行器关闭,默认100ms
spring.redis.lettuce.shutdown-timeout=100
#是否缓存空值
spring.cache.redis.cache-null-values=false
编写配置类
package org.example.base.config;

import com.fasterxml.jackson.annotation.JsonAutoDetect;
import com.fasterxml.jackson.annotation.JsonTypeInfo;
import com.fasterxml.jackson.annotation.PropertyAccessor;
import com.fasterxml.jackson.databind.ObjectMapper;
import com.fasterxml.jackson.databind.jsontype.impl.LaissezFaireSubTypeValidator;
import org.apache.commons.pool2.impl.GenericObjectPoolConfig;
import org.springframework.beans.factory.annotation.Value;
import org.springframework.cache.CacheManager;
import org.springframework.cache.annotation.EnableCaching;
import org.springframework.context.annotation.Bean;
import org.springframework.context.annotation.Configuration;
import org.springframework.context.annotation.Primary;
import org.springframework.data.redis.cache.RedisCacheConfiguration;
import org.springframework.data.redis.cache.RedisCacheManager;
import org.springframework.data.redis.connection.RedisPassword;
import org.springframework.data.redis.connection.RedisStandaloneConfiguration;
import org.springframework.data.redis.connection.lettuce.LettuceClientConfiguration;
import org.springframework.data.redis.connection.lettuce.LettuceConnectionFactory;
import org.springframework.data.redis.connection.lettuce.LettucePoolingClientConfiguration;
import org.springframework.data.redis.core.RedisTemplate;
import org.springframework.data.redis.serializer.Jackson2JsonRedisSerializer;
import org.springframework.data.redis.serializer.RedisSerializationContext;
import org.springframework.data.redis.serializer.RedisSerializer;
import org.springframework.data.redis.serializer.StringRedisSerializer;

import java.time.Duration;
import java.util.HashMap;
import java.util.HashSet;
import java.util.Map;
import java.util.Set;

/**
 * @author l
 * @date Created in 2020/11/3 10:51
 */
@Configuration
@EnableCaching
public class RedisConfig {
 @Value("${spring.redis.database}")
 private int database;

 @Value("${spring.redis.host}")
 private String host;

 @Value("${spring.redis.password}")
 private String password;

 @Value("${spring.redis.port}")
 private int port;

 @Value("${spring.redis.timeout}")
 private long timeout;

 @Value("${spring.redis.lettuce.shutdown-timeout}")
 private long shutDownTimeout;

 @Value("${spring.redis.lettuce.pool.max-idle}")
 private int maxIdle;

 @Value("${spring.redis.lettuce.pool.min-idle}")
 private int minIdle;

 @Value("${spring.redis.lettuce.pool.max-active}")
 private int maxActive;

 @Value("${spring.redis.lettuce.pool.max-wait}")
 private long maxWait;

 Jackson2JsonRedisSerializer<Object> jackson2JsonRedisSerializer = new Jackson2JsonRedisSerializer<>(Object.class);

 @Bean
 public LettuceConnectionFactory lettuceConnectionFactory() {
  GenericObjectPoolConfig genericObjectPoolConfig = new GenericObjectPoolConfig();
  genericObjectPoolConfig.setMaxIdle(maxIdle);
  genericObjectPoolConfig.setMinIdle(minIdle);
  genericObjectPoolConfig.setMaxTotal(maxActive);
  genericObjectPoolConfig.setMaxWaitMillis(maxWait);
  genericObjectPoolConfig.setTimeBetweenEvictionRunsMillis(100);
  RedisStandaloneConfiguration redisStandaloneConfiguration = new RedisStandaloneConfiguration();
  redisStandaloneConfiguration.setDatabase(database);
  redisStandaloneConfiguration.setHostName(host);
  redisStandaloneConfiguration.setPort(port);
  redisStandaloneConfiguration.setPassword(RedisPassword.of(password));
  LettuceClientConfiguration clientConfig = LettucePoolingClientConfiguration.builder()
    .commandTimeout(Duration.ofMillis(timeout))
    .shutdownTimeout(Duration.ofMillis(shutDownTimeout))
    .poolConfig(genericObjectPoolConfig)
    .build();

  LettuceConnectionFactory factory = new LettuceConnectionFactory(redisStandaloneConfiguration, clientConfig);
//  factory.setShareNativeConnection(true);
//  factory.setValidateConnection(false);
  return factory;
 }

 @Bean
 public RedisTemplate<String, Object> redisTemplate(LettuceConnectionFactory lettuceConnectionFactory) {
  RedisTemplate<String, Object> template = new RedisTemplate<>();
  template.setConnectionFactory(lettuceConnectionFactory);
  //使用Jackson2JsonRedisSerializer替换默认的JdkSerializationRedisSerializer来序列化和反序列化redis的value值
  ObjectMapper mapper = new ObjectMapper();
  mapper.setVisibility(PropertyAccessor.ALL, JsonAutoDetect.Visibility.ANY);
  mapper.activateDefaultTyping(LaissezFaireSubTypeValidator.instance,
    ObjectMapper.DefaultTyping.NON_FINAL, JsonTypeInfo.As.PROPERTY);
  jackson2JsonRedisSerializer.setObjectMapper(mapper);
  StringRedisSerializer stringRedisSerializer = new StringRedisSerializer();
  //key采用String的序列化方式
  template.setKeySerializer(stringRedisSerializer);
  // hash的key也采用String的序列化方式
  template.setHashKeySerializer(stringRedisSerializer);
  // value序列化方式采用jackson
  template.setValueSerializer(jackson2JsonRedisSerializer);
  // hash的value序列化方式采用jackson
  template.setHashValueSerializer(jackson2JsonRedisSerializer);
  template.afterPropertiesSet();
  return template;
 }

 @Bean("redisCacheManager")
 @Primary
 public CacheManager cacheManager( LettuceConnectionFactory lettuceConnectionFactory) {
  RedisSerializer<String> redisSerializer = new StringRedisSerializer();

  //解决查询缓存转换异常的问题
  ObjectMapper mapper = new ObjectMapper();
  mapper.setVisibility(PropertyAccessor.ALL, JsonAutoDetect.Visibility.ANY);
  mapper.activateDefaultTyping(LaissezFaireSubTypeValidator.instance,
    ObjectMapper.DefaultTyping.NON_FINAL, JsonTypeInfo.As.PROPERTY);
  jackson2JsonRedisSerializer.setObjectMapper(mapper);

  // 配置1 ,
  RedisCacheConfiguration config1 = RedisCacheConfiguration.defaultCacheConfig()
    //缓存失效时间
    .entryTtl(Duration.ofSeconds(30))
    //key序列化方式
    .serializeKeysWith(RedisSerializationContext.SerializationPair.fromSerializer(redisSerializer))
    //value序列化方式
    .serializeValuesWith(RedisSerializationContext.SerializationPair.fromSerializer(jackson2JsonRedisSerializer))
    //不允许缓存null值
    .disableCachingNullValues();
  //配置2 ,
  RedisCacheConfiguration config2 = RedisCacheConfiguration.defaultCacheConfig()
    .entryTtl(Duration.ofMinutes(1000))
    .serializeKeysWith(RedisSerializationContext.SerializationPair.fromSerializer(redisSerializer))
    .serializeValuesWith(RedisSerializationContext.SerializationPair.fromSerializer(jackson2JsonRedisSerializer))
    .disableCachingNullValues();

  //设置一个初始化的缓存空间set集合
  Set<String> cacheNames = new HashSet<>();
  cacheNames.add("my-redis-cache1");
  cacheNames.add("my-redis-cache2");

  //对每个缓存空间应用不同的配置
  Map<String, RedisCacheConfiguration> configurationMap = new HashMap<>(3);
  configurationMap.put("my-redis-cache1", config1);
  configurationMap.put("my-redis-cache2", config2);

  return RedisCacheManager.builder(lettuceConnectionFactory)
    //默认缓存配置
    .cacheDefaults(config1)
    //初始化缓存空间
    .initialCacheNames(cacheNames)
    //初始化缓存配置
    .withInitialCacheConfigurations(configurationMap).build();

 }
}
编写service层
package org.example.base.service.impl;

import org.example.base.bean.Animal;
import org.example.base.service.AnimalService;
import org.springframework.cache.annotation.CacheConfig;
import org.springframework.cache.annotation.CacheEvict;
import org.springframework.cache.annotation.CachePut;
import org.springframework.cache.annotation.Cacheable;
import org.springframework.stereotype.Service;

/**
 * @author l
 * @date Created in 2020/11/4 17:33
 */
@Service
@CacheConfig(cacheNames = "my-redis-cache1", cacheManager = "redisCacheManager")
public class AnimalServiceImpl implements AnimalService {

 @Override
 @Cacheable(key = "#id",sync = true)
 public Animal getAnimal(Integer id) {
  System.out.println("操作数据库,返回Animal");
  return new Animal(110, "cat", "fish");
 }

 /**
  * 使用@CachePut注解的方法,一定要有返回值,该注解声明的方法缓存的是方法的返回结果。
  * it always causes the
  * method to be invoked and its result to be stored in the associated cache
  **/
 @Override
 @CachePut(key = "#animal.getId()")
 public Animal setAnimal(Animal animal) {
  System.out.println("存入数据库");
  return animal;
 }

 @Override
 @CacheEvict(key = "#id")
 public void deleteAnimal(Integer id) {
  System.out.println("删除数据库中animal");
 }

 @Override
 @CachePut(key = "#animal.getId()")
 public Animal updateAnimal(Animal animal) {
  System.out.println("修改animal,并存入数据库");
  return animal;
 }

}
编写controller层
package org.example.base.controller;

import io.swagger.annotations.Api;
import io.swagger.annotations.ApiOperation;
import io.swagger.annotations.ApiParam;
import lombok.extern.slf4j.Slf4j;
import org.example.base.bean.Animal;
import org.example.base.bean.User;
import org.example.base.service.AnimalService;
import org.example.base.service.UserService;
import org.springframework.beans.factory.annotation.Autowired;
import org.springframework.beans.factory.annotation.Qualifier;
import org.springframework.cache.Cache;
import org.springframework.data.redis.core.RedisTemplate;
import org.springframework.stereotype.Controller;
import org.springframework.web.bind.annotation.GetMapping;
import org.springframework.web.bind.annotation.RequestMapping;
import org.springframework.web.bind.annotation.RequestParam;
import org.springframework.web.bind.annotation.ResponseBody;

/**
 * @author l
 * @date Created in 2020/10/23 15:46
 */
@Controller
@RequestMapping("/user")
@Slf4j
public class UserController {

 private AnimalService animalService;

 @Autowired
 public UserController(AnimalService animalService) {
  this.animalService = animalService;
 }

 @GetMapping("/queryAnimal")
 @ResponseBody
 public Animal queryAnimal(@RequestParam(value = "ID") Integer ID) {
  Animal animal = animalService.getAnimal(ID);
  log.info("animal " + animal.toString());
  return animal;
 }
}
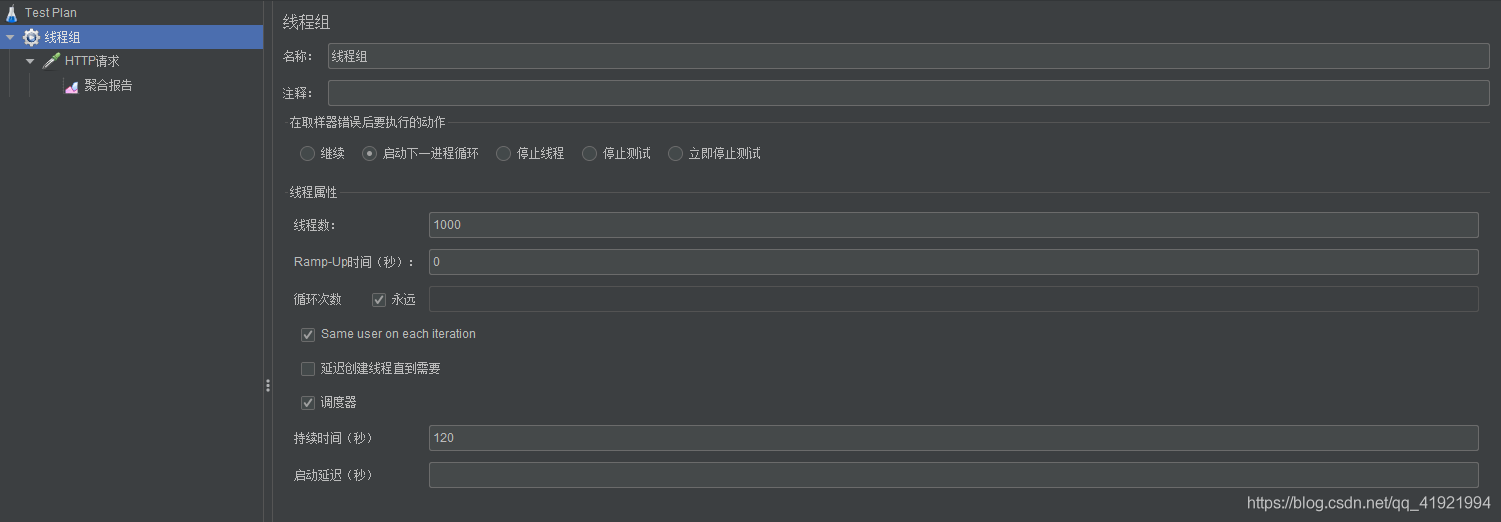
配置jemeter


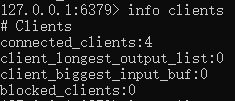
启动jemeter ,查看当前redis的客户端连接数

当前springboot lettuce连接池中有三个连接 加上当前查询窗口的连接,共计4个socket连接。
jemeter 运行2分钟后显示,平均响应时间为239,吞吐量为4158.2/sec

注释掉 RedisConfig 类中
genericObjectPoolConfig.setTimeBetweenEvictionRunsMillis(100);
这行代码,重新启动项目,用jemeter进行压测接口。
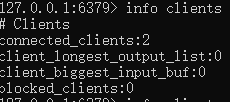
查看当前redis的客户端连接数

可以看出连接池没有生效,经过两分钟压测后显示平均响应时间为241,吞吐量为4139.2/sec

,接口性能相比于使用lettuce连接池中多个连接,略有下降。 总结 要想使lettuce连接池生效,即使用多个redis物理连接。这行设置不能缺少
genericObjectPoolConfig.setTimeBetweenEvictionRunsMillis(100); 这个设置是,每隔多少毫秒,空闲线程驱逐器关闭多余的空闲连接,且保持最少空闲连接可用,这个值最好设置大一点,否者影响性能。同时 genericObjectPoolConfig.setMinIdle(minIdle); 中minldle值要大于0。
lettuce连接池属性timeBetweenEvictionRunsMillis如果不设置 默认是 -1,当该属性值为负值时,lettuce连接池要维护的最小空闲连接数的目标minIdle就不会生效 。源码中的解释如下:
	/**
		 * Target for the minimum number of idle connections to maintain in the pool. This
		 * setting only has an effect if both it and time between eviction runs are
		 * positive.
		 */
		private int minIdle = 0;
factory.setShareNativeConnection(true),shareNativeConnection 这个属性默认是true,允许多个连接公用一个物理连接。如果设置false ,每一个连接的操作都会开启和关闭socket连接。如果设置为false,会导致性能下降,本人测试过了。源码中解释如下:
/**
	 * Enables multiple {@link LettuceConnection}s to share a single native connection. If set to {@literal false}, every
	 * operation on {@link LettuceConnection} will open and close a socket.
	 *
	 * @param shareNativeConnection enable connection sharing.
	 */
	public void setShareNativeConnection(boolean shareNativeConnection) {
		this.shareNativeConnection = shareNativeConnection;
	}
-factory.setValidateConnection(false), validateConnection这个属性是每次获取连接时,校验连接是否可用。默认false,不去校验。默认情况下,lettuce开启一个共享的物理连接,是一个长连接,所以默认情况下是不会校验连接是否可用的。如果设置true,会导致性能下降。
到此这篇关于springboot2整合redis使用lettuce连接池(解决lettuce连接池无效问题)的文章就介绍到这了,更多相关springboot2使用lettuce连接池内容请搜索我们以前的文章或继续浏览下面的相关文章希望大家以后多多支持我们!

