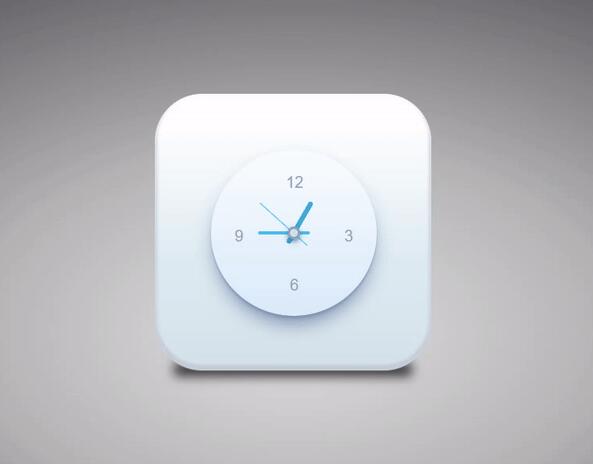
javascript实现时钟动画
本文实例为大家分享了javascript实现时钟动画的具体代码,供大家参考,具体内容如下
<!DOCTYPE html>
<html>
<head lang="en">
  <meta charset="UTF-8">
  <title>时针转动</title>
  <meta name="viewport" content="width=device-width, initial-scale=1.0">
  <style>
    * {
      margin: 0;
      padding: 0;
    }

    body,
    html {
      height: 100%;
      width: 100%
    }

    .t1 {
      width: 100%;
      height: 100%;
      background-image: radial-gradient(ellipse at 50% 70%, hsla(240, 1%, 90%, 1), hsla(225, 8%, 28%, 1));
    }

    .t2 {
      position: relative;
      width: 100%;
      height: 100%;
      background-image: radial-gradient(farthest-side ellipse at 50% 70%, hsla(210, 1%, 78%, 0.73) 100px, rgba(150, 150, 150, 0.7) 400px, hsla(225, 4%, 18%, 0.8) 100%);
      z-index: -3;
    }

    .t3 {
      position: absolute;
      left: 50%;
      margin-left: -175px;
      top: 30%;
      height: 350px;
      width: 350px;
      border-radius: 60px;
      background: #fff;
      background-image: linear-gradient(#ffffff 40px, #ddecf2 210px, #d3e3e9);
    }

    .t3:before {
      content: "";
      position: absolute;
      box-shadow: 0px -4px 3px 3px #b8bdca inset;
      border-radius: 60px;
      opacity: 0.6;
      height: 100%;
      width: 100%;
      -webkit-filter: blur(1px);
      z-index: 2;
    }

    .t3:after {
      content: "";
      height: 17px;
      width: 300px;
      position: absolute;
      top: 97%;
      margin-left: 25px;
      background: #2a2a2b;
      -webkit-filter: blur(7px);
      /*Chrome, Opera*/
      z-index: -1;
    }

    .t4 {
      position: relative;
      margin: 71px;
      width: 210px;
      height: 210px;
      border-radius: 50%;
      background-image: linear-gradient(#f9fdff, #d9eaf8);
      box-shadow: 0px 0px 28px -8px #eaf7fb;
      z-index: 11;
      font-size: 20px;
      ;
      color: #8da6b8;
      font-family: Arial;
    }

    .t4 i {
      font-style: normal
    }

    .hour {
      position: absolute;
    }

    .hour3 {
      right: 30px;
      top: 50%;
      margin-top: -7px;
    }

    .hour6 {
      left: 50%;
      bottom: 27px;
      margin-left: -5px;
    }

    .hour9 {
      left: 30px;
      top: 50%;
      margin-top: -7px;
    }

    .hour12 {
      left: 50%;
      top: 30px;
      margin-left: -10px;
    }

    .t4:before {
      content: "";
      position: absolute;
      width: 210px;
      height: 210px;
      border-radius: 50%;
      box-shadow: 0px 15px 24px -5px #7a8fae;
      z-index: 10;
    }

    .t4:after {
      content: "";
      left: 0px;
      top: 0px;
      position: absolute;
      width: 210px;
      height: 210px;
      border-radius: 50%;
      box-shadow: 0px 4px 4px -1px #7a8fae;
      z-index: 9;
    }

    #miao,
    #fen,
    #shi {
      position: absolute;
      left: 50%;
      height: 210px;
      width: 10px;
      margin-left: -5px;
    }

    #miao {
      z-index: 23;
    }

    #fen {
      z-index: 22;
    }

    #shi {
      z-index: 21;
    }

    #shi:after {
      content: "";
      height: 60px;
      width: 6px;
      position: absolute;
      top: 60px;
      left: 2px;
      background: #1aa9d8;
      border-radius: 8px 8px 8px 8px;
      z-index: -1;
    }

    #fen:after {
      content: "";
      height: 65px;
      width: 4px;
      position: absolute;
      top: 60px;
      left: 3px;
      background: #23bcef;
      border-radius: 8px 8px 8px 8px;
      z-index: -1;
    }

    #miao:after {
      content: "";
      height: 80px;
      width: 1px;
      position: absolute;
      top: 48px;
      left: 4px;
      background: #0dc1fd;
      z-index: -1;
    }

    #point {
      position: absolute;
      left: 50%;
      top: 50%;
      width: 16px;
      height: 16px;
      margin-left: -8px;
      margin-top: -8px;
      z-index: 999;
      border-radius: 50%;
      box-shadow: 0px 3px 8px -1px #0f4873;
    }

    #point:before,
    #point:after {
      content: "";
      height: 10px;
      width: 10px;
      position: absolute;
      top: 0%;
      background: #8ba3b6;
      border-radius: 50%;
      z-index: 1;
    }

    #point:before {
      width: 16px;
      height: 16px;
    }

    #point:after {
      background: #cee3ec;
      left: 3px;
      top: 3px;
    }
  </style>
</head>

<body>
  <div class="t2">
    <!-- 时钟的盒子 -->
    <div class="t3">
      <!-- 时钟区域 -->
      <div class="t4">
        <!-- 数值 -->
        <i class="hour hour3">3</i>
        <i class="hour hour6">6</i>
        <i class="hour hour9">9</i>
        <i class="hour hour12">12</i>
        <!-- 时分秒的转轴 -->
        <div id="miao"></div>
        <div id="fen"></div>
        <div id="shi"></div>
        <!-- 小圆点 -->
        <div id="point"></div>
      </div>
    </div>
  </div>
  <script type="text/javascript">
    // 获取元素
    var shi = document.querySelector('#shi');
    var fen = document.querySelector('#fen');
    var miao = document.querySelector('#miao');

    setInterval(function() {
      var nowDate = new Date();
      // 获取时分秒
      var hour = nowDate.getHours();
      var minute = nowDate.getMinutes();
      var second = nowDate.getSeconds();
      var houerTw = hour % 12 * 30;
      var minuteTW = minute * 6;
      var secondTW = second * 6;
      console.log(houerTw);
      // 变量在拼接是要注意不能加入空格
      shi.style.transform = 'rotate(' + houerTw + 'deg)';
      fen.style.transform = 'rotate(' + minuteTW + 'deg)';
      miao.style.transform = 'rotate(' + secondTW + 'deg)';
    }, 1000)
  </script>

</body>

</html>
效果图:

以上就是本文的全部内容,希望对大家的学习有所帮助,也希望大家多多支持我们。
赞 (0)

