使用SpringBoot自定义starter详解
一、新建一个工程
工程由xxx-sprig-boot-starter和xxx-sprig-boot-starter-configure两个模块组成;

xxx-sprig-boot-starter模块
- 只用来做依赖导入
- 依赖于
xxx-sprig-boot-starter-configure模块,没有实际代码
<?xml version="1.0" encoding="UTF-8"?>
<project xmlns="http://maven.apache.org/POM/4.0.0"
         xmlns:xsi="http://www.w3.org/2001/XMLSchema-instance"
         xsi:schemaLocation="http://maven.apache.org/POM/4.0.0 http://maven.apache.org/xsd/maven-4.0.0.xsd">
    <modelVersion>4.0.0</modelVersion>

    <groupId>com.ander</groupId>
    <artifactId>ander-spring-boot-starter</artifactId>
    <version>1.0-SNAPSHOT</version>

    <!--依赖ander-spring-boot-starter-configure工程-->
    <dependencies>
        <dependency>
            <groupId>com.ander</groupId>
            <artifactId>ander-spring-boot-starter-configure</artifactId>
            <version>0.0.1-SNAPSHOT</version>
        </dependency>
    </dependencies>

</project>

xxx-sprig-boot-starter-configure模块
- 专门自动配置模块
- 依赖于
spring-boot-starter-web
<?xml version="1.0" encoding="UTF-8"?>
<project xmlns="http://maven.apache.org/POM/4.0.0" xmlns:xsi="http://www.w3.org/2001/XMLSchema-instance"
         xsi:schemaLocation="http://maven.apache.org/POM/4.0.0 https://maven.apache.org/xsd/maven-4.0.0.xsd">
    <modelVersion>4.0.0</modelVersion>
    <parent>
        <groupId>org.springframework.boot</groupId>
        <artifactId>spring-boot-starter-parent</artifactId>
        <version>2.3.10.RELEASE</version>
        <relativePath/> <!-- lookup parent from repository -->
    </parent>

    <groupId>com.ander</groupId>
    <artifactId>ander-spring-boot-starter-configure</artifactId>
    <version>0.0.1-SNAPSHOT</version>
    <name>ander-spring-boot-starter-configure</name>
    <description>Demo project for Spring Boot</description>

    <properties>
        <java.version>1.8</java.version>
    </properties>

    <dependencies>
        <dependency>
            <groupId>org.springframework.boot</groupId>
            <artifactId>spring-boot-starter-web</artifactId>
        </dependency>
    </dependencies>

</project>

二、xxx-sprig-boot-starter-configure模块自动配置编码
2.1 服务层编码
/**
 * Service层
 *
 * @Author: Ander
 * @Date: 2021-05-04
 */
public class HelloService {

    private HelloServiceProperties helloServiceProperties;

    public String helloService(String name) {
        return helloServiceProperties.getPrefix() + " "+ name + " " + helloServiceProperties.getSuffix();
    }

    public HelloServiceProperties getHelloServiceProperties() {
        return helloServiceProperties;
    }

    public void setHelloServiceProperties(HelloServiceProperties helloServiceProperties) {
        this.helloServiceProperties = helloServiceProperties;
    }
}
2.2 属性配置类编码
/**
 * 属性配置类
 *
 * @Author: Ander
 * @Date: 2021-05-04
 */
@ConfigurationProperties(prefix = "com.ander")
public class HelloServiceProperties {

    private String prefix = "hi";
    private String suffix = "hello world";

    public String getPrefix() {
        return prefix;
    }

    public void setPrefix(String prefix) {
        this.prefix = prefix;
    }

    public String getSuffix() {
        return suffix;
    }

    public void setSuffix(String suffix) {
        this.suffix = suffix;
    }
}
2.3 starter自动配置类编码
@EnableConfigurationProperties({HelloServiceProperties.class})作用:让xxxProperties生效加入到容器中
/**
 * 自定义starter自动配置类
 *
 * @Author: Ander
 * @Date: 2021-05-04
 */
@Configuration
@ConditionalOnWebApplication // 指定web应用才生效
@EnableConfigurationProperties({HelloServiceProperties.class})
public class HelloServiceAutoConfigure {

    @Autowired
    private HelloServiceProperties helloServiceProperties;

    @Bean
    public HelloService helloService() {
        HelloService helloService = new HelloService();
        helloService.setHelloServiceProperties(helloServiceProperties);
        return helloService;
    }
}
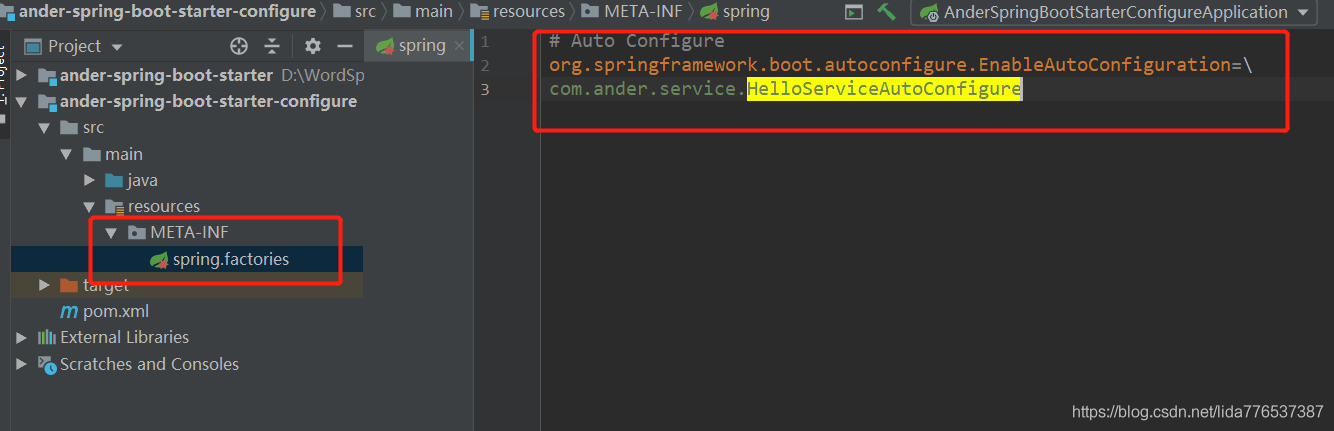
2.4 添加自动配置类到META-INF路径下
2.5 将工程安装到本地
注意先安装xxx-spring-boot-starter-configure,再安装xxx-spring-boot-starter

三、新建一个工程测试自定义starter
3.1 编写controller层
/**
 * starter测试控制类
 *
 * @Author: Ander
 * @Date: 2021-05-05
 */
@RestController
public class StarterTestController {

    @Autowired
    private HelloService helloService;

    @GetMapping("hello")
    public String hello(String name) {
        return helloService.helloService(name);
    }
}
3.2 编写配置文件
server.port=8888
com.ander.prefix=HI
com.ander.suffix=HELLO WORLD
四、测试结果
4.1 使用starter默认配置

4.2 使用自定义配置

到此这篇关于使用Spring Boot自定义starter详解的文章就介绍到这了,更多相关Spring Boot自定义starter内容请搜索我们以前的文章或继续浏览下面的相关文章希望大家以后多多支持我们!
相关推荐
-
springboot自定义starter实现过程图解
这篇文章主要介绍了springboot自定义starter实现过程图解,文中通过示例代码介绍的非常详细,对大家的学习或者工作具有一定的参考学习价值,需要的朋友可以参考下 1.创建一个Empty Project 2.在该工程中点击+,选择new module,新建一个maven工程 点击确定. 3.在该工程中点击+,选择new module,新建一个Spring Initializr工程 后面直接默认next,然后点击finishi. 两个都创建完毕之后点击apply,点击OK.得到如下结构: 4
-
springboot自定义Starter过程解析
自定义Starter命名规则 注意artifactId的命名规则,Spring官方Starter通常命名为spring-boot-starter-{name}如 spring-boot-starter-web, Spring官方建议非官方Starter命名应遵循{name}-spring-boot-starter的格式, 如mybatis-spring-boot-starter.这里创建的项目的artifactId为helloworld-spring-boot-starter 开发Starter
-
SpringBoot自动配置之自定义starter的实现代码
前言:前面已经介绍了自动配置的很多原理,现在我们着手自己定义一个starter. 需求:自定义redis-starter,要求当导入redis坐标后,SpringBoot自动创建Jedis的Bean.正式开始之前,我们可以查看Mybatis的起步依赖是如果实现自动配置的.我这里就省略了,大家根据之前的分析文章,自己看源码即可. 一.先创建一个SpringBoot工程redis-spring-boot-autoconfigure,该工程中添加jedis依赖,并且创建一个自动配置类RedisAuto
-
springboot自定义redis-starter的实现
spring时代整合redis spring我相信只要是一个Java开发人员我相信再熟悉不过了,几乎垄断了整个JavaEE的市场份额,话不多说进入正题. 首先看看我们在spring中整合redis需要做什么 1.首先maven工程的话不用想先导入依赖 <!-- jedis --> <dependency> <groupId>redis.clients</groupId> <artifactId>jedis</artifactId> &
-

SpringBoot自定义starter实例代码
一.简介 SpringBoot 最强大的功能就是把我们常用的场景抽取成了一个个starter(场景启动器),我们通过引入SpringBoot 为我提供的这些场景启动器,我们再进行少量的配置就能使用相应的功能.即使是这样,SpringBoot也不能囊括我们所有的使用场景,往往我们需要自定义starter,来简化我们对SpringBoot的使用. 下面话不多说了,来一起看看详细的介绍吧 二.如何自定义starter 1.实例 如何编写自动配置 ? 我们参照@WebMvcAutoConfigurati
-
使用SpringBoot自定义starter的完整步骤
前言 使用过SpringBoot的都应该知道,一个SpringBoot 项目就是由一个一个 Starter 组成的,一个 Starter 代表该项目的 SpringBoot 启动依赖,除了官方已有的 Starter,我们可以根据自己的需要自定义新的Starter. 一.自定义SpringBoot Starter 自定义Starter,首选需要实现自动化配置,而要实现自动化配置需要满足以下两个条件: (1)能够自动配置项目所需要的配置信息,也就是自动加载依赖环境: (2)能够根据项目提供的信息自动
-
springboot自定义Starter的具体流程
自定义Starter命名规则 注意artifactId的命名规则,Spring官方Starter通常命名为spring-boot-starter-{name}如 spring-boot-starter-web, Spring官方建议非官方Starter命名应遵循{name}-spring-boot-starter的格式, 如mybatis-spring-boot-starter.这里创建的项目的artifactId为helloworld-spring-boot-starter 开发Starter
-
Java SpringBoot自定义starter详解
目录 一.什么是SpringBoot starter机制 二.为什么要自定义starter ? 三.什么时候需要创建自定义starter? 四.自定义starter的开发流程(案例:为短信发送功能创建一个starter) 1.细节:命名规范 2.必须引入的依赖 3.编写相关属性类(XxxProperties):例如 SmsProperties.java 4.编写Starter项目的业务功能 5.编写自动配置类AutoConfig 6.编写spring.factories文件加载自动配置类 7.打
-
使用SpringBoot自定义starter详解
一.新建一个工程 工程由xxx-sprig-boot-starter和xxx-sprig-boot-starter-configure两个模块组成: xxx-sprig-boot-starter模块 只用来做依赖导入 依赖于 xxx-sprig-boot-starter-configure模块,没有实际代码 <?xml version="1.0" encoding="UTF-8"?> <project xmlns="http://mave
-
SpringBoot自定义Starter实现流程详解
目录 starter起步依赖 starter命名规则 自定义starter new module 添加依赖 simplebean 自动配置类 META-INF\spring.factories 在spring-boot-mytest中引入mystarter-spring-boot-starter 添加配置 通过@Autowired引用 启动访问 starter起步依赖 starter起步依赖是springboot一种非常重要的机制, 它打包了某些场景下需要用到依赖,将其统一集成到starter,
-
SpringBoot之自定义Banner详解
1.在线生成banner网站 https://www.bootschool.net/ascii http://www.network-science.de/ascii/ http://patorjk.com/software/taag/ http://www.degraeve.com/img2txt.php 2.两种自定义Banner方式 在自定义Banner之前,先剖析一下源码,源码跟踪解析如下: SpringBoot启动的main方法 public static void main(Stri
-
springboot自定义starter方法及注解实例
目录 SpringBoot starter 自定义starter 自定义starter步骤 实现 打包测试 注解解释 SpringBoot starter 用了springboot 那么久了居然都还没自定义过starter,想想都觉得羞愧,所以今天来玩一下. SpringBoot中的starter是一种非常重要的机制,能够抛弃以前繁杂的配置,将其统一集成进starter,应用者只需要在maven中引入starter依赖,SpringBoot就能自动扫描到要加载的信息并启动相应的默认配置.star
-
springboot集成es详解
1.导入 maven依赖 <dependency> <groupId>org.springframework.boot</groupId> <artifactId>spring-boot-starter-dataelasticsearch</artifactId> <dependency> 注意 保持版本一致 我用的是7.6.2版本的 <properties> <java.version>1.8</jav
-
Java SpringBoot 集成 Redis详解
目录 1.概述 Redis是什么? Redis能该干什么? 特性 2.测试Redis 3.自定义redisTemplate 1.概述 Redis是什么? Redis(Remote Dictionary Server ),即远程字典服务. 是一个开源的使用ANSI C语言编写.支持网络.可基于内存亦可持久化的日志型.Key-Value数据库,并提供多种语言的API. 与memcached一样,为了保证效率,数据都是缓存在内存中.区别的是redis会周期性的把更新的数据写入磁盘或者把修改操作写入追加
-
SpringBoot入门教程详解
目录 一.SpringBoot简介 二.SpringBoot入门案例 1.创建项目 2.编写 Controller 类 3.启动项目 4.使用 Postman 测试 三.SpringBoot VS Spring 四.在官网中构建工程 六.SpringBoot 是如何实现简化开发的 1.启动依赖 2.引导类 七.切换 Web 一.SpringBoot简介 SpringBoot 是由 Pivotal 团队提供的全新框架,其设计目的是用来简化 Spring 应用的初始搭建以及开发过程. 我们在学习 S
-
Vue自定义事件(详解)
前面的话 父组件使用props传递数据给子组件,子组件怎么跟父组件通信呢?这时,Vue的自定义事件就派上用场了.本文将详细介绍Vue自定义事件 事件绑定 每个 Vue 实例都实现了事件接口 (Events interface),即 使用 $on(eventName) 监听事件 使用 $emit(eventName) 触发事件 [注意]Vue 的事件系统分离自浏览器的EventTarget API.尽管它们的运行类似,但是 $on 和 $emit 不是addEventListener 和 disp
-
python魔法方法-自定义序列详解
自定义序列的相关魔法方法允许我们自己创建的类拥有序列的特性,让其使用起来就像 python 的内置序列(dict,tuple,list,string等). 如果要实现这个功能,就要遵循 python 的相关的协议.所谓的协议就是一些约定内容.例如,如果要将一个类要实现迭代,就必须实现两个魔法方法:__iter__.next(python3.x中为__new__).__iter__应该返回一个对象,这个对象必须实现 next 方法,通常返回的是 self 本身.而 next 方法必须在每次调用的时