教你使用springboot配置多数据源
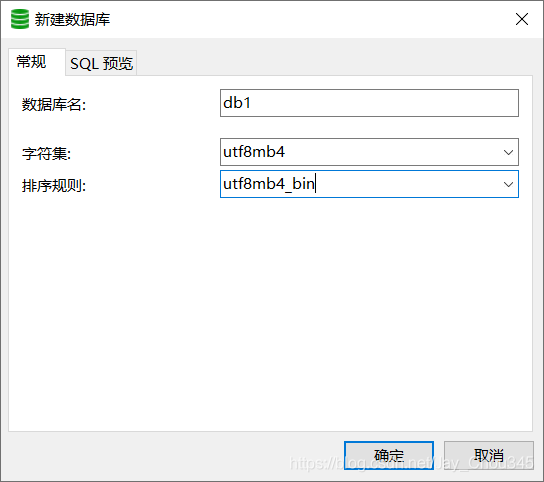
一、建库建表
1.1 创建数据库db1和数据库db2

1.2 在数据库db1中创建表db1

CREATE TABLE `db1` (
  `id` int unsigned zerofill NOT NULL AUTO_INCREMENT,
  `name` varchar(50) DEFAULT NULL,
  `age` int unsigned zerofill DEFAULT NULL,
  PRIMARY KEY (`id`)
) ENGINE=InnoDB AUTO_INCREMENT=1 DEFAULT CHARSET=utf8mb4;
1.3 在数据库db2中创建表db2

CREATE TABLE `db2` (
  `id` int unsigned zerofill NOT NULL AUTO_INCREMENT,
  `name` varchar(50) DEFAULT NULL,
  `age` int unsigned zerofill DEFAULT NULL,
  PRIMARY KEY (`id`)
) ENGINE=InnoDB AUTO_INCREMENT=1 DEFAULT CHARSET=utf8mb4;
二、创建springboot项目
2.1 pom.xml导入依赖
<dependency>
            <groupId>org.springframework.boot</groupId>
            <artifactId>spring-boot-starter-web</artifactId>
        </dependency>
        <dependency>
            <groupId>org.mybatis.spring.boot</groupId>
            <artifactId>mybatis-spring-boot-starter</artifactId>
            <version>2.1.4</version>
        </dependency>

        <dependency>
            <groupId>mysql</groupId>
            <artifactId>mysql-connector-java</artifactId>
            <scope>runtime</scope>
        </dependency>
        <dependency>
            <groupId>org.springframework.boot</groupId>
            <artifactId>spring-boot-starter-test</artifactId>
            <scope>test</scope>
            <exclusions>
                <exclusion>
                    <groupId>org.junit.vintage</groupId>
                    <artifactId>junit-vintage-engine</artifactId>
                </exclusion>
            </exclusions>
        </dependency>
        <dependency>
            <groupId>junit</groupId>
            <artifactId>junit</artifactId>
            <scope>test</scope>
        </dependency>
2.2 创建application.yml文件(与 2.3 二选一进行配置,推荐此方法)
server:
  port: 8080 # 启动端口
spring:
  datasource:
    db1: # 数据源1
      jdbc-url: jdbc:mysql://localhost:3306/db1?serverTimezone=Asia/Shanghai&useUnicode=true&characterEncoding=utf8
      username: root
      password: root
      driver-class-name: com.mysql.cj.jdbc.Driver
    db2: # 数据源2
      jdbc-url: jdbc:mysql://localhost:3306/db2?serverTimezone=Asia/Shanghai&useUnicode=true&characterEncoding=utf8
      username: root
      password: root
      driver-class-name: com.mysql.cj.jdbc.Driver
2.3 创建application.properties文件(与 2.2 二选一进行配置)
server.port=8080

      spring.datasource.db1.url=jdbc:mysql://localhost:3306/db1?serverTimezone=Asia/Shanghai&useUnicode=true&characterEncoding=utf8
      spring.datasource.db1.username=root
      spring.datasource.db1.password=root
      spring.datasource.db1.driver-class-name=com.mysql.jdbc.Driver

      spring.datasource.db2.url=jdbc:mysql://localhost:3306/db2?serverTimezone=Asia/Shanghai&useUnicode=true&characterEncoding=utf8
      spring.datasource.db2.username=root
      spring.datasource.db2.password=root
      spring.datasource.db2.driver-class-name=com.mysql.jdbc.Driver
2.4 创建mapper文件
我个人是放在mapper包下,文件随便命名的
代码随便写的,测试而已

import org.apache.ibatis.annotations.Insert;
import org.apache.ibatis.annotations.Mapper;

/**
 * @Author if
 * @Description: What is it
 * @Date 2021-05-20 下午 09:52
 */
@Mapper
public interface Db1Mapper {
    @Insert("insert into db1(name,age) values('if',18)")
    int add();
}
import org.apache.ibatis.annotations.Insert;
import org.apache.ibatis.annotations.Mapper;

/**
 * @Author if
 * @Description: What is it
 * @Date 2021-05-20 下午 09:52
 */
@Mapper
public interface Db2Mapper {
    @Insert("insert into db2(name,age) values('fi',81)")
    int add();
}
2.5 创建config配置文件
我个人是放在config包下,文件随便命名的

import org.apache.ibatis.session.SqlSessionFactory;
import org.mybatis.spring.SqlSessionFactoryBean;
import org.mybatis.spring.SqlSessionTemplate;
import org.mybatis.spring.annotation.MapperScan;
import org.springframework.beans.factory.annotation.Qualifier;
import org.springframework.boot.context.properties.ConfigurationProperties;
import org.springframework.boot.jdbc.DataSourceBuilder;
import org.springframework.context.annotation.Bean;
import org.springframework.context.annotation.Configuration;
import org.springframework.core.io.support.PathMatchingResourcePatternResolver;
import javax.sql.DataSource;

/**
 * @Author if
 * @Description: 注意以下有些文件路径需要更改
 * @Date 2021-05-20 下午 09:56
 */
@Configuration
@MapperScan(basePackages = "com.ifyyf.study.mapper.db1", sqlSessionFactoryRef = "db1SqlSessionFactory")
public class Db1DataSourceConfig {
    @Bean("db1DataSource")
    @ConfigurationProperties(prefix = "spring.datasource.db1") //读取application.yml中的配置参数映射成为一个对象
    public DataSource getDb1DataSource(){
        return DataSourceBuilder.create().build();
    }

    @Bean("db1SqlSessionFactory")
    public SqlSessionFactory db1SqlSessionFactory(@Qualifier("db1DataSource") DataSource dataSource) throws Exception {
        SqlSessionFactoryBean bean = new SqlSessionFactoryBean();
        bean.setDataSource(dataSource);
        // mapper的xml形式文件位置必须要配置,不然将报错:no statement (这种错误也可能是mapper的xml中,namespace与项目的路径不一致导致)
        bean.setMapperLocations(new PathMatchingResourcePatternResolver().getResources("classpath*:mapping/db1/*.xml"));
        return bean.getObject();
    }

    @Bean("db1SqlSessionTemplate")
    public SqlSessionTemplate db1SqlSessionTemplate(@Qualifier("db1SqlSessionFactory") SqlSessionFactory sqlSessionFactory){
        return new SqlSessionTemplate(sqlSessionFactory);
    }
}
import org.apache.ibatis.session.SqlSessionFactory;
import org.mybatis.spring.SqlSessionFactoryBean;
import org.mybatis.spring.SqlSessionTemplate;
import org.mybatis.spring.annotation.MapperScan;
import org.springframework.beans.factory.annotation.Qualifier;
import org.springframework.boot.context.properties.ConfigurationProperties;
import org.springframework.boot.jdbc.DataSourceBuilder;
import org.springframework.context.annotation.Bean;
import org.springframework.context.annotation.Configuration;
import org.springframework.core.io.support.PathMatchingResourcePatternResolver;
import javax.sql.DataSource;

/**
 * @Author if
 * @Description: 注意以下有些文件路径需要更改
 * @Date 2021-05-20 下午 09:56
 */
@Configuration
@MapperScan(basePackages = "com.ifyyf.study.mapper.db2", sqlSessionFactoryRef = "db2SqlSessionFactory")
public class Db2DataSourceConfig {
    @Bean("db2DataSource")
    @ConfigurationProperties(prefix = "spring.datasource.db2") //读取application.yml中的配置参数映射成为一个对象
    public DataSource getDb2DataSource(){
        return DataSourceBuilder.create().build();
    }

    @Bean("db2SqlSessionFactory")
    public SqlSessionFactory db2SqlSessionFactory(@Qualifier("db2DataSource") DataSource dataSource) throws Exception {
        SqlSessionFactoryBean bean = new SqlSessionFactoryBean();
        bean.setDataSource(dataSource);
        // mapper的xml形式文件位置必须要配置,不然将报错:no statement (这种错误也可能是mapper的xml中,namespace与项目的路径不一致导致)
        bean.setMapperLocations(new PathMatchingResourcePatternResolver().getResources("classpath*:mapping/db2/*.xml"));
        return bean.getObject();
    }

    @Bean("db2SqlSessionTemplate")
    public SqlSessionTemplate db2SqlSessionTemplate(@Qualifier("db2SqlSessionFactory") SqlSessionFactory sqlSessionFactory){
        return new SqlSessionTemplate(sqlSessionFactory);
    }
}
三、测试代码运行
3.1 测试类中测试代码
springboot项目中测试类进行测试
import com.ifyyf.study.mapper.db1.Db1Mapper;
import com.ifyyf.study.mapper.db2.Db2Mapper;
import org.junit.jupiter.api.Test;
import org.springframework.boot.test.context.SpringBootTest;
import javax.annotation.Resource;
@SpringBootTest
class StudyApplicationTests {
@Resource
private Db1Mapper db1Mapper;
@Resource
private Db2Mapper db2Mapper;
@Test
void contextLoads() {
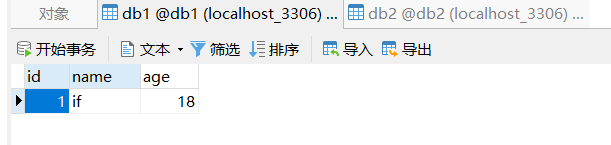
System.out.println(db1Mapper.add());
System.out.println(db2Mapper.add());
}
}
3.2 运行结果


到此这篇关于教你使用springboot配置多数据源的文章就介绍到这了,更多相关springboot配置多数据源内容请搜索我们以前的文章或继续浏览下面的相关文章希望大家以后多多支持我们!
相关推荐
-
SpringBoot Mybatis如何配置多数据源并分包
看了不少网上关于多数据源的配置,大致可分为两类,分包方式和通过切面方式: 样例已上传至github:https://github.com/dadachao/multids 第一个子项目ds01即时使用分包方式完成多数据源配置. 总结项目中出现的问题和解决办法: 数据库的连接信息: 连接信息是写在db.properties文件中的: #数据库ds1 spring.datasource.ds1.driver-class-name=com.mysql.cj.jdbc.Driver spring.dat
-
springboot配置多数据源的实例(MongoDB主从)
相信看过上一篇文章的小伙伴已经知道了, 这章要讲的就是MongoDB主从配置. 在这边文章中,你将要学到的是在项目中配置主从数据库,并且兼容其他数据库哟..这些都是博主项目中需要并且比较重要的知识哦~ 好了,废话不多说,直接进主题. 1.pom依赖 <span style="white-space:pre"> </span><dependency> <groupId>org.springframework.boot</groupId
-

详解springboot采用多数据源对JdbcTemplate配置的方法
springboot多数据源配置,代码如下 DataSourceConfig package com.rookie.bigdata.config; import org.springframework.beans.factory.annotation.Qualifier; import org.springframework.boot.context.properties.ConfigurationProperties; import org.springframework.boot.jdbc.
-
详解Springboot之整合JDBCTemplate配置多数据源
一.前言 现在在我们的项目中,使用多数据源已经是很常见的,下面,这里总结一下springboot整合jdbcTemplate配置多数据源的代码示例,以方便以后直接使用. 二.配置文件 spring: datasource: datasourceone: driverClassName: com.mysql.jdbc.Driver url: jdbc:mysql://localhost:3306/eesy?serverTimezone=UTC&characterEncoding=utf8&u
-
Springboot mybais配置多数据源过程解析
一.分包方式实现: 1.在application.properties中配置两个数据库: #druid连接池 #dataSoureOne(这里是我本地的数据源) spring.datasource.one.type=com.alibaba.druid.pool.DruidDataSource spring.datasource.one.driver-class-name=com.mysql.jdbc.Driver spring.datasource.one.jdbc-url=jdbc:mysql
-
springboot多数据源配置及切换的示例代码详解
注:本文的多数据源配置及切换的实现方法是,在框架中封装,具体项目中配置及使用,也适用于多模块项目 配置文件数据源读取 通过springboot的Envioment和Binder对象进行读取,无需手动声明DataSource的Bean yml数据源配置格式如下: spring: datasource: master: type: com.alibaba.druid.pool.DruidDataSource driverClassName: com.mysql.cj.jdbc.Driver url:
-
SpringBoot多数据源配置详细教程(JdbcTemplate、mybatis)
多数据源配置 首先是配置文件 这里采用yml配置文件,其他类型配置文件同理 我配置了两个数据源,一个名字叫ds1数据源,一个名字叫ds2数据源,如果你想配置更多的数据源,继续加就行了 spring: # 数据源配置 datasource: ds1: #数据源1 driver-class-name: com.mysql.jdbc.Driver # mysql的驱动你可以配置别的关系型数据库 url: jdbc:mysql://ip:3306/db1 #数据源地址 username: root #
-
springboot2.0.0配置多数据源出现jdbcUrl is required with driverClassName的错误
在Spring Boot 2.0配置多数据源和Spring Boot 1.5.x之前,一些配置及用法多少有些不同,其中一个问题就是"jdbcUrl is required with driverClassName."的错误 解决办法: 在配置文件中使用spring.datasource.jdbc-url,而不是通常使用的spring.datasource.url spring: datasource: master: jdbc-url: jdbc:postgresql://192.16
-
springboot redis使用lettuce配置多数据源的实现
目前项目上需要连接两个redis数据源,一个redis数据源是单机模式,一个redis数据源是分片集群模式,这里将具体配置列一下. 项目用的springboot版本为 <parent> <groupId>org.springframework.boot</groupId> <artifactId>spring-boot-starter-parent</artifactId> <version>2.2.1.RELEASE</ver
-
springboot-mongodb的多数据源配置的方法步骤
在日常工作中,我们可能需要连接多个MongoDB数据源,比如用户库user,日志库log.本章我们来记录连接多个数据源的步骤,以两个数据源为例,多个数据源类推. 1.pom.xml中引入mongodb的依赖 <dependency> <groupId>org.springframework.boot</groupId> <artifactId>spring-boot-starter-data-mongodb</artifactId> </d
-
springboot + mybatis配置多数据源示例
在实际开发中,我们一个项目可能会用到多个数据库,通常一个数据库对应一个数据源. 代码结构: 简要原理: 1)DatabaseType列出所有的数据源的key---key 2)DatabaseContextHolder是一个线程安全的DatabaseType容器,并提供了向其中设置和获取DatabaseType的方法 3)DynamicDataSource继承AbstractRoutingDataSource并重写其中的方法determineCurrentLookupKey(),在该方法中使用Da
-
SpringBoot配置MongoDB多数据源的方法步骤
1.项目构建 添加 pom 文件 <dependency> <groupId>org.springframework.boot</groupId> <artifactId>spring-boot-starter-data-mongodb</artifactId> </dependency> 2.在 application.properties 中添加配置 ##start mongodb for basic #-------------
-
springboot v2.0.3版本多数据源配置方法
本篇分享的是springboot多数据源配置,在从springboot v1.5版本升级到v2.0.3时,发现之前写的多数据源的方式不可用了,捕获错误信息如: 异常:jdbcUrl is required with driverClassName. 先来说下之前的多数据源配置如: spring: datasource: url: jdbc:sqlserver://192.168.122.111;DatabaseName=flight username: sa password: 1234.abc
-
springboot下配置多数据源的方法
一.springboot 简介 SpringBoot使开发独立的,产品级别的基于Spring的应用变得非常简单,你只需"just run". 我们为Spring平台及第三方库提 供开箱即用的设置,这样你就可以有条不紊地开始.多数Spring Boot应用需要很少的Spring配置. 你可以使用SpringBoot创建Java应用,并使用 java -jar 启动它或采用传统的war部署方式.我们也提供了一个运行"spring 脚本"的命令行工具. 二.传统的Dat
-
详解SpringBoot和Mybatis配置多数据源
目前业界操作数据库的框架一般是 Mybatis,但在很多业务场景下,我们需要在一个工程里配置多个数据源来实现业务逻辑.在SpringBoot中也可以实现多数据源并配合Mybatis框架编写xml文件来执行SQL.在SpringBoot中,配置多数据源的方式十分便捷, 下面开始上代码: 在pom.xml文件中需要添加一些依赖 <!-- Spring Boot Mybatis 依赖 --> <dependency> <groupId>org.mybatis.spring.b