iOS UITableView展开缩放动画实例代码

Swift - UITableView展开缩放动画
效果
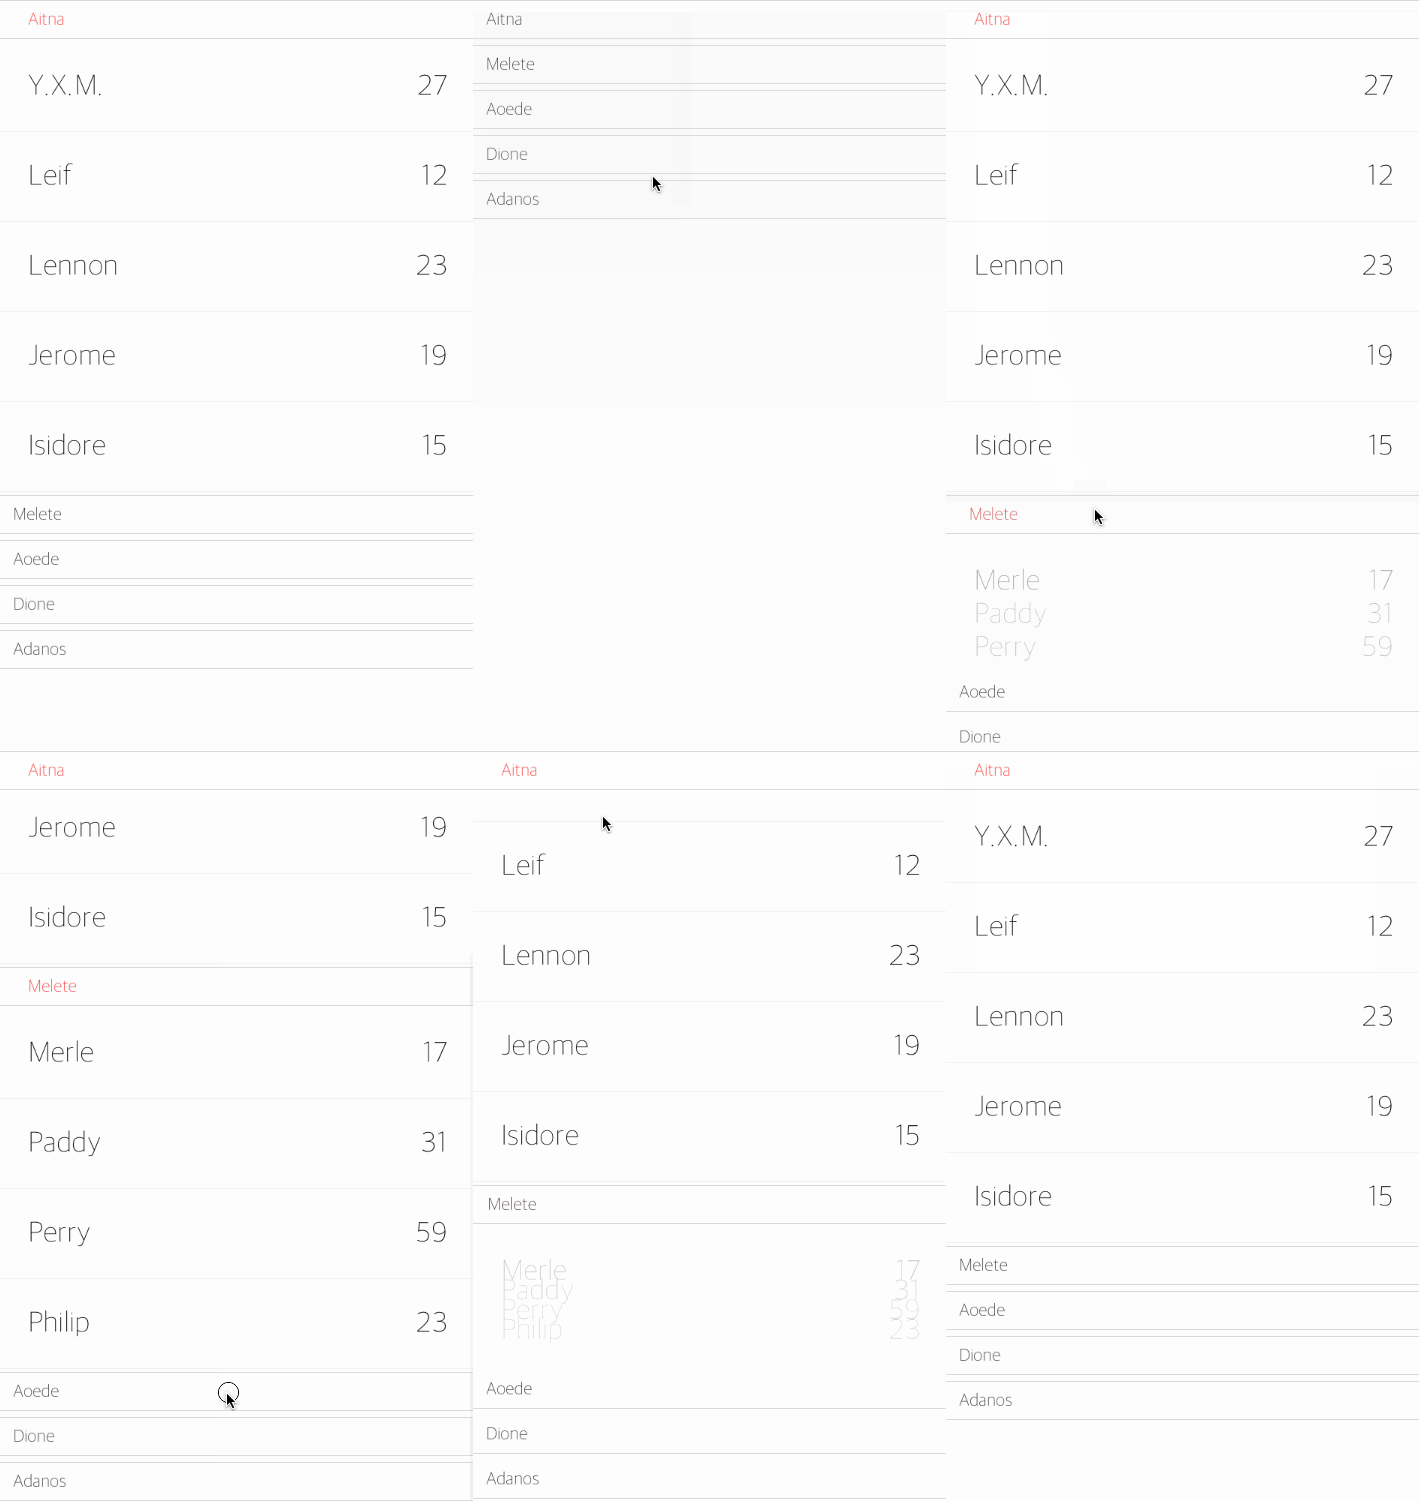
源码:https://github.com/YouXianMing/Swift-Animations

//
// HeaderViewTapAnimationController.swift
// Swift-Animations
//
// Created by YouXianMing on 16/8/9.
// Copyright © 2016年 YouXianMing. All rights reserved.
//

import UIKit

class HeaderViewTapAnimationController: NormalTitleViewController, UITableViewDelegate, UITableViewDataSource {

 private var classes   : [ClassModel]!
 private var tableView   : UITableView!
 private var sectionFirstLoad : Bool!
 private weak var tmpHeadView : ClassHeaderView!

 override func setup() {

  super.setup()

  sectionFirstLoad = false

  // TableView.
  tableView      = UITableView(frame: (contentView?.bounds)!)
  tableView.dataSource   = self
  tableView.delegate   = self
  tableView.rowHeight   = 60
  tableView.sectionHeaderHeight = 30
  tableView.separatorStyle  = .None
  contentView?.addSubview(tableView!)

  // Register.
  ClassHeaderView.registerToTableView(tableView)
  StudentInfoCell.registerToTableView(tableView)

  // Data source.
  let Aitna = ClassModel(className: "Aitna")
  Aitna.expend = false
  Aitna.students?.append(StudentModel(name: "Y.X.M.", age: 27))
  Aitna.students?.append(StudentModel(name: "Leif", age: 12))
  Aitna.students?.append(StudentModel(name: "Lennon", age: 23))
  Aitna.students?.append(StudentModel(name: "Jerome", age: 19))
  Aitna.students?.append(StudentModel(name: "Isidore", age: 15))

  let Melete = ClassModel(className: "Melete")
  Melete.expend = false
  Melete.students?.append(StudentModel(name: "Merle", age: 17))
  Melete.students?.append(StudentModel(name: "Paddy", age: 31))
  Melete.students?.append(StudentModel(name: "Perry", age: 59))
  Melete.students?.append(StudentModel(name: "Philip", age: 23))

  let Aoede = ClassModel(className: "Aoede")
  Aoede.expend = false
  Aoede.students?.append(StudentModel(name: "Verne", age: 12))
  Aoede.students?.append(StudentModel(name: "Vincent", age: 89))
  Aoede.students?.append(StudentModel(name: "Walter", age: 43))
  Aoede.students?.append(StudentModel(name: "Zachary", age: 21))

  let Dione = ClassModel(className: "Dione")
  Dione.expend = false
  Dione.students?.append(StudentModel(name: "Timothy", age: 72))
  Dione.students?.append(StudentModel(name: "Roderick", age: 34))
  Dione.students?.append(StudentModel(name: "Quentin", age: 12))
  Dione.students?.append(StudentModel(name: "Paddy", age: 75))

  let Adanos = ClassModel(className: "Adanos")
  Adanos.expend = false
  Adanos.students?.append(StudentModel(name: "Mortimer", age: 43))
  Adanos.students?.append(StudentModel(name: "Michael", age: 64))
  Adanos.students?.append(StudentModel(name: "Kevin", age: 23))
  Adanos.students?.append(StudentModel(name: "Jeremy", age: 21))

  classes = [ClassModel]()
  classes.append(Aitna)
  classes.append(Melete)
  classes.append(Aoede)
  classes.append(Dione)
  classes.append(Adanos)

  // Expend animations.
  GCDQueue.executeInMainQueue({ 

   self.sectionFirstLoad = true
   self.tableView.insertSections(NSIndexSet(indexesInRange: NSMakeRange(0, self.classes.count)), withRowAnimation: .Fade)

   GCDQueue.executeInMainQueue({

    self.tmpHeadView.buttonEvent()

    }, afterDelaySeconds: 0.4)
   }, afterDelaySeconds: 0.3)
 }

 // MARK: UITableView's delegate & dataSource.

 func tableView(tableView: UITableView, numberOfRowsInSection section: Int) -> Int {

  let classModel = classes[section]
  if classModel.expend == true {

   return (classModel.students?.count)!

  } else {

   return 0
  }
 }

 func numberOfSectionsInTableView(tableView: UITableView) -> Int {

  if sectionFirstLoad == false {

   return 0

  } else {

   return classes.count
  }
 }

 func tableView(tableView: UITableView, cellForRowAtIndexPath indexPath: NSIndexPath) -> UITableViewCell {

  let classModel  = classes[indexPath.section]
  let customCell  = tableView.dequeueReusableCellWithIdentifier("StudentInfoCell") as! CustomCell
  customCell.data  = classModel.students![indexPath.row]
  customCell.indexPath = indexPath
  customCell.loadContent()

  return customCell
 }

 func tableView(tableView: UITableView, didSelectRowAtIndexPath indexPath: NSIndexPath) {

  tableView.selectedEventWithIndexPath(indexPath)
 }

 func tableView(tableView: UITableView, viewForHeaderInSection section: Int) -> UIView? {

  let headerView  = tableView.dequeueReusableHeaderFooterViewWithIdentifier("ClassHeaderView") as! ClassHeaderView
  headerView.section = section
  headerView.data  = classes[section]
  headerView.tableView = tableView
  headerView.loadContent()

  if tmpHeadView == nil && section == 0 {

   tmpHeadView = headerView
  }

  return headerView
 }
}

以上就是本文的全部内容,希望对大家的学习有所帮助,也希望大家多多支持我们。

(0)

相关推荐

  • iOS使用UIScorllView实现两指缩放功能

    两指缩放功能不仅可以用UIPinchGestureRecognizer手势来实现,还能用UIScorllView来实现,UIScrollView可以轻松的实现最大与最小缩放值,以及滚动的效果.代码如下: #import "ViewController.h" @interface ViewController () @property (weak, nonatomic) IBOutlet UIScrollView *scrollView; @property (strong, nonat

  • iOS应用开发中对UIImage进行截取和缩放的方法详解

    截取UIImage指定大小区域 最近遇到这样的需求:从服务器获取到一张照片,只需要显示他的左半部分,或者中间部分等等.也就是截取UIImage指定大小区域. UIImage扩展: 我的解决方案是对UIImage进行扩展.通过CGImageRef和CGImage完成截取,调用的方法是:CGImageCreateWithImageInRect.扩展类叫UIImage+Crop,具体代码如下: UIImage+Crop.h #import <UIKit/UIKit.h> typedef NS_ENU

  • iOS手势识别的详细使用方法(拖动,缩放,旋转,点击,手势依赖,自定义手势)

    手势识别在iOS上非常重要,手势操作移动设备的重要特征,极大的增加了移动设备使用便捷性. 1.UIGestureRecognizer介绍 手势识别在iOS上非常重要,手势操作移动设备的重要特征,极大的增加了移动设备使用便捷性. iOS系统在3.2以后,为方便开发这使用一些常用的手势,提供了UIGestureRecognizer类.手势识别UIGestureRecognizer类是个抽象类,下面的子类是具体的手势,开发这可以直接使用这些手势识别. UITapGestureRecognizer UI

  • iOS实现点击微信头像(放大、缩放、保存)效果

    先来看看实现效果(GIF): 实现思路: 直接自定义 UIView(CYPhotoPreviewer),为了实现双击缩放,可以实现 UIScrollViewDelegate 对应的方法.如果需要模糊背景,可以在自定义的 UIView 中先添加模糊背景,再添加 UIScrollView,继而在 UIScrollView 中添加图片容器,这个容器就是要显示的图片的 superView,代码一目了然: - (void)setup { self.frame = [UIScreenmainScreen].

  • iOS应用开发中使用UIScrollView控件来实现图片缩放

    一.知识点简单介绍 1.UIScrollView控件是什么? (1)移动设备的屏幕⼤大⼩小是极其有限的,因此直接展⽰示在⽤用户眼前的内容也相当有限 (2)当展⽰示的内容较多,超出⼀一个屏幕时,⽤用户可通过滚动⼿手势来查看屏幕以外的内容 (3)普通的UIView不具备滚动功能,不能显⽰示过多的内容 (4)UIScrollView是一个能够滚动的视图控件,可以⽤用来展⽰示⼤大量的内容,并且可以通过滚 动查看所有的内容 (5)  举例:手机上的"设置".其他⽰示例程序 2.UIScrollV

  • iOS开发中Quartz2D控制圆形缩放和实现刷帧效果

    Quartz2D简要回顾 一.什么是Quartz2D Quartz 2D是⼀个二维绘图引擎,同时支持iOS和Mac系统 Quartz 2D能完成的工作: 绘制图形 : 线条\三角形\矩形\圆\弧等 绘制文字 绘制\生成图片(图像) 读取\生成PDF 截图\裁剪图片 自定义UI控件 二.Quartz2D在iOS开发中的价值 为了便于搭建美观的UI界面,iOS提供了UIKit框架,⾥⾯有各种各样的UI控件 UILabel:显⽰文字 UIImageView:显示图片 UIButton:同时显示图片和⽂

  • iOS UITableView展开缩放动画实例代码

    Swift - UITableView展开缩放动画 效果 源码:https://github.com/YouXianMing/Swift-Animations // // HeaderViewTapAnimationController.swift // Swift-Animations // // Created by YouXianMing on 16/8/9. // Copyright © 2016年 YouXianMing. All rights reserved. // import

  • IOS中各种手势操作实例代码

    先看下效果 手势相关的介绍 IOS中手势操作一般是 UIGestureRecognizer 类的几个手势子类去实现,一般我们用到的手势就这么5种: 1.点击  UITapGestureRecognizer 2.平移  UIPanGestureRecognizer 3.缩放  UIPinchGestureRecognizer 4.旋转  UIRotationGestureRecognizer 5.轻扫  UISwipeGestureRecognizer 我们上面这个实例中就用到了上面这5种手势,不

  • 基于Angular.js实现的触摸滑动动画实例代码

    先上图: 这个主要用到是angular-touch.js中封装好的ng-swipe-left,ng-swipe-right,向左或向右的触摸事件.结合css3的transition实现的动画.ng-class为切换写好的动画的className. <!DOCTYPE HTML> <html ng-app="myapp"> <head> <meta http-equiv="content-type" content="

  • IOS UITableView颜色设置的实例详解

    IOS UITableView颜色设置的实例详解 1.系统默认的颜色设置  //无色 cell.selectionStyle = UITableViewCellSelectionStyleNone; //蓝色 cell.selectionStyle = UITableViewCellSelectionStyleBlue; //灰色 cell.selectionStyle = UITableViewCellSelectionStyleGray; 2.自定义颜色和背景设置 改变UITableView

  • iOS 增加右侧按钮功能实例代码

    一,工程图. 二,代码. ViewController.m - (void)viewDidLoad { [super viewDidLoad]; // Do any additional setup after loading the view, typically from a nib. //增加右侧按钮 [self addRightButton]; } #pragma -mark -functions //增加右侧按钮 -(void)addRightButton { UIBarButtonI

  • iOS清除所有缓存的实例代码

    本文介绍了iOS清除所有缓存的实例代码,分享给大家,具体如下: 计算缓存 NSString *libPath = NSSearchPathForDirectoriesInDomains(NSLibraryDirectory, NSUserDomainMask, YES)[0]; CGFloat fileSize=[self folderSizeAtPath:libPath]; - (float ) folderSizeAtPath:(NSString*) folderPath{ NSFileMa

  • iOS 请求权限封装类的实例代码

    直接上代码 #import <Foundation/Foundation.h> #import <AVFoundation/AVFoundation.h> #import <AssetsLibrary/AssetsLibrary.h> #import <Photos/Photos.h> #import <CoreLocation/CoreLocation.h> @interface PermissionUtil : NSObject +(Bool

  • Android图片采样缩放功能实例代码

    为什么要对Android中的图片进行采样缩放呢? 是为了更加高效的加载Bitmap.假设通过imageView来显示图片,很多时候ImageView并没有图片的原始尺寸那么大,这时候把整张图片加载进来后再设给ImageView是没有必要的,因为ImagView并没有办法显示原始的图片. 所以我们可以使用BitmapFactory.Options按照一定的采样率加载缩小后的图片,将缩小后的图片在ImageView中显示,这样就能降低内存占用,在一定程度上避免OOM,提高bitma加载时候的性能.

  • ios中getTime()的兼容性实例代码

    时间格式为:2017-12-12 12:00:00在苹果上获取时间戳有兼容性问题 需要转换成2017/12/12 12:00:00 才可以正确获取到时间戳 let u = navigator.userAgent; //判断浏览器型号 let isAndroid = u.indexOf('Android') > -1 || u.indexOf('Adr') > -1; //android终端 let isiOS = !!u.match(/\(i[^;]+;( U;)? CPU.+Mac OS X

  • Angular动画实现的2种方式以及添加购物车动画实例代码

    前言 在前端应用中,动画是一个常见的场景.在使用了一系列的动画库之后,终于需要自己来实现一个动画了.这次的动画则是基于 Angular 框架.我的场景是一个类似于添加购物车的动画.在这个场景里,需要两个动画,一个是购物车数量的增加动画,一个则是折叠页面元素的动画. 在实现的过程上,我采用了两种不同的 Angular 动画的方式: 使用 TypeScript 控制动画 使用 @Component 中的 animations Angular 动画基础 如 Angular 官网中的示例那样,要在 An

随机推荐