Android实现输入法弹出时把布局顶上去和登录按钮顶上去的解决方法
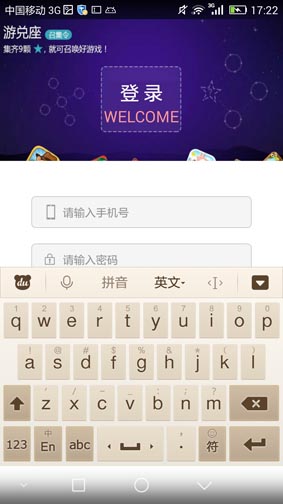
背景:在写登录界面时,老板就觉得在输入密码的时候谈出来的输入法软键盘把登录按钮遮挡住了(入下图所示,不爽),连输入框都被挡了一半,于是不满意了,要叫我改,于是我看QQ的登录效果,我就去研究了一下,弹出输入法整个布局上来了,终于让老板满意了。


(如上图这样,老板不满意的,呵呵)
1,咱们就解决问题吧。
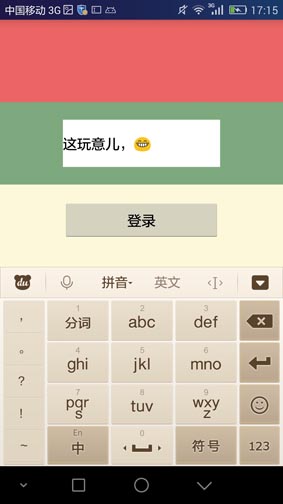
我看了很多博客和问答,很多人都说直接在在AndroidManifest.xml中给这个Activity设置 <activity android:windowSoftInputMode="stateVisible|adjustPan" ...>这样就好使了,这个是否在逗,整个布局向上移动并不明显,反正我的是不好使,不知道那些博主是怎么弄好使的。不过,看评论,也有很多人说不好使。那就做一个大家都好使的代码出来。先看效果。


哈哈,大家有没有看到,连登录按钮都一起跑上去了,应该是顶上去的。老板再也不用担心登录按钮被覆盖掉了。
那咱们就上代码啦:代码不多,全在布局上,就可以解决。
<?xml version="1.0" encoding="utf-8"?>
<ScrollView xmlns:android="http://schemas.android.com/apk/res/android"
  android:layout_width="match_parent" android:layout_height="match_parent"
  android:fillViewport="true"
  android:fadeScrollbars="true">
  <LinearLayout
    android:layout_width="match_parent"
    android:layout_height="wrap_content"
    android:orientation="vertical">
    <LinearLayout
      android:layout_width="match_parent"
      android:layout_height="0dp"
      android:layout_weight="1"
      android:gravity="top|center_horizontal"
      android:orientation="vertical"
      android:background="@color/red2"
      android:visibility="visible">
      <ImageView          <!--这个其实是我放布局中间的控件,我随便写的,放任何控件都可以-->
        android:layout_width="200dp"
        android:layout_height="160dp"
        />
    </LinearLayout>
    <LinearLayout
      android:layout_width="match_parent"
      android:layout_height="0dp"
      android:layout_weight="1"
      android:alwaysDrawnWithCache="true"
      android:gravity="center|center_horizontal"
      android:orientation="vertical"
      android:visibility="visible"
      android:background="@color/abc_search_url_text_normal">
      <EditText
        android:background="@color/white"
        android:layout_width="200dp"
        android:layout_height="60dp"
        />
    </LinearLayout>
    <LinearLayout
      android:layout_width="match_parent"
      android:layout_height="0dp"
      android:layout_weight="1"
      android:background="@color/cornsilk"
      android:gravity="top|center_horizontal"
      android:orientation="vertical"
      android:visibility="visible">
      <Button
        android:layout_marginTop="20dp"
        android:gravity="center"
        android:text="登录"
        android:layout_width="200dp"
        android:layout_height="50dp" />
    </LinearLayout>
  </LinearLayout>
</ScrollView>
对上面就是所有视线代码了,外面一个scrollview,包含一个LinearLayout,在中间包含了三个LinearLayout,当然了包含三个什么容器控件都行,但是一定要用权重(layout_weight)来约束,这是重点,我只说了一遍,还有就是LinearLayout内部的布局尽量用wrap_content,即时要固定高度也要适当,调节调节就好了。
使用的时候很简单,就只有上面一段布局,然而根本用不着神马AndroidManifest.xml中给这个Activity设置
<activity android:name=".view.activity.multisend.MultiChatActivity" android:windowSoftInputMode="stateVisible|adjustResize"/>
对于这段代码,是可以将底部如果有输入框(最好用FrameLayout包裹),可以向上移动的,类似于QQ输入框。可以不用ScrollView而且输入框向上滚动时,整个布局不会向上滚动。
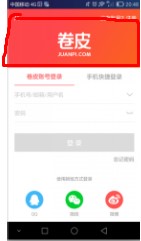
2,最后再提供一个思路,这个思路来自于“卷皮”,卷皮的登录效果,他的设计思路是,在点击EditText输入框的时候,我第一个猜测是:得到了EditText输入焦点,或者是:猜测是监听到键盘弹出的焦点之后,卷皮顶上那个背景就把它慢慢变小隐藏起来,导致下面的两个输入框滚动到顶部去了,就方便用户输入了。这个思路也很好的解决用户直接可以输入的问题。

3,目前很多项目要解决这个问题的方法就是如上面2解决方案所示的,logo逐渐缩小,然后scroll会滚动上去。
csdn这个编辑器越来越烂了,,图片都搞不上来了
布局看看:
<?xml version="1.0" encoding="utf-8"?>
<RelativeLayout xmlns:android="http://schemas.android.com/apk/res/android"
        android:id="@+id/root"
        android:layout_width="match_parent"
        android:layout_height="match_parent"
        android:background="@color/white"
        android:clipToPadding="true"
        android:fitsSystemWindows="true"
        android:orientation="vertical">
  <ImageView
    android:id="@+id/logo"
    android:layout_width="100dp"
    android:layout_height="100dp"
    android:layout_centerHorizontal="true"
    android:layout_gravity="center"
    android:layout_marginTop="80dp"
    android:background="@null"
    android:scaleType="centerCrop"
    android:src="@mipmap/ic_launcher"/>
  <ScrollView
    android:id="@+id/scrollView"
    android:layout_width="match_parent"
    android:layout_height="match_parent"
    android:layout_alignParentLeft="true"
    android:layout_alignParentStart="true"
    android:layout_alignParentTop="true"
    android:layout_marginLeft="15dp"
    android:layout_marginRight="15dp"
    android:fillViewport="true"
    android:scrollbarThumbVertical="@android:color/transparent"
    android:scrollbars="vertical">
    <LinearLayout
      android:id="@+id/content"
      android:layout_width="match_parent"
      android:layout_height="match_parent"
      android:orientation="vertical">
      <LinearLayout
        android:layout_width="match_parent"
        android:layout_height="55dp"
        android:layout_marginTop="200dp"
        android:gravity="center_vertical"
        android:orientation="horizontal"
        android:paddingLeft="13dp">
        <ImageView
          android:layout_width="wrap_content"
          android:layout_height="wrap_content"
          android:layout_marginRight="15dp"
          android:src="@drawable/ic_mobile_flag"/>
        <EditText
          android:id="@+id/et_mobile"
          android:layout_width="0dp"
          android:layout_height="match_parent"
          android:layout_weight="1"
          android:background="@null"
          android:hint="请输入用户名"
          android:inputType="textVisiblePassword"
          android:maxLength="11"
          android:singleLine="true"
          android:text=""
          android:textColor="@color/_9"
          android:textColorHint="@color/_9"
          android:textSize="14dp"/>
        <ImageView
          android:id="@+id/iv_clean_phone"
          android:layout_width="40dp"
          android:layout_height="fill_parent"
          android:scaleType="centerInside"
          android:src="@drawable/ic_clear"
          android:visibility="gone"/>
      </LinearLayout>
      <View
        android:layout_width="match_parent"
        android:layout_height="1px"
        android:background="@color/e"/>
      <LinearLayout
        android:layout_width="match_parent"
        android:layout_height="55dp"
        android:gravity="center_vertical"
        android:orientation="horizontal"
        android:paddingLeft="13dp">
        <ImageView
          android:layout_width="wrap_content"
          android:layout_height="wrap_content"
          android:layout_marginRight="15dp"
          android:src="@drawable/ic_password_flag"/>
        <EditText
          android:id="@+id/et_password"
          android:layout_width="0dp"
          android:layout_height="match_parent"
          android:layout_weight="1"
          android:background="@null"
          android:hint="请输入密码"
          android:inputType="textPassword"
          android:maxLength="30"
          android:singleLine="true"
          android:text=""
          android:textColor="@color/_9"
          android:textColorHint="@color/_9"
          android:textSize="14dp"/>
        <ImageView
          android:id="@+id/clean_password"
          android:layout_width="40dp"
          android:layout_height="fill_parent"
          android:scaleType="centerInside"
          android:src="@drawable/ic_clear"
          android:visibility="gone"/>
        <ImageView
          android:id="@+id/iv_show_pwd"
          android:layout_width="40dp"
          android:layout_height="fill_parent"
          android:scaleType="centerInside"
          android:src="@drawable/pass_gone"/>
      </LinearLayout>
      <View
        android:layout_width="match_parent"
        android:layout_height="1px"
        android:background="@color/e"/>
      <Button
        android:id="@+id/btn_login"
        android:layout_width="match_parent"
        android:layout_height="45dp"
        android:layout_marginBottom="10dp"
        android:layout_marginTop="21dp"
        android:background="@drawable/bg_btn_login_selected"
        android:text="@string/login"
        android:textColor="@color/white"
        android:textSize="18dp"/>
      <LinearLayout
        android:layout_width="match_parent"
        android:layout_height="wrap_content"
        android:orientation="horizontal">
        <TextView
          android:id="@+id/regist"
          android:layout_width="wrap_content"
          android:layout_height="wrap_content"
          android:layout_gravity="right"
          android:layout_marginBottom="10dp"
          android:layout_weight="1"
          android:text="注册新用户"
          android:textColor="#b0b8b2"
          android:textSize="14dp"/>
        <TextView
          android:id="@+id/forget_password"
          android:layout_width="wrap_content"
          android:layout_height="wrap_content"
          android:layout_gravity="right"
          android:layout_marginBottom="10dp"
          android:layout_marginLeft="21dp"
          android:text="@string/login_forget_pwd"
          android:textColor="#b0b8b2"
          android:textSize="14dp"/>
      </LinearLayout>
    </LinearLayout>
  </ScrollView>
  <LinearLayout
    android:id="@+id/service"
    android:layout_width="match_parent"
    android:layout_height="wrap_content"
    android:layout_alignParentBottom="true"
    android:layout_centerHorizontal="true"
    android:gravity="center"
    android:orientation="horizontal"
    android:padding="10dp">
    <TextView
      android:layout_width="wrap_content"
      android:layout_height="wrap_content"
      android:layout_gravity="right"
      android:text="联系客服"
      android:textColor="#b0b8b2"
      android:textSize="14dp"/>
    <View
      android:layout_width="1dp"
      android:layout_height="match_parent"
      android:layout_marginLeft="10dp"
      android:layout_marginRight="10dp"
      android:background="@color/e"/>
    <TextView
      android:layout_width="wrap_content"
      android:layout_height="wrap_content"
      android:layout_gravity="right"
      android:text="关于我们"
      android:textColor="#b0b8b2"
      android:textSize="14dp"/>
  </LinearLayout>
</RelativeLayout>
然后java代码是,
private int screenHeight = 0;//屏幕高度
private int keyHeight = 0; //软件盘弹起后所占高度
private float scale = 0.6f; //logo缩放比例
private int height = 0;
private void initView() {
  screenHeight = this.getResources().getDisplayMetrics().heightPixels; //获取屏幕高度
  keyHeight = screenHeight / 3;//弹起高度为屏幕高度的1/3
}
/**
 * 禁止键盘弹起的时候可以滚动
 */
mScrollView.setOnTouchListener(new View.OnTouchListener() {
  @Override
  public boolean onTouch(View v, MotionEvent event) {
    return true;
  }
});
mScrollView.addOnLayoutChangeListener(new ViewGroup.OnLayoutChangeListener() {
  @Override
  public void onLayoutChange(View v, int left, int top, int right, int bottom, int oldLeft, int oldTop, int oldRight, int oldBottom) {
   /* old是改变前的左上右下坐标点值,没有old的是改变后的左上右下坐标点值
   现在认为只要控件将Activity向上推的高度超过了1/3屏幕高,就认为软键盘弹起*/
    if (oldBottom != 0 && bottom != 0 && (oldBottom - bottom > keyHeight)) {
      Log.e("wenzhihao", "up------>" + (oldBottom - bottom));
      int dist = mContent.getBottom() - bottom;
      if (dist > 0) {
        ObjectAnimator mAnimatorTranslateY = ObjectAnimator.ofFloat(mContent, "translationY", 0.0f, -dist);
        mAnimatorTranslateY.setDuration(300);
        mAnimatorTranslateY.setInterpolator(new LinearInterpolator());
        mAnimatorTranslateY.start();
        RxAnimationUtils.zoomIn(mLogo, 0.6f, dist);
      }
    } else if (oldBottom != 0 && bottom != 0 && (bottom - oldBottom > keyHeight)) {
      Log.e("wenzhihao", "down------>" + (bottom - oldBottom));
      if ((mContent.getBottom() - oldBottom) > 0) {
        ObjectAnimator mAnimatorTranslateY = ObjectAnimator.ofFloat(mContent, "translationY", mContent.getTranslationY(), 0);
        mAnimatorTranslateY.setDuration(300);
        mAnimatorTranslateY.setInterpolator(new LinearInterpolator());
        mAnimatorTranslateY.start();
        //键盘收回后,logo恢复原来大小,位置同样回到初始位置
        RxAnimationUtils.zoomOut(mLogo, 0.6f);
      }
    }
  }
});
mBtnLogin.setOnClickListener(new View.OnClickListener() {
  @Override
  public void onClick(View v) {
    RxKeyboardUtils.hideSoftInput(mContext);
  }
});
/**
 * 缩小
 *
 * @param view
 */
public static void zoomIn(final View view, float scale, float dist) {
  view.setPivotY(view.getHeight());
  view.setPivotX(view.getWidth() / 2);
  AnimatorSet mAnimatorSet = new AnimatorSet();
  ObjectAnimator mAnimatorScaleX = ObjectAnimator.ofFloat(view, "scaleX", 1.0f, scale);
  ObjectAnimator mAnimatorScaleY = ObjectAnimator.ofFloat(view, "scaleY", 1.0f, scale);
  ObjectAnimator mAnimatorTranslateY = ObjectAnimator.ofFloat(view, "translationY", 0.0f, -dist);
  mAnimatorSet.play(mAnimatorTranslateY).with(mAnimatorScaleX);
  mAnimatorSet.play(mAnimatorScaleX).with(mAnimatorScaleY);
  mAnimatorSet.setDuration(300);
  mAnimatorSet.start();
}
/**
 * f放大
 *
 * @param view
 */
public static void zoomOut(final View view, float scale) {
  view.setPivotY(view.getHeight());
  view.setPivotX(view.getWidth() / 2);
  AnimatorSet mAnimatorSet = new AnimatorSet();
  ObjectAnimator mAnimatorScaleX = ObjectAnimator.ofFloat(view, "scaleX", scale, 1.0f);
  ObjectAnimator mAnimatorScaleY = ObjectAnimator.ofFloat(view, "scaleY", scale, 1.0f);
  ObjectAnimator mAnimatorTranslateY = ObjectAnimator.ofFloat(view, "translationY", view.getTranslationY(), 0);
  mAnimatorSet.play(mAnimatorTranslateY).with(mAnimatorScaleX);
  mAnimatorSet.play(mAnimatorScaleX).with(mAnimatorScaleY);
  mAnimatorSet.setDuration(300);
  mAnimatorSet.start();
}
这段代码大体就是这么实现的,动态处理sroll向上滚动问题,logo动态缩小即可解决
总结
以上所述是小编给大家介绍的Android实现输入法弹出时把布局顶上去和登录按钮顶上去的解决方法,希望对大家有所帮助,如果大家有任何疑问请给我留言,小编会及时回复大家的。在此也非常感谢大家对我们网站的支持!

