ASP.NET MVC实现横向展示购物车
通常,我们看到的购物车是这样的:
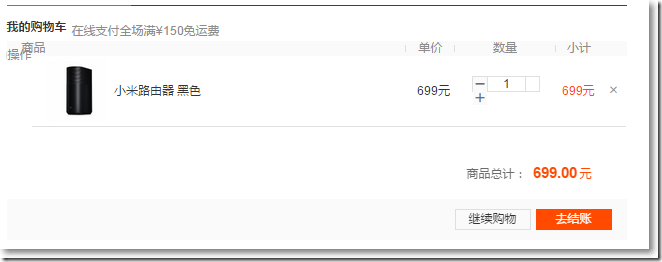
虽然这种购物车显示方式被广泛运用,但我个人觉得不够直观。如果换成这样呢?

本篇的源码放在了:https://github.com/darrenji/ShoppingCartInMVC
以上购物车页能实现的效果包括:
1、购物车明细:显示订购数量、总金额,清空购物车。
2、购物车内产品:数量可调整,对应的小计和总计动态变化。点击移除按钮移除该产品。
3、继续购物按钮:点击左下角的继续购物按钮,回到先前页。
4、使用了Bootstrap, 页面元素自适应,页面宽度调小时,页面布局动态变化。
5、每行放置4个产品,且允许高度不一致,第5个产品另起一行,且不会float到上一行的空白区域,如下图。

首先,有关产品的类。
    public class Product
    {
        public int Id { get; set; }
        public string Name { get; set; }
        public string ImageUrl { get; set; }
        public string Description { get; set; }
        public decimal Price { get; set; }
    }
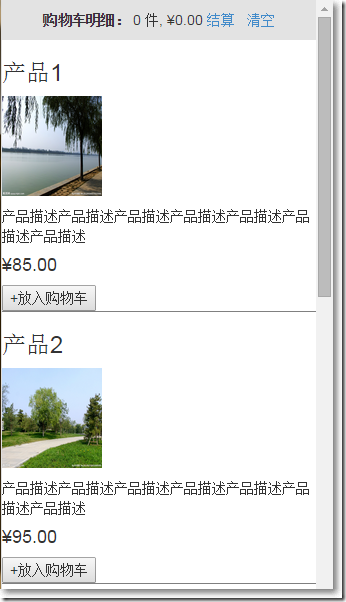
产品选购页如图:
以上,产品选购页是一个有关Product集合的强类型视图页,其对应的Model为:
    public class ProductsListVm
    {
        public ProductsListVm()
        {
            this.Products = new List<Product>();
        }
        public IEnumerable<Product> Products { get; set; }
    }
想像一下,我们在超市购物,在购物车内放着不同的商品对应不同的数量,在这里,可以把商品和数量抽象成一个类:
    public class CartLine
    {
        public Product Product { get; set; }
        public int Quantity { get; set; }
    }
而购物车类实际上就是维护着这个CartLine集合,需要提供添加、移除、计算购物车总价、清空购物车等方法,并提供一个获取到CartLine集合的属性,另外,针对点击购物车页上的增量和减量按钮,也要提供相应的方法。
    public class Cart
    {
        private List<CartLine> lineCollection = new List<CartLine>();
        //添加
        public void AddItem(Product product, int quantity)
        {
            CartLine line = lineCollection.Where(p => p.Product.Id == product.Id).FirstOrDefault();
            if (line == null)
            {
                lineCollection.Add(new CartLine(){Product = product, Quantity = quantity});
            }
            else
            {
                line.Quantity += quantity;
            }
        }
        //点击数量+号或点击数量-号或自己输入一个值
        public void IncreaseOrDecreaseOne(Product product, int quantity)
        {
            CartLine line = lineCollection.Where(p => p.Product.Id == product.Id).FirstOrDefault();
            if (line != null)
            {
                line.Quantity = quantity;
            }
        }
        //移除
        public void RemoveLine(Product product)
        {
            lineCollection.RemoveAll(p => p.Product.Id == product.Id);
        }
        //计算总价
        public decimal ComputeTotalPrice()
        {
            return lineCollection.Sum(p => p.Product.Price*p.Quantity);
        }
        //清空
        public void Clear()
        {
            lineCollection.Clear();
        }
        //获取
        public IEnumerable<CartLine> Lines
        {
            get { return lineCollection; }
        }
    }
购物车页自然就是针对Cart类的一个强类型视图页,嗯,等等,购物车页还需要记录下上一个页面的url,于是,考虑到把Cart类和记录上一个页面url这2个因素,针对购物车页,给出这样的一个Model:
    public class CartIndexVm
    {
        public Cart Cart { get; set; }
        public string ReturnUrl { get; set; }
    }
在HomeController中,需要用到购物车的实例,可以这样写:
private Cart GetCart()
{
    Cart cart = (Cart)Session["Cart"];
    if (cart == null)
    {
        cart = new Cart();
        Session["Cart"] = cart;
    }
    return cart;
}
Cart实例保存到Session中,并从Session中获取。当然,也可以放到ASP.NET MVC绑定机制中,需要做的就是实现IModelBinder接口。
    public class CartModelBinder : IModelBinder
    {
        private const string sessionKey = "Cart";
        public object BindModel(ControllerContext controllerContext, ModelBindingContext bindingContext)
        {
            Cart cart = (Cart)controllerContext.HttpContext.Session[sessionKey];
            if (cart == null)
            {
                cart = new Cart();
                controllerContext.HttpContext.Session[sessionKey] = cart;
            }
            return cart;
        }
    }
自定义的ModelBinder需要在全局中注册。
    public class MvcApplication : System.Web.HttpApplication
    {
        protected void Application_Start()
        {
            AreaRegistration.RegisterAllAreas();
            ......
            ModelBinders.Binders.Add(typeof(Cart), new CartModelBinder());
        }
    }
在Home控制器中,首先提供了一个返回Product集合的方法。
        private List<Product> GetAllProducts()
        {
            return new List<Product>()
            {
                new Product(){Id = 1, Description = "产品描述产品描述产品描述产品描述产品描述产品描述产品描述",ImageUrl = "/images/1.jpg",Name = "产品1",Price = 85M},
                new Product(){Id = 2, Description = "产品描述产品描述产品描述产品描述产品描述产品描述产品描述",ImageUrl = "/images/2.jpg",Name = "产品2",Price = 95M},
                new Product(){Id = 3, Description = "产品描述产品描述产品描述",ImageUrl = "/images/2.jpg",Name = "产品3",Price = 55M},
                new Product(){Id = 4, Description = "产品描述产品描述产品描述产品描述产品描述产品描述产品描述",ImageUrl = "/images/1.jpg",Name = "产品4",Price = 65M},
                new Product(){Id = 5, Description = "产品描述产品描述产品描述产品描述产品描述产品描述产品描述",ImageUrl = "/images/2.jpg",Name = "产品5",Price = 75M}
            };
        }
在HomeController中,有关产品选购页的如下:
        //产品选购页
        public ActionResult Index()
        {
            ProductsListVm productsListVm = new ProductsListVm();
            productsListVm.Products = GetAllProducts();
            return View(productsListVm);
        }
Homme/Index.cshtml是一个ProductsListVm的强类型视图页。
@model MvcApplication1.Models.ProductsListVm
@{
    ViewBag.Title = "Index";
    Layout = "~/Views/Shared/_Layout.cshtml";
}
<style type="text/css">
    .item {
        border-bottom: solid 1px gray;
    }
</style>
<div class="container">
    <div class="row">
        @foreach (var item in Model.Products)
        {
            Html.RenderPartial("ProductSummary", item);
        }
    </div>
</div>
其中,遍历Product集合的时候,又去加载Views/Shared/ProductSummary.cshtml这个强类型部分视图。
@model MvcApplication1.Models.Product
<div class="item">
    <h3>@Model.Name</h3>
    <p><img src="@Model.ImageUrl" style="width: 100px;height: 100px;"/></p>
    <p>@Model.Description</p>
    <h4>@Model.Price.ToString("c")</h4>
    @using (Html.BeginForm("AddToCart", "Home"))
    {
        @Html.HiddenFor(p => p.Id)
        @Html.Hidden("returnUrl", Request.Url.PathAndQuery)
        <input type="submit" value="+放入购物车"/>
    }
</div>
点击"+放入购物车"按钮,调用HomeController中的AddToCart方法,并且需要把选购产品页的url以query string的形式传递给控制器方法。
        //购物车页
        public ActionResult CartIndex(Cart cart, string returnUrl)
        {
            return View(new CartIndexVm
            {
                Cart = cart,
                ReturnUrl = returnUrl
            });
        }
        //添加到购物车
        public ActionResult AddToCart(Cart cart, int id, string returnUrl)
        {
            Product product = GetAllProducts().Where(p => p.Id == id).FirstOrDefault();
            if (product != null)
            {
                cart.AddItem(product, 1);
            }
            return RedirectToAction("CartIndex", new {returnUrl});
        }
购物车页Home/CartIndex.cshtml是一个CartIndexVm的强类型视图页。
@model MvcApplication1.Models.CartIndexVm
@{
    ViewBag.Title = "CartIndex";
    Layout = "~/Views/Shared/_Layout.cshtml";
}
@section styles
{
    <link href="~/Content/shopitem.css" rel="external nofollow"  rel="stylesheet" />
    <link href="~/Content/jquery.bootstrap-touchspin.min.css" rel="external nofollow"  rel="stylesheet" />
}
<div class="container">
    <div class="row">
      @for (int i = 0; i < Model.Cart.Lines.Count(); i++)
      {
          var item = (Model.Cart.Lines.ToList())[i];
          if (i != 0 && i%4 == 0) //每行有4个div
          {
              <div style="clear:both;"></div>
          }

          <div class="col-md-3 column productbox">

                <img src="@item.Product.ImageUrl" style="width: 460px; height: 250px;" class="img-responsive">
                <div class="producttitle">
                    <div class="productname">@item.Product.Name</div>
                    <div class="productdes">@item.Product.Description</div>
                    <div>
                        <table>
                            <tr>
                                <td style="width:50px;">单价:</td>
                                <td>@item.Product.Price</td>
                            </tr>
                            <tr>
                                <td>数量:</td>
                                <td>
                                    <input class="demo2" type="text" value="@item.Quantity" name="demo2" />
                                </td>
                            </tr>
                            <tr>
                                <td>小计:</td>
                                <td>@((item.Quantity * item.Product.Price).ToString("c"))</td>
                            </tr>
                        </table>
                    </div>
                </div>
                <div class="productprice">
                    <div class="text-center">
                        @using (Html.BeginForm("RemoveFromCart", "Home"))
                        {
                            @Html.Hidden("Id", item.Product.Id)
                            @Html.HiddenFor(x => x.ReturnUrl)
                            <input class="btn btn-default btn-sm" type="submit" value="移除"/>
                            <a href="#" rel="external nofollow"  class="btn btn-danger btn-sm" role="button">查看</a>
                        }

                    </div>
                </div>
            </div>
      }

    </div>
</div>
<hr/>
<div class="container">
    <div class="row">
        <div class="text-center" style="font-size: 55px;font-weight: bold;color: red;">
           <span>总计:</span> @Model.Cart.ComputeTotalPrice().ToString("c")
        </div>
        <p align="left" class="actionButtons" style="width: 100%; clear: both">
            <a href="@Model.ReturnUrl" rel="external nofollow" >继续购物</a>
        </p>
    </div>
</div>
@section scripts
{
    <script src="~/Scripts/jquery.bootstrap-touchspin.min.js"></script>
    <script type="text/javascript">
        $(function () {
            var i = $("input[class='demo2']");
            i.TouchSpin({
                min: 1,
                max: 100,
                step: 1//增量或减量
            });
            i.on("touchspin.on.stopupspin", function () {
                $.post('@Url.Action("IncreaseOrDecreaseOne", "Home")', { "id": $(this).closest("div.productbox").find('#Id').val(), "quantity": $(this).val() }, function (data) {
                    if (data.msg) {
                        location.reload();
                    }
                });
                //var temp = $(this).val();
                //alert(temp);
                //var temp = $(this).closest("div.productbox").find('#Id').val();
                //alert(temp);
            });
            i.on("touchspin.on.stopdownspin", function () {
                $.post('@Url.Action("IncreaseOrDecreaseOne", "Home")', { "id": $(this).closest("div.productbox").find('#Id').val(), "quantity": $(this).val() }, function (data) {
                    if (data.msg) {
                        location.reload();
                    }
                });
            });
        });
    </script>
}
在购物车页,用了Bootstrap TouchSpin这款插件,点击其中的数量的增量和减量按钮,就向Home控制器中的IncreaseOrDecreaseOne方法发送一个异步post请求,得到返回数据刷新购物车页。
       //点击数量+号或点击数量-号或自己输入一个值
        [HttpPost]
        public ActionResult IncreaseOrDecreaseOne(Cart cart, int id, int quantity)
        {
            Product product = GetAllProducts().Where(p => p.Id == id).FirstOrDefault();
            if (product != null)
            {
                cart.IncreaseOrDecreaseOne(product, quantity);
            }
            return Json(new
            {
                msg = true
            });
        }
在购车页,点击"移除"按钮,就向Home控制器的RemoveFromCart方法提交表单。
        //从购物车移除
        public ActionResult RemoveFromCart(Cart cart, int id, string returnUrl)
        {
            Product product = GetAllProducts().Where(p => p.Id == id).FirstOrDefault();
            if (product != null)
            {
                cart.RemoveLine(product);
            }
            return RedirectToAction("CartIndex", new {returnUrl});
        }
购物车摘要是通过在Views/Shared/_Layout.cshtml中加载部分视图而来。
<head>
    <meta charset="utf-8" />
    <meta name="viewport" content="width=device-width" />
    <title>@ViewBag.Title</title>
    @Styles.Render("~/Content/css")
    <link href="~/bootstrap/css/bootstrap.min.css" rel="external nofollow"  rel="stylesheet" />
    @RenderSection("styles", required: false)
    @Scripts.Render("~/bundles/jquery")
    <script src="~/bootstrap/js/bootstrap.min.js"></script>
</head>
<body>
    @{Html.RenderAction("Summary", "Home");}
    @RenderBody()
    @RenderSection("scripts", required: false)
</body>
在Home控制器中,对应的Summary方法为:
        //清空购物车
        public ActionResult EmptyCart(Cart cart, string returnUrl)
        {
            cart.Clear();
            return View("Index",new ProductsListVm{Products = GetAllProducts()});
        }
        //显示购物车摘要
        public ActionResult Summary(Cart cart)
        {
            return View(cart);
        }
Home/Summary.cshtml是一个有关Cart的强类型部分视图:
@model MvcApplication1.Models.Cart
@{
Layout = null;
}
<div id="cart" style="background-color: #e3e3e3;padding: 10px; text-align:center;">
<span class="caption">
<b>购物车明细:</b>
@if (Model != null)
{
@Model.Lines.Sum(x => x.Quantity) <span>件,</span>
@Model.ComputeTotalPrice().ToString("c")
}
</span>
@Html.ActionLink("结算", "CartIndex", "Home", new {returnUrl = Request.Url.PathAndQuery}, null)
@Html.ActionLink("清空", "EmptyCart", "Home", new {returnUrl = Request.Url.PathAndQuery}, null)
</div>
注意:需要把Layout设置为null,否则会报错,因为产品选购页和购物车摘要同时加载Views/Shared/_Layout.cshtml就反复调用了。
到此这篇关于ASP.NET MVC实现横向展示购物车的文章就介绍到这了。希望对大家的学习有所帮助,也希望大家多多支持我们。
相关推荐
-

ASP.NET购物车实现过程详解
1. 将test数据库附加到数据库管理系统中:数据库中的book_info包含下列数据: 2. 新建一个网站,将images文件夹复制到网站中: 3. 在Default.aspx中,通过DataList控件展示数据库中的所有数据,以行为主序,每行3列,单击购买按钮时,将商品的ID和数量保存到HashTable中,并将HashTable放置到Session中. protected void DataList1_ItemCommand(object source, DataListCommandEv
-
asp.net 购物车的实现浅析
该购物车的功能如下: . 通过ajax实现添加和删除车上的物品. . 删除的物品会显示出来,可以重新添加到购物车. . 嗯...没有了,具体大家接着看吧. 购物车的结构我打算用一个table来展示,在UserControl里使用ListView展现购物车的物品(因为比拼接字符串要容易维护的多).具体代码如下(ShopCartTest.ascx): 复制代码 代码如下: <asp:ListView ID="ListView1" runat="server">
-
asp.net基于session实现购物车的方法
本文实例讲述了asp.net基于session实现购物车的方法.分享给大家供大家参考,具体如下: //加入购物车 protected void LinkButton2_Click(object sender, EventArgs e) { DataTable dt = null; //用户购买商品 如果 没有登录 则提示登录 if (Session["userName"] == null) { Common.MessageBox.ShowAndRedirectTo(this.Page,
-
asp.net 购物车实现详细代码
<%@ Page language="c#" Codebehind="shoppingcart.aspx.cs" AutoEventWireup="false" Inherits="myshop.shoppingcart" %><!DOCTYPE HTML PUBLIC "-//W3C//DTD HTML 4.0 Transitional//EN" ><HTML> <
-
asp.net基于HashTable实现购物车的方法
本文实例讲述了asp.net基于HashTable实现购物车的方法.分享给大家供大家参考,具体如下: //用户购买商品时 if (e.CommandName.ToLower() == "buy") { //判断用户购物车是否为空 如果为空则分配一个 Hashtable table; if (Session["car"] == null) { table = new Hashtable(); } else { //用户购物车己存在 则取出数据 table = Sess
-
ASP.NET MVC实现横向展示购物车
通常,我们看到的购物车是这样的: 虽然这种购物车显示方式被广泛运用,但我个人觉得不够直观.如果换成这样呢? 本篇的源码放在了:https://github.com/darrenji/ShoppingCartInMVC 以上购物车页能实现的效果包括:1.购物车明细:显示订购数量.总金额,清空购物车.2.购物车内产品:数量可调整,对应的小计和总计动态变化.点击移除按钮移除该产品.3.继续购物按钮:点击左下角的继续购物按钮,回到先前页.4.使用了Bootstrap, 页面元素自适应,页面宽度调小时,页
-
ASP.NET MVC下自定义错误页和展示错误页的方式
在网站运行中,错误是不可避免的,错误页的产生也是不可缺少的. 这几天看了博友的很多文章,自己想总结下我从中学到的和实际中配置的. 首先,需要知道产生错误页的来源,一种是我们的.NET平台抛出的,一种是网站所依赖的宿主抛出的,一般来讲我们所依赖的宿主就是IIS了. IIS中的错误页入口: 其中的错误码想必并不陌生 这里是在服务器上找不到所需资源时抛出的错误页,在这里可以设置需要展示的错误页面,只需将预定的错误页面加入服务器中,然后在指定状态码下配置路径即可. 这是请求在IIS中时,还未完全进入到a
-
ASP.NET MVC使用Boostrap实现产品展示、查询、排序、分页
在产品展示中,通常涉及产品的展示方式.查询.排序.分页,本篇就在ASP.NET MVC下,使用Boostrap来实现. 源码放在了GitHub: https://github.com/darrenji/ProductsSearchSortPage 先上效果图: 最上面是搜索和排序,每次点击搜索条件.排序,或者删除搜索条件都会触发异步加载. 中间部分为产品展示,提供了列表和格子这2种显示方式. 最下方为分页. 能实现的功能包括: 点击某一个搜索条件,该搜索条件被选中,选中项以标签的形式显示到"搜索
-
ASP.NET MVC实现仪表程序
在大多数情况下,我们的Web程序不仅仅需要给用户提供具体数据,在一些情况下,我们还需要给高级的用户或管理者提供数据汇总和分析图表之类的功能. 如果我们不想显示一大堆烦心的数据,希望通过饼图或条形图来直观地显示数据,这是我们可以考虑使用图表控件显示. 在接下来的文章中,我们将向大家介绍数据仪表板程序的实现. 之前有一篇文章关于StackOverflow上的编程趋势,它通过条形和区域图,向我们展示了Stackoverflow上的热门的问题标签. 图1 Stackoverflow的热门标签 通过上图,
-
ASP.NET Mvc开发之删除修改数据
之前那篇文章介绍了ASP.NET MVC使用EF来查询数据和EF中DbQuery<T>泛型对象对数据的延迟加载.今天我们就来看看我们怎么使用EF来删除数据. 其实现在的Web开发通用的模式就是前端使用Js和JQuery来和后端进行数据交互.那么我们就在前端来加两个删除和更新的脚本.代码如下: <!--遍历 Action方法 设置给 ViewData 的集合数据,生成HTML代码--> @foreach (BlogArticle a in ViewData["DataLis
-
ASP.NET MVC中使用Bundle打包压缩js和css的方法
在ASP.NET MVC4中(在WebForm中应该也有),有一个叫做Bundle的东西,它用来将js和css进行压缩(多个文件可以打包成一个文件),并且可以区分调试和非调试,在调试时不进行压缩,以原始方式显示出来,以方便查找问题. 具体优势可自行百度或参看官方介绍:http://www.asp.net/mvc/tutorials/mvc-4/bundling-and-minification 这里仅简单记录下如何使用. 首先,如果是使用的ASP.NET MVC4基本或者其他内容更丰富的模板,B
-
利用ASP.NET MVC和Bootstrap快速搭建响应式个人博客站(一)
1.0 为什么要做这个博客站? 在工作学习中,经常要搜索查找各种各样的资料,每次找到相关资料后都会顺手添加到浏览器书签中,时间一长,书签也就满了.而且下次再点击这个书签时,可能就会忘记当时为什么要添加这个书签了,更有可能书签连接已经无效.这样一来,也就不方便自己查阅了.如果转载.收藏到自己的博客园账号中.CSDN账号中,我们中,知乎中等等,依然是很凌乱,不方便下次查阅. 因此,我下决心开发一个个人技术博客站.主要原因是:可以整合各种宝贵资源,将知识变为宝库:可以借此巩固加强一下自己的"全栈&qu
-
利用ASP.NET MVC和Bootstrap快速搭建个人博客之后台dataTable数据列表
jQuery dataTables 插件是一个优秀的表格插件,是后台工程师的福音!它提供了针对数据表格的排序.浏览器分页.服务器分页.查询.格式化等功能.dataTables 官网也提供了大量的演示和详细的文档进行说明,为了方便使用,这里进行详细说明. 去官网:https://www.datatables.net/ 下载最新版本是v1.10.12. 在页面引入: <link rel="stylesheet" href="~/Content_Admin/css/boots
-
ASP.NET MVC下Bundle的使用方法
ASP.NET MVC中Bundle是用于打包捆绑资源的(一般是css和js),它是在全局文件Global.asax.cs中注册Bundle,而注册的具体实现默认是在App_Start文件夹的BundleConfig.cs中 public class MvcApplication : System.Web.HttpApplication { protected void Application_Start() { AreaRegistration.RegisterAllAreas(); Filt
-
使用asp.net mvc,boostrap及knockout.js开发微信自定义菜单编辑工具(推荐)
前言 微信的接口调试工具可以编辑自定义菜单,不过是提交json格式数据创建菜单,非常的不方便还容易出错.网上的工具不好用,所以就自己写了一个. 正文 先用bootstrap排个页面框架出来,调用自定义菜单接口需要用到AccessToken,放个输入框输入AccessToken.也不排除想直接输入AppId和AppSecret来获取AccessToken的用户,所以还需要下拉菜单来选择是输入AccessToken还是直接获取AccessToken.为了兼顾微信企业号应用创建菜单还需要AgentId