Centos 6中编译配置httpd2.4的多种方法详解
前言
我们使用linux的过程中,一定会用到httpd这个服务,在centos7上,默认安装的httpd就是2.4版本,大家都知道,2.4版本相对之前的版本已经做了改进,用起来更加方便,但是我们的centos6上,默认安装的版本是2.2,那么,如果我们想要在centos6上安装httpd2.4版本的话,我们要如何做呢?
本文中,小编会给大家介绍两种方法,来实现在centos6上编译安装httpd2.4版本。
方法一 分别编译法
1、下载源码并解压缩
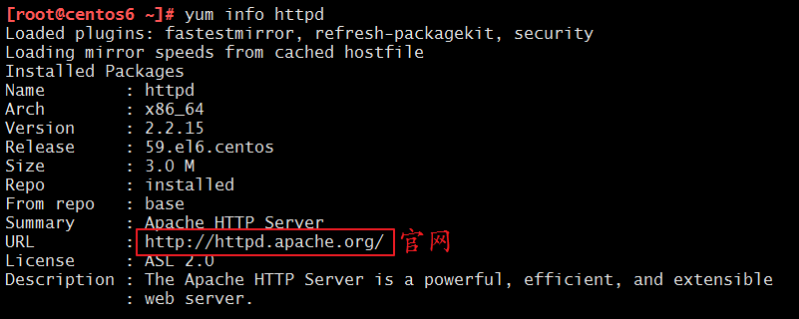
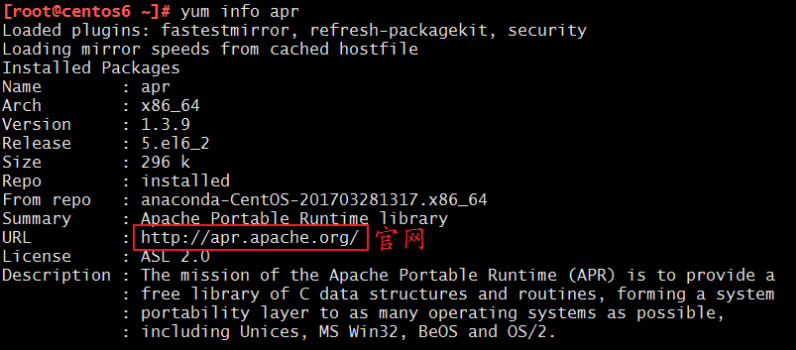
我们可以使用yum info httpd和yum info apr来查看这两个服务的官网,然后我们去官网下载最新的稳定版本:


下面附上官网地址:
httpd官网:http://httpd.apache.org/
apr官网:http://apr.apache.org/
我们可以去官网下载最新的稳定版本,这里,小编下载的是apr-1.6.2.tar.gz,apr-util-1.6.0.tar.gz,httpd-2.4.28.tar.bz2,接下来的实验,就以小编下载的版本为示范,给大家演示如何安装。
我们使用rz命令,将我们下载好的源码包上传至我们的centos6虚拟机,我们可以查看一下:
[root@centos6 temp]# ll
total 8004
-rw-r--r-- 1 root root 1071074 Sep 29 12:27 apr-1.6.2.tar.gz
-rw-r--r-- 1 root root 565507 Sep 29 12:27 apr-util-1.6.0.tar.gz
-rw-r--r-- 1 root root 6553163 Oct 15 12:35 httpd-2.4.28.tar.bz2
接下来就是解压缩:
tar xvf httpd-2.4.28.tar.bz2
tar xvf apr-util-1.6.0.tar.gz
tar xvf apr-1.6.2.tar.gz
解压缩以后,我们照例查看一下:
[root@centos6 temp]# ls
apr-1.6.2 apr-1.6.2.tar.gz apr-util-1.6.0
apr-util-1.6.0.tar.gz httpd-2.4.28 httpd-2.4.28.tar.bz2
我们发现,现在已经有了三个文件夹,该步骤完成。
2、安装所依赖的包组
在编译安装开始之前,我们要先把所依赖的包组安装上,不然在接下来的编译安装过程中会出错。
安装命令如下:
yum groupinstall "development tools" -y
yum install pcre-devel -y
yum install openssl-devel -y
yum install expat-devel -y
安装成功后,我们就可以对apr的分别编译了。
3、编译安装apr-1.6.2
我们对apr-1.6.2进行编译安装,首先要保证我们所有的操作都是在该文件夹内进行的!
首先,我们进入目录
[root@centos6 temp]# cd apr-1.6.2/
[root@centos6 apr-1.6.2]# ls
apr-config.in CMakeLists.txt libapr.mak poll
apr.dep  config.layout libapr.rc random
apr.dsp  configure LICENSE README
apr.dsw  configure.in locks  README.cmake
apr.mak  docs  Makefile.in shmem
apr.pc.in  dso  Makefile.win strings
apr.spec  emacs-mode memory  support
atomic  encoding misc  tables
build  file_io  mmap  test
buildconf  helpers  network_io threadproc
build.conf include  NOTICE  time
build-outputs.mk libapr.dep NWGNUmakefile tools
CHANGES  libapr.dsp passwd  user
然后我们对其进行编译安装即可:
[root@centos6 apr-1.6.2]# ./configure --prefix=/app/apr
[root@centos6 apr-1.6.2]# make && make install
编译的命令很简单,只需要指定一个目录,要记住这个目录0.0,接下来我们还会用到。
编译安装完成后,我们来查看一下/app目录,看是不是已经生成了apr这个文件夹:
[root@centos6 apr-1.6.2]# ls /app/
apr
可以看到已经有了这个文件夹,所以这一步骤我们完成。
4、编译安装apr-util-1.6.0
跟上一步骤很是相似,但是有一个需要注意的地方就是,编译apr-util-1.6.0的时候,需要依赖apr-1.6.2包,所以还要跟上apr-1.6.2的目录。下面我们就来说说具体操作。
首先,我们还是也要进入该目录下:
[root@centos6 temp]# cd apr-util-1.6.0
[root@centos6 apr-util-1.6.0]# ls
aprutil.dep configure.in Makefile.win
aprutil.dsp crypto  memcache
aprutil.dsw dbd  misc
aprutil.mak dbm  NOTICE
apr-util.pc.in docs  NWGNUmakefile
apr-util.spec encoding  README
apu-config.in export_vars.sh.in README.cmake
buckets  hooks  README.FREETDS
build  include  redis
buildconf  ldap  renames_pending
build.conf libaprutil.dep strmatch
build-outputs.mk libaprutil.dsp test
CHANGES  libaprutil.mak uri
CMakeLists.txt libaprutil.rc xlate
config.layout LICENSE  xml
configure  Makefile.in
接着,我们就可以对它进行编译安装了,注意,编译时的代码与刚刚略有不同,需要加上apr-1.6.2的目录:
[root@centos6 apr-util-1.6.0]# ./configure --prefix=/app/apr-util --with-apr=/app/apr/
[root@centos6 apr-util-1.6.0]# make && make install
编译的命令很简单,只需要指定一个目录,要记住这个目录0.0,接下来我们还会用到。
编译安装完成后,我们来查看一下/app目录,看是不是已经生成了apr-util这个文件夹:
[root@centos6 apr-1.6.2]# ls /app/
apr apr-util
可以看到已经有了这个文件夹,所以这一步骤我们完成。
5、编译安装httpd-2.4
同样的,首先我们要进入这个目录:
[root@centos6 temp]# cd httpd-2.4.28/
[root@centos6 httpd-2.4.28]# ls
ABOUT_APACHE docs  Makefile.win
acinclude.m4 emacs-style modules
Apache-apr2.dsw httpd.dep NOTICE
Apache.dsw httpd.dsp NWGNUmakefile
apache_probes.d httpd.mak os
ap.d  httpd.spec README
build  include  README.cmake
BuildAll.dsp INSTALL  README.platforms
BuildBin.dsp InstallBin.dsp ROADMAP
buildconf LAYOUT  server
CHANGES  libhttpd.dep srclib
CMakeLists.txt libhttpd.dsp support
config.layout libhttpd.mak test
configure LICENSE  VERSIONING
configure.in Makefile.in
接着,我们就进行编译安装,编译的命令有些长,大家写的时候要注意不要少写了东西,不然就会报错报错报错!或者就像小编这样,把代码分行写,但是一定要加\符号才可以诺。
[root@centos6 httpd-2.4.28]#./configure --prefix=/app/httpd24 \
> --enable-so \
> --enable-ssl \
> --enable-cgi \
> --enable-rewrite \
> --with-zlib \
> --with-pcre \
> --with-apr=/app/apr/ \
> --with-apr-util=/app/apr-util/ \
> --enable-modules=most \
> --enable-mpms-shared=all \
> --with-mpm=prefork
[root@centos6 httpd-2.4.28]# make && make install
至此,编译安装的步骤全部结束。我们可以来测试了
6、测试并进行配置
首先,我们先来查看一下,我们的80端口是否处于没有开启的状态:
[root@centos6 ~]# ss -tnl
State Recv-Q Send-Q Local Address:Port Peer Address:Port
LISTEN 0 128   :::22   :::*
LISTEN 0 128   *:22   *:*
LISTEN 0 128  127.0.0.1:631   *:*
LISTEN 0 128  ::1:631  :::*
LISTEN 0 100  ::1:25   :::*
LISTEN 0 100  127.0.0.1:25   *:*
可以看出我们的80端口并未开启,强烈建议大家一定要查看,如果我们之前的机器上装过httpd服务,就把他卸载,至少至少也要停止服务,保证我们的80端口是关闭的状态,不然我们新安装的2.4版本是启动不起来的!
接着,我们进入/app/httpd24/bin/这个目录,把服务开启一下:
[root@localhost ~]# cd /app/httpd24/bin/
[root@localhost bin]# ./apachectl start
AH00558: httpd: Could not reliably determine the server's fully qualified domain name, using localhost.localdomain. Set the 'ServerName' directive globally to suppress this message
现在,我们再来查看一下端口开启情况:
[root@localhost bin]# ss -tnl
State Recv-Q Send-Q Local Address:Port Peer Address:Port
LISTEN 0 128   :::80   :::*
LISTEN 0 128   :::22   :::*
LISTEN 0 128   *:22   *:*
LISTEN 0 128  127.0.0.1:631   *:*
LISTEN 0 128  ::1:631  :::*
LISTEN 0 100  ::1:25   :::*
LISTEN 0 100  127.0.0.1:25   *:*
可以看出,我们的80端口已经开启,接着我们就可以用其他的机器来测试一下了:
我们在centos7上使用curl命令来测试:
[root@centos7 ~]# curl 192.168.191.128
<html><body><h1>It works!</h1></body></html>
测试成功。
至此,我们的实验已经圆满完成,已经成功的在centos6上安装上了httpd2.4版本。
方法二 一次编译法
在上一个实验中,我们使用分别编译的方法把httpd2.4版本安装到了centos6上,但是分别编译的方法还是略有麻烦,那有没有一次就可以完成编译的方法呢?小编很负责任的告诉你,当然是有的!接下来我们就来看一看如何才能一次编译安装所有的东西~
1、下载源码并上传至虚拟机
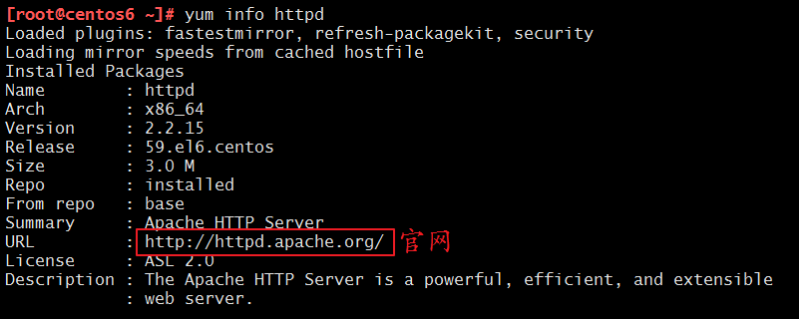
我们可以使用yum info httpd和yum info apr来查看这两个服务的官网,然后我们去官网下载最新的稳定版本:


下面附上官网地址:
httpd官网:http://httpd.apache.org/
apr官网:http://apr.apache.org/
我们可以去官网下载最新的稳定版本,这里,小编下载的是apr-1.6.2.tar.gz,apr-util-1.6.0.tar.gz,httpd-2.4.28.tar.bz2,接下来的实验,就以小编下载的版本为示范,给大家演示如何安装。
我们使用rz命令,将我们下载好的源码包上传至我们的centos6虚拟机,我们可以查看一下:
[root@centos6 temp]# ll
total 8004
-rw-r--r-- 1 root root 1071074 Sep 29 12:27 apr-1.6.2.tar.gz
-rw-r--r-- 1 root root 565507 Sep 29 12:27 apr-util-1.6.0.tar.gz
-rw-r--r-- 1 root root 6553163 Oct 15 12:35 httpd-2.4.28.tar.bz2
该步骤完成。
2、安装所依赖的包组
在编译安装开始之前,我们要先把所依赖的包组安装上,不然在接下来的编译安装过程中会出错。
安装命令如下:
yum groupinstall "development tools" -y
yum install pcre-devel -y
yum install openssl-devel -y
yum install expat-devel -y
安装成功后,我们就可以对apr的分别编译了。
3、对源码进行解压缩
第一步中,我们已经把源码上传到了我们的虚拟机上,但是还没有进行任何操作,这一步骤中,我们就需要把源码进行解压缩,并放入指定的文件夹中,来创造一次编译安装的条件,具体操作如下:
首先,对三个包分别进行解压:
tar xvf httpd-2.4.28.tar.bz2
tar xvf apr-util-1.6.0.tar.gz
tar xvf apr-1.6.2.tar.gz
解压完成后,我们把xvf apr-1.6.2.tar.gz和apr-util-1.6.0.tar.gz分别复制到httpd-2.4.28.tar.bz2这个目录下的指定文件夹中并改名字:
[root@centos6 temp]# cp -a apr-1.6.2 httpd-2.4.28/srclib/apr
[root@centos6 temp]# cp -a apr-util-1.6.0 httpd-2.4.28/srclib/apr-util
[root@centos6 temp]# ls httpd-2.4.28/srclib/
apr apr-util Makefile.in
我们可以看出,在httpd-2.4.28/srclib/目录下已经有了apr和apr-util这两个文件夹了。本步骤完成。
4、编译安装
准备工作都做好了,接下来就是编译安装了。
一样的,需要先进入到httpd-2.4.28/这个目录下。由于代码很长,希望大家仔细仔细再仔细,或者像小编一样分行写:
[root@centos6 temp]# cd httpd-2.4.28
[root@centos6 httpd-2.4.28]# ./configure --prefix=/app/httpd24 \
--enable-so \
--enable-ssl \
--enable-cgi \
--enable-rewrite \
--with-zlib \
--with-pcre \
--with-included-apr \
--enable-modules=most \
--enable-mpms-shared=all \
--with-mpm=prefork
[root@centos6 httpd-2.4.28]# make -j 4 && make install
安装的make -j 4 && make install这一行代码意思是开启4个进程同时工作,进行安装,这样速度比较快一些。
以上,编译安装完成,接着,我们可以进行测试,并进行一些配置的修改。
5、测试并进行配置
首先,进入/app/httpd24这个文件夹,查看一下内容:
[root@centos6 httpd24]# ls
bin build cgi-bin conf error htdocs icons include lib logs man manual modules
上一个实验我们是进入bin/目录下,然后使用apachectl来启动我们的服务的,但是如果每次都这样启动服务,无疑很麻烦,因为要加上路径,所以我们干脆把这个路径设置到PATH变量里面,这样我们使用服务就会变得比较方便,具体操作如下:
[root@centos6 bin]# vim /etc/profile.d/httpd24.sh
PATH=/app/httpd24/bin:$PATH
然后我们运行一下使它生效:
[root@centos6 bin]# . /etc/profile.d/httpd24.sh
现在我们在任意页面都可以启动我们的服务。
[root@centos6 bin]# apachectl start
我们现在可以在另一台机器上测试一下我们的服务:
[root@centos7 ~]# curl 192.168.191.128
<html><body><h1>It works!</h1></body></html>
我们的页面是保存在/app/httpd24/htdocs/这个文件夹里的,我们也可以根据自己的需要,把这个页面修改一下~:
[root@centos6 httpd24]# cd htdocs/
[root@centos6 htdocs]# ls
index.html
[root@centos6 htdocs]# vim index.html
<html><body><h1>Welcome to keer'home!</h1></body></html>
然后我们再去centos7上查看一下:
[root@centos7 ~]# curl 192.168.191.128
<html><body><h1>Welcome to keer'home!</h1></body></html>
已经是我们修改过后的样子了。
当然,我们还是希望能够写成服务脚本,这样的话,我们使用起来就更加便利,现在我们的服务已经启动起来了,我们可以用ps aux来查看一下:
[root@centos6 htdocs]# ps aux
USER  PID %CPU %MEM VSZ RSS TTY  STAT START TIME COMMAND
root   1 0.0 0.0 19348 1560 ?  Ss 00:22 0:01 /sbin/init
root   2 0.0 0.0  0  0 ?  S 00:22 0:00 [kthreadd]
……
daemon 35258 0.0 0.0 76416 1436 ?  S 00:53 0:00 /app/httpd24/bin/httpd -k start
daemon 35259 0.0 0.0 76416 1436 ?  S 00:53 0:00 /app/httpd24/bin/httpd -k start
daemon 35260 0.0 0.1 76416 2104 ?  S 00:53 0:00 /app/httpd24/bin/httpd -k start
daemon 35261 0.0 0.1 76416 2084 ?  S 00:53 0:00 /app/httpd24/bin/httpd -k start
daemon 35262 0.0 0.1 76416 2084 ?  S 00:53 0:00 /app/httpd24/bin/httpd -k start
daemon 35264 0.0 0.0 76416 1440 ?  S 00:54 0:00 /app/httpd24/bin/httpd -k start
root  35326 13.0 0.0 110260 1152 pts/0 R+ 01:22 0:00 ps aux
在这里我们又发现了一个问题,此时的httpd是以daemon的身份运行的,我们当然是希望它是由apache的身份来运行,所以我们可以来修改一下:
我们先来查看一下apache这个用户是否存在:
[root@centos6 htdocs]# id apache
uid=48(apache) gid=48(apache) groups=48(apache)
如果不存在的话,我们可以使用useradd -r apache来创建,因为apache是系统的服务用的账号,所以需要加上-r
然后我们就可以来修改配置文件了,配置文件在/app/httpd24/conf/这个文件夹里,我们进去并把文件修改一下:
[root@centos6 ~]# cd /app/httpd24/conf/
[root@centos6 conf]# ls
extra httpd.conf magic mime.types original
[root@centos6 conf]# vim httpd.conf
打开这个文件以后,我们把:
User daemon
Group daemon
改成这样:
User apache
Group apache
这样就可以了,我们现在把服务停止,重新打开,然后再用ps aux来查看一下:
[root@centos6 conf]# apachectl stop
[root@centos6 conf]# apachectl start
[root@centos6 conf]# ps aux
USER  PID %CPU %MEM VSZ RSS TTY  STAT START TIME COMMAND
root   1 0.0 0.0 19348 1560 ?  Ss 00:22 0:01 /sbin/init
root   2 0.0 0.0  0  0 ?  S 00:22 0:00 [kthreadd]
……
apache 35352 0.0 0.0 76416 1436 ?  S 01:33 0:00 /app/httpd24/bin/httpd -k start
apache 35353 0.0 0.0 76416 1436 ?  S 01:33 0:00 /app/httpd24/bin/httpd -k start
apache 35354 0.0 0.0 76416 1436 ?  S 01:33 0:00 /app/httpd24/bin/httpd -k start
apache 35355 0.0 0.0 76416 1436 ?  S 01:33 0:00 /app/httpd24/bin/httpd -k start
apache 35356 0.0 0.0 76416 1436 ?  S 01:33 0:00 /app/httpd24/bin/httpd -k start
root  35357 3.0 0.0 110260 1152 pts/0 R+ 01:33 0:00 ps aux
这样,我们的httpd就是以apache的身份来运行的了。
当然,我们还可以直接做成服务,服务脚本也不需要我们自己写,直接把系统自带的httpd的服务脚本复制一份,修改一下就可以了,具体操作步骤如下:
[root@centos6 ~]# cd /etc/init.d
[root@centos6 init.d]# ls
abrt-ccpp   cpuspeed htcacheclean lvm2-monitor ntpd   rdma   spice-vdagentd   winbind
abrtd    crond  httpd   mdmonitor  ntpdate  restorecond sshd     wpa_supplicant
abrt-oops   cups  ip6tables  messagebus  portreserve rngd   svnserve
acpid    dnsmasq iptables  netconsole  postfix  rsyslog  sysstat
atd    firstboot irqbalance netfs   pppoe-server sandbox  udev-post
auditd   functions kdump   network   psacct  saslauthd vmware-tools
blk-availability haldaemon killall  NetworkManager quota_nld  single  vmware-tools-thinprint
bluetooth   halt  lvm2-lvmetad nfs-rdma  rdisc   smartd  wdaemon
[root@centos6 init.d]# cp httpd httpd24
[root@centos6 init.d]# vim httpd24
文件里上面的内容不需要改动,我们只需要修改一下路径就可以了,也就是把
# Path to the apachectl script, server binary, and short-form for messages.
apachectl=/usr/sbin/apachectl
httpd=${HTTPD-/usr/sbin/httpd}
prog=httpd
pidfile=${PIDFILE-/var/run/httpd/httpd.pid}
lockfile=${LOCKFILE-/var/lock/subsys/httpd}
RETVAL=0
STOP_TIMEOUT=${STOP_TIMEOUT-10}
修改为:
# Path to the apachectl script, server binary, and short-form for messages.
apachectl=/app/httpd24/bin/apachectl
httpd=${HTTPD-/app/httpd24/bin/httpd}
prog=httpd
pidfile=${PIDFILE-/app/httpd24/logs/httpd.pid}
lockfile=${LOCKFILE-/var/lock/subsys/httpd24}
RETVAL=0
STOP_TIMEOUT=${STOP_TIMEOUT-10}
然后保存退出就可以了。
接下来,就可以把这个服务添加到服务列表里了:
[root@centos6 init.d]# chkconfig --add httpd24
[root@centos6 init.d]# chkconfig httpd24 on
[root@centos6 init.d]# chkconfig --list httpd24
httpd24   0:off 1:off 2:on 3:on 4:on 5:on 6:off
这样,我们的httpd2.4版本就可以通过service来控制了。
至此,我们的服务的主要功能就实现了。
我们的实验圆满完成。
总结
以上就是这篇文章的全部内容了,希望本文的内容对大家的学习或者工作具有一定的参考学习价值,如果有疑问大家可以留言交流,谢谢大家对我们的支持。

