Unity实现跑马灯效果的示例代码

目录
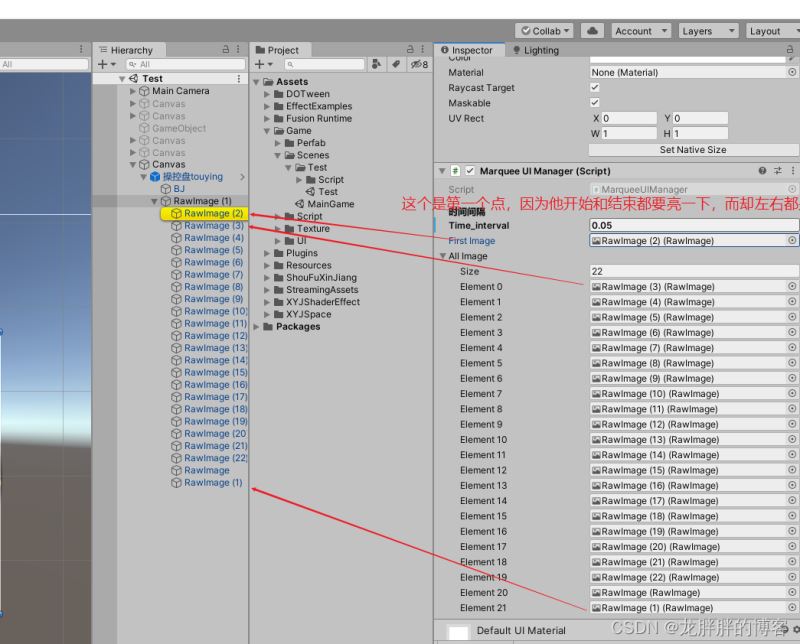
  • 一、效果
  • 二、需要动画插件DOTween
  • 三、脚本
    • 1.每个格子上的脚本文件
    • 2.管理脚本文件

一、效果

二、需要动画插件DOTween

下载地址

三、脚本

1.每个格子上的脚本文件

using System.Collections;
using System.Collections.Generic;
using UnityEngine;
using UnityEngine.UI;
using DG.Tweening;
public class MarqueeUIItem : MonoBehaviour
{
    private RawImage m_RawImage;
    private string thisIndex;
    private Coroutine m_coroutine;
    private void Start()
    {
        m_RawImage = GetComponent<RawImage>();

        thisIndex = transform.GetSiblingIndex().ToString();
    }
    public void UpdateImageColorA()
    {
        KillDOTween();
        m_RawImage.color = Color.white;
        m_coroutine= StartCoroutine(ShowUI());
    }
    private IEnumerator ShowUI()
    {
        yield return new WaitForSeconds(0.1F);
        m_RawImage.DOColor(Color.clear, 1.5f).SetId(thisIndex);
    }
    public void KillDOTween()
    {
        if (DOTween.IsTweening(thisIndex))
        {
            if (m_coroutine != null)
            {
                StopCoroutine(m_coroutine);
            }
            DOTween.Kill(thisIndex);
        }
    }
}

2.管理脚本文件

using System.Collections;
using System.Collections.Generic;
using UnityEngine;
using UnityEngine.UI;

public class MarqueeUIManager : MonoBehaviour
{
    [Header("时间间隔")]
    public float time_interval=0.05f;
    public RawImage m_firstImage;
    public RawImage[] m_allImage;

    private Coroutine m_LeftCor;
    private Coroutine m_RightCor;
    private void Start()
    {
        m_firstImage.color=Color.clear;
        for (int i = 0; i < m_allImage.Length; i++)
        {
            m_allImage[i].color=Color.clear;
        }
    }
        private void Update()
    {
        if (Input.GetKeyDown(KeyCode.L))
        {
            LeftRotationUI();
        }
        if (Input.GetKeyDown(KeyCode.R))
        {
            RightRotationUI();
        }
    }
    private void LeftRotationUI()
    {
        if (m_RightCor != null)
        {
            StopCoroutine(m_RightCor);
        }
          if(m_LeftCor!=null)
        {
            StopCoroutine(m_LeftCor);
        }
        m_LeftCor = StartCoroutine(LeftRoatation());
    }
    private void RightRotationUI()
    {
        if (m_LeftCor != null)
        {
            StopCoroutine(m_LeftCor);
        }
           if (m_RightCor != null)
        {
            StopCoroutine(m_RightCor);
        }
        m_RightCor = StartCoroutine(RightRoatation());
    }

    private IEnumerator LeftRoatation()
    {
        KillAllDOTween();
        yield return new WaitForSeconds(0.01f);
        m_firstImage.GetComponent<MarqueeUIItem>().UpdateImageColorA();
        yield return new WaitForSeconds(time_interval);
        for (int i = m_allImage.Length-1; i > -1; i--)
        {
            m_allImage[i].GetComponent<MarqueeUIItem>().UpdateImageColorA();
            yield return new WaitForSeconds(time_interval);
        }
        yield return new WaitForSeconds(time_interval);
        m_firstImage.GetComponent<MarqueeUIItem>().UpdateImageColorA();

    }
    private IEnumerator RightRoatation()
    {
        KillAllDOTween();
        yield return new WaitForSeconds(0.01f);
        m_firstImage.GetComponent<MarqueeUIItem>().UpdateImageColorA();
        yield return new WaitForSeconds(time_interval);
        for (int i = 0; i < m_allImage.Length; i++)
        {
            m_allImage[i].GetComponent<MarqueeUIItem>().UpdateImageColorA();
            yield return new WaitForSeconds(time_interval);
        }
        yield return new WaitForSeconds(time_interval);
        m_firstImage.GetComponent<MarqueeUIItem>().UpdateImageColorA();
    }
    private void KillAllDOTween()
    {
        m_firstImage.GetComponent<MarqueeUIItem>().KillDOTween();
        m_firstImage.color = Color.clear;
        for (int i = 0; i < m_allImage.Length; i++)
        {
            m_allImage[i].GetComponent<MarqueeUIItem>().KillDOTween();
            m_allImage[i].color = Color.clear;
        }
    }
}

设置

到此这篇关于Unity实现跑马灯效果的示例代码的文章就介绍到这了,更多相关Unity跑马灯效果内容请搜索我们以前的文章或继续浏览下面的相关文章希望大家以后多多支持我们!

(0)

相关推荐

  • Unity之跑马灯抽奖效果单抽与连抽(附demo)

    本文主要介绍了Unity之跑马灯抽奖效果单抽与连抽,分享给大家,具体如下: 效果图 单次抽奖效果 跳过动画抽奖效果 三连抽抽奖效果 设计思路 点击按钮 ,根据需求(概率)计算本次抽奖获得物品模拟转动 (先加速后减速), 一段时间后停止连抽的情况下等所有奖品动画都表演完成才结束跳过动画设计,有跳过时抽奖速度直接到最大,并进入可中奖 场景搭建 一个按钮,一个组奖品放到一个父物体上. 奖品元素,有两种状态,一种旋转状态,一种中奖状态. 代码 using System; using System.Col

  • Unity实现跑马灯抽奖效果

    Unity 跑马灯抽奖效果实现代码,供大家参考,具体内容如下 这边用到插件是NGUI+Dotween,思路简单说下:先排版,通过移动图片蒙版来实现效果. 下面是排版和文件目录. 代码部分是通过余数去确认停的位置,boxlist通过unity拖拉加入数据,chooseBoxList直接通过余数判断添加. 代码量很少,稍微看下就明白了. 直接上代码了: using System; using System.Collections; using System.Collections.Generic;

  • Unity3d实现跑马灯广播效果

    本文实例为大家分享了Unity3d实现跑马灯广播效果的具体代码,供大家参考,具体内容如下 废话不多说,直接上代码 using DG.Tweening; using System.Collections; using System.Collections.Generic; using UnityEngine; using UnityEngine.UI; using Utils; //挂在UI上面 public class BroadcastUI : MonoBehaviour {     priv

  • Unity实现跑马灯效果的示例代码

    目录 一.效果 二.需要动画插件DOTween 三.脚本 1.每个格子上的脚本文件 2.管理脚本文件 一.效果 二.需要动画插件DOTween 下载地址 三.脚本 1.每个格子上的脚本文件 using System.Collections; using System.Collections.Generic; using UnityEngine; using UnityEngine.UI; using DG.Tweening; public class MarqueeUIItem : MonoBe

  • C#实现跑马灯效果的示例代码

    目录 文章描述 开发环境 开发工具 实现代码 实现效果 文章描述 跑马灯效果,功能效果大家应该都知道,就是当我们的文字过长,整个页面放不下的时候(一般用于公告等),可以让它自动实现来回滚动,以让客户可以看到完整的信息(虽然要多等一会儿时间). 其实对于Winform这种技术,实现任何的动态效果相对来说都比较麻烦.而且一般都需要搭配定时器使用,当然,这次要写的跑马灯效果也是一样的,使用了System.Timers.Timer来实现,关于其他定时器以及用法,之前文章有写过,有兴趣的可以翻一下. 因为

  • Vue 使用计时器实现跑马灯效果的实例代码

    Vue 使用计时器实现跑马灯效果,代码如下所示: <!DOCTYPE html> <html lang="en"> <head> <meta charset="UTF-8"> <meta name="viewport" content="width=device-width, initial-scale=1.0"> <meta http-equiv="

  • Android用过TextView实现跑马灯效果的示例

    以前就遇到过这个问题,今天重新拾起来. 跑马灯效果其实就是当文字超过TextView控件宽度的时候,使用滚动的方式显示出来: 方法1:(直接xml搞定) Android系统中TextView实现跑马灯效果,必须具备以下几个条件: 1.android:ellipsize="marquee": 2.TextView必须单行显示,且内容必须超出TextView宽度: 3.TextView要获得焦点才能滚动. xml代码如下: <TextView android:id="@+i

  • android TextView实现跑马灯效果

    本文实例为大家分享了android TextView跑马灯效果的具体代码,供大家参考,具体内容如下 一.要点 设置四个属性 android:singleLine="true" android:ellipsize="marquee" android:focusable="true" android:focusableInTouchMode="true" 直接在xml中使用 <TextView android:layout_

  • Android基于TextView实现跑马灯效果

    本文实例为大家分享了Android TextView实现跑马灯效果的具体代码,供大家参考,具体内容如下 当Layout中只有一个TextView需要实现跑马灯效果时,操作如下. 在Layout的TextView配置文件中增加         android:ellipsize="marquee"         android:focusable="true"         android:focusableInTouchMode="true"

  • Android自定义textview实现竖直滚动跑马灯效果

    本文实例为大家分享了Android自定义textview实现跑马灯效果的具体代码,供大家参考,具体内容如下 xml布局 <?xml version="1.0" encoding="utf-8"?> <RelativeLayout xmlns:android="http://schemas.android.com/apk/res/android" xmlns:tools="http://schemas.android.c

  • 小程序文字跑马灯效果

    本文实例为大家分享了小程序文字跑马灯效果的具体代码,供大家参考,具体内容如下 market.wxml <!--pages/market/market.wxml--> <view>1 显示完后再显示</view> <view class="example"> <view class="marquee_box"> <view class="marquee_text" style=&qu

  • jQuery实现参数自定义的文字跑马灯效果

    本文为大家分享了jQuery实现文字跑马灯效果的具体代码,供大家参考,具体内容如下 一.明确需求 基本需求:最近在工作中接到一个新需求,简单来说就是实现一行文字从右到左跑马灯的效果,并且以固定的时间间隔进行循环. 原本这是一个很容易实现的需求,但是难点是要求很多参数得是用户可自行设置的,包括文字跑马灯的速度和距离下次出现的间隔.具体需求见下图: 这样一来实现这个功能就会有点麻烦了,需要烧烧脑细胞了. 二.具体实现过程 HTML中只需要如下几行代码 <div id="swiper"

  • android使用TextView实现跑马灯效果

    本文实例为大家分享了android使用TextView实现跑马灯效果的具体代码,供大家参考,具体内容如下 先上效果图:此为静态图,实际动态中文字匀速向左滑动. 实现步骤: 第一步:创建好布局页面 <?xml version="1.0" encoding="utf-8"?> <android.support.constraint.ConstraintLayout xmlns:android="http://schemas.android.c

随机推荐