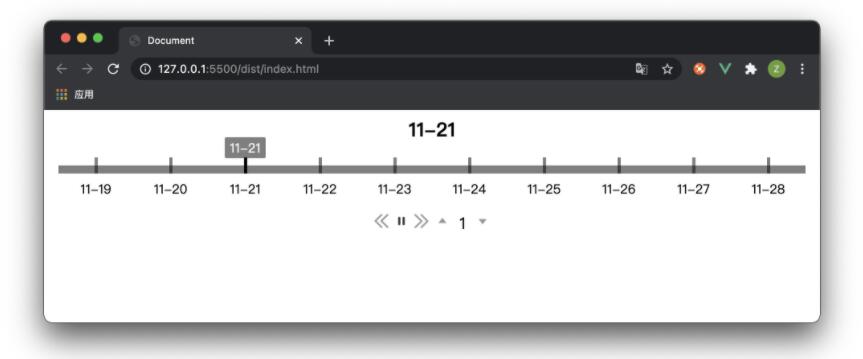
Vue.js实现时间轴功能
本文实例为大家分享了Vue.js实现时间轴功能的具体代码,供大家参考,具体内容如下

时间轴组件封装
Main.js
<template>
  <div class="timeline-main">
    <div class="timeline-axis">
      <div class="axis-item"
        v-for="(time, index) in dateTimes"
        :key="index">
        <div class="axis-item-tick"
          :class="{ 'axis-item-tick-active': index === highlightIndex }"
          @mouseenter="hoverIndex = index"
          @mouseleave="hoverIndex = -1"
          @click="tickClick(time, index)">
        </div>
        <div class="axis-item-label"
          v-if="dateTimeIndexes.indexOf(index) >= 0">
          {{ time }}</div>
        <div class="axis-item-tip"
          v-if="index === highlightIndex || index === hoverIndex">
          {{ time }}</div>
      </div>
    </div>
    <div class="timeline-control">
      <i class="menu-icon icon-left"
        :class="{'menu-icon-disabled': playing}"
        @click="backward"></i>
      <i class="menu-icon"
        :class="{'icon-play': !playing, 'icon-pause': playing}"
        @click="togglePlay"
        @mouseleave="hoverIndex = -1"></i>
      <i class="menu-icon icon-right"
        :class="{'menu-icon-disabled': playing}"
        @click="forward"></i>
      <i class="menu-icon icon-up"
        :class="{'menu-icon-disabled': playing}"
        @click="speedSlow"></i>
      <i
        class="menu-icon speed">{{ options.speed }}</i>
      <i class="menu-icon icon-down"
        :class="{'menu-icon-disabled': playing}"
        @click="speedQuick"></i>
    </div>
  </div>
</template>
<script>
import { dateFormat } from '../util/formatdate.js' // 日期格式化
export default {
  data() {
    return {
      intervalTimer: null, // 定时器
      dateTimeIndexes: [], // 日期列表
      playing: false, // 播放
      activeIndex: 0, // 当前的时间位置
      hoverIndex: 0 // 鼠标移入的时间位置
    }
  },
  props: {
    options: {
      type: Object,
      default() {
        return {}
      }
    },
    dateTimes: {
      type: Array,
      default() {
        return []
      }
    },
    interval: {
      type: Number,
      default() {
        return 100
      }
    }
  },
  computed: {
    highlightIndex() {
      return (
        (this.activeIndex === -1 && this.dateTimes.length - 1) ||
        this.activeIndex
      )
    }
  },
  watch: {
    options: {
      handler() {
        this.renderTimeline()
      },
      deep: true
    },
    playing() {
      if (this.playing) {
        this.intervalTimer = setInterval(() => {
          this.activeIndex = (this.activeIndex + 1) % this.dateTimes.length
        }, this.options.speed * 1000)
      } else {
        if (this.intervalTimer) {
          clearInterval(this.intervalTimer)
          this.intervalTimer = null
        }
      }
    },
    activeIndex() {
      const time = this.dateTimes[this.activeIndex].split(' ')[0]
      this.$emit('getDateFun', time)
    }
  },
  mounted() {
    this.renderTimeline()
    let that = this
    window.onresize = function () {
      that.renderTimeline()
    }
  },
  filters: {
    formatDatetime(dateTime) {
      dateTime = dateFormat(dateTime, 'MM.dd')
      return dateTime
    }
  },
  methods: {
    /**
     * @name: 初始化时间轴
     */
    renderTimeline() {
      // 时间轴的宽度
      const timelineWidth = this.$el.offsetWidth - 40
      // 日期个数
      const dateTimesSize = this.dateTimes.length
      // 如果时间全部显示,时间轴的理想宽度
      const dateTimesWidth = dateTimesSize * this.interval
      // 如果时间轴的宽度小于理想宽度
      if (timelineWidth >= dateTimesWidth) {
        this.dateTimeIndexes = this.dateTimes.map((dateTime, index) => {
          return index
        })
        return
      }
      // 当前时间轴的宽度最大能容纳多少日期刻度
      const maxTicks = Math.floor(timelineWidth / this.interval)
      // 间隔刻度数
      const gapTicks = Math.floor(dateTimesSize / maxTicks)
      // 记录需要显示的日期索引
      this.dateTimeIndexes = []
      for (let t = 0; t <= maxTicks; t++) {
        this.dateTimeIndexes.push(t * gapTicks)
      }
      const len = this.dateTimeIndexes.length
      // 最后一项需要特殊处理
      if (len > 0) {
        const lastIndex = this.dateTimeIndexes[len - 1]
        if (lastIndex + gapTicks > dateTimesSize - 1) {
          this.dateTimeIndexes[len - 1] = dateTimesSize - 1
        } else {
          this.dateTimeIndexes.push(dateTimesSize - 1)
        }
      }
    },

    /**
     * @name: 点击刻度
     * @param {time}
     * @param {index}
     */
    tickClick(time, index) {
      if (this.playing) {
        return
      }
      this.activeIndex = index
    },

    /**
     * @name: 播放和暂停
     */
    togglePlay() {
      this.playing = !this.playing
    },

    /**
     * @name: 时间退后一日
     */
    backward() {
      if (this.playing) {
        return
      }
      this.activeIndex = this.activeIndex - 1
      if (this.activeIndex === -1) {
        this.activeIndex = this.dateTimes.length - 1
      }
    },

    /**
     * @name: 时间前进一日
     */
    forward() {
      if (this.playing) {
        return
      }
      this.activeIndex = (this.activeIndex + 1) % this.dateTimes.length
    },

    /**
     * @name: 减慢速度
     */
    speedSlow() {
      if (this.playing || this.options.speed >= this.options.speedMax) {
        return
      }
      this.options.speed = this.options.speed + 1
    },

    /**
     * @name: 加快速度
     */
    speedQuick() {
      if (this.playing || this.options.speed <= 1) {
        return
      }
      this.options.speed = this.options.speed - 1
    }
  }
}
</script>
<style scoped lang="scss">
.timeline-main {
  padding: 10px;
  box-sizing: border-box;
  .timeline-axis {
    position: relative;
    display: flex;
    justify-content: space-around;
    padding: 8px 0;
    &::before {
      content: '';
      width: 100%;
      height: 10px;
      position: absolute;
      left: 0;
      bottom: 8px;
      display: inline-block;
      background: rgba(0, 0, 0, 0.5);
    }
    .axis-item {
      position: relative;
      display: flex;
      flex-direction: column;
      align-items: center;
      .axis-item-tick {
        display: inline-block;
        width: 4px;
        height: 20px;
        background: rgba(0, 0, 0, 0.5);
        transition: background 0.3s;
        cursor: pointer;
        &:hover {
          background: #000;
        }
      }
      .axis-item-tick-active {
        background: #000;
      }
      .axis-item-label {
        position: absolute;
        bottom: -30px;
        white-space: nowrap;
      }
      .axis-item-tip {
        position: absolute;
        top: -25px;
        padding: 2px 6px;
        border-radius: 2px;
        background: rgba(0, 0, 0, 0.5);
        white-space: nowrap;
        color: #fff;
      }
    }
  }
  .timeline-control {
    margin-top: 40px;
    text-align: center;
    i {
      cursor: pointer;
      display: inline-block;
      font-style: normal;
    }
    .menu-icon {
      font-size: 20px;
      width: 20px;
      height: 20px;
      background-size: cover;
      background-repeat: no-repeat;
      &.icon-left {
        background-image: url('../assets/icon-left.png');
      }

      &.icon-right {
        background-image: url('../assets/icon-right.png');
      }

      &.icon-play {
        background-image: url('../assets/icon-play.png');
      }

      &.icon-pause {
        background-image: url('../assets/icon-pause.png');
      }
      &.icon-up {
        background-image: url('../assets/icon-up.png');
      }

      &.icon-down {
        background-image: url('../assets/icon-down.png');
      }
      &.menu-icon-disabled {
        cursor: no-drop;
        opacity: 0.5;
      }
    }
  }
}
</style>
使用组件
App.vue
<template>
  <div>
    <h2
      style="margin:0;text-align:center;">
      {{this.date}}
    </h2>
    <Main :options="options"
      :dateTimes="dateTimes"
      @getDateFun="getDateFun"
      :interval="interval"></Main>
  </div>
</template>

<script>
import { dateFormat } from './util/formatdate.js'
import Main from './components/Main'
export default {
  name: 'app',
  data() {
    return {
      date: '',
      options: {
        speed: 1, // 速度
        speedMax: 10 // 速度最大值
      },
      interval: 20, // 日期间的间隔
      dateTimes: [
        '03-04',
        '03-05',
        '03-06',
        '03-07',
        '03-08',
        '03-09',
        '03-10',
        '03-11',
        '03-12',
        '03-13'
      ]
    }
  },
  components: {
    Main
  },
  mounted() {
    // 获取最近 10 天的日期
    let list = []
    for (let i = 0; i < 10; i++) {
      list.unshift(
        dateFormat(
          new Date(
            new Date().setDate(new Date().getDate() - i)
          ).toLocaleDateString(),
          'MM-dd'
        )
      )
    }
    this.date = list[0]
    this.dateTimes = list
  },
  methods: {
    // 接收父组件传值
    getDateFun(time) {
      console.log(time)
      this.date = time
    },
  }
}
</script>
以上就是本文的全部内容,希望对大家的学习有所帮助,也希望大家多多支持我们。
赞 (0)

