Java SpringSecurity入门案例与基本原理详解
目录
- 1、入门案例
- 1.1、创建SpringBoot项目
- 1.2、勾选对应的maven依赖
- 1.3、编写Controller路由
- 1.4、启动项目
- 2、基本原理
- 2.1、Security的本质
- 2.2、Security装载过程(一)
- 2.3、Security装载过程(二)
- 2.4、UsernamePasswordAuthenticationFilter过滤器
- 总结
1、入门案例
1.1、创建SpringBoot项目

1.2、勾选对应的maven依赖

这里一些依赖可以没有,最主要是要有Web和Security两个依赖即可!
1.3、编写Controller路由
@Controller
public class RouterController {
    @RequestMapping(value = {"/index","/","/index.html"})
    @ResponseBody
    public String success(){
        return "Hello SpringSecurity";
    }
}

1.4、启动项目
- 启动项目之后会发现自动来到了登录页面,这个登录页面并不是我们写的,是由Security自带的并且现在说明Security已经开启了用户认证。
- 可以在控制台拿到密码(随机),用户名为user;使用密码登录之后就能看到页面了!

2、基本原理
2.1、Security的本质
- SpringSecurity的本质是Interceptor拦截器 + Filter过滤器的执行链,而拦截器的本质是AOP。
- 可以在security包中看到大量的拦截器类、过滤器类等等,它们分别负责不同的功能。
org.springframework.security.web.context.request.async.WebAsyncManagerIntegrationFilter
org.springframework.security.web.context.SecurityContextPersistenceFilter
org.springframework.security.web.header.HeaderWriterFilter
org.springframework.security.web.csrf.CsrfFilter
org.springframework.security.web.authentication.logout.LogoutFilter
org.springframework.security.web.authentication.UsernamePasswordAuthenticationFilter
org.springframework.security.web.authentication.ui.DefaultLoginPageGeneratingFilter
org.springframework.security.web.authentication.ui.DefaultLogoutPageGeneratingFilter
org.springframework.security.web.savedrequest.RequestCacheAwareFilter
org.springframework.security.web.servletapi.SecurityContextHolderAwareRequestFilter
org.springframework.security.web.authentication.AnonymousAuthenticationFilter
org.springframework.security.web.session.SessionManagementFilter
org.springframework.security.web.access.ExceptionTranslationFilter
org.springframework.security.web.access.intercept.FilterSecurityInterceptor
2.2、Security装载过程(一)
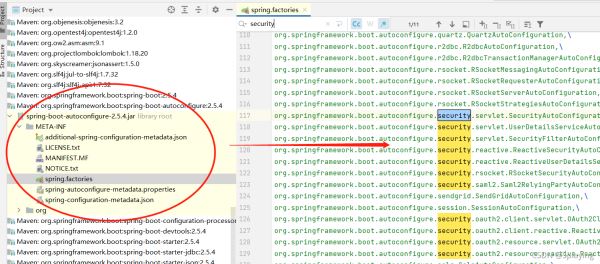
- 根据SpringBoot自动装配原理可以得知,SpringBoot在启动时会自动加载spring-boot-autoconfigure包下的spring.factories中的配置,其中有做安全认证的security组件!

- 虽然自动装配了security的组件,但是并没有完全生效,还需要导入security的依赖,这时才会根据@Condition进行条件装配bean。其中最主要的是会装载一个DelegatingFilterProxy类。
- DelegatingFilterProxy类的作用是将上述所有的过滤器进行串起来
// 过滤器执行链
public void doFilter(ServletRequest request, ServletResponse response, FilterChain filterChain) throws ServletException, IOException {
    Filter delegateToUse = this.delegate;
    if (delegateToUse == null) {
        synchronized(this.delegateMonitor) {
            delegateToUse = this.delegate;
            if (delegateToUse == null) {
                WebApplicationContext wac = this.findWebApplicationContext();
                if (wac == null) {
                    throw new IllegalStateException("No WebApplicationContext found: no ContextLoaderListener or DispatcherServlet registered?");
                }
                delegateToUse = this.initDelegate(wac);
            }
            this.delegate = delegateToUse;
        }
    }
    this.invokeDelegate(delegateToUse, request, response, filterChain);
}
protected Filter initDelegate(WebApplicationContext wac) throws ServletException {
    String targetBeanName = this.getTargetBeanName();			//FilterChainProxy
    Assert.state(targetBeanName != null, "No target bean name set");
    Filter delegate = (Filter)wac.getBean(targetBeanName, Filter.class);
    if (this.isTargetFilterLifecycle()) {
        delegate.init(this.getFilterConfig());
    }
    return delegate;
}
2.3、Security装载过程(二)
- initDelegate方法中的getTargetBeanName为springSecurityFilterChain,由FilterChainProxy类生成
- 内部核心方法doFilterInternal中可以看到获取到的所有过滤器。
@Override
public void doFilter(ServletRequest request, ServletResponse response, FilterChain chain)
		throws IOException, ServletException {
	....
		doFilterInternal(request, response, chain);
	....
}
private void doFilterInternal(ServletRequest request, ServletResponse response, FilterChain chain)
		throws IOException, ServletException {
	...
	List<Filter> filters = getFilters(firewallRequest);
	...
}

一共有14个自动装配好的过滤器、拦截器
2.4、UsernamePasswordAuthenticationFilter过滤器
- 这是Security中的一个过滤器,用户对登录/login请求进行拦截验证的实现类。
@Override
public Authentication attemptAuthentication(HttpServletRequest request, HttpServletResponse response)
		throws AuthenticationException {
	if (this.postOnly && !request.getMethod().equals("POST")) {
		throw new AuthenticationServiceException("Authentication method not supported: " + request.getMethod());
	}
	String username = obtainUsername(request);
	username = (username != null) ? username : "";
	username = username.trim();
	String password = obtainPassword(request);
	password = (password != null) ? password : "";
	UsernamePasswordAuthenticationToken authRequest = new UsernamePasswordAuthenticationToken(username, password);
	// Allow subclasses to set the "details" property
	setDetails(request, authRequest);
	return this.getAuthenticationManager().authenticate(authRequest);
}
其中核心的方法是authenticate()方法,在这里对用户提交的账号和密码进行验证。
总结
本篇文章就到这里了,希望能够给你带来帮助,也希望您能够多多关注我们的更多内容!
赞 (0)

