Spring Boot常用功能Profile详解
入口
相关逻辑的入口是listener类:ConfigFileApplicationListener,当容器广播器触发ApplicationEnvironmentPreparedEvent事件时,ConfigFileApplicationListener会收到广播器的通知,进而执行onApplicationEnvironmentPreparedEvent方法
入口处代码:
	@Override
	public void onApplicationEvent(ApplicationEvent event) {
		if (event instanceof ApplicationEnvironmentPreparedEvent) {
			onApplicationEnvironmentPreparedEvent((ApplicationEnvironmentPreparedEvent) event);
		}
		if (event instanceof ApplicationPreparedEvent) {
			onApplicationPreparedEvent(event);
		}
	}
接下来onApplicationEnvironmentPreparedEvent方法会加载容器中的EnvironmentPostProcessor并进行遍历,调用他们的postProcessEnvironment方法,我们可以看一下此时的PostProcessor有哪些:
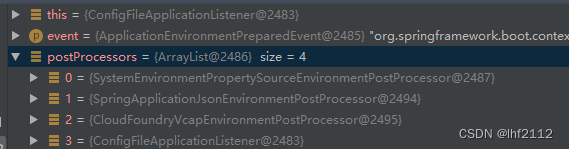
我们发现ConfigFileApplicationListener本身也是其中一个PostProcessor :)
我们直接进入ConfigFileApplicationListener的postProcessEnvironment方法,它会调用一个addPropertySources方法
	protected void addPropertySources(ConfigurableEnvironment environment, ResourceLoader resourceLoader) {
		RandomValuePropertySource.addToEnvironment(environment);
		new Loader(environment, resourceLoader).load();
	}
随机属性值部分暂且不表,我们看下loader.load方法
		public void load() {
			this.profiles = new LinkedList<>();
			this.processedProfiles = new LinkedList<>();
			this.activatedProfiles = false;
			this.loaded = new LinkedHashMap<>();
			initializeProfiles();
			while (!this.profiles.isEmpty()) {
				Profile profile = this.profiles.poll();
				if (profile != null && !profile.isDefaultProfile()) {
					addProfileToEnvironment(profile.getName());
				}
				load(profile, this::getPositiveProfileFilter, addToLoaded(MutablePropertySources::addLast, false));
				this.processedProfiles.add(profile);
			}
			resetEnvironmentProfiles(this.processedProfiles);
			load(null, this::getNegativeProfileFilter, addToLoaded(MutablePropertySources::addFirst, true));
			addLoadedPropertySources();
		}
load方法的重点逻辑-initializeProfiles()
private void initializeProfiles() {
	// The default profile for these purposes is represented as null. We add it
	// first so that it is processed first and has lowest priority.
	this.profiles.add(null);
	Set<Profile> activatedViaProperty = getProfilesActivatedViaProperty();
	this.profiles.addAll(getOtherActiveProfiles(activatedViaProperty));
	// Any pre-existing active profiles set via property sources (e.g.
	// System properties) take precedence over those added in config files.
	addActiveProfiles(activatedViaProperty);
	if (this.profiles.size() == 1) { // only has null profile
		for (String defaultProfileName : this.environment.getDefaultProfiles()) {
			Profile defaultProfile = new Profile(defaultProfileName, true);
			this.profiles.add(defaultProfile);
		}
	}
}
add(null) 可以处理application.properties/yml,接下来getProfilesActivatedViaProperty方法会从spring.profiles.active和spring.profiles.include配置中读取激活的profile~(这两者也是相对常用的配置);再接下来会判断profiles大小是否为1,是的话会添加一个default profile,如图所示:

这也解释了为什么spring.profiles.default必须定义在其他属性源(命令行启动参数),因为这时候分散文件属性元还没有被解析到!
回到load方法,如果profiles不为空,就会进行while遍历,对其调用另外一个load方法:
(load-number2方法):
		private void load(Profile profile, DocumentFilterFactory filterFactory, DocumentConsumer consumer) {
			getSearchLocations().forEach((location) -> {
				boolean isFolder = location.endsWith("/");
				Set<String> names = isFolder ? getSearchNames() : NO_SEARCH_NAMES;
				names.forEach((name) -> load(location, name, profile, filterFactory, consumer));
			});
		}
我们可以看到还会调用到另一个load方法
(load-number3方法):
private void load(String location, String name, Profile profile, DocumentFilterFactory filterFactory,
		DocumentConsumer consumer) {
	if (!StringUtils.hasText(name)) {
		for (PropertySourceLoader loader : this.propertySourceLoaders) {
			if (canLoadFileExtension(loader, location)) {
				load(loader, location, profile, filterFactory.getDocumentFilter(profile), consumer);
				return;
			}
		}
	}
	Set<String> processed = new HashSet<>();
	for (PropertySourceLoader loader : this.propertySourceLoaders) {
		for (String fileExtension : loader.getFileExtensions()) {
			if (processed.add(fileExtension)) {
				loadForFileExtension(loader, location + name, "." + fileExtension, profile, filterFactory,
						consumer);
			}
		}
	}
}
这里的propertySourceLoaders包括:
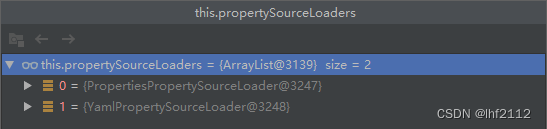
是不是很熟悉?这就是properties和yaml分别对应的PropertySourceLoader~
下面代码会调用loadForFileExtension方法,而这个方法又会调用新的load方法():
(load-number4方法):
private void load(PropertySourceLoader loader, String location, Profile profile, DocumentFilter filter,
		DocumentConsumer consumer) {
	try {
		Resource resource = this.resourceLoader.getResource(location);
		if (resource == null || !resource.exists()) {
			if (this.logger.isTraceEnabled()) {
				StringBuilder description = getDescription("Skipped missing config ", location, resource,
						profile);
				this.logger.trace(description);
			}
			return;
		}
		if (!StringUtils.hasText(StringUtils.getFilenameExtension(resource.getFilename()))) {
			if (this.logger.isTraceEnabled()) {
				StringBuilder description = getDescription("Skipped empty config extension ", location,
						resource, profile);
				this.logger.trace(description);
			}
			return;
		}
		String name = "applicationConfig: [" + location + "]";
		List<Document> documents = loadDocuments(loader, name, resource);
		if (CollectionUtils.isEmpty(documents)) {
			if (this.logger.isTraceEnabled()) {
				StringBuilder description = getDescription("Skipped unloaded config ", location, resource,
						profile);
				this.logger.trace(description);
			}
			return;
		}
		List<Document> loaded = new ArrayList<>();
		for (Document document : documents) {
			if (filter.match(document)) {
				addActiveProfiles(document.getActiveProfiles());
				addIncludedProfiles(document.getIncludeProfiles());
				loaded.add(document);
			}
		}
		Collections.reverse(loaded);
		if (!loaded.isEmpty()) {
			loaded.forEach((document) -> consumer.accept(profile, document));
			if (this.logger.isDebugEnabled()) {
				StringBuilder description = getDescription("Loaded config file ", location, resource, profile);
				this.logger.debug(description);
			}
		}
	}
	catch (Exception ex) {
		throw new IllegalStateException("Failed to load property " + "source from location '" + location + "'",
				ex);
	}
}
这个方法会读取application-profile.properties/yaml文件,并加载文件内激活的profile(如果有的话)
到这里已经读取到了所有的配置信息,主逻辑大概结束了,还差最后一个步骤:addLoadedPropertySources:
		private void addLoadedPropertySources() {
			MutablePropertySources destination = this.environment.getPropertySources();
			List<MutablePropertySources> loaded = new ArrayList<>(this.loaded.values());
			Collections.reverse(loaded);
			String lastAdded = null;
			Set<String> added = new HashSet<>();
			for (MutablePropertySources sources : loaded) {
				for (PropertySource<?> source : sources) {
					if (added.add(source.getName())) {
						addLoadedPropertySource(destination, lastAdded, source);
						lastAdded = source.getName();
					}
				}
			}
		}
这里会将所有属性加入到“destination”,即environment.getPropertySources(),到这里,加载配置属性的逻辑就完成了。
到此这篇关于Spring Boot常用功能Profile详解的文章就介绍到这了,更多相关Spring Boot Profile内容请搜索我们以前的文章或继续浏览下面的相关文章希望大家以后多多支持我们!
相关推荐
-
springboot入门 之profile设置方式
目录 配置方式 命令行方式 系统变量方式 Java系统属性方式 配置文件方式 优先级 激活多个profile 配置方式 命令行方式 命令行方式是一种外部配置的方式,在执行java -jar命令时可以通过 --spring.profiles.active=test的方式进行激活指定的profiles列表. 使用方式如下所示: java -jar order-service-v1.0.jar --spring.profiles.active=dev 系统变量方式 需要添加一个名为SPRING_PRO
-

Java SpringBoot启动指定profile的8种方式详解
目录 配置文件中设置 命令行设置 IDEA中设置 1.program arguments程序参数 2.VM options虚拟机参数 3.Active profiles 参数 遇到的问题 总结 配置文件中设置 通常在公司级别的项目中,我们可能会写多个application- dev/prod.yml ,然后我们通常会在application.yml配置文件中写入 spring: profiles: active: dev 这里会指定激活的profile是application- dev.yml
-
SpringBoot Profile多环境配置方式
目录 Profile多环境配置 Profile配置详解 1.问题 2.为什么要使用profiles Profile多环境配置 我们在开发项目时,通常同一套程序会被发布到几个不同的环境,比如:开发.测试.生产等.其中每个环境的数据库地址.redis地 址.服务器端口等等配置都会不同,如果在为不同环境打包时都要频繁修改配置文件的话,那必将是个非常繁琐且容易发生错误的事. 对于多环境的配置,各种项目构建工具或是框架的基本思路是一致的,通过配置多份不同环境的配置文件,再通过打包命令指定需要打包的内容之后
-
SpringBoot中获取profile的方法详解
目录 spring boot与profile 静态获取方式 autowire ProfileConfig spring boot与profile spring boot 的项目中不再使用xml的方式进行配置,并且,它还遵循着约定大于配置. 静态获取方式 静态工具类获取当前项目的profile环境. import org.springframework.beans.BeansException; import org.springframework.context.ApplicationConte
-
SpringBoot2零基础到精通之profile功能与自定义starter
目录 1 profile功能 1.1 profile的生效规则 1.2 外部配置源 2 自定义starter 1 profile功能 1.1 profile的生效规则 为了方便多环境适配,SpringBoot简化了profile功能,具体的使用规则如下: ①在resources文件夹下可以一次创建多个application-xxx.yaml配置文件,分别对应着不同的生产.测试等环境,但是只有命名为application.yaml(或者后缀.properties的文件)文件会默认加载,所以说其他环
-
SpringBoot Profiles 多环境配置及切换
目录 前言 默认环境配置 默认运行环境 多环境配置 多环境切换 小结 前言 大部分情况下,我们开发的产品应用都会根据不同的目的,支持运行在不同的环境(Profile)下,比如: 开发环境(dev) 测试环境(test) 预览环境(pre) 生产环境(prod) 这里的 环境 实际上是一个统称,不同的环境可能代表着 使用的域名.端口.实例数目是不同的: 连接的数据库地址.端口.名称是不同的: 使用的日志输出格式.级别.保存时间是不同的: 以数据库为例,应用在开发环境下运行时,连接的是开发环境对应的
-
SpringBoot 动态配置Profile环境的方式
下面的例子是通过修改开发环境和生产环境的动态配置的端口号的示例: 开发环境端口号是 8081 生产环境端口号是 8082 springboot的配置方式 springboot的配置有两种:properties和yaml或yml properties方式配置 1.在application.properties配置环境 创建两个application-xx.properties 一个application-dev.properties #开发环境 一个application-pro.properti
-
springboot获取profile的操作
目录 springboot获取profile 通过代码获取profile 通过注解的方式来获取Profile spring profile的基本使用 Spring profile在我们系统中的使用非常简单 我们的问题出在哪里呢? springboot获取profile 通过代码获取profile @Component public class ProfileUtils implements ApplicationContextAware { private static ApplicationC
-
SpringBoot启动指定profile的多种方式
配置文件中设置 通常在公司级别的项目中,我们可能会写多个application- dev/prod.yml ,然后我们通常会在application.yml配置文件中写入 spring: profiles: active: dev 这里会指定激活的profile是application- dev.yml 注意:application.yml中类似Java中的父类,其他application- dev/prod.yml会继承这个文件,可以进行重写,没有进行重写的属性我们也是能直接读取的,比如app
-
Spring Boot常用功能Profile详解
入口 相关逻辑的入口是listener类:ConfigFileApplicationListener,当容器广播器触发ApplicationEnvironmentPreparedEvent事件时,ConfigFileApplicationListener会收到广播器的通知,进而执行onApplicationEnvironmentPreparedEvent方法 入口处代码: @Override public void onApplicationEvent(ApplicationEvent even
-
Java Spring Boot消息服务万字详解分析
目录 消息服务概述 为什么要使用消息服务 异步处理 应用解耦 流量削峰 分布式事务管理 常用消息中间件介绍 ActiveMQ RabbitMQ RocketMQ RabbitMQ消息中间件 RabbitMQ简介 RabbitMQ工作模式介绍 Work queues(工作队列模式) Public/Subscribe(发布订阅模式) Routing(路由模式) Topics(通配符模式) RPC Headers RabbitMQ安装以及整合环境搭建 安装RabbitMQ 下载RabbitMQ 安装R
-
spring boot linux启动方式详解
前台启动 java -jar XXX.jar 后台启动 java -jar xxx.jar & 区别:前台启动ctrl+c就会关闭程序,后台启动ctrl+c不会关闭程序 制定控制台的标准输出 java -jar xxx.jar > catalina.out 2>&1 & catalina.out将标准输出指向制定文件catalina.out 2>&1 输出所有的日志文件 & 后台启动 脚本启动 #!/bin/sh #功能简介:启动上层目录下的ja
-
在Linux系统上安装Spring boot应用的教程详解
Unix/Linux 服务 systemd 服务 操作过程 1. 安装了JDK的centOS7虚拟机 注意下载linux版本JDK的时候不能直接通过wget这种直接链接下载,否则会解压不成功,应该打开原官网,点击同意许可后点击下载(这种方式下载很慢),比较好的方式是复制下载页的地址到迅雷,通过迅雷打开该下载页,同意许可后点击下载. 下载后解压.配置环境变量 tar -zxvf jdk1.8.0_211.jar.gz 环境变量配置:/etc/profile 文件最后添加如下 export JAVA
-
spring boot 结合jsp案例详解
这篇文章主要介绍了spring boot 结合jsp案例详解,文中通过示例代码介绍的非常详细,对大家的学习或者工作具有一定的参考学习价值,需要的朋友可以参考下 引入依赖 <dependency> <groupId>org.springframework.boot</groupId> <artifactId>spring-boot-starter-web</artifactId> </dependency> <!-- jstl是⼀
-
Spring Boot Admin的使用详解(Actuator监控接口)
第一部分 Spring Boot Admin 简介 Spring Boot Admin用来管理和监控Spring Boot应用程序. 应用程序向我们的Spring Boot Admin Client注册(通过HTTP)或使用SpringCloud®(例如Eureka,Consul)发现. UI是Spring Boot Actuator端点上的Vue.js应用程序. Spring Boot Admin 是一个管理和监控Spring Boot 应用程序的开源软件.每个应用都认为是一个客户端,通过HT
-
Spring boot 使用mysql实例详解
Spring boot 使用mysql实例详解 开发阶段用 H2即可,上线时,通过以下配置切换到mysql,spring boot将使用这个配置覆盖默认的H2. 1.建立数据库: mysql -u root CREATE DATABASE springbootdb 2.pom.xml: <dependency> <groupId>mysql</groupId> <artifactId>mysql-connector-java</artifactId&g
-
Dubbo在Spring和Spring Boot中的使用详解
一.在Spring中使用Dubbo 1.Maven依赖 <dependency> <groupId>com.alibaba</groupId> <artifactId>dubbo</artifactId> <version>2.5.3.6</version> <exclusions> <exclusion> <groupId>log4j</groupId> <artif
-
Spring Boot 集成MyBatis 教程详解
Spring Boot是由Pivotal团队提供的全新框架,其设计目的是用来简化新Spring应用的初始搭建以及开发过程.该框架使用了特定的方式来进行配置,从而使开发人员不再需要定义样板化的配置.通过这种方式,Spring Boot致力于在蓬勃发展的快速应用开发领域(rapid application development)成为领导者. 在集成MyBatis前,我们先配置一个druid数据源. Spring Boot 系列 1.Spring Boot 入门 2.Spring Boot 属性配置
-
Spring Security 在 Spring Boot 中的使用详解【集中式】
1.1 准备 1.1.1 创建 Spring Boot 项目 创建好一个空的 Spring Boot 项目之后,写一个 controller 验证此时是可以直接访问到该控制器的. 1.1.2 引入 Spring Security 在 Spring Boot 中引入 Spring Security 是相当简单的,可以在用脚手架创建项目的时候勾选,也可以创建完毕后在 pom 文件中加入相关依赖. <dependency> <groupId>org.springframework