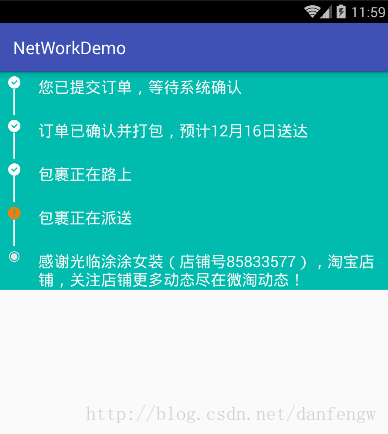
Android StepView实现物流进度效果
本文实例为大家分享了Android StepView物流进度的具体代码,供大家参考,具体内容如下

之前看了一个别人写的物流进度的demo,自定义View用的挺好的,但是感觉太麻烦了,就自己写了一个简单的,思路很简单,上面是效果图。
思路
思路:主要是进行了动态添加,根据上面的效果展示,创建一个子布局,如下图所示(代码里面的布局图一个ImageView一个View一个TextView),然后自定义一个MyVerticalView继承LinearLayout(注意设置orientation),在MyVerticalView中根据数据来addview()就可以了
代码

Model
mode的具体变量是根据上面item的布局,我们需要知道当前的状态跟具体过程描述。状态分为下面三种情况:
STATE_PROCESSING:正在进行中(图标如下)

STATE_COMPLETED:已经完成(图标如下)

STATE_DEFAULT:最后默认步骤(图标如下)

根据上面分析需要两个变量,currentState是为了根据状态设置不同图标的
private String description;//当前状态描述
 private String currentState;//当前状态(上面三个状态中的一个)
完整
public class StepModel {
 public static final String STATE_PROCESSING="PROCESSING";//正在进行的状态
 public static final String STATE_COMPLETED="COMPLETED";//已经完成的状态
 public static final String STATE_DEFAULT="DEFAULT";//结尾的默认状态
 private String description;//当前状态描述
 private String currentState;//当前状态(上面三个状态中的一个)
 public StepModel(String description, String currentState) {
  this.description = description;
  this.currentState = currentState;
 }
 public String getCurrentState() {
  return currentState;
 }
 public void setCurrentState(String currentState) {
  this.currentState = currentState;
 }

 public String getDescription() {
  return description;
 }
 public void setDescription(String description) {
  this.description = description;
 }
}
StepView
public class MyVerticalStepView extends LinearLayout {
 private List<StepModel> mDatas = new ArrayList<>();//下面给出了它的set跟get方法
 private Context mContext;

 public MyVerticalStepView(Context context) {
  this(context, null);
 }

 public MyVerticalStepView(Context context, AttributeSet attrs) {
  this(context, attrs, 0);
 }

 public MyVerticalStepView(Context context, AttributeSet attrs, int defStyleAttr) {
  super(context, attrs, defStyleAttr);
  mContext = context;

 }

 private void init() {
  setOrientation(VERTICAL);
  mDatas = getmDatas();//获取数据
  for (int i = 0; i < mDatas.size(); i++) {
   //获取布局,注意第二个参数一定是ViewGroup,否则margin padding之类的属性将不能使用
   View itemview = LayoutInflater.from(mContext).inflate(R.layout.stepview_item, this, false);
   TextView description = (TextView) itemview.findViewById(R.id.description_tv);
   View line = itemview.findViewById(R.id.line_v);
   ImageView icon = (ImageView) itemview.findViewById(R.id.stepicon_iv);
   description.setText(mDatas.get(i).getDescription());
   //根据不同状态设置不同图标
   switch (mDatas.get(i).getCurrentState()) {
    case StepModel.STATE_COMPLETED:
     icon.setImageResource(R.drawable.complted);
     break;
    case StepModel.STATE_DEFAULT:
    //结尾图标隐藏竖线
     line.setVisibility(GONE);
     icon.setImageResource(R.drawable.default_icon);
     break;
    case StepModel.STATE_PROCESSING:

     icon.setImageResource(R.drawable.attention);
     break;
   }

   this.addView(itemview);

  }
  requestLayout();//重新绘制布局
  invalidate();//刷新当前界面
 }

 public List<StepModel> getmDatas() {
  return mDatas;
 }

 public void setmDatas(List<StepModel> mDatas) {
  this.mDatas = mDatas;
  init();
 }
}
Activity调用
public class StepViewDemoActivity extends AppCompatActivity {
 private MyVerticalStepView mStepView;

 @Override
 protected void onCreate(@Nullable Bundle savedInstanceState) {
  super.onCreate(savedInstanceState);
  setContentView(R.layout.stepviewlayout);
  mStepView= (MyVerticalStepView) findViewById(R.id.stepview);
   init();
 }
 private void init() {
  List<StepModel> datas=new ArrayList<>();
  StepModel step1=new StepModel("您已提交订单,等待系统确认",StepModel.STATE_COMPLETED);
  StepModel step2=new StepModel("订单已确认并打包,预计12月16日送达",StepModel.STATE_COMPLETED);
  StepModel step3=new StepModel("包裹正在路上",StepModel.STATE_COMPLETED);
  StepModel step4=new StepModel("包裹正在派送",StepModel.STATE_PROCESSING);
  StepModel step5=new StepModel("感谢光临涂涂女装(店铺号85833577),淘宝店铺,关注店铺更多动态尽在微淘动态!",StepModel.STATE_DEFAULT);
  datas.add(step1);
  datas.add(step2);
  datas.add(step3);
  datas.add(step4);
  datas.add(step5);
  mStepView.setmDatas(datas);

 }
}
布局
itemview布局
<?xml version="1.0" encoding="utf-8"?>
<RelativeLayout xmlns:android="http://schemas.android.com/apk/res/android"
 android:orientation="horizontal" android:layout_width="match_parent"
 android:layout_height="wrap_content"
 android:paddingTop="5dp"
 android:background="@color/stepviewbg"
 >
<LinearLayout
 android:id="@+id/left"
 android:layout_width="wrap_content"
 android:layout_height="wrap_content"
 android:orientation="vertical"
 android:paddingRight="10dp"
 android:paddingLeft="10dp"

 >
 <ImageView
  android:id="@+id/stepicon_iv"
  android:layout_width="15dp"
  android:layout_height="15dp"
  android:src="@drawable/attention"
  />
 <View
  android:id="@+id/line_v"
  android:layout_width="2dp"
  android:layout_height="30dp"
  android:background="@color/uncompleted_text_color"
  android:layout_gravity="center_horizontal"
  android:visibility="visible"
  ></View>

</LinearLayout>
 <LinearLayout
  android:layout_toRightOf="@+id/left"
  android:layout_width="wrap_content"
  android:layout_height="wrap_content"
  android:layout_weight="1"
  android:orientation="vertical"
  android:paddingRight="10dp"
  android:paddingLeft="10dp"
  >
  <TextView
   android:id="@+id/description_tv"
   android:layout_width="match_parent"
   android:layout_height="wrap_content"
   android:textSize="18sp"
   android:textColor="@color/uncompleted_text_color"
   android:text="订单正在派送中"/>

 </LinearLayout>
</RelativeLayout>
stepview布局
<?xml version="1.0" encoding="utf-8"?>
<LinearLayout xmlns:android="http://schemas.android.com/apk/res/android"
 android:orientation="vertical" android:layout_width="match_parent"
 android:layout_height="match_parent">
 <com.demo.demo.networkdemo.stepview.MyVerticalStepView
  android:id="@+id/stepview"
  android:layout_width="match_parent"
  android:layout_height="wrap_content">
 </com.demo.demo.networkdemo.stepview.MyVerticalStepView>
</LinearLayout>
以上就是本文的全部内容,希望对大家的学习有所帮助,也希望大家多多支持我们。
赞 (0)

