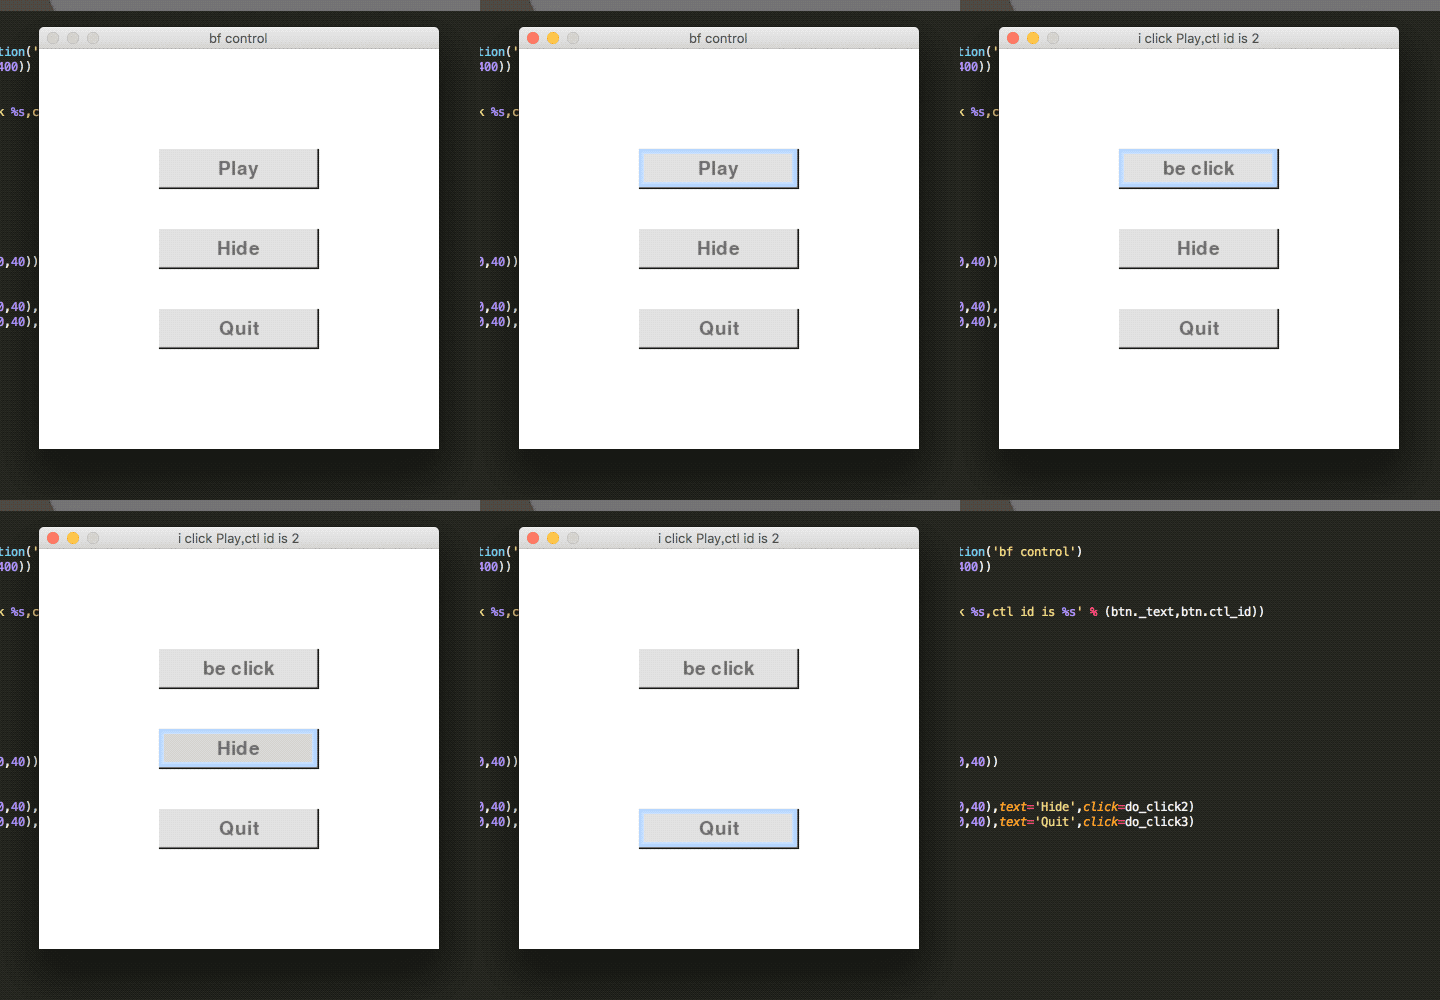
pygame实现非图片按钮效果
本文实例为大家分享了pygame实现非图片按钮效果的具体代码,供大家参考,具体内容如下
按钮类程序
# -*- coding=utf-8 -*-
import threading
import pygame
from pygame.locals import MOUSEBUTTONDOWN

class BFControlId(object):
 _instance_lock = threading.Lock()
 def __init__(self):
  self.id = 1

 @classmethod
 def instance(cls, *args, **kwargs):
  if not hasattr(BFControlId, "_instance"):
   BFControlId._instance = BFControlId(*args, **kwargs)
  return BFControlId._instance

 def get_new_id(self):
  self.id += 1
  return self.id

CLICK_EFFECT_TIME = 100
class BFButton(object):
 def __init__(self, parent, rect, text='Button', click=None):
  self.x,self.y,self.width,self.height = rect
  self.bg_color = (225,225,225)
  self.parent = parent
  self.surface = parent.subsurface(rect)
  self.is_hover = False
  self.in_click = False
  self.click_loss_time = 0
  self.click_event_id = -1
  self.ctl_id = BFControlId().instance().get_new_id()
  self._text = text
  self._click = click
  self._visible = True
  self.init_font()

 def init_font(self):
  font = pygame.font.Font(None, 28)
  white = 100, 100, 100
  self.textImage = font.render(self._text, True, white)
  w, h = self.textImage.get_size()
  self._tx = (self.width - w) / 2
  self._ty = (self.height - h) / 2

 @property
 def text(self):
  return self._text

 @text.setter
 def text(self, value):
  self._text = value
  self.init_font()

 @property
 def click(self):
  return self._click

 @click.setter
 def click(self, value):
  self._click = value

 @property
 def visible(self):
  return self._visible

 @visible.setter
 def visible(self, value):
  self._visible = value

 def update(self, event):
  if self.in_click and event.type == self.click_event_id:
   if self._click: self._click(self)
   self.click_event_id = -1
   return

  x, y = pygame.mouse.get_pos()
  if x > self.x and x < self.x + self.width and y > self.y and y < self.y + self.height:
   self.is_hover = True
   if event.type == MOUSEBUTTONDOWN:
    pressed_array = pygame.mouse.get_pressed()
    if pressed_array[0]:
     self.in_click = True
     self.click_loss_time = pygame.time.get_ticks() + CLICK_EFFECT_TIME
     self.click_event_id = pygame.USEREVENT+self.ctl_id
     pygame.time.set_timer(self.click_event_id,CLICK_EFFECT_TIME-10)
  else:
   self.is_hover = False

 def draw(self):
  if self.in_click:
   if self.click_loss_time < pygame.time.get_ticks():
    self.in_click = False
  if not self._visible:
   return
  if self.in_click:
   r,g,b = self.bg_color
   k = 0.95
   self.surface.fill((r*k, g*k, b*k))
  else:
   self.surface.fill(self.bg_color)
  if self.is_hover:
   pygame.draw.rect(self.surface, (0,0,0), (0,0,self.width,self.height), 1)
   pygame.draw.rect(self.surface, (100,100,100), (0,0,self.width-1,self.height-1), 1)
   layers = 5
   r_step = (210-170)/layers
   g_step = (225-205)/layers
   for i in range(layers):
    pygame.draw.rect(self.surface, (170+r_step*i, 205+g_step*i, 255), (i, i, self.width - 2 - i*2, self.height - 2 - i*2), 1)
  else:
   self.surface.fill(self.bg_color)
   pygame.draw.rect(self.surface, (0,0,0), (0,0,self.width,self.height), 1)
   pygame.draw.rect(self.surface, (100,100,100), (0,0,self.width-1,self.height-1), 1)
   pygame.draw.rect(self.surface, self.bg_color, (0,0,self.width-2,self.height-2), 1)

  self.surface.blit(self.textImage, (self._tx, self._ty))
主要给按钮实现了:
1.鼠标悬停效果
2.按钮点击效果
3.文本绘制效果
4.点击后事件触发效果
5.按钮的隐藏和显示控制
使用方法:
btn = BFButton(my_surface,my_rect,text=my_label,click=my_method)
在事件响应处
btn.update(event)
在绘图处
btn.draw()
下面附一个例子
# -*- coding=utf-8 -*-
import pygame
from bf_button import BFButton

pygame.init()
screencaption = pygame.display.set_caption('bf control')
screen = pygame.display.set_mode((400,400))

def do_click1(btn):
 pygame.display.set_caption('i click %s,ctl id is %s' % (btn._text,btn.ctl_id))
 btn.text = 'be click'

def do_click2(btn):
 btn.visible = False

def do_click3(btn):
 pygame.quit()
 exit()

button1 = BFButton(screen, (120,100,160,40))
button1.text = 'Play'
button1.click = do_click1
button2 = BFButton(screen, (120,180,160,40),text='Hide',click=do_click2)
button3 = BFButton(screen, (120,260,160,40),text='Quit',click=do_click3)

while True:
 for event in pygame.event.get():
  if event.type == pygame.QUIT:
    pygame.quit()
    exit()
  button1.update(event)
  button2.update(event)
  button3.update(event)

 screen.fill((255,255,255))
 button1.draw()
 button2.draw()
 button3.draw()

 pygame.display.update()
例子里有两个按钮
第一个按钮事件是修改界面标题和按钮上的文字
第二个按钮事件是隐藏自己
第三个按钮事件是退出

为方便按钮管理,其实可以定一个ButtonGroup类
class BFButtonGroup(object):
 def __init__(self):
  self.btn_list = []

 def add_button(self, button):
  self.btn_list.append(button)

 def make_button(self, screen, rect, text='Button', click=None):
  button = BFButton(screen, rect,text=text,click=click)
  self.add_button(button)

 def update(self, event):
  for button in self.btn_list: button.update(event)

 def draw(self):
  for button in self.btn_list: button.draw()
这样使用的时候只需要对ButtonGroup进行update和draw
# -*- coding=utf-8 -*-
import pygame
from bf_button import BFButton,BFButtonGroup

pygame.init()
screencaption = pygame.display.set_caption('bf control')
screen = pygame.display.set_mode((400,400))

def do_click1(btn):
 pygame.display.set_caption('i click %s,ctl id is %s' % (btn._text,btn.ctl_id))
 btn.text = 'be click'

def do_click2(btn):
 btn.visible = False

def do_click3(btn):
 pygame.quit()
 exit()

btn_group = BFButtonGroup()
btn_group.make_button(screen, (120,100,160,40),text='Play',click=do_click1)
btn_group.make_button(screen, (120,180,160,40),text='Hide',click=do_click2)
btn_group.make_button(screen, (120,260,160,40),text='Quit',click=do_click3)

while True:
 for event in pygame.event.get():
  if event.type == pygame.QUIT:
    pygame.quit()
    exit()
  btn_group.update(event)

 screen.fill((255,255,255))
 btn_group.draw()

 pygame.display.update()
以上就是本文的全部内容,希望对大家的学习有所帮助,也希望大家多多支持我们。
赞 (0)

