小程序获取用户信息的两种方法详解(getUserProfile和头像昵称填写)
目录
- 第一种使用 getUserProfile
- 第二种使用 头像昵称填写
- 总结

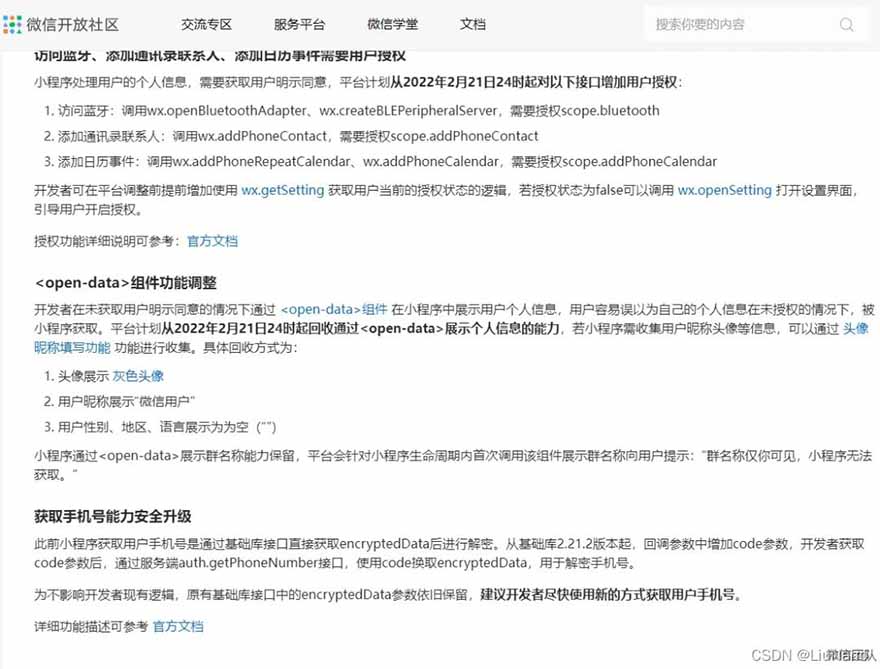
相信大家之前也经常使用open-data获取用户的头像和昵称吧,但微信的这个改编意味着我们要使用新的方法获取信息了。在讨论区引发了很大的讨论,接下来我们一起尝试两种获取信息的方法。
第一种使用 getUserProfile
我们可以查看一下官方文档 wx.getUserProfile(Object object),获取用户信息。页面产生点击事件(例如 button 上 bindtap 的回调中)后才可调用,每次请求都会弹出授权窗口,用户同意后返回 userInfo。但要注意每次都需要授权一次是不是很麻烦,我们可以将他保存在我们数据库中授权一次日后直接调用。
代码示例
<view class="container">
  <view class="userinfo">
    <block wx:if="{{!hasUserInfo}}">
      <button wx:if="{{canIUseGetUserProfile}}" bindtap="getUserProfile"> 获取头像昵称 </button>
      <button wx:else open-type="getUserInfo" bindgetuserinfo="getUserInfo"> 获取头像昵称 </button>
    </block>
    <block wx:else>
      <image bindtap="bindViewTap" class="userinfo-avatar" src="{{userInfo.avatarUrl}}" mode="cover"></image>
      <text class="userinfo-nickname">{{userInfo.nickName}}</text>
    </block>
  </view>
</view>
Page({
  data: {
    userInfo: {},
    hasUserInfo: false,
    canIUseGetUserProfile: false,
  },
  onLoad() {
    if (wx.getUserProfile) {
      this.setData({
        canIUseGetUserProfile: true
      })
    }
  },
  getUserProfile(e) {
    wx.getUserProfile({
      desc: '用于完善会员资料', // 声明获取用户个人信息后的用途,后续会展示在弹窗中,请谨慎填写
      success: (res) => {
        this.setData({
          userInfo: res.userInfo,
          hasUserInfo: true
        })
      }
    })
  },

第二种使用 头像昵称填写
当小程序需要让用户完善个人资料时,可以通过微信提供的头像昵称填写能力快速完善。
头像选择
需要将 button 组件 open-type 的值设置为 chooseAvatar,当用户选择需要使用的头像之后,可以通过 bindchooseavatar 事件回调获取到获取到头像信息的临时路径。
昵称填写
需要将 input 组件 type 的值设置为 nickname,当用户在此input进行输入时,键盘上方会展示微信昵称。
然后我们将他存到数据库,日后直接调用即可!
<button class="avatar-wrapper" open-type="chooseAvatar" bind:chooseavatar="onChooseAvatar">
  <image class="avatar" src="{{avatarUrl}}"></image>
</button>
<input type="nickname" class="weui-input" placeholder="请输入昵称"/>
const defaultAvatarUrl = 'https://mmbiz.qpic.cn/mmbiz/icTdbqWNOwNRna42FI242Lcia07jQodd2FJGIYQfG0LAJGFxM4FbnQP6yfMxBgJ0F3YRqJCJ1aPAK2dQagdusBZg/0'
Page({
  data: {
    avatarUrl: defaultAvatarUrl,
  },
  onChooseAvatar(e) {
    const { avatarUrl } = e.detail
    this.setData({
      avatarUrl,
    })
  }
})

接下来我们要将值进行存储,并上传数据库。我们使用form将数据保存到data里面。
<button class="avatar-wrapper" open-type="chooseAvatar" bind:chooseavatar="onChooseAvatar">
  <image class="avatar" src="{{avatarUrl}}"></image>
</button>
<form catchsubmit="formSubmit">
  <view class="row">
    <view class="text1">名称:</view>
    <input type="nickname" class="weui-input" name="input" placeholder="请输入昵称" />
  </view>
  <button type="primary" style="margin-top:40rpx;margin-bottom:20rpx" formType="submit">提交</button>
</form>
const defaultAvatarUrl = 'https://mmbiz.qpic.cn/mmbiz/icTdbqWNOwNRna42FI242Lcia07jQodd2FJGIYQfG0LAJGFxM4FbnQP6yfMxBgJ0F3YRqJCJ1aPAK2dQagdusBZg/0'
Page({
  /**
   * 页面的初始数据
   */
  data: {
    avatarUrl: defaultAvatarUrl,
    name: '',
  },
  onChooseAvatar(e) {
    const { avatarUrl } = e.detail
    this.setData({
      avatarUrl,
    })
  },
  formSubmit(e) {
    console.log(e.detail.value.input)
    this.setData({
      name: e.detail.value.input
    })
   }
 })
这样我们点击提交时候发现值保存data里面了,接下来我们获取openid,可以参考之前视频哦!这里默认已经将openid保存到app.js里面了!
onLoad: function (options) {
    const app = getApp()
    var userid = app.globalData.openid
    this.setData({
      userid: userid,
    })
  },
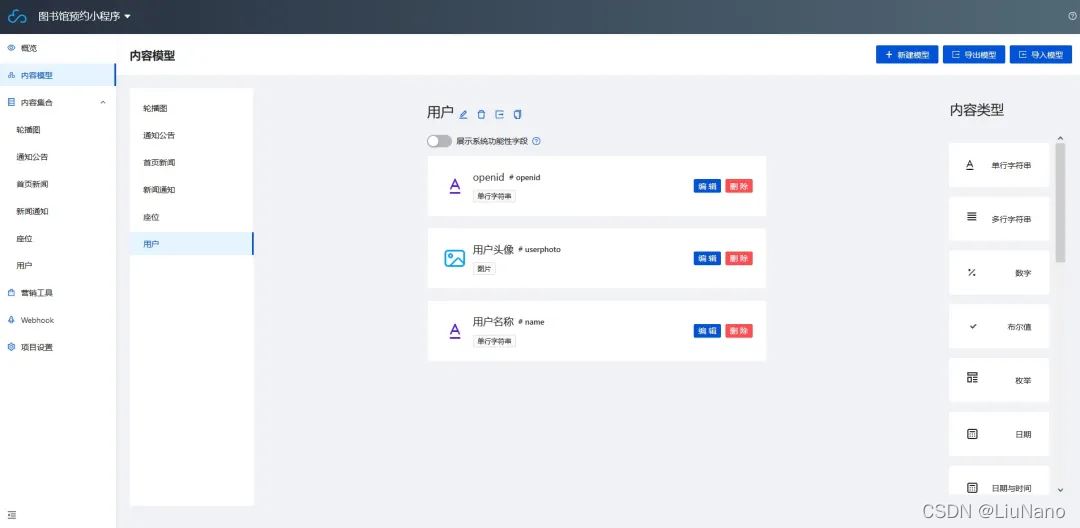
接下来我们上传图片到云开发,然后存到数据库中,这里在cms创建内容模型。

// pages/getuser/getuser.js
const db = wx.cloud.database()
const defaultAvatarUrl = 'https://mmbiz.qpic.cn/mmbiz/icTdbqWNOwNRna42FI242Lcia07jQodd2FJGIYQfG0LAJGFxM4FbnQP6yfMxBgJ0F3YRqJCJ1aPAK2dQagdusBZg/0'
Page({
  /**
   * 页面的初始数据
   */
  data: {
    avatarUrl: defaultAvatarUrl,
    name: '',
    userid: '
',
    userphoto: '
',
    imgrl: '
'
  },
  onChooseAvatar(e) {
    const { avatarUrl } = e.detail
    this.setData({
      avatarUrl,
    })
  },
  formSubmit(e) {
    console.log(e.detail.value.input)
    this.setData({
      name: e.detail.value.input
    })
    var that = this;
        wx.cloud.uploadFile({
          cloudPath: (new Date()).valueOf() + '.png', // 文件名
          filePath: this.data.avatarUrl, // 文件路径
          success: res => {
            // get resource ID
            console.log(res.fileID)
            // 赋值图片
            that.setData({
              imgrl: res.fileID
            })
            that.upload(res.fileID);
          },
          fail: err => {
            // handle error
          }
        })
  },
  upload(filepath){
    console.log(filepath)
    db.collection("user").add({
      data: {
          name:this.data.name,
          openid:this.data.userid,
          userphoto:filepath,
          _createTime: Date.parse(new Date()),
      }
  }).then(res => {
      wx.showToast({
          title: '添加成功',
          icon: 'success',
          duration: 2000
      })
  })
  },
  /**
   * 生命周期函数--监听页面加载
   */
  onLoad: function (options) {
    const app = getApp()
    var userid = app.globalData.openid
    this.setData({
      userid: userid,
    })
  },
})
这样我们就完成了!

总结
到此这篇关于小程序获取用户信息的文章就介绍到这了,更多相关小程序获取用户信息方法内容请搜索我们以前的文章或继续浏览下面的相关文章希望大家以后多多支持我们!
赞 (0)

