Flutter 控制屏幕旋转的实现
最近需要做个平板的项目,然后需要直接横屏,有2种实现方式。
1, 随着屏幕旋转,布局自动调整。做横竖屏适配
2,强制屏幕横屏,不随着屏幕去调整
第一种方式这里就不做说明了。代码做适配就可以。 下面说一下第二种实现方式
Flutter 自带方式
flutter 为我们提供了方法来控制系统的横竖屏显示
 SystemChrome.setPreferredOrientations([
   DeviceOrientation.landscapeLeft,
   DeviceOrientation.landscapeRight,
   DeviceOrientation.portraitUp,
   DeviceOrientation.portraitDown
  ]).then((_) {
  });
包含的方向类型。 !!!!但是但是但是这个方法只适用于android在iOS上没有效果,上网查资料有大神封装的 flutter插件orientation,flutter插件auto_orientation在iOS上都起不到效果,所以打算自己写一个原生文件与flutter进行通讯,实现屏幕旋转。也是笔者在查询资料之后做的一个整合和解释说明
iOS端实现屏幕旋转
创建iOS原生文件
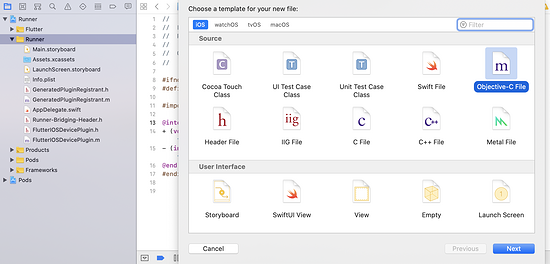
创建iOS原生文件来实现交互,首先要创建个原生文件。命名为FlutterIOSDevicePlugin。 创建文件

创建一个命名为FlutterIOSDevicePlugin.h 和命名为FlutterIOSDevicePlugin.m文件,说明一下: FlutterIOSDevicePlugin.h文件选择图片里面的header File模块创建即可。
创建之后,一起看一下FlutterIOSDevicePlugin.h里面的代码
#ifndef FlutterIOSDevicePlugin_h
#define FlutterIOSDevicePlugin_h

#import <Flutter/Flutter.h>

@interface FlutterIOSDevicePlugin : NSObject<FlutterPlugin>
+ (void)registerWithRegistrar:(NSObject<FlutterPluginRegistrar>*)registrar flutterViewController:(FlutterViewController*) controller;
- (instancetype)newInstance:(NSObject<FlutterPluginRegistrar>*)registrar flutterViewController:(FlutterViewController*) controller;
@end
#endif /* FlutterIOSDevicePlugin_h */
这个不需要过多说明了看一下FlutterIOSDevicePlugin.m的代码
#import <Foundation/Foundation.h>
#import "FlutterIOSDevicePlugin.h"

@interface FlutterIOSDevicePlugin () {
  NSObject<FlutterPluginRegistrar> *_registrar;
  FlutterViewController *_controller;
}
@end

static NSString* const CHANNEL_NAME = @"flutter_ios_device";
static NSString* const METHOD_CHANGE_ORIENTATION = @"change_screen_orientation";
static NSString* const ORIENTATION_PORTRAIT_UP = @"portraitUp";
static NSString* const ORIENTATION_PORTRAIT_DOWN = @"portraitDown";
static NSString* const ORIENTATION_LANDSCAPE_LEFT = @"landscapeLeft";
static NSString* const ORIENTATION_LANDSCAPE_RIGHT = @"landscapeRight";

@implementation FlutterIOSDevicePlugin
+ (void)registerWithRegistrar:(NSObject<FlutterPluginRegistrar>*)registrar {
  FlutterMethodChannel* channel = [FlutterMethodChannel
                   methodChannelWithName:CHANNEL_NAME
                   binaryMessenger:[registrar messenger]];
  FlutterIOSDevicePlugin* instance = [[FlutterIOSDevicePlugin alloc] newInstance:registrar flutterViewController:nil];
  [registrar addMethodCallDelegate:instance channel:channel];
}

+ (void)registerWithRegistrar:(NSObject<FlutterPluginRegistrar>*)registrar flutterViewController:(FlutterViewController*) controller {
  FlutterMethodChannel* channel = [FlutterMethodChannel
                   methodChannelWithName:CHANNEL_NAME
                   binaryMessenger:[registrar messenger]];
  FlutterIOSDevicePlugin* instance = [[FlutterIOSDevicePlugin alloc] newInstance:registrar flutterViewController:controller];
  [registrar addMethodCallDelegate:instance channel:channel];
}

- (instancetype)newInstance:(NSObject<FlutterPluginRegistrar>*)registrar flutterViewController:(FlutterViewController*) controller{
  _registrar = registrar;
  _controller = controller;
  return self;
}

- (void)handleMethodCall:(FlutterMethodCall*)call result:(FlutterResult)result {
  if ([METHOD_CHANGE_ORIENTATION isEqualToString:call.method]) {
    NSArray *arguments = call.arguments;
    NSString *orientation = arguments[0];
    NSNumber *index = [NSNumber numberWithInt: [call.arguments[0] intValue]];
    NSInteger iOSOrientation;
     if ([orientation isEqualToString:ORIENTATION_LANDSCAPE_LEFT]){
           iOSOrientation = UIDeviceOrientationLandscapeLeft;
         }else if([orientation isEqualToString:ORIENTATION_LANDSCAPE_RIGHT]){
           iOSOrientation = UIDeviceOrientationLandscapeRight;
         }else if ([orientation isEqualToString:ORIENTATION_PORTRAIT_DOWN]){
           iOSOrientation = UIDeviceOrientationPortraitUpsideDown;
         }else{
           iOSOrientation = UIDeviceOrientationPortrait;
         }

    [[UIDevice currentDevice] setValue:@(iOSOrientation) forKey:@"orientation"];
//    [[NSNotificationCenter defaultCenter] postNotificationName:@"FlutterIOSDevicePlugin" object:nil userInfo:@{@"orientationMask": index}];
//    [UIViewController attemptRotationToDeviceOrientation];

    result(nil);
  } else {
    result(FlutterMethodNotImplemented);
  }
}
@end
以上是全部的代码,其中尝试了用通知的方式去做屏幕旋转,后来发现其实没有那么麻烦,直接采用的是
[[UIDevice currentDevice] setValue:@(iOSOrientation) forKey:@"orientation"];
方式做的。其中遇到的问题:
问题1:iphone手机上可以正常旋转,ipad上不行
这个问题主要原因是info。plist文件里面的iphone和ipad不一致,且勾选Requires full screen 即可

回到正轨哈
注册原生插件文件
iOS 工程种有个GeneratedPluginRegistrant.m文件,直接注册就可以了。 如果你项目引入了其他第三方插件,也是统一在这个地方注册的
#import "GeneratedPluginRegistrant.h"

#if __has_include(<auto_orientation/AutoOrientationPlugin.h>)
#import <auto_orientation/AutoOrientationPlugin.h>
#else
@import auto_orientation;
#endif

#if __has_include(<orientation/OrientationPlugin.h>)
#import <orientation/OrientationPlugin.h>
#else
@import orientation;
#endif
#import "FlutterIOSDevicePlugin.h"

@implementation GeneratedPluginRegistrant

+ (void)registerWithRegistry:(NSObject<FlutterPluginRegistry>*)registry {
 [AutoOrientationPlugin registerWithRegistrar:[registry registrarForPlugin:@"AutoOrientationPlugin"]];
 [OrientationPlugin registerWithRegistrar:[registry registrarForPlugin:@"OrientationPlugin"]];
//  [registry registrarForPlugin:@"FlutterIOSDevicePlugin"];

  [FlutterIOSDevicePlugin registerWithRegistrar: [registry registrarForPlugin:@"FlutterIOSDevicePlugin"]];
}

@end
代码中的这个片段是自己写的插件注册的方法,其他的AutoOrientationPlugin,OrientationPlugin是引用第三方插件自动生成的代码。
[FlutterIOSDevicePlugin registerWithRegistrar: [registry registrarForPlugin:@"FlutterIOSDevicePlugin"]];
AppDelegate文件中的设置
import UIKit
import Flutter

@UIApplicationMain
@objc class AppDelegate: FlutterAppDelegate {
 var orientationMask: UIInterfaceOrientationMask = .all;

 override func application(
  _ application: UIApplication,
  didFinishLaunchingWithOptions launchOptions: [UIApplication.LaunchOptionsKey: Any]?
 ) -> Bool {
  NotificationCenter.default.addObserver(self, selector: #selector(changeLandscape(center:)), name:NSNotification.Name(rawValue: "FlutterIOSDevicePlugin"), object: nil)
  GeneratedPluginRegistrant.register(with: self);
  return super.application(application, didFinishLaunchingWithOptions: launchOptions)
 }
  override func application(_ application: UIApplication, supportedInterfaceOrientationsFor window: UIWindow?) -> UIInterfaceOrientationMask {
    return orientationMask;
  }

  @objc func changeLandscape(center: Notification){
    let index: NSNumber = (center.userInfo?["orientationMask"] ?? 5) as! NSNumber
    var mask : UIInterfaceOrientationMask = .all
    switch index {
    case 0:
      mask = .portrait
      break
    case 1:
      mask = .landscapeLeft
      break
    case 2:
      mask = .landscapeRight
      break
    case 3:
      mask = .portraitUpsideDown
      break
    case 4:
      mask = .landscape
      break
    case 5:
      mask = .all
      break
    case 6:
      mask = .allButUpsideDown
      break

    default:
      mask = .all
      break
    }
    orientationMask = mask;
    _ = application(UIApplication.shared, supportedInterfaceOrientationsFor: UIApplication.shared.keyWindow)
  }
}
其中changeLandscape方法是控制监听的事件的方法,目前没什么用。 主要代码是这一段,这个是在发出屏幕旋转的时候回调的方法,这里面设置的是全部的方向都可以。
  override func application(_ application: UIApplication, supportedInterfaceOrientationsFor window: UIWindow?) -> UIInterfaceOrientationMask {
    return orientationMask;
  }
问题2:程序不走该方法
具体原因是因为info.plist文件问题。参考上面设置就没问题
flutter 原生代码使用
这个地方是针对于iOS平台去做的区别。
MethodChannel _channel = const MethodChannel('flutter_ios_device');

@override
 void initState() {
  SystemChrome.setPreferredOrientations([
   DeviceOrientation.landscapeLeft,
   DeviceOrientation.landscapeRight,
   DeviceOrientation.portraitUp,
   DeviceOrientation.portraitDown
  ]).then((_) {
   if (Platform.isIOS) {
    this.changeScreenOrientation(DeviceOrientation.landscapeLeft);
   }
  });
  super.initState();
 }

Future<void> changeScreenOrientation(DeviceOrientation orientation) {
  String o;
  switch (orientation) {
   case DeviceOrientation.portraitUp:
    o = 'portraitUp';
    break;
   case DeviceOrientation.portraitDown:
    o = 'portraitDown';
    break;
   case DeviceOrientation.landscapeLeft:
    o = 'landscapeLeft';
    break;
   case DeviceOrientation.landscapeRight:
    o = 'landscapeRight';
    break;
  }
  return _channel.invokeMethod('change_screen_orientation', [o]);
 }
代码不用过多说明了, 有不了解的可以留言
问题3: 启动程序自动旋转
SystemChrome.setPreferredOrientations需要设置全部内容。不然会默认旋转。有点小坑,
以上基本上可以实现屏幕旋转的问题,如果有小伙伴还是不行,可以试一下用iOS原生通知的方式去完成。这个我做的是平板的项目,暂时没有问题,更多相关Flutter 控制屏幕旋转内容请搜索我们以前的文章或继续浏览下面的相关文章希望大家以后多多支持我们!

