Android毕业设计备忘录APP
目录
- 1.系统需求分析
- 1.2 系统需求
- 功能&说明
- 1.3 该项目涉及到的技术点
- 2.数据存储设计
- 2.1 SharedPrefenrences/SQLite存储介绍
- SharedPrefenrences :
- SQLite存储
- 2.2数据表结构
- 3.具体编码及截图
- 3.1 主界面
- 3.2 各功能模块
- 4 总结
源码放到GitHub上了,大家可以看一下 https://github.com/become-better1/hh
1.系统需求分析
1.1 系统功能及框图
该项目实现了备忘录的创建,修改,删除,查询,对备忘录数目的统计和软件的说明。
1.2 系统需求
功能&说明
备忘录的创建 主键自动生成,将控件中的数据对Word字段进行赋值
备忘录的修改 将控件中的数据对Word字段进行赋值,查询条件是与原先的Word字段相等
备忘录的查询 对Word字段进行查询,查询条件是与控件中的数据相等
备忘录的删除 按照Word字段进行删除,查询条件是与控件中的数据相等
备忘录数目的统计 通过SharedPrefenrences来存储和读取数据
软件的说明 进一步的描述
1.3 该项目涉及到的技术点
界面控件:TextView,EditText,Button,ImageButton,ListView,View
布局:线性布局
事件:监听事件
数据存储:SharedPrefenrences,SQLite存储
Activity和Intent
2.数据存储设计
2.1 SharedPrefenrences/SQLite存储介绍
SharedPrefenrences :
SharedPreferences是Android平台上一个轻量级的存储类,用来保存应用的一些常用配置,比如Activity状态,Activity暂停时,将此activity的状态保存到SharedPereferences中;当Activity重载,系统回调方法onSaveInstanceState时,再从SharedPreferences中将值取出。
SharedPreferences提供了java常规的Long、Int、String等类型数据的保存接口。 [SharedPreferences类似过去Windows系统上的ini配置文件,但是它分为多种权限,可以全局共享访问。
提示最终是以xml方式来保存,整体效率来看不是特别的高,对于常规的轻量级而言比SQLite要好不少,如果真的存储量不大可以考虑自己定义文件格式。xml处理时Dalvik会通过自带底层的本地XML Parser解析,比如XMLpull方式,这样对于内存资源占用比较好。
文件存储
文件存储是Android中最基本的一种数据存储方式,它不对存储的内容进行任何的格式化处理,所有数据都是原封不动的保存到文件当中,因而它比较适合用于存储一些简单的文本数据或者二进制数据。如果你想使用文件存储的方式来保存一些较为复杂的文本数据,就需要定义一套自己的格式规范以方便将数据从文件中重新解析出来。
Context类中提供了一个openFileOutput()方法,可以用于将数据存储到指定的文件中。这个方法有两个参数,第一个参数是文件名,在文件创建的时候使用的就是这个名称,(文件的位置是默认 存储到/data/data/packagename/files/目录下的)第二个参数就是文件的操作模式,主要有两种模式可选:MODE_PRIVATE和 MODE_APPEND,其中MODE_PRIVATE是默认的操作模式,表示当指定文件已存在,所写入的内容将会覆盖源文件中的内容,而MODE_APPEND则表示如果该文件已存在,就往文件里追加内容,不存在就创建新文件
SQLite存储
①SQLite是一个轻量级的关系型数据库,运算速度快,占用资源少,很适合在移动设备上使用, 不仅支持标准SQL语法,还遵循ACID(数据库事务)原则,无需账号,使用起来非常方便!
②但是在很多情况下, 文件并不一定是有效的,如多线程并发访问是相关的;app要处理可能变化的复杂数据结构等等! 比如银行的存钱与取钱!使用前两者就会显得很无力或者繁琐,数据库的出现可以解决这种问题, 而Android又给我们提供了这样一个轻量级的SQLite,为何不用?
③SQLite支持五种数据类型:NULL,INTEGER,REAL(浮点数),TEXT(字符串文本)和BLOB(二进制对象) 虽然只有五种,但是对于varchar,char等其他数据类型都是可以保存的;因为SQLite有个最大的特点:你可以各种数据类型的数据保存到任何字段中而不用关心字段声明的数据类型是什么,比如你 可以在Integer类型的字段中存放字符串,当然除了声明为主键INTEGER PRIMARY KEY的字段只能够存储64位整数! 另外, SQLite 在解析CREATE TABLE 语句时, 会忽略 CREATE TABLE 语句中跟在字段名后面的数据类型信息如下面语句会忽略 name字段的类型信息:CREATE TABLE person (personid integer primary key autoincrement, name varchar(20))
2.2数据表结构
给出使用的数据库的逻辑结构,需要说明各字段属性及含义
Id:作为主键,自带生成
Word:进行存储备忘录的信息
SharedPrefenrences代码
```java
SharedPreferences sharedP=getSharedPreferences("SaveTable",MODE_PRIVATE);
SharedPreferences.Editor editor=sharedP.edit();
int num=sharedP.getInt("number", 0);
num++;
editor.putInt("number", num);
editor.commit();
数据库封装代码:

```java
package com.example.coursedesign;

import java.util.ArrayList;
import java.util.List;

import android.content.ContentValues;
import android.content.Context;
import android.database.Cursor;
import android.database.sqlite.SQLiteDatabase;
import android.database.sqlite.SQLiteOpenHelper;
import android.util.Log;

public class DBOpenHelper extends SQLiteOpenHelper {
    final String CREATE_TABLE_SQL="create table myTable(_id integer primary key autoincrement,word text)";
    public static final String name = "myDb";
    public static final String table_name = "myTable";
    public DBOpenHelper( Context context, String name,  SQLiteDatabase.CursorFactory factory, int version) {
        super(context, name, null, version);
    }

    @Override
    public void onCreate(SQLiteDatabase db) {
        db.execSQL(CREATE_TABLE_SQL);
    }
    @Override
    public void onUpgrade(SQLiteDatabase db, int oldVersion, int newVersion) {
        Log.i("生活小助手","--版本更新"+oldVersion+"-->"+newVersion);
    }
    public List<String> readAll () {
        List<String> allCommodities = new ArrayList<String>();
        SQLiteDatabase db = this.getWritableDatabase();
        Cursor cursor = db.rawQuery("select * from myTable order by _id",null);
        if(cursor.moveToFirst()) {
            do {
                String title = cursor.getString(cursor.getColumnIndex("word"));
                allCommodities.add(title);
            }while (cursor.moveToNext());
        }
        cursor.close();
        return allCommodities;
    }
    public boolean addMyCollection(String s) {
        SQLiteDatabase db = this.getWritableDatabase();
        ContentValues values = new ContentValues();
        values.put("word",s);
        db.insert(table_name,null,values);
        values.clear();
        return true;
    }
    public void delete(String word) {
        SQLiteDatabase db = this.getWritableDatabase();
        if(db.isOpen()) {
         db.delete(table_name,"word=?",new String[]{word+""});
            db.close();
        }
    }

    public boolean update (String word,String wordP) {
        SQLiteDatabase db = this.getWritableDatabase();
        String sql = "update  myTable set word=? where word=?";
        String[] obj = new String[]{word,wordP};
        db.execSQL(sql,obj);
        return true;
    }
}
3.具体编码及截图
3.1 主界面
通过listView来显示所有的备忘录,界面含有主页,刷新,添加,个人中心的功能。

界面代码:
<LinearLayout xmlns:android="http://schemas.android.com/apk/res/android"
    xmlns:tools="http://schemas.android.com/tools"
    android:layout_width="match_parent"
    android:layout_height="match_parent"
    android:orientation="vertical"
    android:background="@drawable/blue"
    tools:context="com.example.coursedesign.MainActivity" >

    <ListView
        android:id="@+id/main_list"
        android:layout_width="match_parent"
        android:layout_height="370dp"
        android:layout_marginTop="4dp"
        android:layout_weight="1.19" />

    <View
        android:id="@+id/view1"
        android:layout_width="match_parent"
        android:layout_height="2dp"
        android:layout_marginTop="50dp"
        android:background="@drawable/green" />

    <LinearLayout
        android:layout_width="match_parent"
        android:layout_height="wrap_content"
        android:orientation="horizontal" >

        <ImageButton
            android:id="@+id/ib_home_page"
            android:layout_width="58dp"
            android:layout_height="55dp"
            android:src="@drawable/home" />

        <View
            android:id="@+id/view2"
            android:layout_width="2dp"
            android:layout_height="55dp"
            android:background="@drawable/green" />

        <ImageButton
            android:id="@+id/ib_add_product"
            android:layout_width="58dp"
            android:layout_height="55dp"
            android:src="@drawable/add" />

        <View
            android:id="@+id/view3"
            android:layout_width="2dp"
            android:layout_height="55dp"
            android:background="@drawable/green" />

        <ImageButton
            android:id="@+id/refresh"
            android:layout_width="58dp"
            android:layout_height="55dp"
            android:src="@drawable/refresh" />

        <View
            android:id="@+id/view4"
            android:layout_width="2dp"
            android:layout_height="55dp"
            android:background="@drawable/green" />

        <ImageButton
            android:id="@+id/ib_personal_center"
            android:layout_width="50dp"
            android:layout_height="55dp"
            android:layout_weight="0.84"
            android:src="@drawable/person" />
    </LinearLayout>

   </LinearLayout>
后台代码:
package com.example.coursedesign;

import java.util.ArrayList;
import java.util.List;

import android.app.Activity;
import android.content.Intent;
import android.os.Bundle;
import android.view.Menu;
import android.view.MenuItem;
import android.view.View;
import android.widget.AdapterView;
import android.widget.ArrayAdapter;
import android.widget.Button;
import android.widget.ImageButton;
import android.widget.ListView;
import android.widget.Toast;

public class MainActivity extends Activity {
   ImageButton buttonRefresh;
   ImageButton  buttonAdd;
   ImageButton buttonHome;
   ImageButton buttonPerson;
   DBOpenHelper dbHelper;
   List<String> listString=new ArrayList<String>();
   ListView listview;
	@Override
	protected void onCreate(Bundle savedInstanceState) {
		super.onCreate(savedInstanceState);
		setContentView(R.layout.activity_main);
		dbHelper = new  DBOpenHelper(getApplicationContext(),DBOpenHelper.name , null, 1);
		buttonRefresh=(ImageButton) findViewById(R.id.refresh);//刷新
		listview=(ListView) findViewById( R.id.main_list);
		 buttonRefresh.setOnClickListener(new View.OnClickListener() {
	            @Override
	            public void onClick(View v) {
	                listString = dbHelper.readAllCommodities();
	                ArrayAdapter<String> adapter=new ArrayAdapter<String>(MainActivity.this, android.R.layout.simple_list_item_1,listString);
	                listview.setAdapter(adapter);
	            }
	        });
		 listview.setOnItemClickListener(new AdapterView.OnItemClickListener() {///List
	            @Override
	            public void onItemClick(AdapterView<?> parent, View view, int position, long id) {
	                String s = (String) listview.getAdapter().getItem(position);
	                Bundle bundle1 = new Bundle();
	                bundle1.putInt("position",position);
	                bundle1.putString("title",s);
	                Intent intent = new Intent(MainActivity.this, ListViewActivity.class);
	                intent.putExtras(bundle1);
	                startActivity(intent);
	            }
	        });
		 buttonAdd=(ImageButton) findViewById(R.id.ib_add_product);//Add
		 buttonAdd.setOnClickListener(new View.OnClickListener() {
	            @Override
	            public void onClick(View v) {
	            	  Intent intent = new Intent(MainActivity.this, AddActivity.class);
	                  startActivity(intent);
	            }
	        });
		 buttonHome=(ImageButton) findViewById(R.id.ib_home_page);//home
		  buttonHome.setOnClickListener(new View.OnClickListener() {
		            @Override
		            public void onClick(View v) {
		            	 Toast.makeText(getApplicationContext(), "已在主页", Toast.LENGTH_SHORT).show();
		            }
		        });
		  buttonPerson=(ImageButton) findViewById(R.id.ib_personal_center);///person
		  buttonPerson.setOnClickListener(new View.OnClickListener() {
	            @Override
	            public void onClick(View v) {
	            	 Intent intent = new Intent(MainActivity.this, PersonActivity.class);
	                  startActivity(intent);
	            	 Toast.makeText(getApplicationContext(), "进入个人中心", Toast.LENGTH_SHORT).show();
	            }
	        });

	}

}
3.2 各功能模块
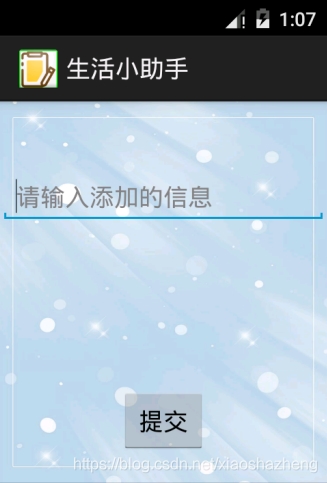
添加备忘录:
界面
通过SQLite数据实现对备忘录的添加。

界面代码:
<LinearLayout xmlns:android="http://schemas.android.com/apk/res/android"
    xmlns:tools="http://schemas.android.com/tools"
    android:layout_width="match_parent"
    android:layout_height="match_parent"
     android:orientation="vertical"
     android:background="@drawable/blue"
    tools:context="com.example.coursedesign.AddActivity" >
   <View
        android:layout_width="match_parent"
        android:layout_height="50dp" />
    <EditText
        android:id="@+id/add_text"
        android:layout_width="match_parent"
        android:layout_height="wrap_content"
        android:hint="请输入添加的信息" />
     <View
        android:layout_width="match_parent"
        android:layout_height="120dp" />
    <Button
        android:id="@+id/add_button"
         android:layout_gravity="center_horizontal"
         android:layout_width="wrap_content"
        android:layout_height="wrap_content"
        android:text="提交"
        />

</LinearLayout>
后台代码:
package com.example.coursedesign;

import android.app.Activity;
import android.app.backup.SharedPreferencesBackupHelper;
import android.content.SharedPreferences;
import android.os.Bundle;
import android.view.Menu;
import android.view.MenuItem;
import android.view.View;
import android.widget.ArrayAdapter;
import android.widget.Button;
import android.widget.EditText;
import android.widget.Toast;

public class AddActivity extends Activity {

	Button button;
	EditText editText;
	@Override
	protected void onCreate(Bundle savedInstanceState) {
		super.onCreate(savedInstanceState);
		setContentView(R.layout.activity_add);
		button=(Button) findViewById(R.id.add_button);
		editText=(EditText) findViewById(R.id.add_text);
		 button.setOnClickListener(new View.OnClickListener() {
	            @Override
	            public void onClick(View v) {
	               String s=editText.getText().toString();
	               DBOpenHelper dbHelper = new DBOpenHelper(getApplicationContext(), DBOpenHelper.name, null, 1);
	               if(s!=null){
	            	   if(dbHelper.addMyCollection(s)){
	            		   Toast.makeText(getApplicationContext(), "添加成功", Toast.LENGTH_SHORT).show();
	            		   SharedPreferences sharedP=getSharedPreferences("SaveTable",MODE_PRIVATE);
	            		   SharedPreferences.Editor editor=sharedP.edit();
	            		   int num=sharedP.getInt("number", 0);
	            		   num++;
	            		   editor.putInt("number", num);
	            		   editor.commit();
	            		   finish();
	            	   }
	            	   else{
	            		   Toast.makeText(getApplicationContext(), "添加失败", Toast.LENGTH_SHORT).show();
	            	   }
	               }
	            }
	        });
	}

}
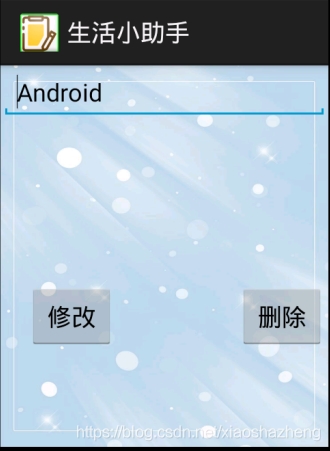
删除和修改备忘录:
通过SQLite数据实现对备忘录的修改和删除。
界面:

界面代码:
<LinearLayout xmlns:android="http://schemas.android.com/apk/res/android"
    xmlns:tools="http://schemas.android.com/tools"
    android:layout_width="match_parent"
    android:layout_height="match_parent"
    android:orientation="vertical"
    android:background="@drawable/blue"
    tools:context="com.example.coursedesign.ListViewActivity" >

    <EditText
        android:id="@+id/listView_text"
        android:layout_width="match_parent"
        android:layout_height="wrap_content"
        android:hint="你好"
         />
    <View
        android:layout_width="match_parent"
        android:layout_height="120dp" />
    <LinearLayout
    android:layout_width="match_parent"
    android:layout_height="match_parent"
     android:layout_gravity="center_horizontal">
          <View
        android:layout_width="20dp"
        android:layout_height="wrap_content" />
    <Button
        android:id="@+id/listView_updata"
         android:layout_width="wrap_content"
        android:layout_height="wrap_content"
        android:text="修改"
        />
     <View
        android:layout_width="90dp"
        android:layout_height="wrap_content" />
        <Button
        android:id="@+id/listView_delete"
         android:layout_width="wrap_content"
        android:layout_height="wrap_content"
        android:text="删除"
        />
    </LinearLayout>

</LinearLayout>
后台代码:
package com.example.coursedesign;

import android.app.Activity;
import android.os.Bundle;
import android.view.Menu;
import android.view.MenuItem;
import android.view.View;
import android.widget.Button;
import android.widget.EditText;
import android.widget.Toast;

public class ListViewActivity extends Activity {
    EditText text;
    Button button_up;
    Button button_delete;
    int position;
    String str;
	@Override
	protected void onCreate(Bundle savedInstanceState) {
		super.onCreate(savedInstanceState);
		setContentView(R.layout.activity_list_view);
		text=(EditText) findViewById(R.id.listView_text);
		button_delete=(Button) findViewById(R.id.listView_delete);
		button_up=(Button) findViewById(R.id.listView_updata);
		Bundle b = getIntent().getExtras();
        if( b != null) {
        	str=b.getString("title");
        	//Toast.makeText(getApplicationContext(), str, Toast.LENGTH_SHORT).show();
        	  text.setText(str.toCharArray(), 0, str.length());
            position = b.getInt("position");
        }
        button_delete.setOnClickListener(new View.OnClickListener() {//delete
            @Override
            public void onClick(View v) {
               DBOpenHelper dbHelper = new DBOpenHelper(getApplicationContext(), DBOpenHelper.name, null, 1);
               dbHelper.deleteMyCollection(str);
               Toast.makeText(getApplicationContext(), "删除成功", Toast.LENGTH_SHORT).show();
               finish();
            }
        });
        button_up.setOnClickListener(new View.OnClickListener() {//delete
            @Override
            public void onClick(View v) {
            	String wordNew="";
             wordNew=text.getText().toString();
               DBOpenHelper dbHelper = new DBOpenHelper(getApplicationContext(), DBOpenHelper.name, null, 1);
               if(dbHelper.updateUser(wordNew, str)){
               Toast.makeText(getApplicationContext(), "更新成功", Toast.LENGTH_SHORT).show();
               finish();
               }
            }
        });
	}

}
进入页面:
通过使用Intent进行Activity的启动。
界面:

界面代码:
<LinearLayout xmlns:android="http://schemas.android.com/apk/res/android"
    xmlns:tools="http://schemas.android.com/tools"
    android:layout_width="match_parent"
    android:layout_height="match_parent"
        android:orientation="vertical"
    android:background="@drawable/note2"
    tools:context="com.example.coursedesign.FirstActivity" >
   <View   android:layout_width="150dp"
       android:layout_height="79dp"/>
   <TextView android:layout_width="wrap_content"
       android:layout_height="wrap_content"
       android:text="欢迎来到生活小助手"
        android:layout_gravity="center_horizontal"
       android:textColor="#68EE68"
       android:textSize="24dp"
       android:textStyle="bold"/>
     <View   android:layout_width="150dp"
       android:layout_height="79dp"/>
   <Button
       android:id="@+id/Loading"
          android:layout_width="70dp"
       android:layout_height="40dp"
       android:background="@drawable/green1"
       android:text="进入"
        android:layout_gravity="center_horizontal"
       android:textColor="#F24FFF"
       android:textSize="30dp"
       android:textStyle="bold"
       tools:ignore="MissingConstraints" />

</LinearLayout>
后台代码:
package com.example.coursedesign;

import android.app.Activity;
import android.content.Intent;
import android.os.Bundle;
import android.view.Menu;
import android.view.MenuItem;
import android.view.View;
import android.widget.Button;
import android.widget.ImageButton;

public class FirstActivity extends Activity {

	@Override
	protected void onCreate(Bundle savedInstanceState) {
		super.onCreate(savedInstanceState);
		setContentView(R.layout.activity_first);
		Button button=(Button) findViewById(R.id.Loading);
		 button.setOnClickListener(new View.OnClickListener() {
	            @Override
	            public void onClick(View v) {
	            	  Intent intent = new Intent(FirstActivity.this, MainActivity.class);
	                  startActivity(intent);
	            }
	        });
	}

}
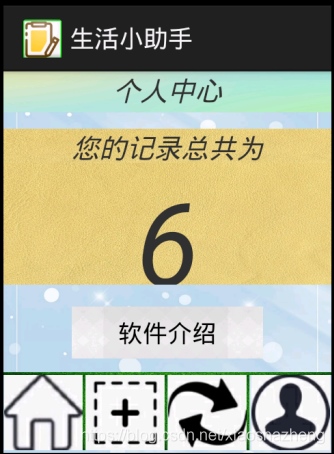
个人中心
备忘录数量的统计以及软件的说明
界面:

界面代码:
<LinearLayout xmlns:android="http://schemas.android.com/apk/res/android"
    xmlns:tools="http://schemas.android.com/tools"
    android:layout_width="match_parent"
    android:layout_height="match_parent"
    android:orientation="vertical"
    android:background="@drawable/blue"
    tools:context="com.example.coursedesign.PersonActivity" >

    <TextView
        android:layout_width="match_parent"
        android:layout_height="30dp"
        android:background="@drawable/green1"
        android:gravity="center_horizontal"
        android:text="个人中心"
        android:textSize="20sp"
        android:textStyle="italic" />
        <View
            android:layout_width="2dp"
            android:layout_height="0dp"  />
    <TextView
        android:layout_width="match_parent"
         android:layout_marginTop="12dp"
        android:layout_height="25dp"
        android:background="@drawable/yellow"
        android:gravity="center_horizontal"
        android:text="您的记录总共为"
        android:textSize="20sp"
        android:textStyle="italic" />

    <TextView
        android:id="@+id/person_text"
        android:layout_width="match_parent"
        android:layout_height="89dp"
        android:background="@drawable/yellow"
        android:gravity="center_horizontal"
        android:text="50"
        android:textSize="85sp"
        android:textStyle="italic" />

    <Button
        android:id="@+id/person_button"
        android:layout_width="140dp"
        android:layout_height="38dp"
          android:layout_marginTop="16dp"
        android:layout_gravity="center_horizontal"
         android:background="@drawable/white"
        android:text="软件介绍" />
    <View
        android:layout_width="match_parent"
        android:layout_height="2dp"
        android:layout_marginTop="10dp"
        android:background="@drawable/green" />
    <LinearLayout
        android:layout_width="match_parent"
        android:layout_height="wrap_content"
        android:orientation="horizontal" >

        <ImageButton
            android:id="@+id/person_home_page"
            android:layout_width="58dp"
            android:layout_height="55dp"
            android:src="@drawable/home" />

        <View
            android:layout_width="2dp"
            android:layout_height="55dp"
            android:background="@drawable/green" />

        <ImageButton
            android:id="@+id/person_add_product"
            android:layout_width="58dp"
            android:layout_height="55dp"
            android:src="@drawable/add" />

        <View
            android:layout_width="2dp"
            android:layout_height="55dp"
            android:background="@drawable/green" />

        <ImageButton
            android:id="@+id/person_refresh"
            android:layout_width="58dp"
            android:layout_height="55dp"
            android:src="@drawable/refresh" />

        <View
            android:layout_width="2dp"
            android:layout_height="55dp"
            android:background="@drawable/green" />

        <ImageButton
            android:id="@+id/person_personal_center"
            android:layout_width="50dp"
            android:layout_height="55dp"
            android:layout_weight="0.84"
            android:src="@drawable/person" />
    </LinearLayout>

</LinearLayout>
后台代码:
package com.example.coursedesign;

import android.app.Activity;
import android.content.Intent;
import android.content.SharedPreferences;
import android.os.Bundle;
import android.view.Menu;
import android.view.MenuItem;
import android.view.View;
import android.widget.Button;
import android.widget.TextView;

public class PersonActivity extends Activity {

	TextView text;
	@Override
	protected void onCreate(Bundle savedInstanceState) {
		super.onCreate(savedInstanceState);
		setContentView(R.layout.activity_person);
		 SharedPreferences sharedP=getSharedPreferences("SaveTable",MODE_PRIVATE);
		   int num=sharedP.getInt("number", 0);
		   Integer num2=(Integer)num;
		   text=(TextView) findViewById(R.id.person_text);
		   text.setText(num2.toString());
		   Button button=(Button) findViewById(R.id.person_button);
		   button.setOnClickListener(new View.OnClickListener() {
	            @Override
	            public void onClick(View v) {
	            	Intent intent = new Intent(PersonActivity.this, AppActivity.class);
	                  startActivity(intent);
	            }
	        });
	}

}
软件说明:
对软件的进一步说明。
界面:

界面代码:
<LinearLayout xmlns:android="http://schemas.android.com/apk/res/android"
    xmlns:tools="http://schemas.android.com/tools"
    android:layout_width="match_parent"
    android:layout_height="match_parent"
    android:orientation="vertical"
    android:background="@drawable/blue"
    tools:context="com.example.coursedesign.AppActivity" >

    <TextView
        android:layout_width="wrap_content"
        android:layout_height="wrap_content"
        android:text="开发目的:"
        android:textSize="20sp"
        android:layout_marginTop="5dp"
        android:layout_marginStart="5dp"/>
    <TextView
        android:layout_width="match_parent"
        android:layout_height="wrap_content"
        android:text="它是帮助你忘记的事情,在每个人忙碌的生活当中,人的记忆是有限的,备忘录就是让你把多个事情都能记起的东西。"
        android:textSize="15sp"
        android:layout_marginStart="5dp"
        android:layout_marginEnd="5dp"
        android:layout_marginTop="5dp"/>
    <TextView
        android:layout_width="wrap_content"
        android:layout_height="wrap_content"
        android:text="开发人员:"
        android:textSize="20sp"
        android:layout_marginTop="5dp"
        android:layout_marginStart="5dp"/>
    <TextView
        android:layout_width="wrap_content"
        android:layout_height="wrap_content"
        android:text="何昊"
        android:textSize="15sp"
        android:layout_marginTop="5dp"
        android:layout_marginStart="5dp"/>

    <TextView
        android:layout_width="wrap_content"
        android:layout_height="wrap_content"
        android:text="系统版本:"
        android:textSize="20sp"
        android:layout_marginTop="5dp"
        android:layout_marginStart="5dp"/>
    <TextView
        android:layout_width="wrap_content"
        android:layout_height="wrap_content"
        android:text="android app v1.0.0"
        android:textSize="15sp"
        android:layout_marginTop="5dp"
        android:layout_marginStart="5dp"/>
    <Button
        android:id="@+id/person_button"
        android:layout_width="150dp"
        android:layout_height="50dp"
        android:text="返回"
        android:textSize="20sp"
         android:layout_marginTop="5dp"
        android:layout_gravity="center_horizontal"/>

</LinearLayout>
后台代码:
package com.example.coursedesign;

import android.app.Activity;
import android.os.Bundle;
import android.view.Menu;
import android.view.MenuItem;
import android.view.View;
import android.widget.Button;

public class AppActivity extends Activity {

	@Override
	protected void onCreate(Bundle savedInstanceState) {
		super.onCreate(savedInstanceState);
		setContentView(R.layout.activity_app);
		Button button = (Button) findViewById(R.id.person_button);
        button.setOnClickListener(new View.OnClickListener() {
            @Override
            public void onClick(View v) {
                finish();
            }
        });
	}
}
4 总结
谈一下发现的问题与收获:
- 开始时使用相对布局进行设计,以为可以通过简单的拖拽就可以实现布局的设计,后面发现在控件变多的时候,变得很麻烦,并且由于界面的选择,eclipse这边的界面与模拟器的界面并不相同。后来使用线性布局进行设计。
- 之前上课学过openOrCreateDatabase方法与SQLitreOpenHelper类,存在有一些不明白的问题,通过这次课设,掌握了这些知识。
- 对时间规划不足,使得项目结束时间有点晚。
到此这篇关于Android毕业设计备忘录APP的文章就介绍到这了,更多相关Android备忘录内容请搜索我们以前的文章或继续浏览下面的相关文章希望大家以后多多支持我们!

