解析.NET中几种Timer的使用

这篇博客将梳理一下.NET中4个Timer类,及其用法。

1. System.Threading.Timer

public Timer(TimerCallback callback, object state, int dueTime, int period);

callback委托将会在period时间间隔内重复执行,state参数可以传入想在callback委托中处理的对象,dueTime标识多久后callback开始执行,period标识多久执行一次callback。

using System.Threading;
// System.Threading.Timer
Timer timer = new Timer(delegate
{
 Console.WriteLine($"Timer Thread: {Thread.CurrentThread.ManagedThreadId}");
 Console.WriteLine($"Is Thread Pool: {Thread.CurrentThread.IsThreadPoolThread}");
 Console.WriteLine("Timer Action.");
},
null,
2000,
);
Console.WriteLine("Main Action.");
Console.WriteLine($"Main Thread: {Thread.CurrentThread.ManagedThreadId}");
Console.ReadLine();
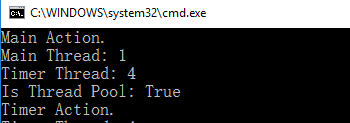
Timer回掉方法执行是在另外ThreadPool中一条新线程中执行的。

2. System.Timers.Timer

System.Timers.Timer和System.Threading.Timer相比,提供了更多的属性,

Interval  指定执行Elapsed事件的时间间隔;

Elapsed  指定定期执行的事件;

Enabled  用于Start/Stop Timer;

Start    开启Timer

Stop    停止Timer

System.Timers.Timer timer = new System.Timers.Timer();
timer.Interval = 500;
timer.Elapsed += delegate
{
 Console.WriteLine($"Timer Thread: {Thread.CurrentThread.ManagedThreadId}");
 Console.WriteLine($"Is Thread Pool: {Thread.CurrentThread.IsThreadPoolThread}");
 Console.WriteLine("Timer Action");
 timer.Stop();
};
timer.Start();
Console.WriteLine("Main Action.");
Console.WriteLine($"Main Thread: {Thread.CurrentThread.ManagedThreadId}");
Console.ReadLine();
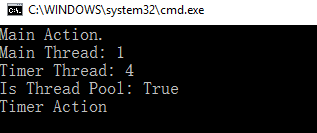
Timer Elapsed定期任务是在ThreadPool的线程中执行的。

3. System.Windows.Forms.Timer

Interval  指定执行Elapsed事件的时间间隔;

Tick       指定定期执行的事件;

Enabled  用于Start/Stop Timer;

Start    开启Timer

Stop    停止Timer

使用System.Windows.Forms.Timer来更新窗体中Label内时间,

using System.Windows.Forms;
public Form1()
{
 InitializeComponent();
 this.Load += delegate
 {
 Timer timer = new Timer();
 timer.Interval = 500;
 timer.Tick += delegate
 {
 System.Diagnostics.Debug.WriteLine($"Timer Thread: {System.Threading.Thread.CurrentThread.ManagedThreadId}");
 System.Diagnostics.Debug.WriteLine($"Is Thread Pool: {System.Threading.Thread.CurrentThread.IsThreadPoolThread}");
 this.lblTimer.Text = DateTime.Now.ToLongTimeString();
 };
 timer.Start();
 System.Diagnostics.Debug.WriteLine($"Main Thread: {System.Threading.Thread.CurrentThread.ManagedThreadId}");
 };
}
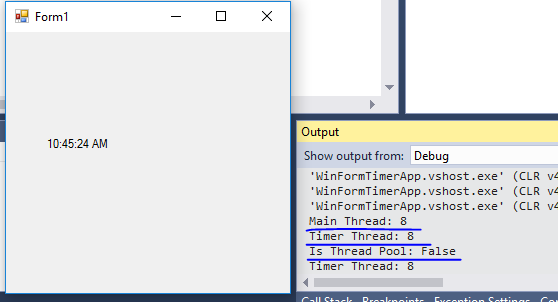
Timer Tick事件中执行的事件线程与主窗体的线程是同一个,并没有创建新线程(或者使用ThreadPool中线程)来更新UI。下面将代码做一个改动,使用System.Timers.Timer来更新UI上的时间,代码如下,

public Form1()
{
 InitializeComponent();
 this.Load += delegate
 {
 System.Timers.Timer timer = new System.Timers.Timer();
 timer.Interval = 500;
 timer.Elapsed += delegate
 {
 System.Diagnostics.Debug.WriteLine($"Timer Thread: {System.Threading.Thread.CurrentThread.ManagedThreadId}");
 System.Diagnostics.Debug.WriteLine($"Is Thread Pool: {System.Threading.Thread.CurrentThread.IsThreadPoolThread}");
 this.lblTimer.Text = DateTime.Now.ToLongTimeString();
 };
 timer.Start();
 System.Diagnostics.Debug.WriteLine($"Main Thread: {System.Threading.Thread.CurrentThread.ManagedThreadId}");
 };
}
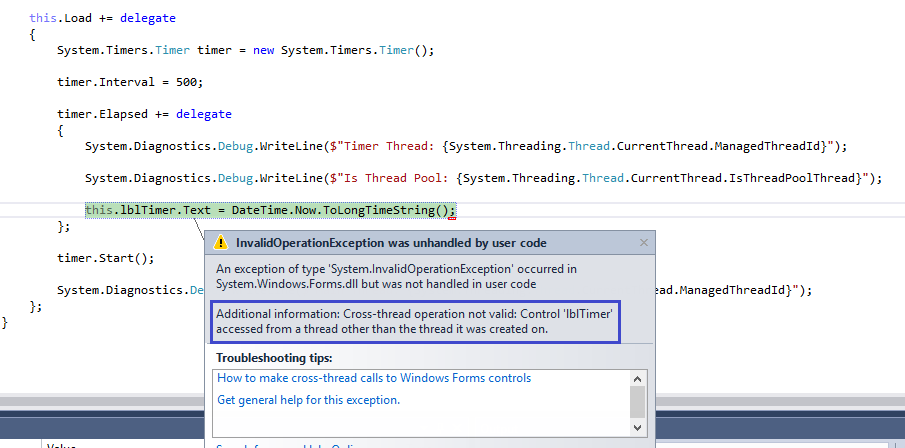
很熟悉的一个错误。因为Label是由UI线程创建的,所以对其进行修改需要在UI线程中进行。System.Timers.Timer中Elasped执行是在ThreadPool中新创建的线程中执行的。所以会有上面的错误。

4. System.Windows.Threading.DispatcherTimer

属性和方法与System.Windows.Forms.Timer类似。

using System.Windows.Threading;
public MainWindow()
{
 InitializeComponent();
 this.Loaded += delegate
 {
 //DispatcherTimer
 DispatcherTimer timer = new DispatcherTimer();
 timer.Interval = TimeSpan.FromSeconds(1);
 timer.Start();
 Debug.WriteLine($"Main Thread Id: {Thread.CurrentThread.ManagedThreadId}");
 timer.Tick += delegate
 {
 tbTime.Text = DateTime.Now.ToLongTimeString();
 Debug.WriteLine($"Timer Thread Id: {Thread.CurrentThread.ManagedThreadId}");
 timer.Stop();
 };
 };
}
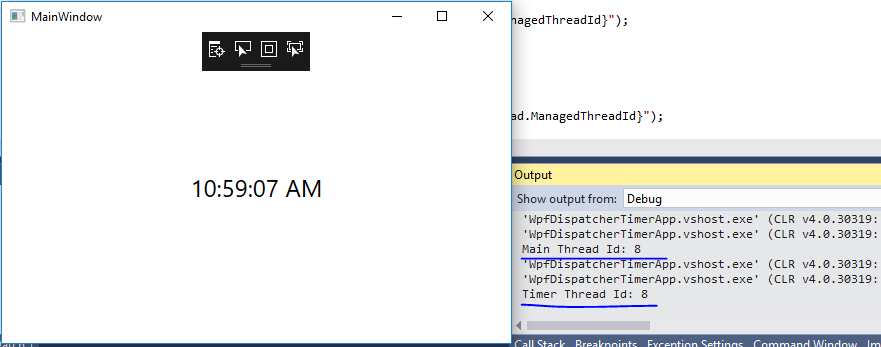
DispatcherTimer中Tick事件执行是在主线程中进行的。

使用DispatcherTimer时有一点需要注意,因为DispatcherTimer的Tick事件是排在Dispatcher队列中的,当系统在高负荷时,不能保证在Interval时间段执行,可能会有轻微的延迟,但是绝对可以保证Tick的执行不会早于Interval设置的时间。如果对Tick执行时间准确性高可以设置DispatcherTimer的priority。例如:

DispatcherTimer timer = new DispatcherTimer(DispatcherPriority.Send);

以上就是本文的全部内容,希望本文的内容对大家的学习或者工作能带来一定的帮助,同时也希望多多支持我们!

(0)

相关推荐

  • asp.net中System.Timers.Timer的使用方法

    我们经常会在网站中加一些定时执行的任务,比如生成静态页.执行邮件发送等. 可以通过在Global.asax中这样设置来实现. 复制代码 代码如下: void Application_Start(object sender, EventArgs e)     {                // 在应用程序启动时运行的代码        System.Timers.Timer MT = new System.Timers.Timer(); MT.Enabled = true; MT.Interv

  • .NET中的Timer类型用法详解

    在.NET FrameWork中有多个Timer,那么怎么根据实际情况进行选择确实是一个问题. 总体而言,计时器共有以下四种: 多线程计时器: 1 System.Threading.Timer 2 System.Timers.Timer 特殊环境的单线程计时器: 1 System.Windows.Forms.Timer(使用环境:Windows Forms Timer) 2 System.Windows.Threading.DispatcherTimer( 使用环境:WPF timer); 单线

  • asp.net Timer的使用方法

    页面代码:  复制代码 代码如下: <%@ Page Language="C#" AutoEventWireup="true" CodeFile="Default.aspx.cs" Inherits="_Default" %> <%@ Register Assembly="AjaxControlToolkit" Namespace="AjaxControlToolkit"

  • .NET Framework中定时器timer的单线程与多线程使用讲解

    如果你需要使用规律的时间间隔重复执行一些方法,最简单的方式是使用定时器(timer).与下边的例子相比,定时器可以便捷.高效地使用内存和资源: new Thread (delegate() { while (enabled) { DoSomeAction(); Thread.Sleep (TimeSpan.FromHours (24)); } }).Start(); 这不仅仅会永久占用一个线程,而且如果没有额外的代码,DoSomeAction每天都会发生在更晚的时间.定时器解决了这些问题. .N

  • 利用Timer在ASP.NET中实现计划任务的方法

    .NET Framework中为我们提供了3种类型的Timer,分别是: Server Timer(System.Timers.Timer),Thread Timer(System.Threading.Timer )和Windows Timer(System.Windows.Forms.Timer). 其中Windows Timer和WinAPI中的Timer一样,是基于消息的,而且是单线程的.另外两个Timer则不同于Windows Timer,它们是基于ThreadPool的,这样最大的好处

  • asp.net中Timer无刷新定时器的实现方法

    本文实例讲述了asp.net中Timer无刷新定时器的实现方法.Timer控件要实现无刷新,得用到ajax技术,这里使用VS2008自带的ajax技术.    首先得添加一个ScriptManager控件,然后再添加一个UpdatePanel用于存放Timer控件内容的,就可以实现无刷新了.下面是详细的内容: 一.前台代码如下: <form id="form1" runat="server"> <asp:ScriptManager ID="

  • 解析.NET中几种Timer的使用

    这篇博客将梳理一下.NET中4个Timer类,及其用法. 1. System.Threading.Timer public Timer(TimerCallback callback, object state, int dueTime, int period); callback委托将会在period时间间隔内重复执行,state参数可以传入想在callback委托中处理的对象,dueTime标识多久后callback开始执行,period标识多久执行一次callback. using Syst

  • [C#].NET中几种Timer的使用实例

    这篇博客将梳理一下.NET中4个Timer类,及其用法. 1. System.Threading.Timer public Timer(TimerCallback callback, object state, int dueTime, int period); callback委托将会在period时间间隔内重复执行,state参数可以传入想在callback委托中处理的对象,dueTime标识多久后callback开始执行,period标识多久执行一次callback. using Syst

  • C#中三种Timer计时器的详细用法

    一.基于 Windows 的标准计时器(System.Windows.Forms.Timer) 首先注意一点就是:Windows 计时器是为单线程环境设计的.它直接继承自Componet. Timer控件只有绑定了Tick事件和设置Enabled=True后才会自动计时,停止计时可以用Stop()方法控制,通过Stop()停止之后,如果想重新计时,可以用Start()方法来启动计时器. Timer控件和它所在的Form属于同一个线程,在这种Timer的EventHandler中可以直接获取和修改

  • 解析php中两种缩放图片的函数,为图片添加水印

    有两种改变图像大小的方法.(1):ImageCopyResized() 函数在所有GD版本中有效,但其缩放图像的算法比较粗糙.(2):ImageCopyResampled(),其像素插值算法得到的图像边缘比较平滑.质量较好(但该函数的速度比 ImageCopyResized() 慢).两个函数的参数是一样的.如下:ImageCopyResampled(dest,src,dx,dy,sx,sy,dw,dh,sw,sh);ImageCopyResized(dest,src,dx,dy,sx,sy,d

  • 解析C++中四种强制类型转换的区别详解

    C++的四种强制类型转换,所以C++不是类型安全的.分别为:static_cast , dynamic_cast , const_cast , reinterpret_cast为什么使用C风格的强制转换可以把想要的任何东西转换成合乎心意的类型.那为什么还需要一个新的C++类型的强制转换呢?新类型的强制转换可以提供更好的控制强制转换过程,允许控制各种不同种类的强制转换.C++中风格是static_cast<type>(content).C++风格的强制转换其他的好处是,它们能更清晰的表明它们要干

  • JAVA中4种解析XML文件的方法

    XML是一种通用的数据交换格式,它的平台无关性.语言无关性.系统无关性.给数据集成与交互带来了极大的方便.XML在不同的语言环境中解析方式都是一样的,只不过实现的语法不同而已. XML的解析方式分为四种: 1.DOM解析: 2.SAX解析: 3.JDOM解析: 4.DOM4J解析. 其中前两种属于基础方法,是官方提供的平台无关的解析方式:后两种属于扩展方法,它们是在基础的方法上扩展出来的,只适用于java平台. 针对以下XML文件,会对四种方式进行详细描述: <?xml version="

  • SpringBoot项目中的视图解析器问题(两种)

    前言:SpringBoot官网推荐使用HTML视图解析器,但是根据个人的具体业务也有可能使用到JSP视图解析器,所以这里我给大家简单介绍一下这两种视图解析器的具体使用 一.解析成JSP页面 1.在pom.xml文件中添加相关依赖 <dependency> <groupId>javax.servlet</groupId> <artifactId>javax.servlet-api</artifactId> </dependency> &

  • Java解析XML的四种方法详解

    XML现在已经成为一种通用的数据交换格式,它的平台无关性,语言无关性,系统无关性,给数据集成与交互带来了极大的方便.对于XML本身的语法知识与技术细节,需要阅读相关的技术文献,这里面包括的内容有DOM(Document Object Model),DTD(Document Type Definition),SAX(Simple API for XML),XSD(Xml Schema Definition),XSLT(Extensible Stylesheet Language Transform

  • 详解Java解析XML的四种方法

    XML现在已经成为一种通用的数据交换格式,它的平台无关性,语言无关性,系统无关性,给数据集成与交互带来了极大的方便.对于XML本身的语法知识与技术细节,需要阅读相关的技术文献,这里面包括的内容有DOM(Document Object Model),DTD(Document Type Definition),SAX(Simple API for XML),XSD(Xml Schema Definition),XSLT(Extensible Stylesheet Language Transform

  • 解析iOS10中的极光推送消息的适配

    iOS10发布后,发现项目中的极光推送接收消息异常了. 查了相关资料后才发现,iOS10中对于通知做了不少改变.同时也发现极光也很快更新了对应的SDK. 现在就把适配修改的做法分享一下,希望对有需要的童鞋有所帮助. 具体做法如下: 注意:必须先安装Xcode8.0版本. 一.添加相关的SKD,或framework文件 1.添加UserNotification.framework 2.更新jpush的SDK(最新版本:jpush-ios-2.1.9.a)https://www.jiguang.cn

随机推荐