android 仿微信demo——微信主界面实现
以往文章中实现微信启动页,登录注册功能,此基础上继续完善仿微信功能。
主界面实现
(1)整体采用RelativeLayout相对布局
(2)最上面是toolbar操作栏,搜索框SearchView,Overflow(含有4个单选菜单项)
(3)中间使用Fragment组件(不使用ViewPager,有兴趣可以自己添加实现下)。
(4)最下面是水平的LinearLayout线性布局:含有4个自定义的控件

这一篇主要是实现主界面,其他像顶部(toolbar,SearchView,Overflow),中间的fragment,后续文章在更新。
创建主界面activity MainWeixin.java
MainWeixin.java
package com.example.wxchatdemo;
import android.annotation.SuppressLint;
import android.app.AlertDialog;
import android.app.Dialog;
import android.app.FragmentManager;
import android.app.FragmentTransaction;
import android.content.DialogInterface;
import android.content.Intent;
import android.graphics.Color;
import android.os.Bundle;
import android.support.v4.app.FragmentActivity;
import android.view.KeyEvent;
import android.view.View;
import android.view.Window;
import android.widget.ImageView;
import android.widget.TextView;

public class MainWeixin extends FragmentActivity implements View.OnClickListener {
    private WeixinFragment firstFragment = null;// 用于显示微信界面
    private ContactListFragment secondFragment = null;// 用于显示通讯录界面
    private FindFragment thirdFragment = null;// 用于显示发现界面
    private SelfFragment fourthFragment = null;// 用于显示我界面
    private View firstLayout = null;// 微信显示布局
    private View secondLayout = null;// 通讯录显示布局
    private View thirdLayout = null;// 发现显示布局
    private View fourthLayout = null;// 我显示布局
    /*声明组件变量*/
    private ImageView weixinImg = null;
    private ImageView contactImg = null;
    private ImageView findImg = null;
    private ImageView selfImg = null;
    private TextView weixinText = null;
    private TextView contactText = null;
    private TextView  findText = null;
    private TextView selfText = null;
    private FragmentManager fragmentManager = null;// 用于对Fragment进行管理
    @Override
    protected void onCreate(Bundle savedInstanceState) {
        super.onCreate(savedInstanceState);
        requestWindowFeature(Window.FEATURE_NO_TITLE);//要求窗口没有title
        super.setContentView(R.layout.main_weixin);
        // 初始化布局元素
        initViews();
        fragmentManager = getFragmentManager();//用于对Fragment进行管理
        // 设置默认的显示界面
        setTabSelection(0);
    }
    /**
     * 在这里面获取到每个需要用到的控件的实例,并给它们设置好必要的点击事件
     */
    @SuppressLint("NewApi")
    public void initViews() {
        fragmentManager = getFragmentManager();
        firstLayout = findViewById(R.id.weixin_layout);
        secondLayout = findViewById(R.id.contacts_layout);
        thirdLayout = findViewById(R.id.find_layout);
        fourthLayout = findViewById(R.id.self_layout);
        weixinImg = (ImageView) findViewById(R.id.weixin_img);
        contactImg = (ImageView) findViewById(R.id.contact_img);
        findImg = (ImageView) findViewById(R.id.find_img);
        selfImg = (ImageView) findViewById(R.id.self_img);
        weixinText = (TextView) findViewById(R.id.weixin_text);
        contactText = (TextView) findViewById(R.id.contact_text);
        findText = (TextView) findViewById(R.id.find_text);
        selfText = (TextView) findViewById(R.id.self_text);
        //处理点击事件
        firstLayout.setOnClickListener(this);
        secondLayout.setOnClickListener(this);
        thirdLayout.setOnClickListener(this);
        fourthLayout.setOnClickListener(this);
    }
    @Override
    public void onClick(View v) {
        switch (v.getId()) {
            case R.id.weixin_layout:
                setTabSelection(0);// 当点击了微信时,选中第1个tab
                break;
            case R.id.contacts_layout:
                setTabSelection(1);// 当点击了通讯录时,选中第2个tab
                break;
            case R.id.find_layout:
                setTabSelection(2);// 当点击了发现时,选中第3个tab
                break;
            case R.id.self_layout:
                setTabSelection(3);// 当点击了我时,选中第4个tab
                break;
            default:
                break;
        }
    }
    /**
     * 根据传入的index参数来设置选中的tab页 每个tab页对应的下标。0表示微信,1表示通讯录,2表示发现,3表示我
     */
    @SuppressLint("NewApi")
    private void setTabSelection(int index) {
        clearSelection();// 每次选中之前先清除掉上次的选中状态
        FragmentTransaction transaction = fragmentManager.beginTransaction();// 开启一个Fragment事务
        hideFragments(transaction);// 先隐藏掉所有的Fragment,以防止有多个Fragment显示在界面上的情况
        switch (index) {
            case 0:
                // 当点击了我的微信tab时改变控件的图片和文字颜色
                weixinImg.setImageResource(R.drawable.tab_weixin_pressed);//修改布局中的图片
                weixinText.setTextColor(Color.parseColor("#0090ff"));//修改字体颜色
                if (firstFragment == null) {
                    /*获取登录activity传过来的微信号*/
                    Intent intent = getIntent();
                    String number = intent.getStringExtra("weixin_number");
                    // 如果FirstFragment为空,则创建一个并添加到界面上
                    firstFragment = new WeixinFragment(number);
                    transaction.add(R.id.fragment, firstFragment);
                } else {
                    // 如果FirstFragment不为空,则直接将它显示出来
                    transaction.show(firstFragment);//显示的动作
                }
                break;
            // 以下和firstFragment类同
            case 1:
                contactImg.setImageResource(R.drawable.tab_address_pressed);
                contactText.setTextColor(Color.parseColor("#0090ff"));
                if (secondFragment == null) {
                    /*获取登录activity传过来的微信号*/
                    Intent intent = getIntent();
                    String number = intent.getStringExtra("weixin_number");
                    secondFragment = new ContactListFragment(number);
                    transaction.add(R.id.fragment, secondFragment);
                } else {
                    transaction.show(secondFragment);
                }
                break;
            case 2:
                findImg.setImageResource(R.drawable.tab_find_frd_pressed);
                findText.setTextColor(Color.parseColor("#0090ff"));
                if (thirdFragment == null) {
                    thirdFragment = new FindFragment();
                    transaction.add(R.id.fragment, thirdFragment);
                } else {
                    transaction.show(thirdFragment);
                }
                break;
            case 3:
                selfImg.setImageResource(R.drawable.tab_settings_pressed);
                selfText.setTextColor(Color.parseColor("#0090ff"));
                if (fourthFragment == null) {
                    fourthFragment = new SelfFragment();
                    transaction.add(R.id.fragment, fourthFragment);
                } else {
                    transaction.show(fourthFragment);
                }
                break;
        }
        transaction.commit();
    }
    /**
     * 清除掉所有的选中状态
     */
    private void clearSelection() {
        weixinImg.setImageResource(R.drawable.tab_weixin_normal);
        weixinText.setTextColor(Color.parseColor("#82858b"));
        contactImg.setImageResource(R.drawable.tab_address_normal);
        contactText.setTextColor(Color.parseColor("#82858b"));
        findImg.setImageResource(R.drawable.tab_find_frd_normal);
        findText.setTextColor(Color.parseColor("#82858b"));
        selfImg.setImageResource(R.drawable.tab_settings_normal);
        selfText.setTextColor(Color.parseColor("#82858b"));
    }
    /**
     * 将所有的Fragment都设置为隐藏状态 用于对Fragment执行操作的事务
     */
    @SuppressLint("NewApi")
    private void hideFragments(FragmentTransaction transaction) {
        if (firstFragment != null) {
            transaction.hide(firstFragment);
        }
        if (secondFragment != null) {
            transaction.hide(secondFragment);
        }
        if (thirdFragment != null) {
            transaction.hide(thirdFragment);
        }
        if (fourthFragment != null) {
            transaction.hide(fourthFragment);
        }
    }
    //封装一个AlertDialog
    private void exitDialog() {
        Dialog dialog = new AlertDialog.Builder(this)
                .setTitle("温馨提示")
                .setMessage("您确定要退出程序吗?")
                .setPositiveButton("关闭微信", new DialogInterface.OnClickListener() {
                    @Override
                    public void onClick(DialogInterface arg0, int arg1) {
                        finish();
                    }
                })
                .setNegativeButton("取消", new DialogInterface.OnClickListener() {
                    @Override
                    public void onClick(DialogInterface arg0, int arg1) {
                    }
                }).create();
        dialog.show();//显示对话框
    }
    /**
     * 返回菜单键监听事件
     */
    @Override
    public boolean onKeyDown(int keyCode, KeyEvent event) {
        if (keyCode == KeyEvent.KEYCODE_BACK) {//如果是返回按钮
            exitDialog();
        }
        return super.onKeyDown(keyCode, event);
    }
}
创建主界面activity MainWeixin.java对应的主布局文件main_weixin.xml
main_weixin.xml
<RelativeLayout xmlns:android="http://schemas.android.com/apk/res/android"
    android:layout_width="match_parent"
    android:layout_height="match_parent">
    <FrameLayout
        android:id="@+id/fragment"
        android:layout_width="match_parent"
        android:layout_height="match_parent"
        android:background="@color/white">
    </FrameLayout>
    <LinearLayout
        android:layout_width="match_parent"
        android:layout_height="48dp"
        android:layout_alignParentStart="true"
        android:layout_alignParentLeft="true"
        android:layout_alignParentBottom="true"
        android:background="#f7f7f7"
        android:gravity="center"
        android:orientation="horizontal">
        <LinearLayout
            android:id="@+id/weixin_layout"
            android:layout_width="0dp"
            android:layout_height="match_parent"
            android:layout_centerVertical="true"
            android:layout_weight="1"
            android:orientation="vertical"
            android:padding="3dp">
            <ImageView
                android:id="@+id/weixin_img"
                android:layout_width="wrap_content"
                android:layout_height="24dp"
                android:layout_gravity="center_horizontal"
                android:src="@drawable/tab_weixin_pressed" />
            <TextView
                android:id="@+id/weixin_text"
                android:layout_width="wrap_content"
                android:layout_height="20dp"
                android:layout_gravity="center_horizontal"
                android:gravity="top"
                android:text="微信"
                android:textColor="#82858b"
                android:textSize="13dp" />
        </LinearLayout>
        <LinearLayout
            android:id="@+id/contacts_layout"
            android:layout_width="0dp"
            android:layout_height="match_parent"
            android:layout_centerVertical="true"
            android:layout_weight="1"
            android:orientation="vertical"
            android:padding="3dp">
            <ImageView
                android:id="@+id/contact_img"
                android:layout_width="wrap_content"
                android:layout_height="24dp"
                android:layout_gravity="center_horizontal"
                android:src="@drawable/tab_address_normal" />
            <TextView
                android:id="@+id/contact_text"
                android:layout_width="wrap_content"
                android:layout_height="20dp"
                android:layout_gravity="center_horizontal"
                android:gravity="top"
                android:text="通讯录"
                android:textColor="#82858b"
                android:textSize="13dp" />
        </LinearLayout>
        <LinearLayout
            android:id="@+id/find_layout"
            android:layout_width="0dp"
            android:layout_height="match_parent"
            android:layout_centerVertical="true"
            android:layout_weight="1"
            android:orientation="vertical"
            android:padding="3dp">
            <ImageView
                android:id="@+id/find_img"
                android:layout_width="wrap_content"
                android:layout_height="24dp"
                android:layout_gravity="center_horizontal"
                android:src="@drawable/tab_find_frd_normal" />
            <TextView
                android:id="@+id/find_text"
                android:layout_width="wrap_content"
                android:layout_height="20dp"
                android:layout_gravity="center_horizontal"
                android:gravity="top"
                android:text="发现"
                android:textColor="#82858b"
                android:textSize="13dp" />
        </LinearLayout>
        <LinearLayout
            android:id="@+id/self_layout"
            android:layout_width="0dp"
            android:layout_height="match_parent"
            android:layout_centerVertical="true"
            android:layout_weight="1"
            android:orientation="vertical"
            android:padding="3dp">
            <ImageView
                android:id="@+id/self_img"
                android:layout_width="wrap_content"
                android:layout_height="24dp"
                android:layout_gravity="center_horizontal"
                android:src="@drawable/tab_settings_normal" />
            <TextView
                android:id="@+id/self_text"
                android:layout_width="wrap_content"
                android:layout_height="20dp"
                android:layout_gravity="center_horizontal"
                android:gravity="top"
                android:text="我"
                android:textColor="#82858b"
                android:textSize="13dp" />
        </LinearLayout>
    </LinearLayout>
</RelativeLayout>
创建4个Fragment.class和4个Fragment.xml布局,对应微信,通讯录,发现,我
WeixinFragment.java
package com.example.wxchatdemo;
import android.annotation.SuppressLint;
import android.app.Fragment;
import android.os.Bundle;
import android.view.LayoutInflater;
import android.view.View;
import android.view.ViewGroup;

@SuppressLint("ValidFragment")
public class WeixinFragment extends Fragment {
    private String number;
    @SuppressLint("ValidFragment")
    WeixinFragment(String number) {
        this.number = number;
    }
    public View onCreateView(LayoutInflater inflater, ViewGroup container, Bundle savedInstanceState) {
        View view = inflater.inflate(R.layout.weixin_fragment, container, false);
        return view;
    }
}
ContactListFragment.java
package com.example.wxchatdemo;
import android.annotation.SuppressLint;
import android.app.Fragment;
import android.os.Bundle;
import android.view.LayoutInflater;
import android.view.View;
import android.view.ViewGroup;

@SuppressLint("ValidFragment")
public class ContactListFragment extends Fragment {
    private String number;
    @SuppressLint("ValidFragment")
    ContactListFragment(String number) {
        this.number = number;
    }
    public View onCreateView(LayoutInflater inflater, ViewGroup container, Bundle savedInstanceState) {
        View view = inflater.inflate(R.layout.weixin_fragment, container, false);
        return view;
    }
}
FindFragment.java
package com.example.wxchatdemo;
import android.app.Fragment;
import android.os.Bundle;
import android.view.LayoutInflater;
import android.view.View;
import android.view.ViewGroup;
public class FindFragment extends Fragment {
    public View onCreateView(LayoutInflater inflater, ViewGroup container, Bundle savedInstanceState) {
        View view = inflater.inflate(R.layout.find_fragment, container, false);
        return view;
    }
}
SelfFragment.java
package com.example.wxchatdemo;
import android.app.Fragment;
import android.os.Bundle;
import android.view.LayoutInflater;
import android.view.View;
import android.view.ViewGroup;
public class SelfFragment extends Fragment {
    public View onCreateView(LayoutInflater inflater, ViewGroup container, Bundle savedInstanceState) {
        View view = inflater.inflate(R.layout.self_fragment, container, false);
        return view;
    }
}
创建四个fragmen布局,代码都一样,只要有就行,后面会完善的,四个fragment布局文件为,weixin_fragment.xml,contactlist_fragment.xml,find_fragment.xml,self_fragment.xml
<LinearLayout xmlns:android="http://schemas.android.com/apk/res/android"
    android:layout_width="match_parent"
    android:layout_height="match_parent">
</LinearLayout>
在AndroidMainfest.xml中声明创建的activity,由于创建fragment不是activity,所有不用声明,声明主界面的activity即可(fragment是内嵌在activity中的)

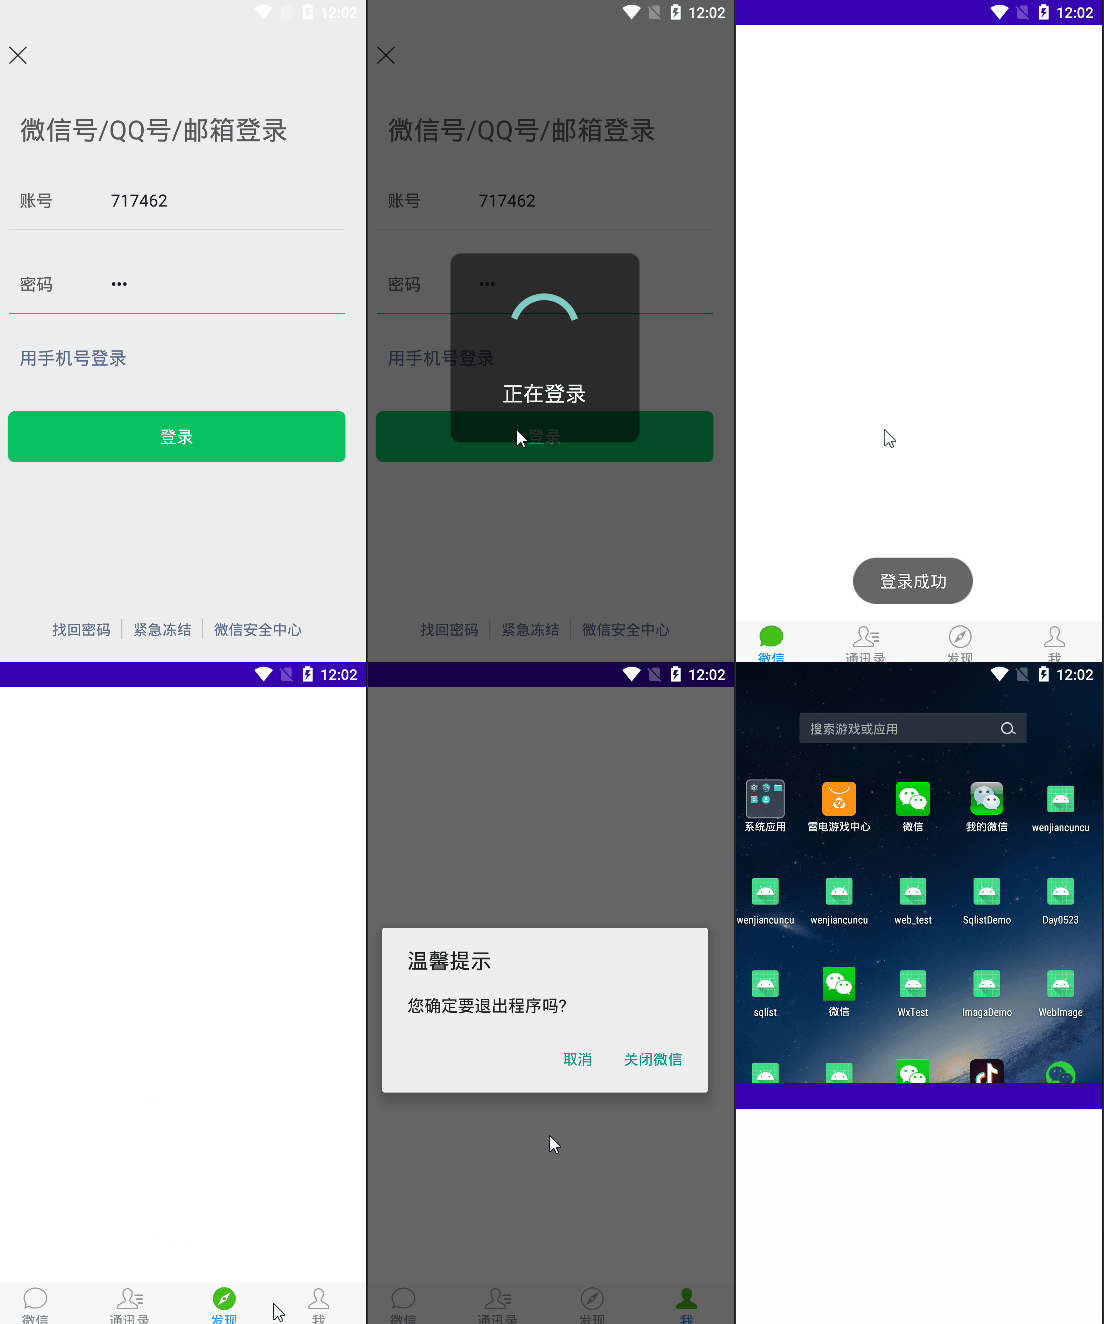
测试
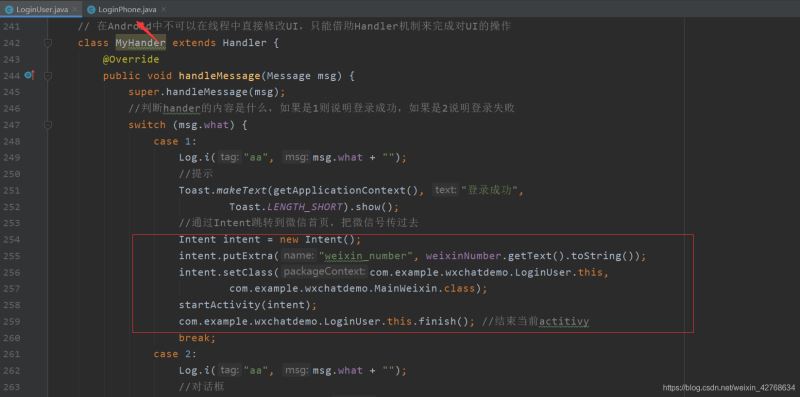
把之前两个登录activity请求成功跳转的activity代码段注释取消掉,启动项目测试


总结
这篇关于微信demo的文章就到这里了,希望大家可以多多关注我们的更多精彩内容!

