SpringBoot整合Shiro思路(最新超详细)
目录
- 1.SpringBoot整合Shiro思路
- 2.环境搭建
- 2.1创建项目
- 2.2引入依赖
- 2.3创建前端页面
- 2.4配置视图信息
- 2.5解决IDEA冲突问题
- 2.6测试搭建的环境
- 3.整合Shiro
- 3.1引入依赖
- 3.2自定义Realm
- 3.3Shiro配置
- 3.4启动测试
- 4.常见过滤器
- 5.认证和退出
- 5.1在index.jsp添加a标签
- 5.2编写controller
- 5.3修改自定义Realm
- 5.4修改ShiroConfig配置
- 5.5测试
- 6.MDSalt的认证实现
- 6.1创建数据库
- 6.2引入依赖
- 6.3配置数据源和整合mybatis
- 6.4创建实体类entity
- 6.5创建DAO接口
- 6.6编写Mapper配置文件
- 6.7创建Service接口
- 6.8编写生成随机盐工具类
- 6.9编写Service实现类
- 6.10编写Controller
- 6.11修改自定义Realm
- 6.12编写获取对象工具类
- 6.13修改Config
- 6.14添加注册页面
- 6.15测试
- 7.授权实现
- 7.1模拟数据实现授权
- 7.1.1模拟数据
- 7.1.2页面资源授权
- 7.1.3代码方式授权
- 7.1.4方法调用授权
- 7.2数据库实现角色授权
- 7.2.1授权数据持久化
- 7.2.2创建数据库表
- 7.2.3创建实体类
- 7.2.4创建Dao接口
- 7.2.5编写Mapper实现
- 7.2.6编写Service接口
- 7.2.7编写Service实现方法
- 7.2.8修改自定义Realm
- 7.3数据库实现权限授权
- 7.3.1创建Dao接口
- 7.3.2编写Mapper实现
- 7.3.3编写Service接口
- 7.3.4编写Service实现方法
- 7.3.5修改自定义Realm
- 7.3.6数据库表数据设置
- 7.3.7测试
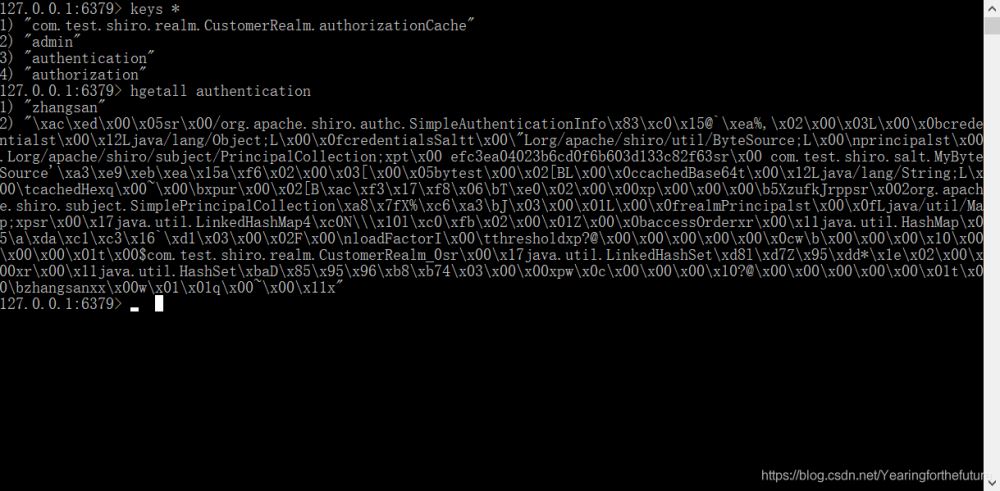
- 8.shiro使用缓存
- 8.1Cache
- 8.1.1Cache作用
- 8.1.2使用shiro中默认EhCache实现缓存
- 8.1.3测试
- 8.2Redis
- 8.2.1shiro中使用Redis作为缓存实现
- 8.测试
- 9.shrio实现验证功能
- 9.1验证码工具类
- 9.2开发页面加入验证码
- 9.3开发控制器
- 9.4放行验证码
- 9.5修改认证流程
- 9.6启动测试
- 10.shiro标签在jsp使用
- 11.Shiro整合springboot之thymeleaf权限控制
- 11.1引入依赖
- 11.2页面中引入命名空间
- 11.3常见权限控制标签使用
- 11.4加入shiro的方言配置
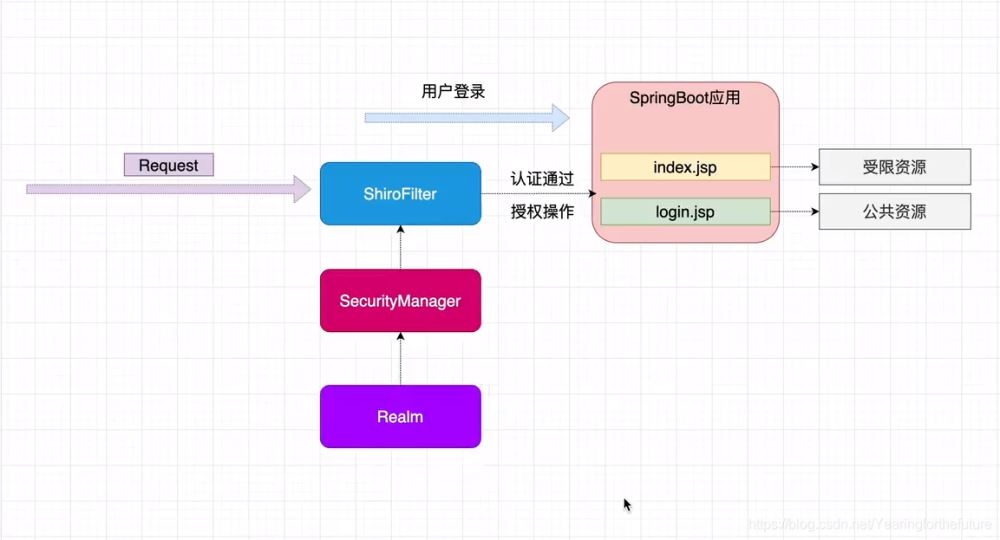
1.SpringBoot整合Shiro思路
2. 环境搭建
2.1 创建项目

2.2 引入依赖
pom.xml
<dependencies>
    <dependency>
        <groupId>org.springframework.boot</groupId>
        <artifactId>spring-boot-starter-web</artifactId>
    </dependency>

        <artifactId>spring-boot-devtools</artifactId>
        <scope>runtime</scope>
        <optional>true</optional>
        <groupId>org.projectlombok</groupId>
        <artifactId>lombok</artifactId>
        <artifactId>spring-boot-starter-test</artifactId>
        <scope>test</scope>
    <!--引入Jsp依赖-->
        <groupId>org.apache.tomcat.embed</groupId>
        <artifactId>tomcat-embed-jasper</artifactId>
    <!--jstl-->
        <groupId>jstl</groupId>
        <artifactId>jstl</artifactId>
        <version>1.2</version>
</dependencies>
<build>
    <plugins>
        <plugin>
            <groupId>org.springframework.boot</groupId>
            <artifactId>spring-boot-maven-plugin</artifactId>
            <configuration>
                <excludes>
                    <exclude>
                        <groupId>org.projectlombok</groupId>
                        <artifactId>lombok</artifactId>
                    </exclude>
                </excludes>
            </configuration>
        </plugin>
    </plugins>
</build>
2.3 创建前端页面
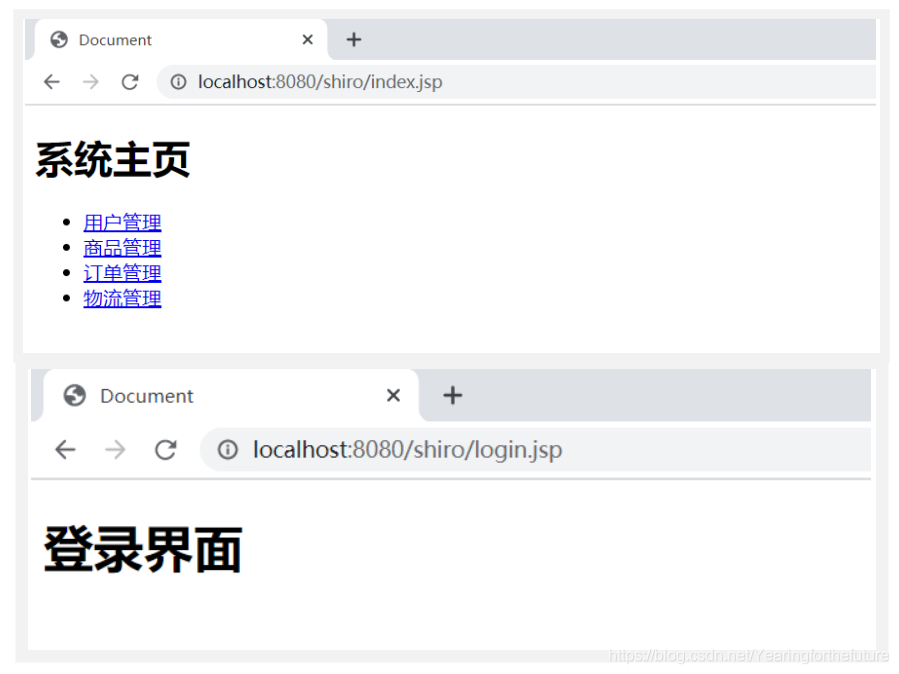
在webapp文件夹中创建index.jsp和login.jsp
index.jsp
<%@page contentType="text/html;UTF-8" pageEncoding="UTF-8" isErrorPage="false" %>
<!doctype html>
<html lang="en">
<head>
<meta charset="UTF-8">
<meta name="viewport"
content="width=device-width, user-scalable=no, initial-scale=1.0, maximum-scale=1.0, minimum-scale=1.0">
<meta http-equiv="X-UA-Compatible" content="ie=edge">
<title>Document</title>
</head>
<body>
<%--受限资源--%>
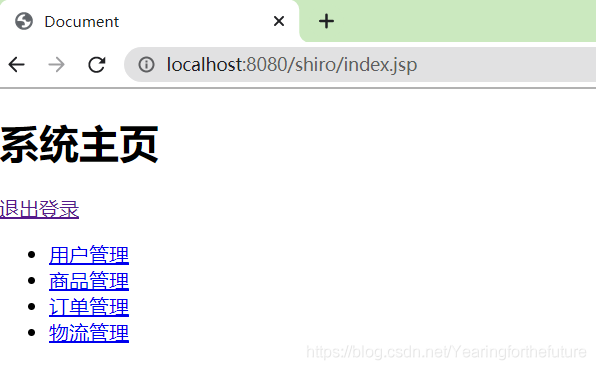
<h1>系统主页</h1>
<ul>
<li><a href="#" rel="external nofollow" rel="external nofollow" rel="external nofollow" rel="external nofollow" rel="external nofollow" rel="external nofollow" rel="external nofollow" rel="external nofollow" rel="external nofollow" rel="external nofollow" rel="external nofollow" rel="external nofollow" >用户管理</a></li>
<li><a href="#" rel="external nofollow" rel="external nofollow" rel="external nofollow" rel="external nofollow" rel="external nofollow" rel="external nofollow" rel="external nofollow" rel="external nofollow" rel="external nofollow" rel="external nofollow" rel="external nofollow" rel="external nofollow" >商品管理</a></li>
<li><a href="#" rel="external nofollow" rel="external nofollow" rel="external nofollow" rel="external nofollow" rel="external nofollow" rel="external nofollow" rel="external nofollow" rel="external nofollow" rel="external nofollow" rel="external nofollow" rel="external nofollow" rel="external nofollow" >订单管理</a></li>
<li><a href="#" rel="external nofollow" rel="external nofollow" rel="external nofollow" rel="external nofollow" rel="external nofollow" rel="external nofollow" rel="external nofollow" rel="external nofollow" rel="external nofollow" rel="external nofollow" rel="external nofollow" rel="external nofollow" >物流管理</a></li>
</ul>
</body>
</html>
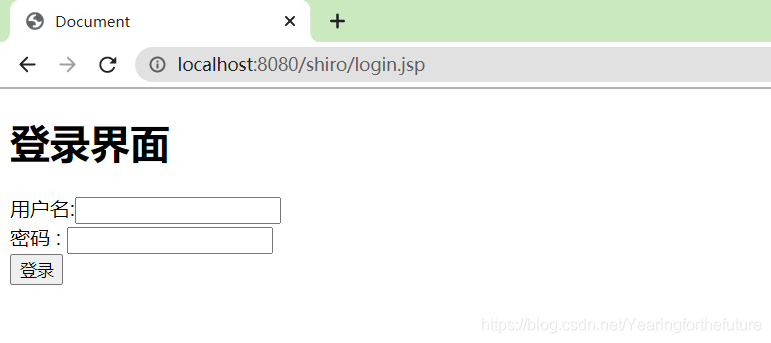
login.jsp
<%@page contentType="text/html;UTF-8" pageEncoding="UTF-8" isErrorPage="false" %>
<!doctype html>
<html lang="en">
<head>
<meta charset="UTF-8">
<meta name="viewport"
content="width=device-width, user-scalable=no, initial-scale=1.0, maximum-scale=1.0, minimum-scale=1.0">
<meta http-equiv="X-UA-Compatible" content="ie=edge">
<title>Document</title>
</head>
<body>
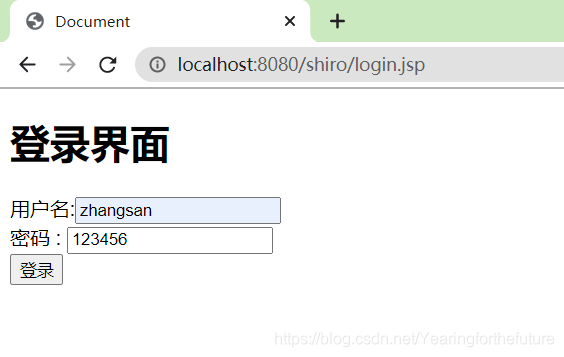
<h1>登录界面</h1>
<form action="${pageContext.request.contextPath}/user/login" method="post">
用户名:<input type="text" name="username" > <br/>
密码 : <input type="text" name="password"> <br>
<input type="submit" value="登录">
</form>
</html>
2.4 配置视图信息
application.properties
server.port=8080
server.servlet.context-path=/shiro
spring.application.name=shiro

spring.mvc.view.prefix=/
spring.mvc.view.suffix=.jsp
2.5 解决IDEA冲突问题
JSP 与IDEA 与SpringBoot存在一定的不兼容,修改此配置即可解决
2.6 测试搭建的环境
3. 整合Shiro
3.1 引入依赖
pom.xml
<!--引入shrio-->
<dependency>
    <groupId>org.apache.shiro</groupId>
    <artifactId>shiro-spring-boot-starter</artifactId>
    <version>1.5.3</version>
</dependency>
3.2 自定义Realm
在shiro文件夹下创建realm文件夹
package com.test.shiro.realm;

import org.apache.shiro.authc.AuthenticationException;
import org.apache.shiro.authc.AuthenticationInfo;
import org.apache.shiro.authc.AuthenticationToken;
import org.apache.shiro.authz.AuthorizationInfo;
import org.apache.shiro.realm.AuthorizingRealm;
import org.apache.shiro.subject.PrincipalCollection;

/**
 * 自定义Realm
 */
public class CustomerRealm extends AuthorizingRealm {
    @Override
    protected AuthorizationInfo doGetAuthorizationInfo(PrincipalCollection principalCollection) {
        return null;
    }

    @Override
    protected AuthenticationInfo doGetAuthenticationInfo(AuthenticationToken authenticationToken) throws AuthenticationException {
        return null;
    }
}
3.3 Shiro配置
在config文件夹中创建ShiroConfig.java
@Configuration
public class ShiroConfig {
    //ShiroFilter过滤所有请求
    @Bean
    public ShiroFilterFactoryBean getShiroFilterFactoryBean(DefaultWebSecurityManager securityManager) {
        ShiroFilterFactoryBean shiroFilterFactoryBean = new ShiroFilterFactoryBean();
        //给ShiroFilter配置安全管理器
        shiroFilterFactoryBean.setSecurityManager(securityManager);
        //配置系统受限资源
        //配置系统公共资源
        Map<String, String> map = new HashMap<String, String>();
        map.put("/index.jsp","authc");//表示这个资源需要认证和授权
        // 设置认证界面路径
        shiroFilterFactoryBean.setLoginUrl("/login.jsp");
        shiroFilterFactoryBean.setFilterChainDefinitionMap(map);

        return shiroFilterFactoryBean;
    }
    //创建安全管理器
    @Bean
    public DefaultWebSecurityManager getDefaultWebSecurityManager(Realm realm) {
        DefaultWebSecurityManager securityManager = new DefaultWebSecurityManager();
        securityManager.setRealm(realm);
        return securityManager;
    }
    //创建自定义Realm
    @Bean
    public Realm getRealm() {
        CustomerRealm realm = new CustomerRealm();
        return realm;
    }
}
3.4 启动测试
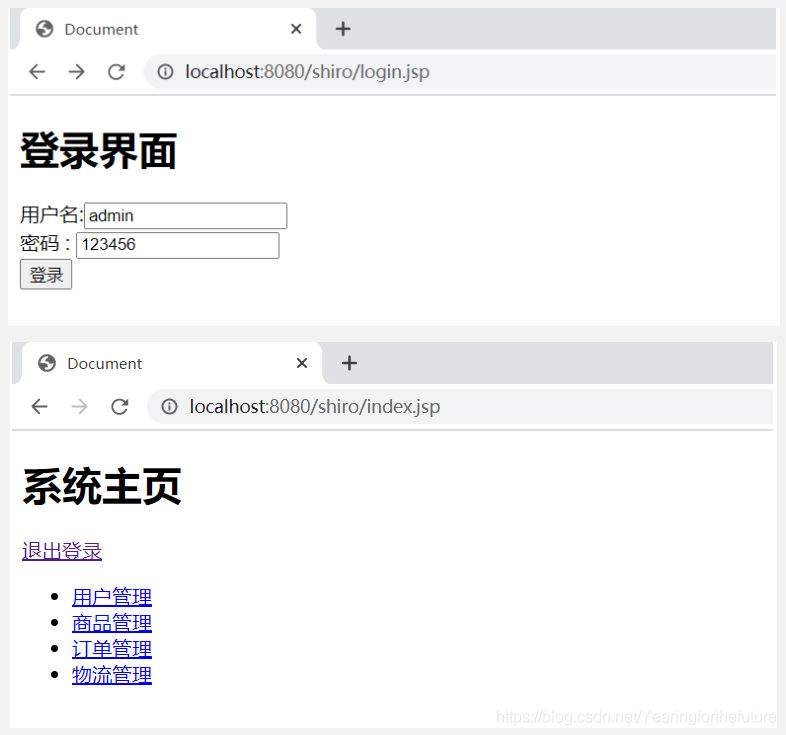
输入http://localhost:8080/shiro/index.jsp,发现需要跳转到login.jsp
4. 常见过滤器
注意: shiro提供和多个默认的过滤器,我们可以用这些过滤器来配置控制指定url的权限:
5. 认证和退出
5.1 在index.jsp添加a标签
index.jsp
<a href="${pageContext.request.contextPath}/user/logout" rel="external nofollow" rel="external nofollow" >退出登录</a>
5.2 编写controller
UserController.java
@Controller
@RequestMapping("/user")
public class UserController {
    @RequestMapping("logout")
    public String logout() {
        Subject subject = SecurityUtils.getSubject();
        subject.logout();
        return "redirect:/login.jsp";
    }
    @RequestMapping("/login")
    public String login(String username, String password) {
        //获取主题对象
        Subject subject = SecurityUtils.getSubject();
        try {
            subject.login(new UsernamePasswordToken(username,password));
            System.out.println("登录成功!!!");
            return "redirect:/index.jsp";
        } catch (UnknownAccountException e) {
            e.printStackTrace();
            System.out.println("用户错误!!!");
        } catch (IncorrectCredentialsException e) {
            System.out.println("密码错误!!!");
        }
        return "redirect:/login.jsp";
    }
}
5.3 修改自定义Realm
CustomerRealm.java
/**
 * 自定义Realm
 */
public class CustomerRealm extends AuthorizingRealm {
    @Override
    protected AuthorizationInfo doGetAuthorizationInfo(PrincipalCollection principalCollection) {
        return null;
    }

    @Override
    protected AuthenticationInfo doGetAuthenticationInfo(AuthenticationToken authenticationToken) throws AuthenticationException {
        String principal = (String) authenticationToken.getPrincipal();
        if ("zhangsan".equals(principal)) {
            return new SimpleAuthenticationInfo(principal,"123456",this.getName());
        }
        return null;
    }
}
5.4 修改ShiroConfig配置
ShiroConfig.java
公共资源一定是在受限资源上面,不然会造成死循环。
@Configuration
public class ShiroConfig {
    //ShiroFilter过滤所有请求
    @Bean
    public ShiroFilterFactoryBean getShiroFilterFactoryBean(DefaultWebSecurityManager securityManager) {
        ShiroFilterFactoryBean shiroFilterFactoryBean = new ShiroFilterFactoryBean();
        //给ShiroFilter配置安全管理器
        shiroFilterFactoryBean.setSecurityManager(securityManager);
        //配置系统受限资源
        //配置系统公共资源
        Map<String, String> map = new HashMap<String, String>();
        map.put("/user/login","anon");//表示这个为公共资源 一定是在受限资源上面
        map.put("/**","authc");//表示这个受限资源需要认证和授权
        // 设置认证界面路径
        shiroFilterFactoryBean.setLoginUrl("/login.jsp");
        shiroFilterFactoryBean.setFilterChainDefinitionMap(map);

        return shiroFilterFactoryBean;
    }
    //创建安全管理器
    @Bean
    public DefaultWebSecurityManager getDefaultWebSecurityManager(Realm realm) {
        DefaultWebSecurityManager securityManager = new DefaultWebSecurityManager();
        securityManager.setRealm(realm);
        return securityManager;
    }
    //创建自定义Realm
    @Bean
    public Realm getRealm() {
        CustomerRealm realm = new CustomerRealm();
        return realm;
    }
}
5.5 测试
登录正常,登出正常,未登录和登出后不能访问index.jsp
6. MDSalt的认证实现
6.1 创建数据库
SET NAMES utf8mb4;
SET FOREIGN_KEY_CHECKS = 0;
-- ----------------------------
-- Table structure for t_user
-- ----------------------------
DROP TABLE IF EXISTS `t_user`;
CREATE TABLE `t_user` (
  `id` INT(6) NOT NULL AUTO_INCREMENT,
  `username` VARCHAR(40) DEFAULT NULL,
  `password` VARCHAR(40) DEFAULT NULL,
  `salt` VARCHAR(255) DEFAULT NULL,
  PRIMARY KEY (`id`)
) ENGINE=INNODB AUTO_INCREMENT=2 DEFAULT CHARSET=utf8;

SET FOREIGN_KEY_CHECKS = 1;
6.2 引入依赖
<!--引入mybatis-->
<dependency>
    <groupId>tk.mybatis</groupId>
    <artifactId>mapper-spring-boot-starter</artifactId>
    <version>2.1.5</version>
</dependency>
<!--mysql-->
<dependency>
    <groupId>mysql</groupId>
    <artifactId>mysql-connector-java</artifactId>
</dependency>
<!--druid-->
<dependency>
    <groupId>com.alibaba</groupId>
    <artifactId>druid</artifactId>
    <version>1.2.6</version>
</dependency>
6.3 配置数据源和整合mybatis
application.properties
#配置数据源
spring.datasource.type=com.alibaba.druid.pool.DruidDataSource
spring.datasource.driver-class-name=com.mysql.jdbc.Driver
spring.datasource.url=jdbc:mysql://localhost:3306/springboot_shrio?characterEncoding=UTF-8
spring.datasource.username=root
spring.datasource.password=123456

mybatis.type-aliases-package=com.test.entity
mybatis.mapper-locations=classpath:com/test/mapper/*.xml
6.4 创建实体类entity
User.java
@Data
@Accessors(chain = true)
@NoArgsConstructor
@AllArgsConstructor
public class User {
    private String  id;
    private String username;
    private String password;
    private String salt;
}
6.5 创建DAO接口
UserDao.java
@Mapper
@Repository
public interface UserDao {
    void save(User user);

    User findByUsername(String username);
}
6.6 编写Mapper配置文件
UserDao.xml
<?xml version="1.0" encoding="UTF-8" ?>
<!DOCTYPE mapper
        PUBLIC "-//mybatis.org//DTD Config 3.0//EN"
        "http://mybatis.org/dtd/mybatis-3-mapper.dtd">

<mapper namespace="com.test.dao.UserDao">

    <insert id="save" parameterType="User" useGeneratedKeys="true" keyProperty="id">
        insert into t_user values(#{id},#{username},#{password},#{salt})
    </insert>
    <select id="findByUsername" parameterType="String" resultType="User">
        select id,username,password,salt
        from t_user
        where username = #{username}
    </select>
</mapper>
6.7 创建Service接口
UserService.java
public interface UserService {
    //注册用户方法
    void register(User user);
    //根据用户名查找用户
    User findByUsername(String username);
}
6.8 编写生成随机盐工具类
SaltUtil.java
public class SaltUtil {
    public static String getSalt(int n) {
        char[] chars = "ABCDEFGHIJKLMNOPQRSTUVWXYZabcdefghijklmnopqrstuvwxyz01234567890!@#$%^&*()".toCharArray();
        StringBuilder sb = new StringBuilder();
        for (int i = 0; i < n; i++) {
            char c = chars[new Random().nextInt(chars.length)];
            sb.append(c);
        }
        return sb.toString();
    }

    public static void main(String[] args) {
        System.out.println(getSalt(4));
    }
}
6.9 编写Service实现类
UserServiceImpl.java
@Service("userService")
@Transactional
public class UserServiceImpl implements UserService {
    @Autowired
    private UserDao userDao;

    @Override
    public void register(User user) {
        //1.获取随机盐
        String salt = SaltUtil.getSalt(8);
        //2.将随机盐保存到数据
        user.setSalt(salt);
        //3.明文密码进行md5 + salt + hash散列
       Md5Hash MD5 = new Md5Hash(user.getPassword(),salt,1024);
       user.setPassword(MD5.toHex());
       userDao.save(user);
    }

    @Override
    public User findByUsername(String username) {
        return userDao.findByUsername(username);
    }
}
6.10 编写Controller
UserController.java
@Controller
@RequestMapping("/user")
public class UserController {

    @Autowired
    private UserService userService;

    @RequestMapping("/register")
    public String register(User user) {
        try {
            userService.register(user);
            return "redirect:/login.jsp";
        } catch (Exception e) {
            e.printStackTrace();
            return "redirect:/register.jsp";
        }
    }
    @RequestMapping("logout")
    public String logout() {
        Subject subject = SecurityUtils.getSubject();
        subject.logout();
        return "redirect:/login.jsp";
    }
    @RequestMapping("/login")
    public String login(String username, String password) {
        //获取主题对象
        Subject subject = SecurityUtils.getSubject();
        try {
            subject.login(new UsernamePasswordToken(username,password));
            System.out.println("登录成功!!!");
            return "redirect:/index.jsp";
        } catch (UnknownAccountException e) {
            e.printStackTrace();
            System.out.println("用户错误!!!");
        } catch (IncorrectCredentialsException e) {
            System.out.println("密码错误!!!");
        }
        return "redirect:/login.jsp";
    }
}
6.11 修改自定义Realm
CustomerRealm.java
/**
 * 自定义Realm
 */
public class CustomerRealm extends AuthorizingRealm {
    @Override
    protected AuthorizationInfo doGetAuthorizationInfo(PrincipalCollection principalCollection) {
        return null;
    }

    @Override
    protected AuthenticationInfo doGetAuthenticationInfo(AuthenticationToken authenticationToken) throws AuthenticationException {
        String principal = (String) authenticationToken.getPrincipal();
        //获取UserService对象
        UserService userService = (UserService) ApplicationContextUtil.getBean("userService");
        //System.out.println(userService);
        User user = userService.findByUsername(principal);
        if (!ObjectUtils.isEmpty(user)) {
            return new SimpleAuthenticationInfo(user.getUsername(), user.getPassword(), ByteSource.Util.bytes(user.getSalt()), this.getName());
        }
        return null;
    }
}
6.12 编写获取对象工具类
ApplicationContextUtil.java
@Component
public class ApplicationContextUtil implements ApplicationContextAware {

    private static ApplicationContext context;

    @Override
    public void setApplicationContext(ApplicationContext applicationContext) throws BeansException {
        this.context = applicationContext;
    }
    //根据bean名字获取工厂中指定bean 对象
    public static Object getBean(String beanName) {
        return context.getBean(beanName);
    }
}
6.13 修改Config
ShiroConfig.java
@Configuration
public class ShiroConfig {
    //ShiroFilter过滤所有请求
    @Bean
    public ShiroFilterFactoryBean getShiroFilterFactoryBean(DefaultWebSecurityManager securityManager) {
        ShiroFilterFactoryBean shiroFilterFactoryBean = new ShiroFilterFactoryBean();
        //给ShiroFilter配置安全管理器
        shiroFilterFactoryBean.setSecurityManager(securityManager);
        //配置系统受限资源
        //配置系统公共资源
        Map<String, String> map = new HashMap<String, String>();
        map.put("/user/login","anon");//表示这个为公共资源 一定是在受限资源上面
        map.put("/user/register","anon");//表示这个为公共资源 一定是在受限资源上面
        map.put("/register.jsp","anon");//表示这个为公共资源 一定是在受限资源上面
        map.put("/**","authc");//表示这个受限资源需要认证和授权
        // 设置认证界面路径
        shiroFilterFactoryBean.setLoginUrl("/login.jsp");
        shiroFilterFactoryBean.setFilterChainDefinitionMap(map);

        return shiroFilterFactoryBean;
    }
    //创建安全管理器
    @Bean
    public DefaultWebSecurityManager getDefaultWebSecurityManager(Realm realm) {
        DefaultWebSecurityManager securityManager = new DefaultWebSecurityManager();
        securityManager.setRealm(realm);
        return securityManager;
    }
    //创建自定义Realm
    @Bean
    public Realm getRealm() {
        CustomerRealm realm = new CustomerRealm();
        HashedCredentialsMatcher credentialsMatcher = new HashedCredentialsMatcher();
        //设置使用MD5加密算法
        credentialsMatcher.setHashAlgorithmName("md5");
        //散列次数
        credentialsMatcher.setHashIterations(1024);
        realm.setCredentialsMatcher(credentialsMatcher);
        return realm;
    }
6.14 添加注册页面
register.jsp
<%@page contentType="text/html;UTF-8" pageEncoding="UTF-8" isErrorPage="false" %>
<!doctype html>
<html lang="en">
<head>
    <meta charset="UTF-8">
    <meta name="viewport"
          content="width=device-width, user-scalable=no, initial-scale=1.0, maximum-scale=1.0, minimum-scale=1.0">
    <meta http-equiv="X-UA-Compatible" content="ie=edge">
    <title>Document</title>
</head>
<body>
<h1>注册界面</h1>
<form action="${pageContext.request.contextPath}/user/register" method="post">
    用户名:<input type="text" name="username" > <br/>
    密码  : <input type="text" name="password"> <br>
    <input type="submit" value="立即注册">
</form>
</html>
6.15 测试
添加成功

认证
优化版推荐阅读(SpringBoot + Shiro + Jwt 实现登录认证,代码分析):https://blog.csdn.net/qq_43290318/article/details/108225519
7. 授权实现
7.1 模拟数据实现授权
7.1.1 模拟数据
CustomerRealm.java
@Override
    protected AuthorizationInfo doGetAuthorizationInfo(PrincipalCollection principalCollection) {
        String principal = (String) principalCollection.getPrimaryPrincipal();
        if ("zhangsan".equals(principal)) {
            SimpleAuthorizationInfo info = new SimpleAuthorizationInfo();
            info.addRole("admin");
            info.addRole("user");
            info.addStringPermission("user:find:*");
            info.addStringPermission("admin:*");
            return info;
        }
        return null;
    }
7.1.2 页面资源授权
index.jsp
<%@page contentType="text/html;UTF-8" pageEncoding="UTF-8" isErrorPage="false" %>
<%@taglib prefix="shiro" uri="http://shiro.apache.org/tags" %>
<!doctype html>
<html lang="en">
<head>
<meta charset="UTF-8">
<meta name="viewport"
content="width=device-width, user-scalable=no, initial-scale=1.0, maximum-scale=1.0, minimum-scale=1.0">
<meta http-equiv="X-UA-Compatible" content="ie=edge">
<title>Document</title>
</head>
<body>
<%--受限资源--%>
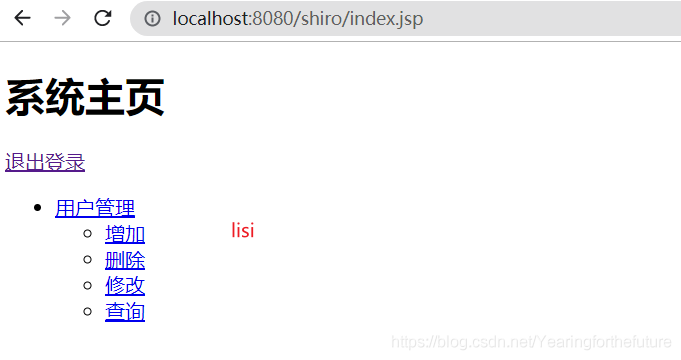
<h1>系统主页</h1>
<a href="${pageContext.request.contextPath}/user/logout" rel="external nofollow" rel="external nofollow" >退出登录</a>
<ul>
<shiro:hasRole name="user">
<li><a href="#" rel="external nofollow" rel="external nofollow" rel="external nofollow" rel="external nofollow" rel="external nofollow" rel="external nofollow" rel="external nofollow" rel="external nofollow" rel="external nofollow" rel="external nofollow" rel="external nofollow" rel="external nofollow" >用户管理</a></li>
<ul>
<shiro:hasPermission name="user:save:*">
<li><a href="#" rel="external nofollow" rel="external nofollow" rel="external nofollow" rel="external nofollow" rel="external nofollow" rel="external nofollow" rel="external nofollow" rel="external nofollow" rel="external nofollow" rel="external nofollow" rel="external nofollow" rel="external nofollow" >增加</a></li>
</shiro:hasPermission>
<shiro:hasPermission name="user:delete:*">
<li><a href="#" rel="external nofollow" rel="external nofollow" rel="external nofollow" rel="external nofollow" rel="external nofollow" rel="external nofollow" rel="external nofollow" rel="external nofollow" rel="external nofollow" rel="external nofollow" rel="external nofollow" rel="external nofollow" >删除</a></li>
</shiro:hasPermission>
<shiro:hasPermission name="user:update:*">
<li><a href="#" rel="external nofollow" rel="external nofollow" rel="external nofollow" rel="external nofollow" rel="external nofollow" rel="external nofollow" rel="external nofollow" rel="external nofollow" rel="external nofollow" rel="external nofollow" rel="external nofollow" rel="external nofollow" >修改</a></li>
</shiro:hasPermission>
<shiro:hasPermission name="user:find:*">
<li><a href="#" rel="external nofollow" rel="external nofollow" rel="external nofollow" rel="external nofollow" rel="external nofollow" rel="external nofollow" rel="external nofollow" rel="external nofollow" rel="external nofollow" rel="external nofollow" rel="external nofollow" rel="external nofollow" >查询</a></li>
</shiro:hasPermission>
</ul>
</shiro:hasRole>
<shiro:hasRole name="admin">
<li><a href="#" rel="external nofollow" rel="external nofollow" rel="external nofollow" rel="external nofollow" rel="external nofollow" rel="external nofollow" rel="external nofollow" rel="external nofollow" rel="external nofollow" rel="external nofollow" rel="external nofollow" rel="external nofollow" >商品管理</a></li>
<li><a href="#" rel="external nofollow" rel="external nofollow" rel="external nofollow" rel="external nofollow" rel="external nofollow" rel="external nofollow" rel="external nofollow" rel="external nofollow" rel="external nofollow" rel="external nofollow" rel="external nofollow" rel="external nofollow" >订单管理</a></li>
<li><a href="#" rel="external nofollow" rel="external nofollow" rel="external nofollow" rel="external nofollow" rel="external nofollow" rel="external nofollow" rel="external nofollow" rel="external nofollow" rel="external nofollow" rel="external nofollow" rel="external nofollow" rel="external nofollow" >物流管理</a></li>
</shiro:hasRole>
</ul>
</body>
</html>
7.1.3 代码方式授权
OrderController.java
@Controller
@RequestMapping("order")
public class OrderController {
    @RequestMapping("save")
    public String save() {
        //基于角色
        //获取主体对象
        Subject subject = SecurityUtils.getSubject();
        //代码方式
        if (subject.hasRole("admin")) {
            System.out.println("保存订单!");
        }else{
            System.out.println("无权访问!");
        }
        System.out.println("进入save方法============");
        return "redircet:/index.jsp";
    }
}
7.1.4 方法调用授权
OrderController.java
@Controller
@RequestMapping("order")
public class OrderController {

    @RequiresRoles(value={"admin","user"})//用来判断角色  同时具有 admin user
    @RequiresPermissions("user:update:01") //用来判断权限字符串
    @RequestMapping("save")
    public String save(){
        System.out.println("进入方法");
        return "redirect:/index.jsp";
    }

}
7.2 数据库实现角色授权
7.2.1 授权数据持久化
7.2.2 创建数据库表
SET NAMES utf8mb4;
SET FOREIGN_KEY_CHECKS = 0;

-- ----------------------------
-- Table structure for t_perms
-- ----------------------------
DROP TABLE IF EXISTS `t_perms`;
CREATE TABLE `t_pers` (
  `id` int(6) NOT NULL AUTO_INCREMENT,
  `name` varchar(80) DEFAULT NULL,
  `url` varchar(255) DEFAULT NULL,
  PRIMARY KEY (`id`)
) ENGINE=InnoDB DEFAULT CHARSET=utf8;

-- ----------------------------
-- Table structure for t_role
-- ----------------------------
DROP TABLE IF EXISTS `t_role`;
CREATE TABLE `t_role` (
  `id` int(6) NOT NULL AUTO_INCREMENT,
  `name` varchar(60) DEFAULT NULL,
  PRIMARY KEY (`id`)
) ENGINE=InnoDB DEFAULT CHARSET=utf8;

-- ----------------------------
-- Table structure for t_role_perms
-- ----------------------------
DROP TABLE IF EXISTS `t_role_perms`;
CREATE TABLE `t_role_perms` (
  `id` int(6) NOT NULL,
  `roleid` int(6) DEFAULT NULL,
  `permsid` int(6) DEFAULT NULL,
  PRIMARY KEY (`id`)
) ENGINE=InnoDB DEFAULT CHARSET=utf8;

-- ----------------------------
-- Table structure for t_user
-- ----------------------------
DROP TABLE IF EXISTS `t_user`;
CREATE TABLE `t_user` (
  `id` int(6) NOT NULL AUTO_INCREMENT,
  `username` varchar(40) DEFAULT NULL,
  `password` varchar(40) DEFAULT NULL,
  `salt` varchar(255) DEFAULT NULL,
  PRIMARY KEY (`id`)
) ENGINE=InnoDB AUTO_INCREMENT=2 DEFAULT CHARSET=utf8;

-- ----------------------------
-- Table structure for t_user_role
-- ----------------------------
DROP TABLE IF EXISTS `t_user_role`;
CREATE TABLE `t_user_role` (
  `id` int(6) NOT NULL,
  `userid` int(6) DEFAULT NULL,
  `roleid` int(6) DEFAULT NULL,
  PRIMARY KEY (`id`)
) ENGINE=InnoDB DEFAULT CHARSET=utf8;

SET FOREIGN_KEY_CHECKS = 1;
7.2.3 创建实体类
User
@Data
@Accessors(chain = true)
@AllArgsConstructor
@NoArgsConstructor
public class User implements Serializable {
    private String id;
    private String username;
    private String password;
    private String salt;

    //定义角色集合
    private List<Role> roles;

}
Role
@Data
@Accessors(chain = true)
@AllArgsConstructor
@NoArgsConstructor
public class Role implements Serializable {
    private String id;
    private String name;

    //定义权限的集合
    private List<Perms> perms;

}
Perms
@Data
@Accessors(chain = true)
@AllArgsConstructor
@NoArgsConstructor
public class Perms implements Serializable {
    private String id;
    private String name;
    private String url;
}
7.2.4 创建Dao接口
UserDao.java
//根据用户名查询所有角色
User findRolesByUserName(String username);
7.2.5 编写Mapper实现
UserDao.xml
<resultMap id="userMap" type="User">
  <id column="uid" property="id"/>
  <result column="username" property="username"/>
  <!--角色信息-->
  <collection property="roles" javaType="list" ofType="Role">
    <id column="id" property="id"/>
    <result column="rname" property="name"/>
  </collection>
</resultMap>

<select id="findRolesByUserName" parameterType="String" resultMap="userMap">
  SELECT u.id uid,u.username,r.id,r.NAME rname
  FROM t_user u
  LEFT JOIN t_user_role ur
  ON u.id=ur.userid
  LEFT JOIN t_role r
  ON ur.roleid=r.id
  WHERE u.username=#{username}
</select>
7.2.6 编写Service接口
UserService.java
public interface UserService {
    User findRoleByUsername(String username);
}
7.2.7 编写Service实现方法
UserServiceImpl.java
@Service("userService")
@Transactional
public class UserServiceImpl implements UserService {
    @Autowired
    private UserDao userDao;

    @Override
    public User findRoleByUsername(String username) {
        return userDao.findRoleByUsername(username);
    }
}
7.2.8 修改自定义Realm
CustomerRealm.java
/**
 * 自定义Realm
 */
public class CustomerRealm extends AuthorizingRealm {
    @Override
    protected AuthorizationInfo doGetAuthorizationInfo(PrincipalCollection principalCollection) {
        String principal = (String) principalCollection.getPrimaryPrincipal();
        //获取UserService对象
        UserService userService = (UserService) ApplicationContextUtil.getBean("userService");
        //System.out.println(userService);
        //基于角色授权
        User user = userService.findRoleByUsername(principal);
        if (!CollectionUtils.isEmpty(user.getRoles())) {
            SimpleAuthorizationInfo info = new SimpleAuthorizationInfo();
            user.getRoles().forEach(role -> info.addRole(role.getName()));
            return info;
        }
        return null;
    }
    ......
}
7.3 数据库实现权限授权
7.3.1 创建Dao接口
UserDao.java
	@Mapper
@Repository
public interface UserDao {
    //根据角色id查询权限集合
    Role findPermByRoleId(String id);
    //根据角色id查询权限集合
    List<Perms> findPermsByRoleId2(String id);
}
7.3.2 编写Mapper实现
UserDao.xml
<?xml version="1.0" encoding="UTF-8" ?>
<!DOCTYPE mapper
        PUBLIC "-//mybatis.org//DTD Config 3.0//EN"
        "http://mybatis.org/dtd/mybatis-3-mapper.dtd">

<mapper namespace="com.test.dao.UserDao">
    <resultMap id="roleMap" type="Role">
        <result column="name" property="name"/>
        <collection property="perms" javaType="list" ofType="Perms">
            <id column="id" property="id"/>
            <result column="name" property="name"/>
            <result column="url" property="url"/>
        </collection>
    </resultMap>
    <select id="findPermByRoleId" parameterType="String" resultType="Role" resultMap="roleMap">
        SELECT r.`name`,p.`id`,p.`name`,p.`url`
        FROM t_role r
        LEFT JOIN t_role_perms rp
        ON r.`id` = rp.`roleid`
        LEFT JOIN t_pers p
        ON rp.`permsid` = p.`id`
        WHERE r.`id` = #{id}
    </select>

    <select id="findPermsByRoleId2" parameterType="String" resultType="Perms">
      SELECT p.id,p.NAME,p.url,r.NAME
      FROM t_role r
      LEFT JOIN t_role_perms rp
      ON r.id=rp.roleid
      LEFT JOIN t_pers p ON rp.permsid=p.id
      WHERE r.id=#{id}
    </select>
</mapper>
7.3.3 编写Service接口
UserService.java
public interface UserService {
     //根据角色id查询权限集合
    Role findPermByRoleId(String id);
    //根据角色id查询权限集合
    List<Perms> findPermsByRoleId2(String id);
}
7.3.4 编写Service实现方法
UserServiceImpl.java
@Service("userService")
@Transactional
public class UserServiceImpl implements UserService {
    @Autowired
    private UserDao userDao;

  @Override
    public Role findPermByRoleId(String id) {
        return userDao.findPermByRoleId(id);
    }

    @Override
    public List<Perms> findPermsByRoleId2(String id) {
        return userDao.findPermsByRoleId2(id);
    }
}
7.3.5 修改自定义Realm
CustomerRealm.java
/**
 * 自定义Realm
 */
public class CustomerRealm extends AuthorizingRealm {
   @Override
    protected AuthorizationInfo doGetAuthorizationInfo(PrincipalCollection principalCollection) {
        String principal = (String) principalCollection.getPrimaryPrincipal();
        //获取UserService对象
        UserService userService = (UserService) ApplicationContextUtil.getBean("userService");
        //System.out.println(userService);
        //基于角色授权
        User user = userService.findRoleByUsername(principal);
        System.out.println("user======="+user);
        if (!CollectionUtils.isEmpty(user.getRoles())) {
            SimpleAuthorizationInfo info = new SimpleAuthorizationInfo();
            user.getRoles().forEach(role ->{
                    info.addRole(role.getName());
                /*Role role2 = userService.findPermByRoleId(role.getId());
                System.out.println("role2======"+role2);
                if (!CollectionUtils.isEmpty(role2.getPerms())) {
                    role2.getPerms().forEach(perm -> info.addStringPermission(perm.getName()));
                }*/

                //权限信息
                List<Perms> perms = userService.findPermsByRoleId2(role.getId());
                System.out.println("perms========"+perms);
                if(!CollectionUtils.isEmpty(perms) && perms.get(0)!=null ){
                    perms.forEach(perm->{
                        info.addStringPermission(perm.getName());
                    });
                }
            });
            return info;
        }
        return null;
    }
    ......
}
7.3.6 数据库表数据设置

7.3.7 测试

8. shiro使用缓存
8.1 Cache
8.1.1 Cache 作用
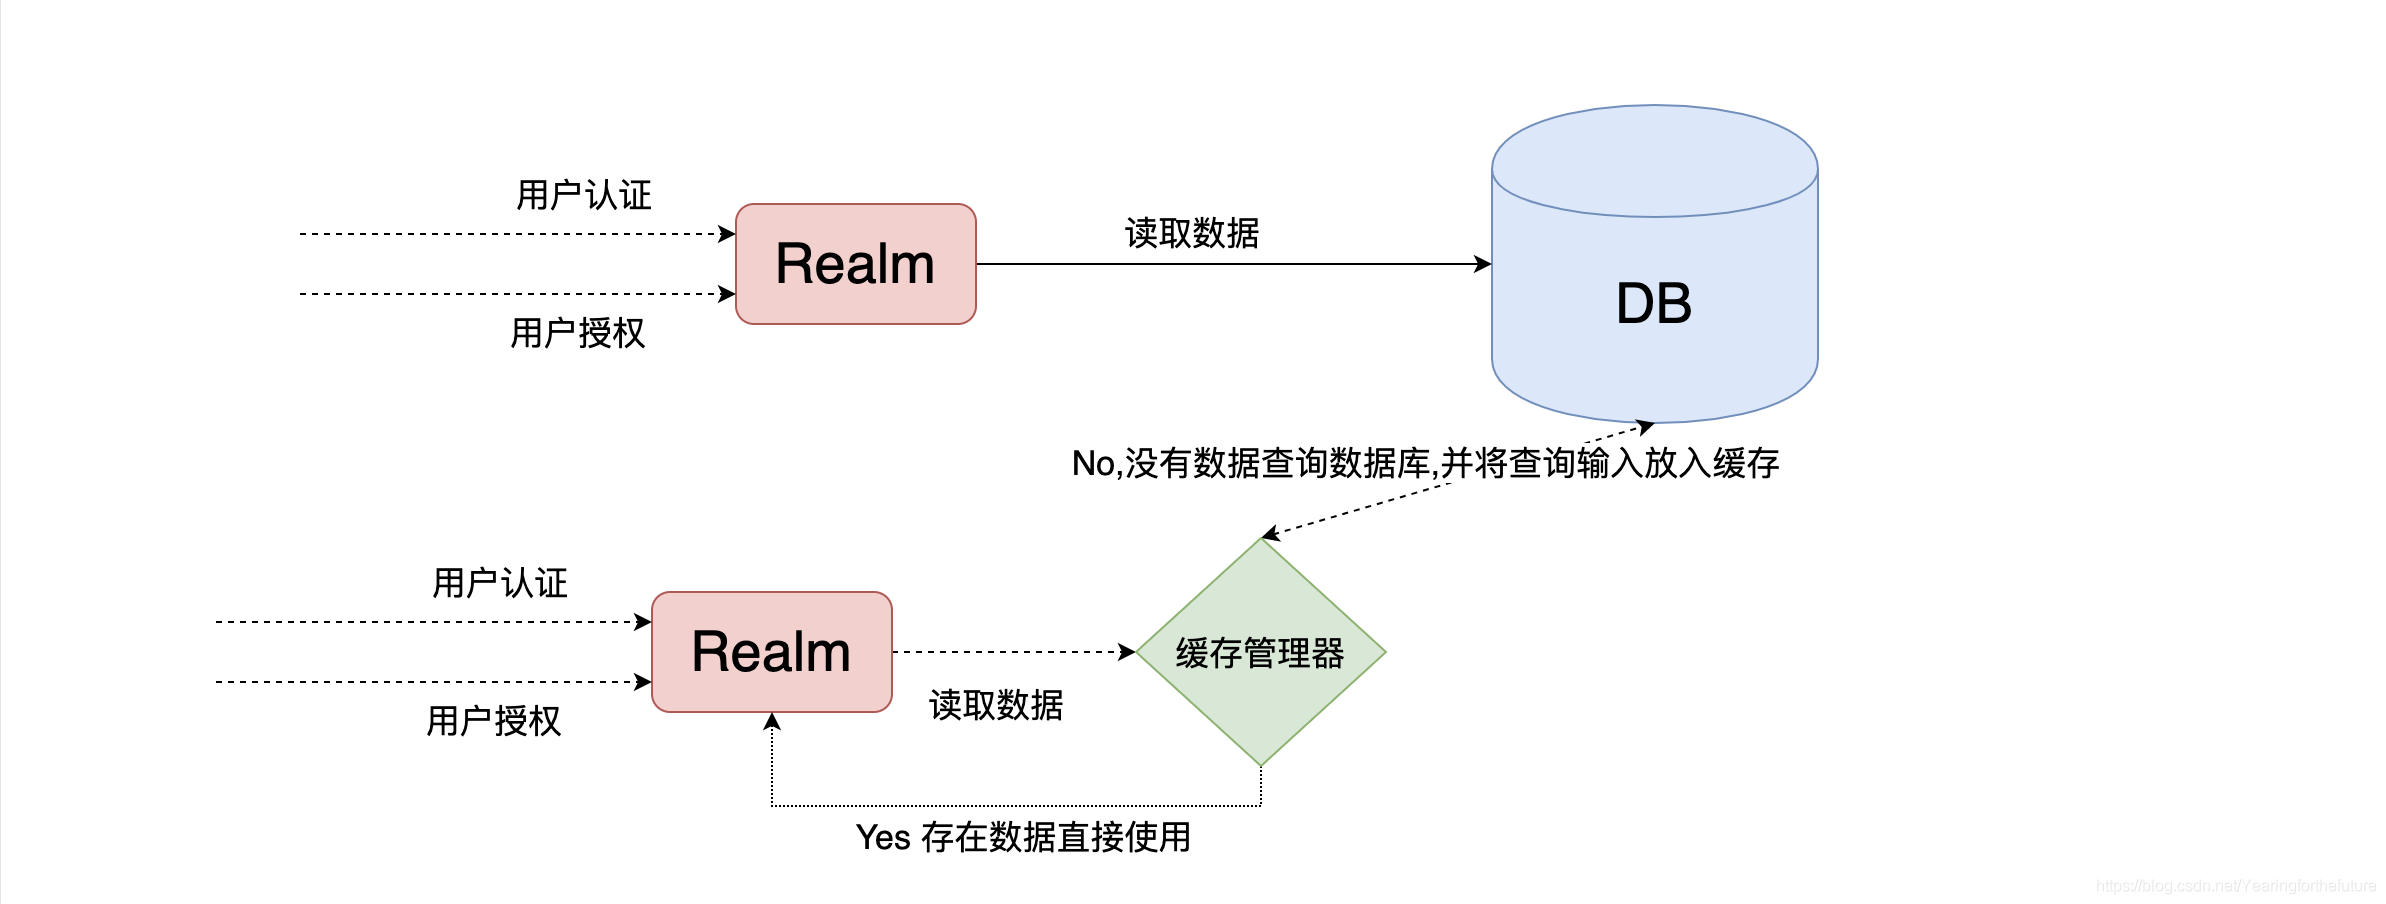
Cache 缓存: 计算机内存中一段数据
作用: 用来减轻DB的访问压力,从而提高系统的查询效率
流程:
8.1.2 使用shiro中默认EhCache实现缓存
1.引入依赖
<!--引入shiro和ehcache-->
<dependency>
  <groupId>org.apache.shiro</groupId>
  <artifactId>shiro-ehcache</artifactId>
  <version>1.5.3</version>
</dependency>
2.开启缓存
//3.创建自定义realm
@Bean
public Realm getRealm() {
    CustomerRealm realm = new CustomerRealm();
    HashedCredentialsMatcher credentialsMatcher = new HashedCredentialsMatcher();
    //设置使用MD5加密算法
    credentialsMatcher.setHashAlgorithmName("md5");
    //散列次数
    credentialsMatcher.setHashIterations(1024);
    realm.setCredentialsMatcher(credentialsMatcher);

    //开启缓存管理器
    realm.setCacheManager(new EhCacheManager());
    realm.setCachingEnabled(true);//开启缓存
    realm.setAuthenticationCachingEnabled(true);//开启认证缓存
    realm.setAuthenticationCacheName("authentication");
    realm.setAuthorizationCachingEnabled(true);//开启授权缓存
    realm.setAuthorizationCacheName("authorization");

    return realm;
}
8.1.3 测试
注意:如果控制台没有任何sql展示说明缓存已经开启
8.2 Redis
8.2.1 shiro中使用Redis作为缓存实现
1.引入redis依赖
<!--redis整合springboot-->
<dependency>
  <groupId>org.springframework.boot</groupId>
  <artifactId>spring-boot-starter-data-redis</artifactId>
</dependency>
2.配置redis连接
spring.redis.port=6379
spring.redis.host=localhost
spring.redis.database=0
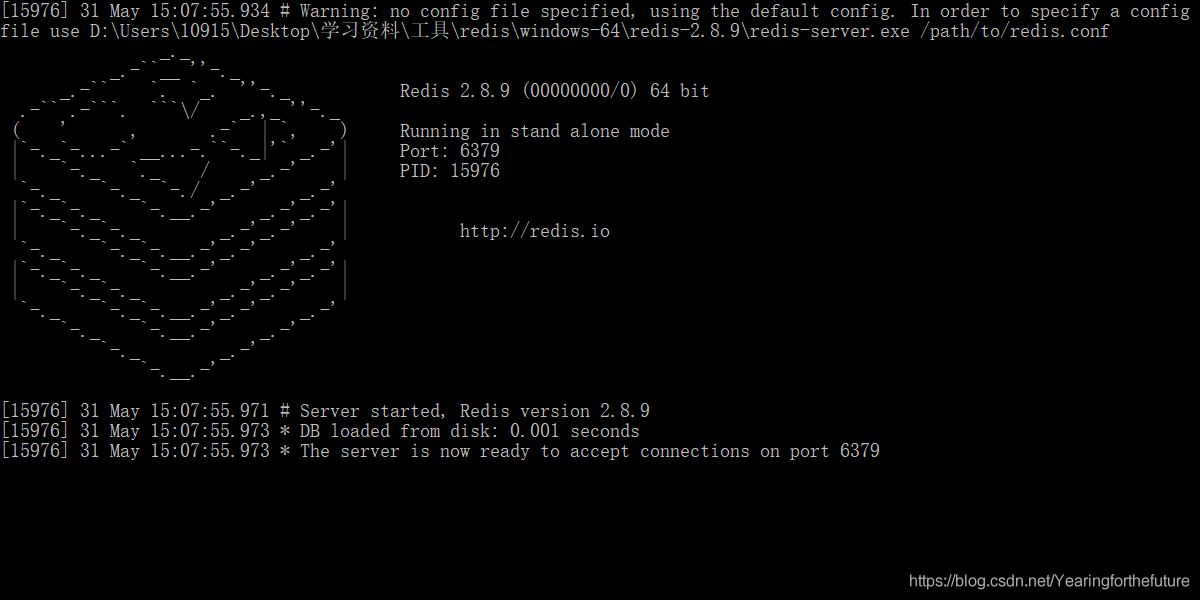
3.启动redis服务
4. 开发RedisCacheManager
自定义shiro缓存管理器
RedisCacheManager.java
import org.apache.shiro.cache.Cache;
import org.apache.shiro.cache.CacheException;
import org.apache.shiro.cache.CacheManager;

//自定义shiro缓存管理器
public class RedisCacheManager implements CacheManager {
    //参数1:认证或者是授权缓存的统一名称
    @Override
    public <K, V> Cache<K, V> getCache(String cacheName) throws CacheException {
        System.out.println(cacheName);
        return new RedisCache<K,V>(cacheName);
    }
}
5.开RedisCache实现
//自定义redis缓存的实现
public class RedisCache<k,v> implements Cache<k,v> {

    private String cacheName;

    public RedisCache() {
    }

    public RedisCache(String cacheName) {
        this.cacheName = cacheName;
    }

    @Override
    public v get(k k) throws CacheException {
        return (v) getRedisTemplate().opsForHash().get(this.cacheName, k.toString());
    }

    @Override
    public v put(k k, v v) throws CacheException {
        System.out.println("put key: "+k);
        System.out.println("put value:"+v);
        getRedisTemplate().opsForHash().put(this.cacheName,k.toString(), v);
        return null;
    }

    @Override
    public v remove(k k) throws CacheException {
        System.out.println("=============remove=============");
        return (v) getRedisTemplate().opsForHash().delete(this.cacheName,k.toString());
    }

    @Override
    public void clear() throws CacheException {
        System.out.println("=============clear==============");
        getRedisTemplate().delete(this.cacheName);
    }

    @Override
    public int size() {
        return getRedisTemplate().opsForHash().size(this.cacheName).intValue();
    }

    @Override
    public Set<k> keys() {
        return getRedisTemplate().opsForHash().keys(this.cacheName);
    }

    @Override
    public Collection<v> values() {
        return getRedisTemplate().opsForHash().values(this.cacheName);
    }

    private RedisTemplate getRedisTemplate(){
        RedisTemplate redisTemplate = (RedisTemplate) ApplicationContextUtil.getBean("redisTemplate");
        redisTemplate.setKeySerializer(new StringRedisSerializer());
        redisTemplate.setHashKeySerializer(new StringRedisSerializer());
        return redisTemplate;
    }
}
6. 启动项目测试发现报错 错误解释: 由于shiro中提供的simpleByteSource实现没有实现序列化,所有在认证时出现错误信息
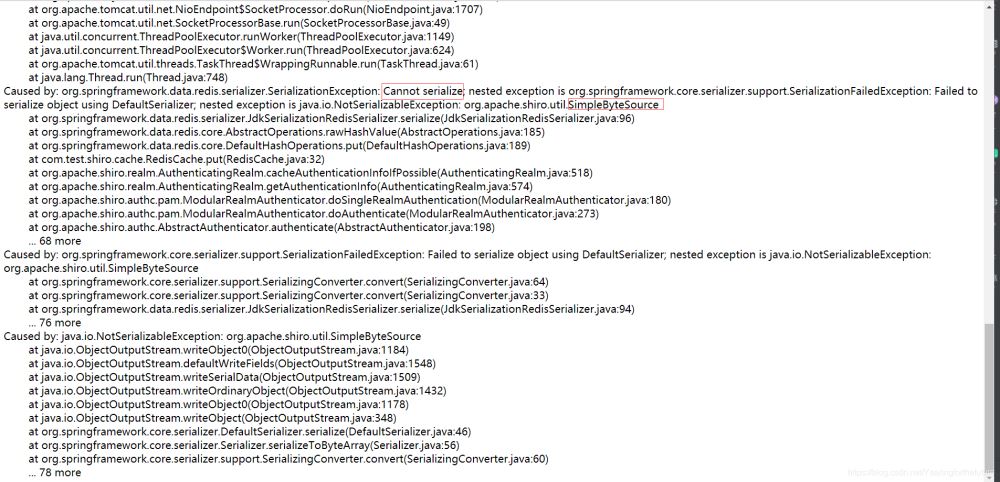
解决方案如下:
实现 实体类 序列化
自定义salt实现 实现序列化接口
import org.apache.shiro.codec.Base64;
import org.apache.shiro.codec.CodecSupport;
import org.apache.shiro.codec.Hex;
import org.apache.shiro.util.ByteSource;

import java.io.File;
import java.io.InputStream;
import java.io.Serializable;
import java.util.Arrays;
//自定义salt实现 实现序列化接口
public class MyByteSource implements ByteSource, Serializable {
    private  byte[] bytes;
    private String cachedHex;
    private String cachedBase64;
    public MyByteSource(byte[] bytes) {
        this.bytes = bytes;
    }
    public MyByteSource(char[] chars) {
        this.bytes = CodecSupport.toBytes(chars);
    public MyByteSource(String string) {
        this.bytes = CodecSupport.toBytes(string);
    public MyByteSource(ByteSource source) {
        this.bytes = source.getBytes();
    public MyByteSource(File file) {
        this.bytes = (new MyByteSource.BytesHelper()).getBytes(file);
    public MyByteSource(InputStream stream) {
        this.bytes = (new MyByteSource.BytesHelper()).getBytes(stream);
    public static boolean isCompatible(Object o) {
        return o instanceof byte[] || o instanceof char[] || o instanceof String || o instanceof ByteSource || o instanceof File || o instanceof InputStream;
    public byte[] getBytes() {
        return this.bytes;
    public boolean isEmpty() {
        return this.bytes == null || this.bytes.length == 0;
    public String toHex() {
        if (this.cachedHex == null) {
            this.cachedHex = Hex.encodeToString(this.getBytes());
        }
        return this.cachedHex;
    public String toBase64() {
        if (this.cachedBase64 == null) {
            this.cachedBase64 = Base64.encodeToString(this.getBytes());
        return this.cachedBase64;
    public String toString() {
        return this.toBase64();
    public int hashCode() {
        return this.bytes != null && this.bytes.length != 0 ? Arrays.hashCode(this.bytes) : 0;
    public boolean equals(Object o) {
        if (o == this) {
            return true;
        } else if (o instanceof ByteSource) {
            ByteSource bs = (ByteSource)o;
            return Arrays.equals(this.getBytes(), bs.getBytes());
        } else {
            return false;
    private static final class BytesHelper extends CodecSupport {
        private BytesHelper() {
        public byte[] getBytes(File file) {
            return this.toBytes(file);
        public byte[] getBytes(InputStream stream) {
            return this.toBytes(stream);
}
修改自定义realm中使用的salt
@Override
protected AuthenticationInfo doGetAuthenticationInfo(AuthenticationToken authenticationToken) throws AuthenticationException {
    String principal = (String) authenticationToken.getPrincipal();
    //获取UserService对象
    UserService userService = (UserService) ApplicationContextUtil.getBean("userService");
    //System.out.println(userService);
    User user = userService.findByUsername(principal);
    if (!ObjectUtils.isEmpty(user)) {
        return new SimpleAuthenticationInfo(user.getUsername(), user.getPassword(), new MyByteSource(user.getSalt()), this.getName());
    }
    return null;
}
8. 测试
9. shrio实现验证功能
9.1 验证码工具类
import javax.imageio.ImageIO;
import java.awt.*;
import java.awt.geom.AffineTransform;
import java.awt.image.BufferedImage;
import java.io.File;
import java.io.FileOutputStream;
import java.io.IOException;
import java.io.OutputStream;
import java.util.Arrays;
import java.util.Random;

/**
 *@创建人  cx
 *@创建时间  2018/11/27 17:36
 *@描述   验证码生成
 */
public class VerifyCodeUtils{

    //使用到Algerian字体,系统里没有的话需要安装字体,字体只显示大写,去掉了1,0,i,o几个容易混淆的字符
    public static final String VERIFY_CODES = "23456789ABCDEFGHJKLMNPQRSTUVWXYZ";
    private static Random random = new Random();

    /**
     * 使用系统默认字符源生成验证码
     * @param verifySize    验证码长度
     * @return
     */
    public static String generateVerifyCode(int verifySize){
        return generateVerifyCode(verifySize, VERIFY_CODES);
    }
    /**
     * 使用指定源生成验证码
     * @param verifySize    验证码长度
     * @param sources   验证码字符源
     * @return
     */
    public static String generateVerifyCode(int verifySize, String sources){
        if(sources == null || sources.length() == 0){
            sources = VERIFY_CODES;
        }
        int codesLen = sources.length();
        Random rand = new Random(System.currentTimeMillis());
        StringBuilder verifyCode = new StringBuilder(verifySize);
        for(int i = 0; i < verifySize; i++){
            verifyCode.append(sources.charAt(rand.nextInt(codesLen-1)));
        }
        return verifyCode.toString();
    }

    /**
     * 生成随机验证码文件,并返回验证码值
     * @param w
     * @param h
     * @param outputFile
     * @param verifySize
     * @return
     * @throws IOException
     */
    public static String outputVerifyImage(int w, int h, File outputFile, int verifySize) throws IOException{
        String verifyCode = generateVerifyCode(verifySize);
        outputImage(w, h, outputFile, verifyCode);
        return verifyCode;
    }

    /**
     * 输出随机验证码图片流,并返回验证码值
     * @param w
     * @param h
     * @param os
     * @param verifySize
     * @return
     * @throws IOException
     */
    public static String outputVerifyImage(int w, int h, OutputStream os, int verifySize) throws IOException{
        String verifyCode = generateVerifyCode(verifySize);
        outputImage(w, h, os, verifyCode);
        return verifyCode;
    }

    /**
     * 生成指定验证码图像文件
     * @param w
     * @param h
     * @param outputFile
     * @param code
     * @throws IOException
     */
    public static void outputImage(int w, int h, File outputFile, String code) throws IOException{
        if(outputFile == null){
            return;
        }
        File dir = outputFile.getParentFile();
        if(!dir.exists()){
            dir.mkdirs();
        }
        try{
            outputFile.createNewFile();
            FileOutputStream fos = new FileOutputStream(outputFile);
            outputImage(w, h, fos, code);
            fos.close();
        } catch(IOException e){
            throw e;
        }
    }

    /**
     * 输出指定验证码图片流
     * @param w
     * @param h
     * @param os
     * @param code
     * @throws IOException
     */
    public static void outputImage(int w, int h, OutputStream os, String code) throws IOException{
        int verifySize = code.length();
        BufferedImage image = new BufferedImage(w, h, BufferedImage.TYPE_INT_RGB);
        Random rand = new Random();
        Graphics2D g2 = image.createGraphics();
        g2.setRenderingHint(RenderingHints.KEY_ANTIALIASING,RenderingHints.VALUE_ANTIALIAS_ON);
        Color[] colors = new Color[5];
        Color[] colorSpaces = new Color[] { Color.WHITE, Color.CYAN,
                Color.GRAY, Color.LIGHT_GRAY, Color.MAGENTA, Color.ORANGE,
                Color.PINK, Color.YELLOW };
        float[] fractions = new float[colors.length];
        for(int i = 0; i < colors.length; i++){
            colors[i] = colorSpaces[rand.nextInt(colorSpaces.length)];
            fractions[i] = rand.nextFloat();
        }
        Arrays.sort(fractions);

        g2.setColor(Color.GRAY);// 设置边框色
        g2.fillRect(0, 0, w, h);

        Color c = getRandColor(200, 250);
        g2.setColor(c);// 设置背景色
        g2.fillRect(0, 2, w, h-4);

        //绘制干扰线
        Random random = new Random();
        g2.setColor(getRandColor(160, 200));// 设置线条的颜色
        for (int i = 0; i < 20; i++) {
            int x = random.nextInt(w - 1);
            int y = random.nextInt(h - 1);
            int xl = random.nextInt(6) + 1;
            int yl = random.nextInt(12) + 1;
            g2.drawLine(x, y, x + xl + 40, y + yl + 20);
        }

        // 添加噪点
        float yawpRate = 0.05f;// 噪声率
        int area = (int) (yawpRate * w * h);
        for (int i = 0; i < area; i++) {
            int x = random.nextInt(w);
            int y = random.nextInt(h);
            int rgb = getRandomIntColor();
            image.setRGB(x, y, rgb);
        }

        shear(g2, w, h, c);// 使图片扭曲

        g2.setColor(getRandColor(100, 160));
        int fontSize = h-4;
        Font font = new Font("Algerian", Font.ITALIC, fontSize);
        g2.setFont(font);
        char[] chars = code.toCharArray();
        for(int i = 0; i < verifySize; i++){
            AffineTransform affine = new AffineTransform();
            affine.setToRotation(Math.PI / 4 * rand.nextDouble() * (rand.nextBoolean() ? 1 : -1), (w / verifySize) * i + fontSize/2, h/2);
            g2.setTransform(affine);
            g2.drawChars(chars, i, 1, ((w-10) / verifySize) * i + 5, h/2 + fontSize/2 - 10);
        }

        g2.dispose();
        ImageIO.write(image, "jpg", os);
    }

    private static Color getRandColor(int fc, int bc) {
        if (fc > 255)
            fc = 255;
        if (bc > 255)
            bc = 255;
        int r = fc + random.nextInt(bc - fc);
        int g = fc + random.nextInt(bc - fc);
        int b = fc + random.nextInt(bc - fc);
        return new Color(r, g, b);
    }

    private static int getRandomIntColor() {
        int[] rgb = getRandomRgb();
        int color = 0;
        for (int c : rgb) {
            color = color << 8;
            color = color | c;
        }
        return color;
    }

    private static int[] getRandomRgb() {
        int[] rgb = new int[3];
        for (int i = 0; i < 3; i++) {
            rgb[i] = random.nextInt(255);
        }
        return rgb;
    }

    private static void shear(Graphics g, int w1, int h1, Color color) {
        shearX(g, w1, h1, color);
        shearY(g, w1, h1, color);
    }

    private static void shearX(Graphics g, int w1, int h1, Color color) {

        int period = random.nextInt(2);

        boolean borderGap = true;
        int frames = 1;
        int phase = random.nextInt(2);

        for (int i = 0; i < h1; i++) {
            double d = (double) (period >> 1)
                    * Math.sin((double) i / (double) period
                    + (6.2831853071795862D * (double) phase)
                    / (double) frames);
            g.copyArea(0, i, w1, 1, (int) d, 0);
            if (borderGap) {
                g.setColor(color);
                g.drawLine((int) d, i, 0, i);
                g.drawLine((int) d + w1, i, w1, i);
            }
        }

    }

    private static void shearY(Graphics g, int w1, int h1, Color color) {

        int period = random.nextInt(40) + 10; // 50;

        boolean borderGap = true;
        int frames = 20;
        int phase = 7;
        for (int i = 0; i < w1; i++) {
            double d = (double) (period >> 1)
                    * Math.sin((double) i / (double) period
                    + (6.2831853071795862D * (double) phase)
                    / (double) frames);
            g.copyArea(i, 0, 1, h1, 0, (int) d);
            if (borderGap) {
                g.setColor(color);
                g.drawLine(i, (int) d, i, 0);
                g.drawLine(i, (int) d + h1, i, h1);
            }

        }

    }
    public static void main(String[] args) throws IOException {
        //获取验证码
        String s = generateVerifyCode(4);
        //将验证码放入图片中
        outputImage(260,60,new File("/Users/chenyannan/Desktop/安工资料/aa.jpg"),s);
        System.out.println(s);
    }
}
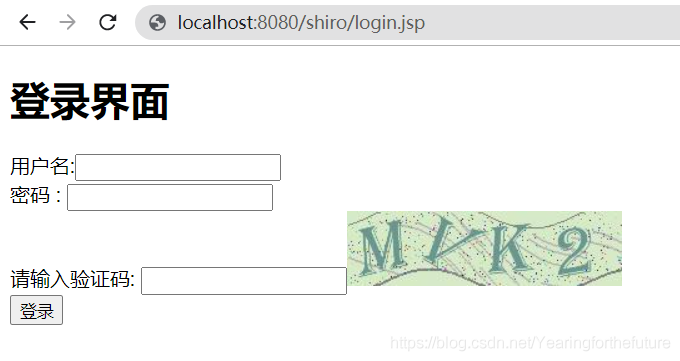
9.2 开发页面加入验证码
<form action="${pageContext.request.contextPath}/user/login" method="post">
    用户名:<input type="text" name="username">

    密码 : <input type="text" name="password">

    请输入验证码: <input type="text" name="code"><img src="${pageContext.request.contextPath}/user/getImage" alt="">

    <input type="submit" value="登录">
</form>
9.3 开发控制器
@RequestMapping("getImage")
public void getImage(HttpSession session, HttpServletResponse response) throws IOException {
  //生成验证码
  String code = VerifyCodeUtils.generateVerifyCode(4);
  //验证码放入session
  session.setAttribute("code",code);
  //验证码存入图片
  ServletOutputStream os = response.getOutputStream();
  response.setContentType("image/png");
  VerifyCodeUtils.outputImage(220,60,os,code);
}
9.4 放行验证码
ShiroConfig.java
map.put("/user/getImage","anon");//验证码
9.5 修改认证流程
@RequestMapping("login")
public String login(String username, String password,String code,HttpSession session) {
    //比较验证码
    String codes = (String) session.getAttribute("code");
    try {
        if (codes.equalsIgnoreCase(code)){
            //获取主体对象
            Subject subject = SecurityUtils.getSubject();
                subject.login(new UsernamePasswordToken(username, password));
                return "redirect:/index.jsp";
        }else{
            throw new RuntimeException("验证码错误!");
        }
    } catch (UnknownAccountException e) {
        e.printStackTrace();
        System.out.println("用户名错误!");
    } catch (IncorrectCredentialsException e) {
        e.printStackTrace();
        System.out.println("密码错误!");
    }catch (Exception e){
        e.printStackTrace();
        System.out.println(e.getMessage());
    }
    return "redirect:/login.jsp";
}
9.6 启动测试
10. shiro标签在jsp使用
需要在jsp页面中引入标签
<%@ taglib uri="http://shiro.apache.org/tags" prefix="shiro" %>
标签:
<shiro:authenticated> 登录之后
<shiro:notAuthenticated> 不在登录状态时
<shiro:guest> 用户在没有RememberMe时
<shiro:user> 用户在RememberMe时
<shiro:hasAnyRoles name="abc,123" > 在有abc或者123角色时
<shiro:hasRole name="abc"> 拥有角色abc
<shiro:lacksRole name="abc"> 没有角色abc
<shiro:hasPermission name="abc"> 拥有权限资源abc <shiro:lacksPermission name="abc"> 没有abc权限资源
<shiro:principal> 显示用户身份名称
<shiro:principal property="username"/> 显示用户身份中的属性值
11. Shiro整合springboot之thymeleaf权限控制
11.1 引入依赖
<dependency>
    <groupId>com.github.theborakompanioni</groupId>
    <artifactId>thymeleaf-extras-shiro</artifactId>
    <version>2.0.0</version>
</dependency>
11.2 页面中引入命名空间
<html xmlns="http://www.w3.org/1999/xhtml" xmlns:th="http://www.thymeleaf.org"
      xmlns:shiro="http://www.pollix.at/thymeleaf/shiro">
11.3 常见权限控制标签使用
<!-- 验证当前用户是否为“访客”,即未认证(包含未记住)的用户。 -->
<p shiro:guest="">Please <a href="login.html" rel="external nofollow"  rel="external nofollow"  rel="external nofollow" >login</a></p>

<!-- 认证通过或已记住的用户。 -->
<p shiro:user="">
    Welcome back John! Not John? Click <a href="login.html" rel="external nofollow"  rel="external nofollow"  rel="external nofollow" >here</a> to login.
</p>
<!-- 已认证通过的用户。不包含已记住的用户,这是与user标签的区别所在。 -->
<p shiro:authenticated="">
    Hello, <span shiro:principal=""></span>, how are you today?
<a shiro:authenticated="" href="updateAccount.html" rel="external nofollow" >Update your contact information</a>
<!-- 输出当前用户信息,通常为登录帐号信息。 -->
<p>Hello, <shiro:principal/>, how are you today?</p>
<!-- 未认证通过用户,与authenticated标签相对应。与guest标签的区别是,该标签包含已记住用户。 -->
<p shiro:notAuthenticated="">
    Please <a href="login.html" rel="external nofollow"  rel="external nofollow"  rel="external nofollow" >login</a> in order to update your credit card information.
<!-- 验证当前用户是否属于该角色。 -->
<a shiro:hasRole="admin" href="admin.html" rel="external nofollow" >Administer the system</a><!-- 拥有该角色 -->
<!-- 与hasRole标签逻辑相反,当用户不属于该角色时验证通过。 -->
<p shiro:lacksRole="developer"><!-- 没有该角色 -->
    Sorry, you are not allowed to developer the system.
<!-- 验证当前用户是否属于以下所有角色。 -->
<p shiro:hasAllRoles="developer, 2"><!-- 角色与判断 -->
    You are a developer and a admin.
<!-- 验证当前用户是否属于以下任意一个角色。  -->
<p shiro:hasAnyRoles="admin, vip, developer,1"><!-- 角色或判断 -->
    You are a admin, vip, or developer.
<!--验证当前用户是否拥有指定权限。  -->
<a shiro:hasPermission="userInfo:add" href="createUser.html" rel="external nofollow"  rel="external nofollow" >添加用户</a><!-- 拥有权限 -->
<!-- 与hasPermission标签逻辑相反,当前用户没有制定权限时,验证通过。 -->
<p shiro:lacksPermission="userInfo:del"><!-- 没有权限 -->
    Sorry, you are not allowed to delete user accounts.
<!-- 验证当前用户是否拥有以下所有角色。 -->
<p shiro:hasAllPermissions="userInfo:view, userInfo:add"><!-- 权限与判断 -->
    You can see or add users.
<!-- 验证当前用户是否拥有以下任意一个权限。  -->
<p shiro:hasAnyPermissions="userInfo:view, userInfo:del"><!-- 权限或判断 -->
    You can see or delete users.
<a shiro:hasPermission="pp" href="createUser.html" rel="external nofollow"  rel="external nofollow" >Create a new User</a>
11.4 加入shiro的方言配置
页面标签不起作用一定要记住加入方言处理
@Bean(name = "shiroDialect")
public ShiroDialect shiroDialect(){
  return new ShiroDialect();
}
内容参考:
B站编程不良人:https://www.bilibili.com/video/BV1uz4y197Zm
仅用于学习!
到此这篇关于SpringBoot整合Shiro思路(最新超详细)的文章就介绍到这了,更多相关SpringBoot整合Shiro内容请搜索我们以前的文章或继续浏览下面的相关文章希望大家以后多多支持我们!
相关推荐
-

解决Springboot整合shiro时静态资源被拦截的问题
目录结构如下 在自己配置的ShiroConfig中已经放行了 filterChainDefinitionMap.put("/static/**", "anon"); login.ftl也引用了静态资源 <link rel="stylesheet" type="text/css" href="/logins/css/normalize.css" rel="external nofollow&q
-
SpringBoot整合Shiro实现权限控制的代码实现
1.SpringBoot整合Shiro Apache Shiro是一个强大且易用的Java安全框架,执行身份验证.授权.密码和会话管理. 1.1.shiro简介 shiro有个核心组件,分别为Subject.SecurityManager和Realms Subject:相当于当前操作的"用户",这个用户不一定是一个具体的人,是一个抽象的概念,表明的是和当前程序进行交互的任何东西,例如爬虫.脚本.等等.所有的Subject都绑定到SecurityManager上,与 Subject 的所
-
springboot整合Shiro
目录 什么是Shiro Shiro的三大核心概念 Shiro功能介绍 Springboot整合Shiro 导入依赖 javaConfig Realm Controller Shiro整合thymeleaf 导入依赖 HTML页面命名空间 使用举例 总结 什么是Shiro Apache Shiro是一个功能强大且易于使用的Java安全框架,它执行身份验证.授权.加密和会话管理.借助Shiro易于理解的API,您可以快速轻松地保护任何应用程序-从最小的移动应用程序到最大的web和企业应用程序. Sh
-
Springboot整合knife4j与shiro的操作
一.介绍knife4j 增强版本的Swagger 前端UI,取名knife4j是希望她能像一把匕首一样小巧,轻量,并且功能强悍,更名也是希望把她做成一个为Swagger接口文档服务的通用性解决方案,不仅仅只是专注于前端Ui前端. 二.Spring Boot 整合knife4j 第一步 在Maven中的pom.xml文件引入: <dependency> <groupId>com.github.xiaoymin</groupId> <artifactId>kni
-
springboot整合shiro的过程详解
目录 什么是 Shiro Shiro 架构 Shiro 架构图 Shiro 工作原理 Shiro 详细架构图 springboot 整合 shiro springboot 整合 shiro 思路 项目搭建 主要依赖 数据库表设计 实体类 自定义 Realm shiro 的配置类 ShiroFilterFactoryBean 过滤器链配置中的 url 匹配规则 ShiroFilterFactoryBean 过滤器 ShiroFilterFactoryBean 过滤器分类 前端页面 登录页面 log
-
springboot整合shiro之thymeleaf使用shiro标签的方法
thymeleaf介绍 简单说, Thymeleaf 是一个跟 Velocity.FreeMarker 类似的模板引擎,它可以完全替代 JSP .相较与其他的模板引擎,它有如下三个极吸引人的特点: 1.Thymeleaf 在有网络和无网络的环境下皆可运行,即它可以让美工在浏览器查看页面的静态效果,也可以让程序员在服务器查看带数据的动态页面效果.这是由于它支持 html 原型,然后在 html 标签里增加额外的属性来达到模板+数据的展示方式.浏览器解释 html 时会忽略未定义的标签属性,所以 t
-
SpringBoot整合Shiro思路(最新超详细)
目录 1.SpringBoot整合Shiro思路 2.环境搭建 2.1创建项目 2.2引入依赖 2.3创建前端页面 2.4配置视图信息 2.5解决IDEA冲突问题 2.6测试搭建的环境 3.整合Shiro 3.1引入依赖 3.2自定义Realm 3.3Shiro配置 3.4启动测试 4.常见过滤器 5.认证和退出 5.1在index.jsp添加a标签 5.2编写controller 5.3修改自定义Realm 5.4修改ShiroConfig配置 5.5测试 6.MDSalt的认证实现 6.1创
-
SpringBoot整合mybatis-plus快速入门超详细教程
目录 前言 mybatis-plus 简介 mybatis-plus 优点 相关链接 mybatis-plus实例 1.示例项目结构 2.数据库准备 3.pom.xml: 4.application.yml 5.User.java 6.UserMapper.java 7.UserServiceImpl.java 8.测试类 mybatis-plus的crud: 1.insert操作: 2.select操作: 3.update操作: 4.delete操作: 总结 前言 mybatis-plus 简
-
springboot整合Shiro的步骤
1.创建一个springboot项目 选中web和thymeleaf 1.1新建index.html <!DOCTYPE html> <html lang="en" xmlns:th="http://www.thymeleaf.org"> <head> <meta charset="UTF-8"> <title>Title</title> </head&
-
Java安全框架——Shiro的使用详解(附springboot整合Shiro的demo)
Shiro简介 Apache Shiro是一个强大且易用的Java安全框架,执行身份验证.授权.密码和会话管理 三个核心组件:Subject, SecurityManager 和 Realms Subject代表了当前用户的安全操作 SecurityManager管理所有用户的安全操作,是Shiro框架的核心,Shiro通过SecurityManager来管理内部组件实例,并通过它来提供安全管理的各种服务. Realm充当了Shiro与应用安全数据间的"桥梁"或者"连接器&q
-
Springboot整合Shiro实现登录与权限校验详细解读
目录 Springboot-cli 开发脚手架系列 简介 前言 1. 环境 2. 简介 3. Realm配置 4. 核心配置 5. 接口编写 6. 网页资源 7. 效果演示 8. 源码分享 Springboot-cli 开发脚手架系列 Springboot优雅的整合Shiro进行登录校验,权限认证(附源码下载) 简介 Springboo配置Shiro进行登录校验,权限认证,附demo演示. 前言 我们致力于让开发者快速搭建基础环境并让应用跑起来,提供使用示例供使用者参考,让初学者快速上手. 本博
-
Springboot整合Shiro的代码实例
这篇文章主要介绍了Springboot整合Shiro的代码实例,文中通过示例代码介绍的非常详细,对大家的学习或者工作具有一定的参考学习价值,需要的朋友可以参考下 1.导入依赖 <!--shiro--> <dependency> <groupId>org.apache.shiro</groupId> <artifactId>shiro-spring</artifactId> <version>1.4.0</versio
-
SpringBoot整合Shiro框架,实现用户权限管理
一.Shiro简介 核心角色 1)Subject:认证主体 代表当前系统的使用者,就是用户,在Shiro的认证中,认证主体通常就是userName和passWord,或者其他用户相关的唯一标识. 2)SecurityManager:安全管理器 Shiro架构中最核心的组件,通过它可以协调其他组件完成用户认证和授权.实际上,SecurityManager就是Shiro框架的控制器. 3)Realm:域对象 定义了访问数据的方式,用来连接不同的数据源,如:关系数据库,配置文件等等. 核心理念 Shi
-
SpringBoot整合Shiro的方法详解
目录 1.Shito简介 1.1 什么是shiro 1.2 有哪些功能 2.QuickStart 3.SpringBoot中集成 1.导入shiro相关依赖 2.自定义UserRealm 3.定义shiroConfig 4.新建页面进行测试 1.Shito简介 1.1 什么是shiro Apache Shiro是一个java安全(权限)框架 Shiro可以非常容易的开发出足够好的应用,其不仅可以用在javase环境,也可以用在javaee环境 shiro可以完成,认证,授权,加密,会话管理,we
-
SpringBoot整合Shiro的代码详解
shiro是一个权限框架,具体的使用可以查看其官网 http://shiro.apache.org/ 它提供了很方便的权限认证和登录的功能. 而springboot作为一个开源框架,必然提供了和shiro整合的功能!接下来就用springboot结合springmvc,mybatis,整合shiro完成对于用户登录的判定和权限的验证. 1.准备数据库表结构 这里主要涉及到五张表:用户表,角色表(用户所拥有的角色),权限表(角色所涉及到的权限),用户-角色表(用户和角色是多对多的),角色-权限表